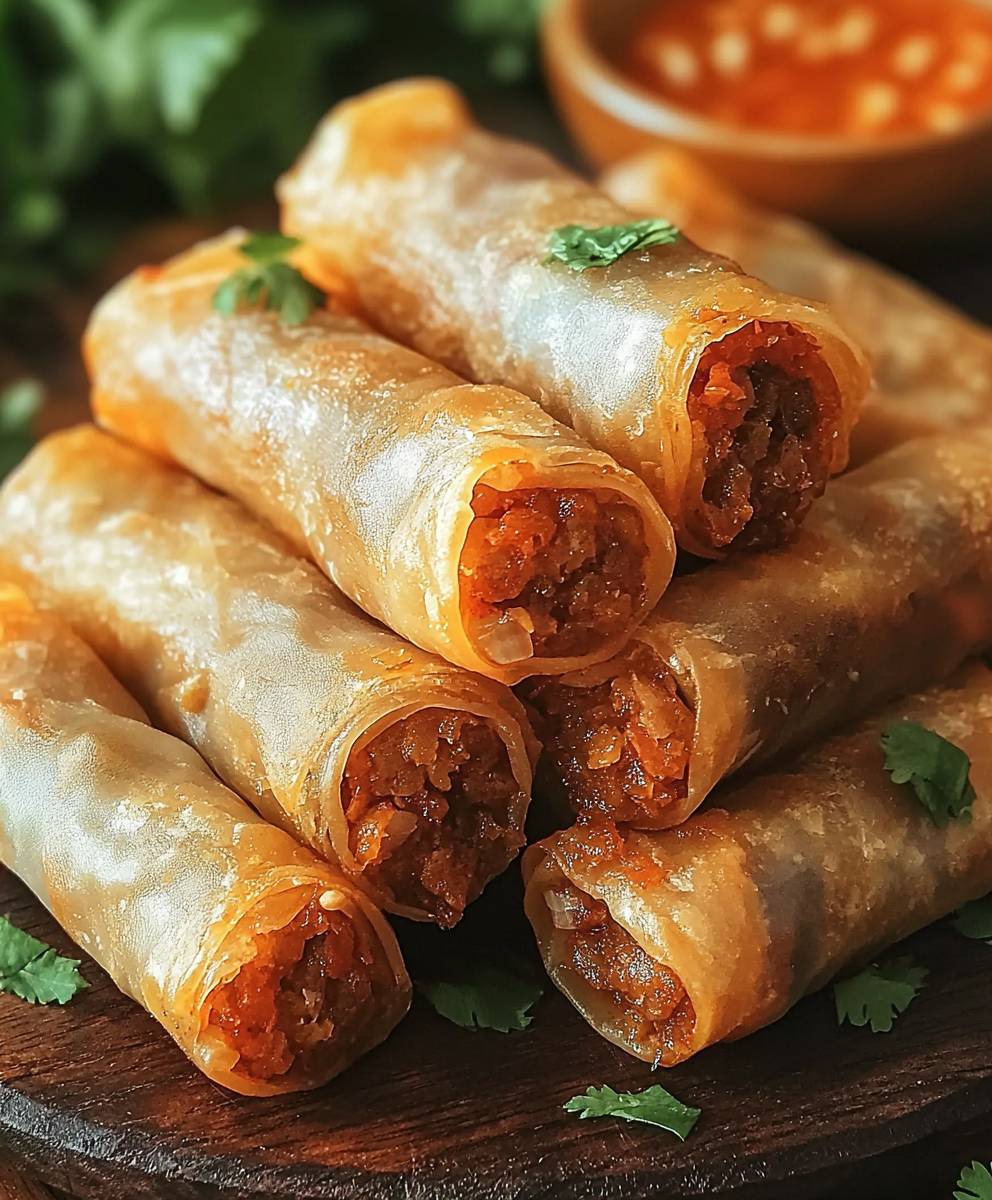
Crunchy Lumpia Filipino Dish is a delightful treat that never fails to impress at gatherings and family dinners. As I take a bite of these golden, crispy rolls, I am instantly transported to the vibrant streets of the Philippines, where this beloved dish has been a staple for generations. Traditionally filled with a savory mixture of vegetables, meat, and spices, Crunchy Lumpia Filipino Dish embodies the rich culinary heritage of Filipino culture, showcasing the perfect blend of flavors and textures that make it so irresistible.
People adore this dish not only for its satisfying crunch but also for its versatility; it can be served as an appetizer, snack, or even a main course. The combination of fresh ingredients wrapped in a delicate pastry creates a mouthwatering experience that leaves everyone wanting more. Whether you’re hosting a party or simply craving a taste of home, Crunchy Lumpia Filipino Dish is sure to become a favorite in your kitchen, bringing joy and warmth to every occasion.

Ingredients:
- 1 pound ground pork
- 1 cup finely chopped carrots
- 1 cup finely chopped green beans
- 1 cup finely chopped cabbage
- 1 medium onion, finely chopped
- 4 cloves garlic, minced
- 2 tablespoons soy sauce
- 1 tablespoon oyster sauce
- 1 teaspoon ground black pepper
- 1 teaspoon salt
- 1 package lumpia wrappers (about 20-25 pieces)
- Oil for frying
Preparing the Filling
Let’s start by preparing the filling for our crunchy lumpia. This is where all the flavors come together, and I can’t wait to share this with you!
- In a large mixing bowl, combine the ground pork, chopped carrots, green beans, and cabbage. Make sure to mix them well so that the flavors meld together.
- Add the chopped onion and minced garlic to the mixture. These ingredients will add a wonderful aroma and depth to the filling.
- Next, pour in the soy sauce and oyster sauce. These sauces will give our lumpia that savory umami flavor that we all love.
- Season the mixture with ground black pepper and salt. Remember, you can adjust the seasoning according to your taste preferences.
- Using your hands, mix everything together until all the ingredients are well incorporated. I find that using my hands gives me the best results, but you can also use a spoon if you prefer.
Assembling the Lumpia
Now that we have our filling ready, it’s time to assemble the lumpia. This part is super fun, and I love getting my hands involved!
- Take a lumpia wrapper and lay it flat on a clean surface or cutting board. Make sure the corner of the wrapper is pointing towards you, like a diamond shape.
- Place about 2 tablespoons of the filling near the bottom corner of the wrapper. Be careful not to overfill, as this can make it difficult to roll.
- Fold the bottom corner of the wrapper over the filling, tucking it in tightly. This will help secure the filling inside.
- Next, fold in the sides of the wrapper towards the center. This will create a neat little package.
- Continue rolling the wrapper away from you until you reach the top corner. Before sealing, dab a little water on the top corner to help it stick. Press gently to seal the lumpia.
- Repeat this process with the remaining wrappers and filling. I usually set aside a few assembled lumpia on a plate while I finish the rest.
Cooking the Lumpia
Now that we have our lumpia all rolled up, it’s time to cook them to crispy perfection!
- In a large frying pan or deep skillet, heat about 2 inches of oil over medium heat. You can test if the oil is hot enough by dropping a small piece of the wrapper into the oil; if it sizzles, you’re good to go!
- Carefully add a few lumpia to the hot oil, making sure not to overcrowd the pan. I usually fry them in batches of 4-5, depending on the size of my pan.
- Fry the lumpia for about 3-4 minutes on each side, or until they are golden brown and crispy. Use tongs to turn them gently to ensure even cooking.
- Once they are cooked, remove the lumpia from the oil and place them on a plate lined with paper towels to absorb any excess oil.
- Repeat the frying process with the remaining lumpia until they are all cooked. Make sure to keep an eye on the oil temperature, adjusting the heat as necessary to prevent burning.
Serving the Lumpia
Now that our lumpia are beautifully golden and crispy, it’s time to serve them up!
- Arrange the cooked lumpia on a serving platter. They look so inviting and delicious!
- For an extra touch, you can serve them with a dipping sauce. A simple
Conclusion:
In conclusion, this Crunchy Lumpia recipe is an absolute must-try for anyone looking to explore the vibrant flavors of Filipino cuisine. The delightful combination of crispy wrappers and savory fillings creates a mouthwatering experience that is sure to impress your family and friends. Whether you choose to fill your lumpia with traditional ingredients like pork and vegetables or opt for a creative twist with shrimp or even a vegetarian version, the possibilities are endless! I highly recommend serving these crunchy delights with a side of sweet and sour sauce or a spicy vinegar dip to elevate the flavors even further. You can also experiment with different dipping sauces to find your perfect match. For a fun twist, consider making mini lumpia for appetizers at your next gathering or even a dessert version filled with sweetened bananas and chocolate! I encourage you to give this Crunchy Lumpia recipe a try and share your experience with me! I would love to hear about your variations and any tips you discover along the way. Cooking is all about creativity and sharing, so don’t hesitate to snap a photo and tag me on social media. Let’s celebrate the joy of cooking together! Print
Crunchy Lumpia: A Delicious Filipino Dish You Need to Try
- Total Time: 40 minutes
- Yield: 20–25 pieces 1x
Description
Savor the crispy goodness of homemade Lumpia, a Filipino spring roll filled with flavorful ground pork and fresh vegetables. These delicious bites make for a perfect appetizer or snack, guaranteed to delight your guests!
Ingredients
- 1 pound ground pork
- 1 cup finely chopped carrots
- 1 cup finely chopped green beans
- 1 cup finely chopped cabbage
- 1 medium onion, finely chopped
- 4 cloves garlic, minced
- 2 tablespoons soy sauce
- 1 tablespoon oyster sauce
- 1 teaspoon ground black pepper
- 1 teaspoon salt
- 1 package lumpia wrappers (about 20–25 pieces)
- Oil for frying
Instructions
- In a large mixing bowl, combine the ground pork, chopped carrots, green beans, and cabbage. Mix well to meld the flavors.
- Add the chopped onion and minced garlic to the mixture for added aroma and depth.
- Pour in the soy sauce and oyster sauce for a savory umami flavor.
- Season with ground black pepper and salt, adjusting to taste.
- Mix everything together using your hands or a spoon until well incorporated.
- Lay a lumpia wrapper flat on a clean surface with a corner pointing towards you (diamond shape).
- Place about 2 tablespoons of filling near the bottom corner of the wrapper.
- Fold the bottom corner over the filling, tucking it in tightly.
- Fold in the sides towards the center to create a neat package.
- Roll the wrapper away from you until you reach the top corner. Dab a little water on the top corner to seal it.
- Repeat with the remaining wrappers and filling.
- Heat about 2 inches of oil in a large frying pan or deep skillet over medium heat. Test the oil by dropping in a small piece of wrapper; if it sizzles, it’s ready.
- Carefully add a few lumpia to the hot oil, frying in batches of 4-5 to avoid overcrowding.
- Fry for about 3-4 minutes on each side until golden brown and crispy. Use tongs to turn gently.
- Remove cooked lumpia and place them on a plate lined with paper towels to absorb excess oil.
- Repeat the frying process with the remaining lumpia, adjusting the heat as necessary.
- Arrange the cooked lumpia on a serving platter.
- Serve with a dipping sauce of your choice for an extra touch.
Notes
- Feel free to customize the filling with your favorite vegetables or proteins.
- For a healthier option, you can bake the lumpia instead of frying them.
- Prep Time: 20 minutes
- Cook Time: 20 minutes