Peanut Butter Frozen Yogurt Bars are a delightful treat that perfectly blend the creamy richness of peanut butter with the refreshing coolness of frozen yogurt. As someone who has always had a sweet tooth, I can confidently say that these bars are not just a dessert; they are a nostalgic nod to summer days spent enjoying ice cream, but with a healthier twist. The origins of frozen yogurt can be traced back to the 1970s, and since then, it has evolved into a beloved alternative to traditional ice cream, making it a staple in many households.
What I love most about Peanut Butter Frozen Yogurt Bars is their incredible taste and texture. The smooth, velvety peanut butter pairs beautifully with the tangy yogurt, creating a harmonious balance that is both satisfying and indulgent. Plus, they are incredibly convenient to make, requiring minimal ingredients and effort. Whether you’re looking for a quick snack, a dessert to impress guests, or a healthy option for kids, these bars are sure to become a favorite in your home. Join me as we dive into this delicious recipe that is as easy to make as it is enjoyable to eat!

Ingredients:
- 2 cups plain Greek yogurt
- 1 cup creamy peanut butter
- 1/2 cup honey or maple syrup
- 1 teaspoon vanilla extract
- 1/4 teaspoon salt
- 1/2 cup mini chocolate chips (optional)
- 1/2 cup crushed nuts (optional, for added crunch)
- Parchment paper (for lining the pan)
- 9×9 inch baking dish or a similar-sized pan
Preparing the Mixture
1. **Gather Your Ingredients**: Start by gathering all your ingredients on the countertop. This makes the process smoother and ensures you have everything you need at hand. 2. **Mix the Yogurt and Peanut Butter**: In a large mixing bowl, combine the 2 cups of plain Greek yogurt and 1 cup of creamy peanut butter. I like to use a whisk for this step, as it helps to blend the two ingredients together smoothly. You want a creamy, homogeneous mixture without any lumps. 3. **Add Sweetness**: Next, pour in 1/2 cup of honey or maple syrup. If you prefer a less sweet option, you can adjust the amount to your taste. Add 1 teaspoon of vanilla extract and 1/4 teaspoon of salt. The salt enhances the flavors, so don’t skip it! Whisk everything together until it’s well combined and smooth. 4. **Incorporate Optional Ingredients**: If you’re using mini chocolate chips or crushed nuts, fold them into the mixture now. I love the added texture and flavor that these ingredients bring, but feel free to customize based on your preferences. You can also add dried fruits or seeds if you like!Preparing the Pan
5. **Line the Baking Dish**: Take your 9×9 inch baking dish and line it with parchment paper. This step is crucial as it prevents the yogurt bars from sticking to the pan, making it easier to remove them later. Leave some overhang on the sides for easy lifting. 6. **Pour the Mixture**: Once your mixture is ready, pour it into the lined baking dish. Use a spatula to spread it evenly across the pan. Make sure to smooth out the top so that it looks nice and even.Freezing the Bars
7. **Freeze the Mixture**: Place the baking dish in the freezer. I usually let it freeze for at least 4 hours, but if you can, overnight is even better. This allows the bars to set properly and makes them easier to cut. 8. **Check for Firmness**: After the initial freezing time, check the bars. They should be firm to the touch. If they’re still a bit soft, give them more time in the freezer.Cutting and Serving the Bars
9. **Remove from the Pan**: Once the bars are fully frozen, take the baking dish out of the freezer. Use the overhanging parchment paper to lift the entire block of yogurt out of the pan. Place it on a cutting board. 10. **Cut into Bars**: Using a sharp knife, cut the frozen yogurt mixture into bars or squares, depending on your preferred size. I usually cut them into 1-inch squares for bite-sized treats, but you can make them larger if you prefer. 11. **Store the Bars**: If you’re not eating them right away, place the cut bars back into the freezer. I recommend storing them in an airtight container or wrapping them individually in plastic wrap to prevent freezer burn. They can last for up to a month in the freezer, but I doubt they’ll last that long!Enjoying Your Peanut Butter Frozen Yogurt Bars
12. **Serve and Enjoy**: When you’re ready to enjoy your delicious peanut butter frozen yogurt bars, simply take them out of the freezer and let them sit for a few minutes to soften slightly. This makes them easier to bite into. 13. **Garnish (Optional)**: If you want to get fancy, you can drizzle some melted chocolate or a sprinkle of crushed nuts on top before serving. It adds a nice touch and makes them look even more appetizing. 14. **Share with Friends**: These bars are perfect for sharing! I love bringing them to gatherings or serving them as a refreshing dessert on a hot day. They’re a hit with both kids and adults alike. 15. **Experiment with Flavors**: Once you’ve mastered the basic recipe, feel free to experiment with different flavors. You can swap out the peanut butter for
Conclusion:
In summary, these Peanut Butter Frozen Yogurt Bars are an absolute must-try for anyone looking to indulge in a delicious yet healthy treat. The creamy peanut butter combined with the tangy yogurt creates a delightful balance of flavors that is sure to satisfy your sweet tooth without the guilt. Plus, they are incredibly easy to make, requiring just a few simple ingredients and minimal prep time. For serving suggestions, I love to pair these bars with fresh fruit like sliced bananas or strawberries for an extra burst of flavor. You can also drizzle some melted dark chocolate on top for a decadent twist or sprinkle some crushed nuts for added crunch. If you’re feeling adventurous, try adding a swirl of honey or a dash of cinnamon to the yogurt mixture before freezing for a unique flavor profile. I encourage you to give these Peanut Butter Frozen Yogurt Bars a try and experience the joy of making a treat that is both satisfying and nutritious. Once you’ve made them, I’d love to hear about your experience! Share your thoughts, variations, or even a photo of your creation on social media. Let’s spread the love for this delightful recipe together! Print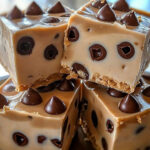
Peanut Butter Frozen Yogurt Bars: A Delicious and Healthy Treat for Summer
- Total Time: 255 minutes
- Yield: 16 bars 1x
Description
These Peanut Butter Frozen Yogurt Bars are a creamy and delicious treat that blend the rich flavors of peanut butter and Greek yogurt, sweetened with honey or maple syrup. Easy to make and customizable with your favorite mix-ins, they serve as a refreshing dessert or snack, perfect for any occasion.
Ingredients
- 2 cups plain Greek yogurt
- 1 cup creamy peanut butter
- 1/2 cup honey or maple syrup
- 1 teaspoon vanilla extract
- 1/4 teaspoon salt
- 1/2 cup mini chocolate chips (optional)
- 1/2 cup crushed nuts (optional, for added crunch)
- Parchment paper (for lining the pan)
- 9x9 inch baking dish or a similar-sized pan
Instructions
### Peanut Butter Frozen Yogurt Bars Recipe
#### Description
These Peanut Butter Frozen Yogurt Bars are a creamy, delicious treat that combines the rich flavors of peanut butter and Greek yogurt, sweetened with honey or maple syrup. Perfect for a refreshing dessert or snack, these bars are easy to make and can be customized with your favorite mix-ins!
#### Ingredients
– **2 cups** plain Greek yogurt
– **1 cup** creamy peanut butter
– **1/2 cup** honey or maple syrup
– **1 teaspoon** vanilla extract
– **1/4 teaspoon** salt
– **1/2 cup** mini chocolate chips (optional)
– **1/2 cup** crushed nuts (optional, for added crunch)
– **Parchment paper** (for lining the pan)
– **9×9 inch baking dish** or a similar-sized pan
#### Instructions
1. **Gather Your Ingredients**: Start by gathering all your ingredients on the countertop.
2. **Mix the Yogurt and Peanut Butter**: In a large mixing bowl, combine the Greek yogurt and peanut butter. Whisk until smooth and creamy.
3. **Add Sweetness**: Pour in honey or maple syrup, vanilla extract, and salt. Whisk until well combined.
4. **Incorporate Optional Ingredients**: Fold in mini chocolate chips or crushed nuts if using.
5. **Line the Baking Dish**: Line a 9×9 inch baking dish with parchment paper, leaving overhang for easy removal.
6. **Pour the Mixture**: Pour the yogurt mixture into the lined baking dish and smooth the top with a spatula.
7. **Freeze the Mixture**: Place the dish in the freezer for at least 4 hours, or overnight for best results.
8. **Check for Firmness**: After freezing, check if the bars are firm. If not, freeze longer.
9. **Remove from the Pan**: Lift the frozen block out of the pan using the parchment paper.
10. **Cut into Bars**: Cut into squares or bars using a sharp knife.
11. **Store the Bars**: Store cut bars in an airtight container or wrap individually in plastic wrap. They can last up to a month in the freezer.
12. **Serve and Enjoy**: Let the bars sit for a few minutes at room temperature before serving for easier biting.
13. **Garnish (Optional)**: Drizzle with melted chocolate or sprinkle with crushed nuts before serving.
14. **Share with Friends**: Perfect for gatherings or as a refreshing dessert.
15. **Experiment with Flavors**: Feel free to swap peanut butter for other nut butters or add different mix-ins.
#### Notes
– Adjust the sweetness to your preference by varying the amount of honey or maple syrup.
– For a different flavor, try using almond butter or sunflower seed butter instead of peanut butter.
– These bars are great for meal prep and can be made ahead of time for a quick snack.
#### Prep Time
15 minutes
#### Cook Time
4 hours (freezing time)
#### Total Time
4 hours 15 minutes
#### Yield
Approximately 16 bars (depending on size)
Notes
- Adjust the sweetness to your preference by varying the amount of honey or maple syrup.
- For a different flavor, try using almond butter or sunflower seed butter instead of peanut butter.
- These bars are great for meal prep and can be made ahead of time for a quick snack.
- Prep Time: 15 minutes
- Cook Time: 240 minutes