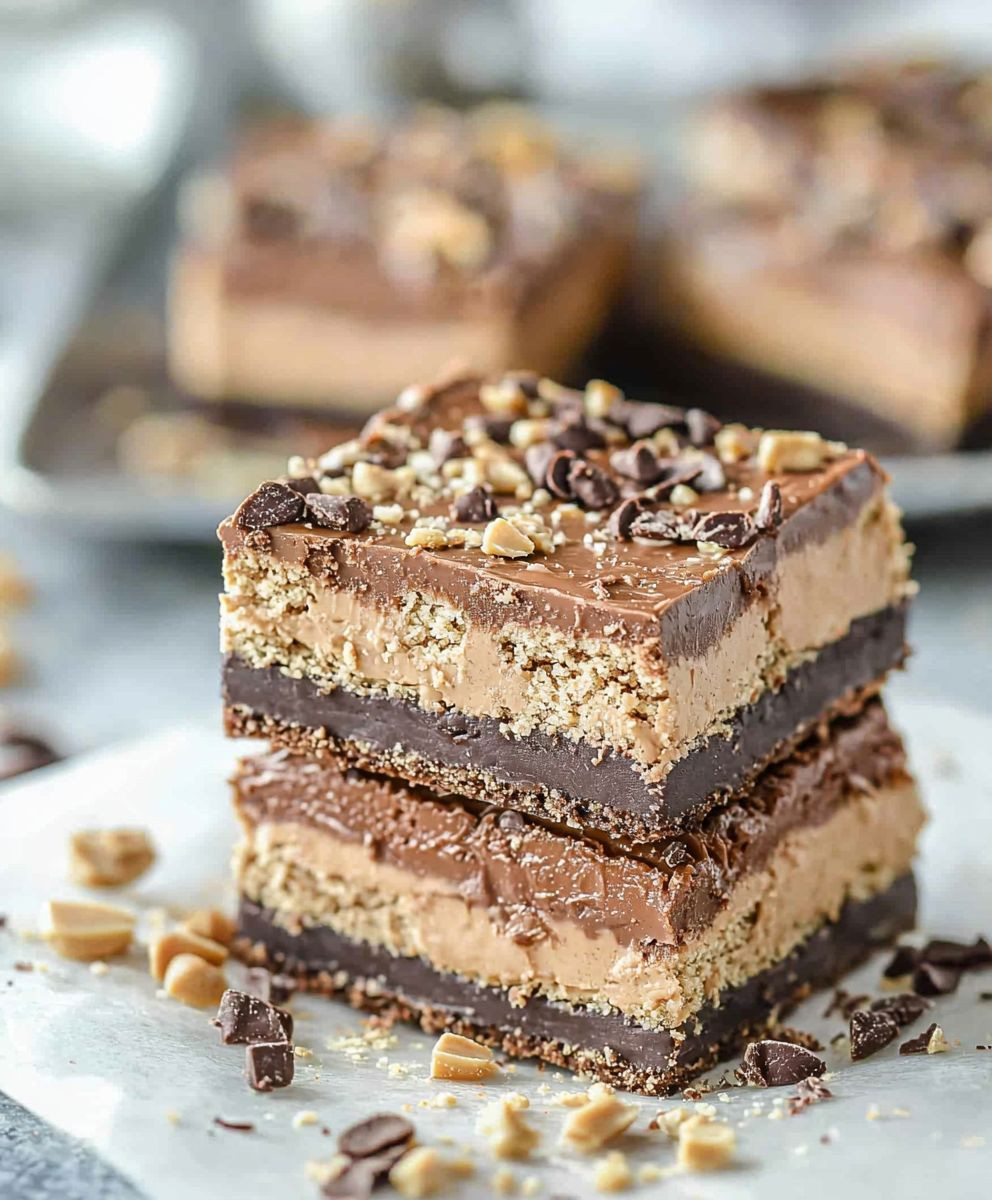
Disneyland Peanut Butter Sandwich Bars are a delightful treat that transports you straight to the happiest place on Earth with every bite. These bars are not just a snack; they are a nostalgic reminder of childhood adventures spent at Disneyland, where the aroma of sweet and savory delights fills the air. The combination of creamy peanut butter and soft, chewy layers creates a texture that is simply irresistible, making them a favorite among both kids and adults alike.
What I love most about these Disneyland Peanut Butter Sandwich Bars is their convenience. They are easy to prepare and perfect for sharing at gatherings or enjoying as a quick pick-me-up during a busy day. The rich, nutty flavor paired with a hint of sweetness makes them a satisfying treat that keeps you coming back for more. Whether you’re reminiscing about your last trip to Disneyland or simply looking for a delicious dessert to whip up at home, these bars are sure to become a staple in your recipe collection.

Ingredients:
- 1 cup creamy peanut butter
- 1/2 cup unsalted butter, softened
- 1 cup granulated sugar
- 1 cup brown sugar, packed
- 2 large eggs
- 1 teaspoon vanilla extract
- 2 cups all-purpose flour
- 1 teaspoon baking powder
- 1/2 teaspoon salt
- 1 cup chocolate chips (semi-sweet or milk chocolate)
- 1/2 cup chopped peanuts (optional, for topping)
Preparing the Batter
- In a large mixing bowl, combine the creamy peanut butter and softened unsalted butter. Using an electric mixer, beat them together on medium speed until the mixture is smooth and creamy. This should take about 2-3 minutes.
- Add the granulated sugar and brown sugar to the peanut butter and butter mixture. Continue to mix on medium speed until the sugars are fully incorporated and the mixture is light and fluffy, which should take another 2-3 minutes.
- Next, crack in the two large eggs, one at a time, mixing well after each addition. Then, add the vanilla extract and mix until everything is well combined.
- In a separate bowl, whisk together the all-purpose flour, baking powder, and salt. Gradually add this dry mixture to the wet ingredients, mixing on low speed until just combined. Be careful not to overmix; you want to keep the batter light and fluffy.
- Once the flour mixture is fully incorporated, fold in the chocolate chips using a spatula. If you’re feeling adventurous, you can also add in the chopped peanuts at this stage for an extra crunch!
Preparing the Baking Dish
- Preheat your oven to 350°F (175°C). This is an important step, as a properly preheated oven ensures even baking.
- While the oven is heating, prepare a 9×13 inch baking dish. Grease it lightly with cooking spray or butter to prevent the bars from sticking. You can also line the bottom with parchment paper for easier removal later on.
Baking the Bars
- Once your batter is ready and your oven is preheated, pour the batter into the prepared baking dish. Use a spatula to spread it evenly across the dish, making sure to reach the corners.
- If you’re using chopped peanuts as a topping, sprinkle them evenly over the top of the batter now. This adds a delightful crunch and enhances the peanut flavor.
- Place the baking dish in the preheated oven and bake for 25-30 minutes. You’ll know they’re done when the edges are golden brown and a toothpick inserted into the center comes out clean or with just a few moist crumbs.
- Once baked, remove the dish from the oven and let it cool in the pan for about 10-15 minutes. This cooling time helps the bars set up properly.
Cooling and Serving
- After the initial cooling period, carefully lift the bars out of the baking dish using the edges of the parchment paper (if you used it). If you didn’t use parchment, you can use a spatula to gently lift them out.
- Transfer the bars to a wire rack to cool completely. This step is crucial because it allows the bars to firm up, making them easier to cut into squares.
- Once the bars are completely cool, use a sharp knife to cut them into squares or rectangles, depending on your preference. I usually aim for about 24 bars, but you can make them larger or smaller as you like!
- Serve the bars immediately, or store them in an airtight container at room temperature for up to a week. They also freeze well, so feel free to make a double batch and save some for later!
Tips and Variations
- If you want to switch things up, try adding different mix-ins like butterscotch chips, white chocolate chips, or even dried fruit for a unique twist.
- For a more decadent treat, drizzle melted chocolate
Conclusion:
In summary, these Disneyland Peanut Butter Sandwich Bars are an absolute must-try for anyone looking to indulge in a delightful treat that captures the magic of Disney right in your own kitchen. The combination of creamy peanut butter, sweet chocolate, and a crunchy texture makes these bars not only delicious but also incredibly satisfying. Whether you’re planning a family movie night, a picnic in the park, or just a cozy afternoon snack, these bars are the perfect addition to any occasion. For serving suggestions, consider pairing these bars with a glass of cold milk or a warm cup of hot chocolate for a comforting experience. You can also get creative with variations by adding chopped nuts, drizzling caramel on top, or even incorporating your favorite candies into the mix. The possibilities are endless, and I encourage you to make this recipe your own! I can’t wait for you to try these Disneyland Peanut Butter Sandwich Bars! Once you do, please share your experience and any fun twists you added. Your feedback not only inspires me but also helps fellow readers discover new ways to enjoy this delightful treat. So roll up your sleeves, gather your ingredients, and let the magic of Disneyland come alive in your kitchen! Print
Disneyland Peanut Butter Sandwich Bars: A Delicious Recipe to Bring the Magic Home
- Total Time: 45 minutes
- Yield: 24 bars 1x
Description
Enjoy these Peanut Butter Chocolate Chip Bars, featuring a delightful combination of creamy peanut butter and rich chocolate chips. Easy to prepare, these bars are perfect for satisfying your sweet cravings!
Ingredients
- 1 cup creamy peanut butter
- 1/2 cup unsalted butter, softened
- 1 cup granulated sugar
- 1 cup brown sugar, packed
- 2 large eggs
- 1 teaspoon vanilla extract
- 2 cups all-purpose flour
- 1 teaspoon baking powder
- 1/2 teaspoon salt
- 1 cup chocolate chips (semi-sweet or milk chocolate)
- 1/2 cup chopped peanuts (optional, for topping)
Instructions
- In a large mixing bowl, combine the creamy peanut butter and softened unsalted butter. Using an electric mixer, beat them together on medium speed until the mixture is smooth and creamy (about 2-3 minutes).
- Add the granulated sugar and brown sugar to the mixture. Continue mixing on medium speed until the sugars are fully incorporated and the mixture is light and fluffy (another 2-3 minutes).
- Crack in the two large eggs, one at a time, mixing well after each addition. Then, add the vanilla extract and mix until well combined.
- In a separate bowl, whisk together the all-purpose flour, baking powder, and salt. Gradually add this dry mixture to the wet ingredients, mixing on low speed until just combined. Avoid overmixing to keep the batter light and fluffy.
- Fold in the chocolate chips using a spatula. Optionally, add chopped peanuts for extra crunch.
- Preheat your oven to 350°F (175°C).
- Grease a 9×13 inch baking dish lightly with cooking spray or butter. Optionally, line the bottom with parchment paper for easier removal.
- Pour the batter into the prepared baking dish and spread it evenly with a spatula.
- If using, sprinkle chopped peanuts over the top of the batter.
- Bake in the preheated oven for 25-30 minutes, or until the edges are golden brown and a toothpick inserted into the center comes out clean or with a few moist crumbs.
- Remove from the oven and let cool in the pan for 10-15 minutes.
- Carefully lift the bars out of the baking dish using the edges of the parchment paper or a spatula.
- Transfer to a wire rack to cool completely.
- Once cool, cut into squares or rectangles (aim for about 24 bars).
- Serve immediately or store in an airtight container at room temperature for up to a week. These bars also freeze well for later enjoyment!
Notes
- For variations, consider adding butterscotch chips, white chocolate chips, or dried fruit.
- For a more decadent treat, drizzle melted chocolate over the cooled bars.
- Prep Time: 15 minutes
- Cook Time: 30 minutes