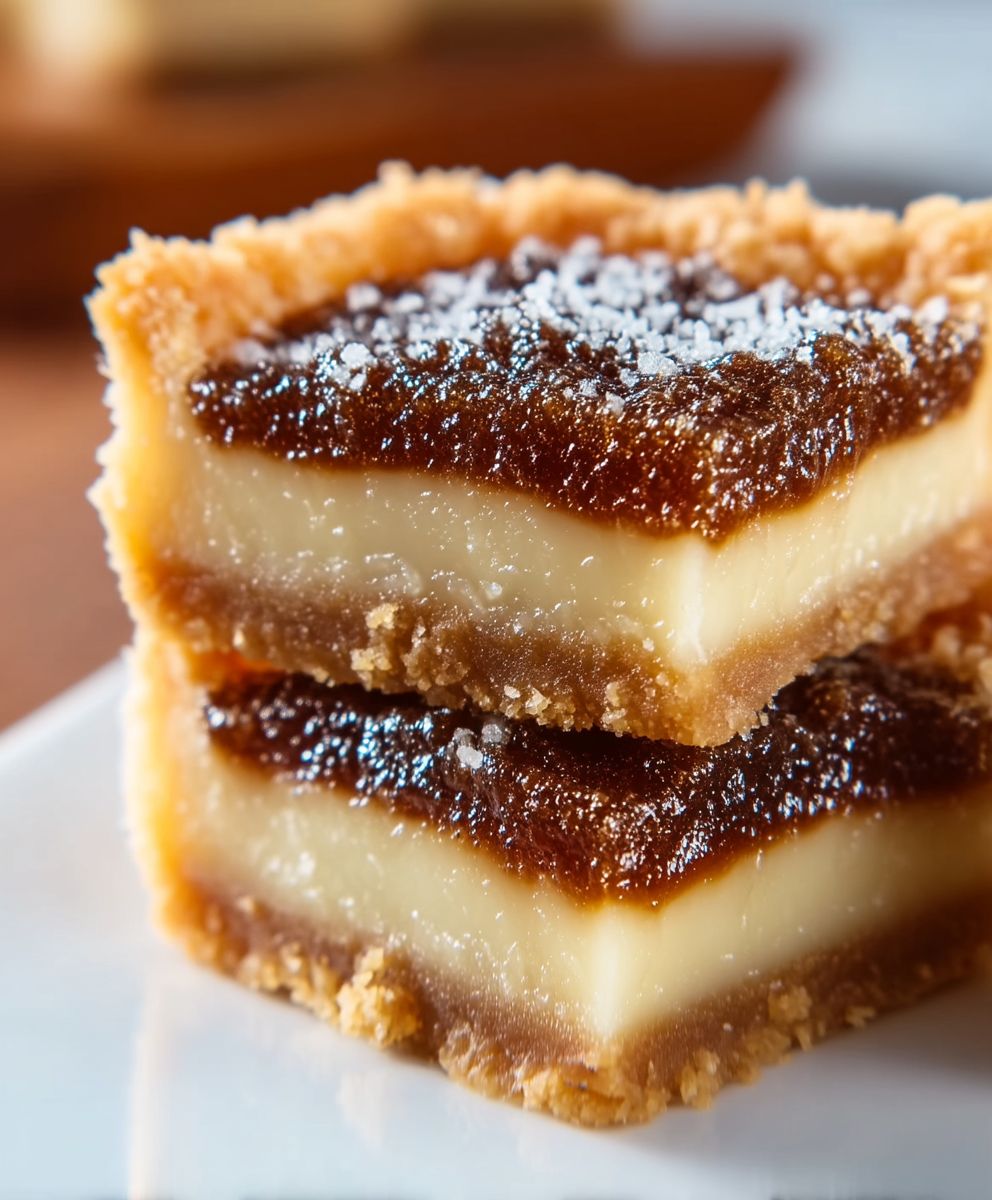
Butter Tart Squares: Prepare to be captivated by a dessert that perfectly marries the iconic Canadian butter tart with the ease and convenience of a square! Imagine sinking your teeth into a buttery, flaky crust, giving way to a gooey, sweet, and intensely satisfying filling. This isn’t just a dessert; it’s a nostalgic trip to grandma’s kitchen, a celebration of Canadian heritage, and an utterly irresistible treat all rolled into one.
The butter tart, a quintessential Canadian pastry, boasts a history as rich and layered as its filling. While its exact origins are debated, it’s believed to have evolved from border pies brought over by early Scottish settlers. Over time, it transformed into the beloved butter tart we know today, a symbol of Canadian baking prowess. But let’s face it, sometimes we crave that incredible butter tart flavor without the fuss of individual tarts. That’s where these delightful Butter Tart Squares come in!
People adore butter tarts (and by extension, these squares!) for their incredible combination of textures and flavors. The flaky, buttery pastry provides the perfect counterpoint to the rich, caramel-like filling. The sweetness is balanced by a hint of vanilla and often a touch of tartness from raisins or nuts, creating a symphony of sensations that dance on your palate. Plus, these squares are incredibly easy to make and perfect for sharing, making them a crowd-pleasing dessert for any occasion. Get ready to experience the magic of butter tarts in a whole new, effortlessly delicious way!

Ingredients:
- For the Crust:
- 1 ½ cups all-purpose flour
- ½ cup cold unsalted butter, cubed
- ¼ cup cold vegetable shortening, cubed
- ¼ teaspoon salt
- 4-6 tablespoons ice water
- For the Filling:
- ½ cup unsalted butter, melted
- 1 cup packed brown sugar
- ½ cup corn syrup
- 2 large eggs, lightly beaten
- 1 teaspoon vanilla extract
- ¼ teaspoon salt
- 1 cup raisins (optional, but highly recommended!)
- ½ cup chopped walnuts or pecans (optional)
Preparing the Crust:
- In a large bowl, whisk together the flour and salt.
- Add the cold butter and shortening to the flour mixture. Using a pastry blender or your fingertips, cut the butter and shortening into the flour until the mixture resembles coarse crumbs. You should still see small pieces of butter and shortening – this is what creates a flaky crust!
- Gradually add the ice water, one tablespoon at a time, mixing gently after each addition. Continue adding water until the dough just comes together. Be careful not to overmix, as this will develop the gluten and make the crust tough.
- Form the dough into a disc, wrap it in plastic wrap, and refrigerate for at least 30 minutes. This allows the gluten to relax and the butter to firm up, resulting in a more tender crust. I usually let it chill for an hour, just to be safe!
Preparing the Filling:
- While the dough is chilling, prepare the filling. In a medium bowl, whisk together the melted butter, brown sugar, and corn syrup until smooth.
- Add the lightly beaten eggs, vanilla extract, and salt. Whisk until well combined. The mixture should be smooth and glossy.
- If using, stir in the raisins and chopped nuts. Make sure they are evenly distributed throughout the filling. I love the texture and flavor the raisins and nuts add, but feel free to omit them if you prefer a plain butter tart filling.
Assembling and Baking:
- Preheat your oven to 350°F (175°C).
- Lightly grease and flour a 9×13 inch baking pan. This will prevent the squares from sticking and make them easier to remove after baking.
- Remove the dough from the refrigerator and place it on a lightly floured surface. Roll the dough out into a rectangle that is slightly larger than the baking pan.
- Carefully transfer the dough to the prepared baking pan. Press the dough into the bottom and up the sides of the pan. Trim any excess dough from the edges. You can crimp the edges with a fork for a decorative touch.
- Pour the filling evenly over the crust. Make sure the filling is spread to all corners of the pan.
- Bake for 30-35 minutes, or until the crust is golden brown and the filling is set. The filling should be slightly jiggly in the center, but it will firm up as it cools. Keep a close eye on them towards the end of the baking time to prevent the crust from burning.
- Remove the baking pan from the oven and let the squares cool completely in the pan before cutting into squares. This is important, as the filling will be very soft when it’s hot.
- Once the squares are completely cool, cut them into squares using a sharp knife. I usually cut them into about 24 squares, but you can adjust the size to your preference.
Tips for Success:
- Use cold ingredients: Cold butter and shortening are essential for creating a flaky crust. Make sure your butter and shortening are very cold before you start. I even put my flour in the freezer for about 15 minutes before using it.
- Don’t overmix the dough: Overmixing the dough will develop the gluten and make the crust tough. Mix the dough just until it comes together.
- Chill the dough: Chilling the dough allows the gluten to relax and the butter to firm up, resulting in a more tender crust. Don’t skip this step!
- Use a pastry blender or your fingertips: A pastry blender or your fingertips are the best tools for cutting the butter and shortening into the flour. Avoid using a food processor, as it can overmix the dough.
- Adjust the sweetness: If you prefer a less sweet filling, you can reduce the amount of brown sugar slightly.
- Add different nuts: Feel free to experiment with different types of nuts, such as pecans, walnuts, or almonds.
- Add chocolate chips: For a chocolatey twist, add ½ cup of chocolate chips to the filling.
- Store properly: Store the butter tart squares in an airtight container at room temperature for up to 3 days, or in the refrigerator for up to 5 days.
Variations:
- Pecan Butter Tart Squares: Substitute the walnuts or raisins with 1 cup of chopped pecans.
- Walnut Butter Tart Squares: Substitute the raisins with 1 cup of chopped walnuts.
- Raisin Butter Tart Squares: Omit the walnuts and use 1 ½ cups of raisins.
- Chocolate Chip Butter Tart Squares: Add ½ cup of chocolate chips to the filling along with the raisins and nuts, or as a substitute.
- Maple Butter Tart Squares: Substitute ¼ cup of the corn syrup with maple syrup for a richer, more complex flavor.
Troubleshooting:
- Crust is too tough: This is usually caused by overmixing the dough. Be careful not to overmix the dough, and make sure to chill it for at least 30 minutes.
- Crust is too crumbly: This is usually caused by not using enough water. Add the ice water one tablespoon at a time, mixing gently after each addition, until the dough just comes together.
- Filling is too runny: This could be caused by not baking the squares long enough, or by using too much liquid in the filling. Make sure to bake the squares until the filling is set, and double-check your measurements.
- Filling is too dry: This could be caused by overbaking the squares, or by using too little liquid in the filling. Make sure to bake the squares until the filling is just set, and double-check your measurements.
- Squares are sticking to the pan: Make sure to grease and flour the baking pan thoroughly before adding the dough. You can also line the pan with parchment paper for extra insurance.
Serving Suggestions:
- Serve the butter tart squares as a dessert or snack.
- Serve them with a scoop of vanilla ice cream or a dollop of whipped cream.
- Serve them with a cup of coffee or tea.
- Bring them to a potluck or party.
- Package them up as a gift for friends and family.
Nutritional Information (approximate, per square):
- Calories: 250-300
- Fat: 15-20g
- Saturated Fat: 8-12g
- Cholesterol: 40-50mg
- Sodium: 50-75mg
- Carbohydrates: 30-40g
- Sugar: 20-25g
- Protein: 2-3g
Note: Nutritional information is an estimate and may vary depending on the specific ingredients used.
Equipment You’ll Need:
- Large bowl
- Medium bowl
- Whisk
- Pastry blender or your fingertips
- Measuring cups and spoons
- Plastic wrap
- Rolling pin
- 9×13 inch baking pan
- Sharp knife
Why I Love This Recipe:
These Butter Tart Squares are a classic Canadian treat that are perfect for any occasion. They are easy to make, incredibly delicious, and always a crowd-pleaser. The flaky crust and sweet, gooey filling are simply irresistible. I especially love the addition of raisins and walnuts, which add a wonderful texture and flavor. This recipe is also very versatile – you can easily customize it to your liking by adding different nuts, chocolate chips, or other ingredients. Whether you’re a seasoned baker or a beginner, you’re sure to love this recipe! Plus, they are so much easier to make than individual butter tarts! No more fiddling with tiny tart shells. These squares are the
Conclusion:
So there you have it! These Butter Tart Squares are truly a must-try, and I’m confident they’ll become a new favorite in your household. The combination of the buttery, crumbly shortbread crust and the gooey, caramel-like filling is simply irresistible. It’s the perfect balance of textures and flavors, making each bite a little piece of heaven. Forget fiddling with individual tart shells; this recipe simplifies the whole process without sacrificing any of the classic butter tart taste we all know and love.
What makes these squares so special is their versatility. They’re fantastic served warm, straight from the oven, with a scoop of vanilla ice cream melting on top. The contrast between the warm, gooey square and the cold, creamy ice cream is divine! Or, let them cool completely and cut them into neat little squares for a more elegant presentation. They’re perfect for potlucks, bake sales, or even just a simple afternoon treat with a cup of coffee or tea.
But the fun doesn’t stop there! Feel free to experiment with variations to make these Butter Tart Squares your own signature dessert. Try adding a handful of chopped walnuts or pecans to the filling for a nutty crunch. A sprinkle of sea salt on top before baking will enhance the sweetness and add a delightful salty-sweet dimension. For a richer, more decadent flavor, use brown butter in the shortbread crust. The possibilities are endless!
If you’re feeling adventurous, you could even incorporate other flavors into the filling. A touch of maple syrup will amplify the caramel notes, while a splash of bourbon will add a warm, boozy kick. For the chocolate lovers out there, swirl in a bit of melted dark chocolate into the filling before baking for a truly indulgent treat.
These squares are also incredibly easy to transport, making them ideal for picnics and road trips. Just pack them in an airtight container, and they’ll be ready to enjoy whenever and wherever you are. They also freeze beautifully, so you can make a batch ahead of time and have them on hand for unexpected guests or a sudden craving. Simply thaw them at room temperature for a few hours before serving.
I truly believe that everyone should have this recipe in their repertoire. It’s a crowd-pleaser, it’s easy to make, and it’s guaranteed to satisfy your sweet tooth. Plus, the aroma that fills your kitchen while these squares are baking is simply intoxicating!
So, what are you waiting for? Gather your ingredients, preheat your oven, and get ready to bake up a batch of these amazing Butter Tart Squares. I promise you won’t be disappointed.
And most importantly, I’d love to hear about your experience! Did you try any variations? Did you serve them with ice cream or coffee? What did your friends and family think? Share your photos and stories in the comments below. I can’t wait to see what you create! Happy baking!
Butter Tart Squares: The Ultimate Guide to Baking Perfection
Classic Canadian Butter Tart Squares with flaky crust and sweet, gooey filling. Easy to make, perfect for any occasion!
Ingredients
- 1 ½ cups all-purpose flour
- ½ cup cold unsalted butter, cubed
- ¼ cup cold vegetable shortening, cubed
- ¼ teaspoon salt
- 4-6 tablespoons ice water
- ½ cup unsalted butter, melted
- 1 cup packed brown sugar
- ½ cup corn syrup
- 2 large eggs, lightly beaten
- 1 teaspoon vanilla extract
- ¼ teaspoon salt
- 1 cup raisins (optional, but highly recommended!)
- ½ cup chopped walnuts or pecans (optional)
Instructions
- In a large bowl, whisk together the flour and salt.
- Add the cold butter and shortening to the flour mixture. Using a pastry blender or your fingertips, cut the butter and shortening into the flour until the mixture resembles coarse crumbs. You should still see small pieces of butter and shortening – this is what creates a flaky crust!
- Gradually add the ice water, one tablespoon at a time, mixing gently after each addition. Continue adding water until the dough just comes together. Be careful not to overmix, as this will develop the gluten and make the crust tough.
- Form the dough into a disc, wrap it in plastic wrap, and refrigerate for at least 30 minutes. This allows the gluten to relax and the butter to firm up, resulting in a more tender crust.
- While the dough is chilling, prepare the filling. In a medium bowl, whisk together the melted butter, brown sugar, and corn syrup until smooth.
- Add the lightly beaten eggs, vanilla extract, and salt. Whisk until well combined. The mixture should be smooth and glossy.
- If using, stir in the raisins and chopped nuts. Make sure they are evenly distributed throughout the filling.
- Preheat your oven to 350°F (175°C).
- Lightly grease and flour a 9×13 inch baking pan. This will prevent the squares from sticking and make them easier to remove after baking.
- Remove the dough from the refrigerator and place it on a lightly floured surface. Roll the dough out into a rectangle that is slightly larger than the baking pan.
- Carefully transfer the dough to the prepared baking pan. Press the dough into the bottom and up the sides of the pan. Trim any excess dough from the edges. You can crimp the edges with a fork for a decorative touch.
- Pour the filling evenly over the crust. Make sure the filling is spread to all corners of the pan.
- Bake for 30-35 minutes, or until the crust is golden brown and the filling is set. The filling should be slightly jiggly in the center, but it will firm up as it cools. Keep a close eye on them towards the end of the baking time to prevent the crust from burning.
- Remove the baking pan from the oven and let the squares cool completely in the pan before cutting into squares. This is important, as the filling will be very soft when it’s hot.
- Once the squares are completely cool, cut them into squares using a sharp knife.
Notes
- Use cold ingredients: Cold butter and shortening are essential for creating a flaky crust.
- Don’t overmix the dough: Overmixing the dough will develop the gluten and make the crust tough.
- Chill the dough: Chilling the dough allows the gluten to relax and the butter to firm up, resulting in a more tender crust.
- Adjust the sweetness: If you prefer a less sweet filling, you can reduce the amount of brown sugar slightly.
- Add different nuts: Feel free to experiment with different types of nuts, such as pecans, walnuts, or almonds.
- Add chocolate chips: For a chocolatey twist, add ½ cup of chocolate chips to the filling.
- Store properly: Store the butter tart squares in an airtight container at room temperature for up to 3 days, or in the refrigerator for up to 5 days.