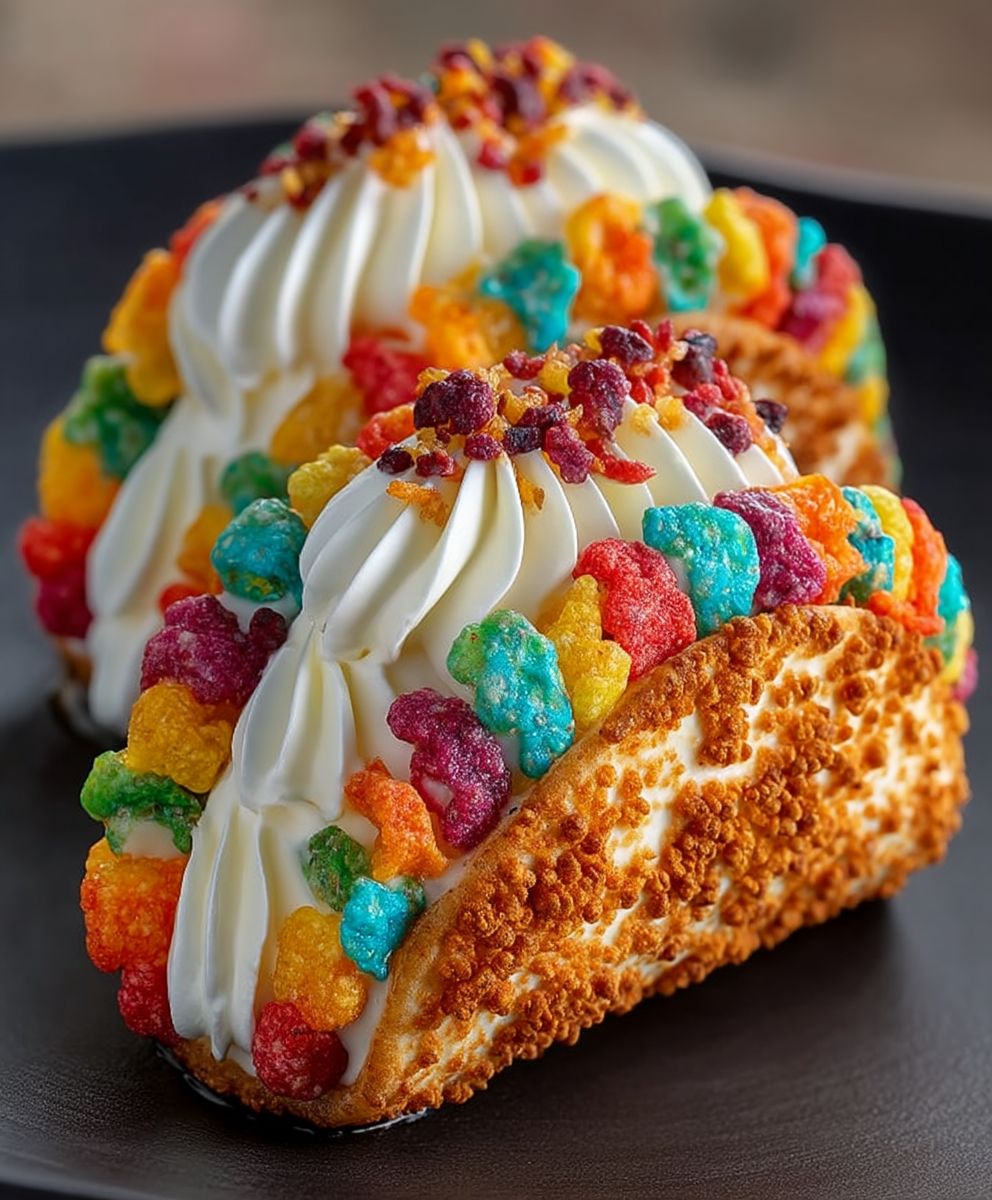
Fruity Pebbles Cheesecake Tacos: Prepare to have your mind blown! I know, it sounds like a fever dream, but trust me, this whimsical dessert is about to become your new obsession. Imagine the creamy, tangy delight of cheesecake, perfectly nestled in a sweet, crispy taco shell, and then showered with the iconic, colorful crunch of Fruity Pebbles. It’s a textural and flavor explosion that will transport you straight back to Saturday morning cartoons.
While not steeped in centuries of tradition, the concept of dessert tacos has been gaining popularity as a fun and innovative way to enjoy classic flavors. This particular iteration, the Fruity Pebbles Cheesecake Tacos, takes that playful spirit to a whole new level. It’s a celebration of childhood nostalgia combined with the sophisticated indulgence of cheesecake.
So, why do people adore this quirky treat? Well, beyond the sheer novelty, it’s the perfect balance of flavors and textures. The creamy cheesecake filling provides a smooth, rich counterpoint to the crunchy taco shell and the sugary sweetness of the Fruity Pebbles. It’s also incredibly convenient – a handheld dessert that’s perfect for parties, picnics, or simply a fun treat on a weeknight. Plus, let’s be honest, who can resist the vibrant colors and playful vibe of Fruity Pebbles? Get ready to embark on a culinary adventure that’s as delicious as it is delightful!

Ingredients:
- For the Taco Shells:
- 1 cup all-purpose flour
- 1/2 teaspoon baking powder
- 1/4 teaspoon salt
- 2 tablespoons granulated sugar
- 3 tablespoons cold unsalted butter, cut into small cubes
- 1 large egg
- 2-3 tablespoons ice water
- Vegetable oil, for frying
- For the Cheesecake Filling:
- 8 ounces cream cheese, softened
- 1/2 cup granulated sugar
- 1/4 cup sour cream
- 1 teaspoon vanilla extract
- 1/2 cup heavy cream
- 1 cup Fruity Pebbles cereal, plus more for garnish
- For the Fruity Pebbles Coating (Optional):
- 1 cup Fruity Pebbles cereal, finely crushed
- 2 tablespoons unsalted butter, melted
Making the Taco Shells
- Combine Dry Ingredients: In a large bowl, whisk together the flour, baking powder, salt, and sugar. Make sure everything is evenly distributed.
- Cut in the Butter: Add the cold, cubed butter to the dry ingredients. Using a pastry blender or your fingertips, cut the butter into the flour mixture until it resembles coarse crumbs. The smaller the butter pieces, the flakier the taco shell will be!
- Add the Egg: In a separate small bowl, lightly beat the egg. Pour the egg into the flour mixture and mix until just combined.
- Add Ice Water: Gradually add the ice water, one tablespoon at a time, mixing until the dough just comes together. Be careful not to overmix, as this will develop the gluten and make the taco shells tough. You want a soft, pliable dough.
- Form a Disc: Gently form the dough into a disc, wrap it in plastic wrap, and refrigerate for at least 30 minutes. This allows the gluten to relax and makes the dough easier to roll out.
- Roll Out the Dough: After chilling, remove the dough from the refrigerator and place it on a lightly floured surface. Roll out the dough to about 1/8 inch thickness. You want it thin enough to be crispy but not so thin that it tears easily.
- Cut Out Circles: Use a 4-inch round cookie cutter or a sharp knife to cut out circles from the dough. Re-roll any scraps to get as many circles as possible.
- Fry the Taco Shells: Heat about 2 inches of vegetable oil in a deep pot or fryer to 350°F (175°C). Carefully place the dough circles, one or two at a time, into the hot oil. Use tongs to gently fold the circle in half immediately after placing it in the oil to create the taco shape. Fry for about 1-2 minutes per side, or until golden brown and crispy.
- Drain and Cool: Remove the fried taco shells from the oil and place them on a wire rack lined with paper towels to drain excess oil. Let them cool completely before filling. This is crucial for them to maintain their shape.
Preparing the Cheesecake Filling
- Cream the Cream Cheese and Sugar: In a large bowl, beat the softened cream cheese and sugar together until smooth and creamy. Make sure there are no lumps of cream cheese remaining.
- Add Sour Cream and Vanilla: Add the sour cream and vanilla extract to the cream cheese mixture and beat until well combined. The sour cream adds a nice tang to the filling.
- Whip the Heavy Cream: In a separate bowl, whip the heavy cream until stiff peaks form. Be careful not to overwhip, or you’ll end up with butter!
- Fold in the Whipped Cream: Gently fold the whipped cream into the cream cheese mixture until just combined. This will make the filling light and airy.
- Add Fruity Pebbles: Gently fold in the Fruity Pebbles cereal. Be careful not to overmix, as this can crush the cereal and make the filling soggy. You want to keep the cereal crunchy.
- Chill the Filling: Cover the bowl with plastic wrap and refrigerate the cheesecake filling for at least 30 minutes to allow it to firm up slightly. This will make it easier to fill the taco shells.
Optional: Fruity Pebbles Coating
- Crush the Cereal: Place the Fruity Pebbles cereal in a resealable bag and crush them finely using a rolling pin or food processor. You want a fine, even crumb.
- Melt the Butter: Melt the unsalted butter in a small bowl.
- Dip the Taco Shells: Dip the edges of the cooled taco shells into the melted butter, then immediately dip them into the crushed Fruity Pebbles cereal. This will create a colorful and flavorful coating.
- Let Set: Place the coated taco shells on a wire rack to allow the butter and cereal coating to set.
Assembling the Fruity Pebbles Cheesecake Tacos
- Fill the Taco Shells: Once the taco shells are completely cooled and the cheesecake filling is chilled, spoon or pipe the cheesecake filling into the taco shells. Be generous with the filling!
- Garnish: Garnish the filled tacos with additional Fruity Pebbles cereal. You can also add a drizzle of melted white chocolate or a dollop of whipped cream for extra flair.
- Serve Immediately: Serve the Fruity Pebbles Cheesecake Tacos immediately for the best taste and texture. If you need to store them, keep them refrigerated, but be aware that the taco shells may soften over time.
Conclusion:
And there you have it! These Fruity Pebbles Cheesecake Tacos are so much more than just a dessert; they’re a vibrant explosion of flavor and fun, guaranteed to bring a smile to anyone’s face. I truly believe this recipe is a must-try for anyone looking to add a touch of whimsy and deliciousness to their life. The creamy, tangy cheesecake filling perfectly complements the crunchy, sweet Fruity Pebbles shell, creating a textural and taste sensation that’s simply irresistible.
Why is this a must-try? Because it’s unique, it’s easy to make (seriously, even a beginner baker can nail this!), and it’s a guaranteed crowd-pleaser. Forget boring desserts; these tacos are a conversation starter, a party favorite, and a delightful treat for any occasion. Plus, who can resist the nostalgic charm of Fruity Pebbles? It’s like a trip down memory lane with every bite!
But the fun doesn’t stop there! The beauty of this recipe lies in its versatility. Feel free to experiment with different variations to suit your taste.
Serving Suggestions and Variations:
* Drizzle it! A drizzle of melted white chocolate or a raspberry sauce adds an extra layer of sweetness and visual appeal.
* Fruit Fiesta! Add fresh berries like strawberries, blueberries, or raspberries to the cheesecake filling or as a topping for a burst of freshness.
* Chocolate Lover’s Dream! Mix cocoa powder into the cheesecake filling for a chocolatey twist, or use chocolate-flavored tortillas for the taco shells.
* Nutty Delight! Sprinkle chopped nuts like pecans or walnuts on top for added crunch and flavor.
* Ice Cream Tacos! For an extra indulgent treat, replace the cheesecake filling with your favorite ice cream flavor. Just be sure to assemble and serve immediately to prevent the tortillas from getting soggy.
* Mini Tacos! Use smaller tortillas to create bite-sized Fruity Pebbles Cheesecake Tacos, perfect for parties or as a fun snack for kids.
* Seasonal Flavors! Adapt the cheesecake filling to reflect seasonal flavors. For example, add pumpkin spice in the fall or peppermint extract during the holidays.
* Vegan Option! Use a vegan cream cheese alternative and vegan-friendly tortillas to create a delicious and inclusive dessert for everyone to enjoy.
I’m confident that once you try this recipe, you’ll be hooked. It’s the perfect balance of sweet, creamy, and crunchy, and it’s guaranteed to satisfy your sweet tooth. Don’t be afraid to get creative and put your own spin on it! The possibilities are endless.
So, what are you waiting for? Gather your ingredients, put on your apron, and get ready to embark on a culinary adventure. I promise you won’t regret it. This Fruity Pebbles Cheesecake Tacos recipe is a guaranteed winner!
And most importantly, I’d love to hear about your experience! Did you try the recipe? Did you make any variations? What did you think? Share your photos and comments on social media using [Your Hashtag Here] so I can see your creations. I can’t wait to see what you come up with! Happy baking!
Fruity Pebbles Cheesecake Tacos: A Deliciously Fun Dessert Recipe
Crispy homemade taco shells filled with creamy cheesecake and Fruity Pebbles cereal. Optional Fruity Pebbles coating for extra flavor.
Ingredients
**Suggestions for Improvement:**
* **Ingredient Specificity:** While generally good, a few ingredients could benefit from more specific quantities. For example:
* **Vegetable Oil:** Instead of just “Vegetable oil, for frying,” consider specifying an approximate amount, like “Vegetable oil, about 4 cups for frying” or “Vegetable oil, enough to fill a deep pot 2 inches deep.” This helps avoid guesswork.
* **Fruity Pebbles for Garnish:** Instead of just “more for garnish,” you could say “about 1/4 cup Fruity Pebbles for garnish” to give a better idea of the quantity.
* **Temperature Precision:**
* **Chilling Time:** While “at least 30 minutes” is good, you could add an upper limit, like “30 minutes to 1 hour” to prevent the dough from becoming too hard to work with. Similarly for the filling.
* **Technique Clarification:**
* **Cutting in Butter:** Briefly explain *why* the butter needs to be cold and cut into small cubes. (e.g., “The cold butter creates pockets of steam during frying, resulting in a flaky taco shell.”)
* **Folding Technique:** Briefly explain *why* it’s important to gently fold in the whipped cream and Fruity Pebbles. (e.g., “Gently fold in the whipped cream to maintain its volume and lightness. Overmixing will deflate the cream.”)
* **Troubleshooting Tips:**
* **Dough Too Dry/Wet:** Add a sentence or two addressing what to do if the dough is too dry (add a *tiny* bit more ice water) or too wet (add a *tiny* bit more flour).
* **Oil Temperature:** Mention that if the oil isn’t hot enough, the taco shells will absorb too much oil and be greasy. If it’s too hot, they’ll burn quickly.
* **Yield:** Include an estimated yield for the recipe (e.g., “Yields approximately 8-10 tacos”).
* **Nutritional Information (Optional):** If desired, you could include approximate nutritional information per taco.
**Revised Example Snippets (incorporating suggestions):**
* **Vegetable Oil:** “Vegetable oil, about 4 cups for frying, enough to fill a deep pot 2 inches deep.”
* **Fruity Pebbles for Garnish:** “About 1/4 cup Fruity Pebbles for garnish.”
* **Chilling Time:** “Refrigerate for 30 minutes to 1 hour.”
* **Cutting in Butter:** “Add the cold, cubed butter to the dry ingredients. Using a pastry blender or your fingertips, cut the butter into the flour mixture until it resembles coarse crumbs. The cold butter creates pockets of steam during frying, resulting in a flaky taco shell.”
* **Folding Technique:** “Gently fold the whipped cream into the cream cheese mixture until just combined. Gently fold in the Fruity Pebbles cereal. Be careful not to overmix; overmixing will deflate the cream and make the filling dense.”
* **Dough Too Dry/Wet:** “If the dough is too dry, add a *tiny* bit more ice water (1/2 teaspoon at a time). If it’s too wet, add a *tiny* bit more flour (1/2 teaspoon at a time).”
* **Oil Temperature:** “Heat about 2 inches of vegetable oil in a deep pot or fryer to 350°F (175°C). If the oil isn’t hot enough, the taco shells will absorb too much oil and be greasy. If it’s too hot, they’ll burn quickly.”
* **Yield:** “Yields approximately 8-10 tacos.”
**Overall:**
These are just minor suggestions. Your recipe is already very well-written and comprehensive. The addition of these details would just make it even more foolproof and helpful for cooks of all skill levels. The recipe itself sounds delicious and fun!
Instructions
- Combine Dry Ingredients: In a large bowl, whisk together the flour, baking powder, salt, and sugar.
- Cut in the Butter: Add the cold, cubed butter to the dry ingredients. Using a pastry blender or your fingertips, cut the butter into the flour mixture until it resembles coarse crumbs.
- Add the Egg: In a separate small bowl, lightly beat the egg. Pour the egg into the flour mixture and mix until just combined.
- Add Ice Water: Gradually add the ice water, one tablespoon at a time, mixing until the dough just comes together. Be careful not to overmix.
- Form a Disc: Gently form the dough into a disc, wrap it in plastic wrap, and refrigerate for at least 30 minutes.
- Roll Out the Dough: After chilling, remove the dough from the refrigerator and place it on a lightly floured surface. Roll out the dough to about 1/8 inch thickness.
- Cut Out Circles: Use a 4-inch round cookie cutter or a sharp knife to cut out circles from the dough. Re-roll any scraps to get as many circles as possible.
- Fry the Taco Shells: Heat about 2 inches of vegetable oil in a deep pot or fryer to 350°F (175°C). Carefully place the dough circles, one or two at a time, into the hot oil. Use tongs to gently fold the circle in half immediately after placing it in the oil to create the taco shape. Fry for about 1-2 minutes per side, or until golden brown and crispy.
- Drain and Cool: Remove the fried taco shells from the oil and place them on a wire rack lined with paper towels to drain excess oil. Let them cool completely before filling.
- Cream the Cream Cheese and Sugar: In a large bowl, beat the softened cream cheese and sugar together until smooth and creamy.
- Add Sour Cream and Vanilla: Add the sour cream and vanilla extract to the cream cheese mixture and beat until well combined.
- Whip the Heavy Cream: In a separate bowl, whip the heavy cream until stiff peaks form.
- Fold in the Whipped Cream: Gently fold the whipped cream into the cream cheese mixture until just combined.
- Add Fruity Pebbles: Gently fold in the Fruity Pebbles cereal. Be careful not to overmix.
- Chill the Filling: Cover the bowl with plastic wrap and refrigerate the cheesecake filling for at least 30 minutes to allow it to firm up slightly.
- Crush the Cereal: Place the Fruity Pebbles cereal in a resealable bag and crush them finely using a rolling pin or food processor.
- Melt the Butter: Melt the unsalted butter in a small bowl.
- Dip the Taco Shells: Dip the edges of the cooled taco shells into the melted butter, then immediately dip them into the crushed Fruity Pebbles cereal.
- Let Set: Place the coated taco shells on a wire rack to allow the butter and cereal coating to set.
- Fill the Taco Shells: Once the taco shells are completely cooled and the cheesecake filling is chilled, spoon or pipe the cheesecake filling into the taco shells.
- Garnish: Garnish the filled tacos with additional Fruity Pebbles cereal. You can also add a drizzle of melted white chocolate or a dollop of whipped cream for extra flair.
- Serve Immediately: Serve the Fruity Pebbles Cheesecake Tacos immediately for the best taste and texture. If you need to store them, keep them refrigerated, but be aware that the taco shells may soften over time.
Notes
**Suggestions for Improvement:**
* **Ingredient Quantities – Clarify “More for Garnish”:** Under “B. For the Cheesecake Filling,” specify an approximate amount for “more for garnish” of Fruity Pebbles. Even a vague estimate like “1/4 cup” would be helpful.
* **Taco Shell Size – Add a Visual Cue:** In step II.A.7, consider adding a visual cue for the 4-inch circle size. Something like “(about the size of a CD)” or “(slightly smaller than a standard saucer)” can help people without a cookie cutter visualize the size.
* **Frying Safety – Emphasize Caution:** In step II.A.8, add a stronger warning about the hot oil. Something like: “**CAUTION: Hot oil can cause severe burns. Be extremely careful when adding the dough circles to the oil.**”
* **Frying – Visual Cues for Doneness:** In step II.A.8, add a visual cue for when the taco shells are done. For example: “Fry for about 1-2 minutes per side, or until golden brown and crispy *and the bubbles from frying have slowed down significantly*.”
* **Filling Consistency – Add a Note:** In step II.B.6, add a note about the filling consistency: “Chill the filling for at least 30 minutes to allow it to firm up *to a pipeable consistency*.” This helps users understand the goal of chilling.
* **Coating – Alternative Application:** In step II.C.3, consider adding an alternative application method for the Fruity Pebbles coating, such as sprinkling the crushed cereal onto the buttered edges. This provides an option for those who find dipping messy.
* **Assembly – Serving Suggestion:** In step II.D.3, add a note about serving immediately to maintain the taco shell’s crispness. Something like: “Serve immediately for the best taste and texture. *The longer they sit, the softer the taco shells will become.*”
**Revised Sections (Examples incorporating suggestions):**
* **B. For the Cheesecake Filling:**
* 8 ounces cream cheese, softened
* 1/2 cup granulated sugar
* 1/4 cup sour cream
* 1 teaspoon vanilla extract
* 1/2 cup heavy cream
* 1 cup Fruity Pebbles cereal, plus *approximately 1/4 cup* more for garnish
* **A. Making the Taco Shells:**
7. **Cut Out Circles:** Use a 4-inch round cookie cutter (about the size of a CD) or a sharp knife to cut out circles from the dough. Re-roll any scraps to get as many circles as possible.
8. **Fry the Taco Shells:** Heat about 2 inches of vegetable oil in a deep pot or fryer to 350°F (175°C). **CAUTION: Hot oil can cause severe burns. Be extremely careful when adding the dough circles to the oil.** Carefully place the dough circles, one or two at a time, into the hot oil. Use tongs to gently fold the circle in half immediately after placing it in the oil to create the taco shape. Fry for about 1-2 minutes per side, or until golden brown and crispy *and the bubbles from frying have slowed down significantly*.
* **B. Preparing the Cheesecake Filling:**
6. **Chill the Filling:** Cover the bowl with plastic wrap and refrigerate the cheesecake filling for at least 30 minutes to allow it to firm up *to a pipeable consistency*.
* **C. Optional: Fruity Pebbles Coating:**
3. **Dip the Taco Shells:** Dip the edges of the cooled taco shells into the melted butter, then immediately dip them into the crushed Fruity Pebbles cereal. *Alternatively, you can brush the edges with melted butter and sprinkle the crushed cereal over them.*
* **D. Assembling the Fruity Pebbles Cheesecake Tacos:**
3. **Serve Immediately:** Serve the Fruity Pebbles Cheesecake Tacos immediately for the best taste and texture. *The longer they sit, the softer the taco shells will become.* If you need to store them, keep them refrigerated, but be aware that the taco shells may soften over time.
These are just suggestions; your original breakdown is already very good. The added details will simply enhance the user experience and ensure greater success with the recipe.