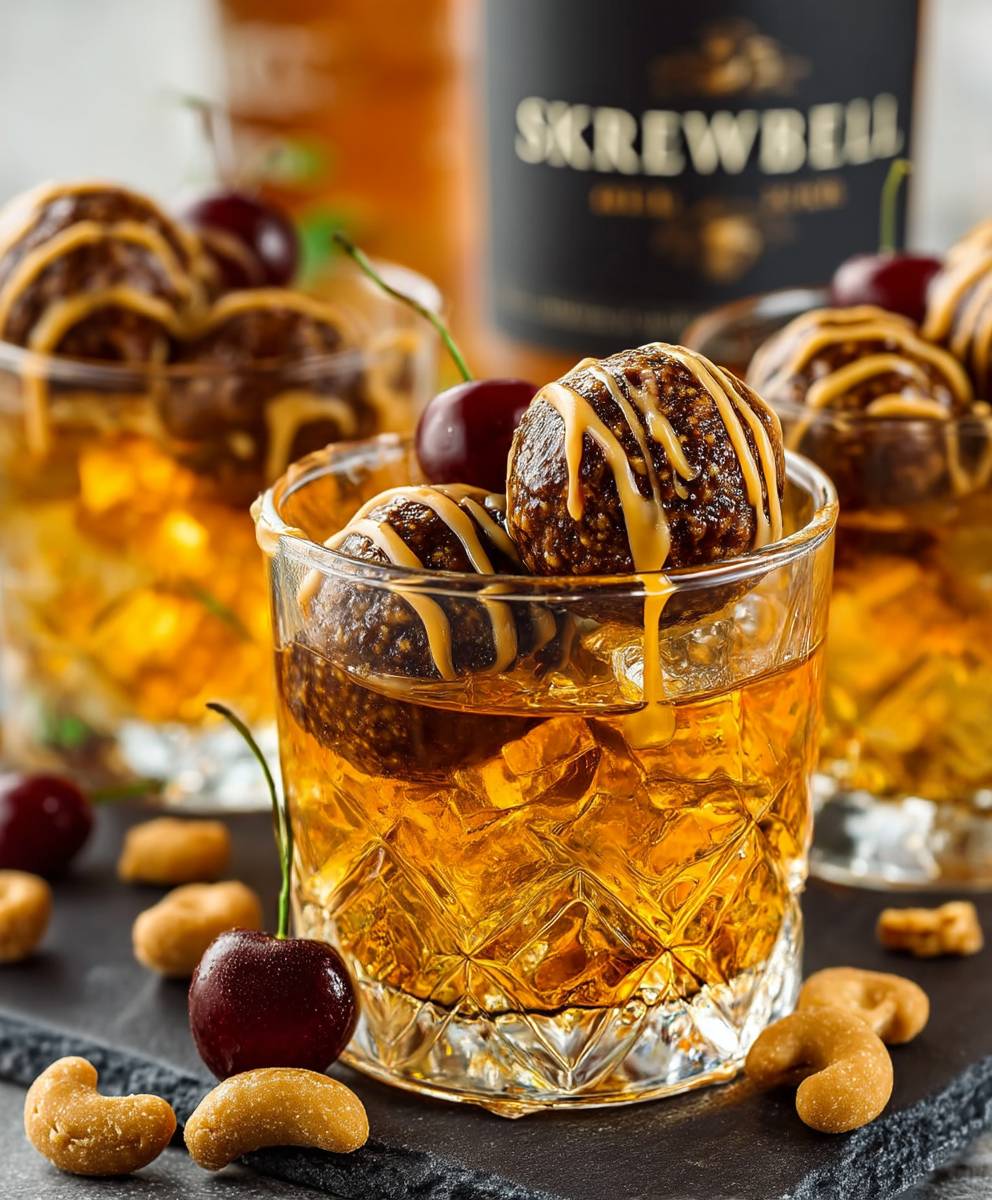
Skrewball Whiskey Balls: Prepare to be amazed by a dessert that perfectly marries the smooth, nutty flavor of peanut butter whiskey with the irresistible decadence of a no-bake treat! These aren’t your grandma’s rum balls – unless your grandma happens to be a particularly adventurous mixologist. This recipe takes the classic concept of a boozy confection and elevates it with the unique and unforgettable taste of Skrewball Peanut Butter Whiskey.
While the exact origins of whiskey balls are shrouded in a bit of mystery (perhaps intentionally, given their potent nature!), the concept of incorporating spirits into desserts has been around for centuries. Think of the traditional fruitcake soaked in rum or brandy, a holiday staple in many cultures. Skrewball Whiskey Balls build upon this tradition, offering a modern twist that’s perfect for parties, holidays, or simply a delightful indulgence after a long day.
What makes these whiskey balls so incredibly popular? It’s the harmonious blend of flavors and textures. The creamy peanut butter, the rich chocolate, and the distinctive kick of Skrewball whiskey create a symphony of taste that’s both comforting and exciting. Plus, the no-bake aspect makes them incredibly convenient – no oven required! They’re the perfect make-ahead dessert, allowing you to spend less time in the kitchen and more time enjoying the company of your friends and family. Get ready to experience a truly unforgettable treat!

Ingredients:
- 1 cup Skrewball Peanut Butter Whiskey
- 1 cup creamy peanut butter
- 3 cups powdered sugar, plus more for dusting
- 1/2 cup (1 stick) unsalted butter, softened
- 1 teaspoon vanilla extract
- 1/4 teaspoon salt
- 12 ounces semi-sweet chocolate chips
- 1 tablespoon vegetable shortening (or coconut oil)
- Optional: Chopped peanuts for garnish
Making the Peanut Butter Balls
- Combine the Wet Ingredients: In a large mixing bowl, I start by creaming together the softened butter and peanut butter. Make sure your butter is truly softened – it should be easy to press with a finger. This will ensure a smooth and creamy base for our whiskey balls. I use an electric mixer (either a stand mixer or a hand mixer) for this, as it makes the process much easier and faster. Beat the butter and peanut butter on medium speed until they are light and fluffy, usually about 2-3 minutes.
- Incorporate the Skrewball: Now for the fun part! Slowly pour in the Skrewball Peanut Butter Whiskey. I usually add it in a steady stream while the mixer is running on low speed. Be careful not to add it too quickly, or it might splash. The whiskey will add a delicious peanut butter flavor and a subtle kick to the balls. Mix until well combined. Don’t worry if it looks a little thin at this stage; the powdered sugar will fix that.
- Add the Vanilla and Salt: Stir in the vanilla extract and salt. The vanilla enhances the overall flavor, and the salt balances the sweetness. Mix until everything is evenly distributed.
- Gradually Add the Powdered Sugar: This is where things can get a little messy, so I recommend starting on low speed. Gradually add the powdered sugar, one cup at a time, mixing well after each addition. As you add the powdered sugar, the mixture will start to thicken and form a dough. Be patient and scrape down the sides of the bowl as needed to ensure all the ingredients are incorporated. You might need to add a little extra powdered sugar if the dough is too sticky, but be careful not to add too much, or the balls will be dry. The goal is to have a dough that is firm enough to hold its shape but still soft and pliable.
- Chill the Dough: Once the dough is formed, cover the bowl with plastic wrap and refrigerate for at least 30 minutes, or even better, for an hour. This chilling time is crucial because it allows the dough to firm up, making it much easier to roll into balls. If you skip this step, the dough will be too sticky and difficult to work with.
Forming and Chilling the Balls
- Prepare Your Workspace: While the dough is chilling, prepare your workspace. Line a baking sheet with parchment paper or wax paper. This will prevent the balls from sticking to the sheet. Also, have a small bowl of powdered sugar ready for dusting your hands.
- Roll the Dough into Balls: Once the dough is chilled, remove it from the refrigerator. Using a small cookie scoop or a spoon, scoop out portions of the dough and roll them into 1-inch balls. I find that using a cookie scoop helps to ensure that all the balls are the same size. Before rolling each ball, lightly dust your hands with powdered sugar to prevent the dough from sticking. Place the rolled balls on the prepared baking sheet, leaving a little space between each one.
- Chill the Balls Again: After you’ve rolled all the dough into balls, return the baking sheet to the refrigerator and chill for another 30 minutes. This second chilling step is important because it helps the balls hold their shape during the dipping process.
Dipping in Chocolate
- Melt the Chocolate: While the balls are chilling for the second time, prepare the chocolate coating. In a heat-safe bowl, combine the semi-sweet chocolate chips and vegetable shortening (or coconut oil). The shortening helps to thin the chocolate, making it easier to dip the balls and giving it a smoother, glossier finish. You can melt the chocolate in the microwave or over a double boiler.
- Microwave Method: Microwave the chocolate in 30-second intervals, stirring well after each interval, until the chocolate is completely melted and smooth. Be careful not to overheat the chocolate, or it will seize up.
- Double Boiler Method: Fill a saucepan with about an inch of water and bring it to a simmer. Place the heat-safe bowl with the chocolate and shortening over the simmering water, making sure the bottom of the bowl doesn’t touch the water. Stir constantly until the chocolate is melted and smooth.
- Dip the Peanut Butter Balls: Remove the chilled peanut butter balls from the refrigerator. Using a fork or dipping tools, carefully dip each ball into the melted chocolate, making sure it is completely coated. Gently tap off any excess chocolate.
- Place on Parchment Paper: Place the chocolate-covered balls back on the parchment-lined baking sheet.
- Garnish (Optional): If desired, sprinkle the tops of the chocolate-covered balls with chopped peanuts while the chocolate is still wet. This adds a nice crunch and visual appeal.
- Chill to Set the Chocolate: Return the baking sheet to the refrigerator and chill for at least 30 minutes, or until the chocolate is completely set. This will prevent the chocolate from melting when you handle the balls.
Serving and Storing
- Serve and Enjoy: Once the chocolate is set, the Skrewball Whiskey Balls are ready to serve! These are perfect for parties, holidays, or any time you want a delicious and boozy treat.
- Storage: Store the Skrewball Whiskey Balls in an airtight container in the refrigerator for up to a week. They can also be frozen for longer storage. To freeze, place the balls in a single layer on a baking sheet and freeze until solid. Then, transfer them to a freezer-safe bag or container. They can be thawed in the refrigerator before serving.
Tips and Variations:
- Whiskey Choice: While this recipe is specifically for Skrewball Peanut Butter Whiskey, you could experiment with other flavored whiskeys. A caramel whiskey or even a vanilla whiskey would also be delicious.
- Chocolate Type: Feel free to use milk chocolate, dark chocolate, or even white chocolate instead of semi-sweet chocolate. Each type of chocolate will give the balls a different flavor profile.
- Nut Allergies: If you have nut allergies, you can substitute the peanut butter with sunflower seed butter or another nut-free alternative. Just be sure to choose a brand that is smooth and creamy.
- Add-Ins: Get creative with add-ins! You could add chopped pretzels, crushed Oreos, or even mini chocolate chips to the dough for extra texture and flavor.
- Presentation: For a more elegant presentation, you can drizzle the chocolate-covered balls with melted white chocolate or sprinkle them with edible glitter.
Enjoy your Skrewball Whiskey Balls! They are sure to be a hit!
Conclusion:
So, there you have it! These Skrewball Whiskey Balls are truly a must-try for anyone who loves a decadent, boozy treat. They’re incredibly easy to make, require minimal baking (or none at all, depending on your chosen method!), and deliver a flavor explosion that’s both sophisticated and utterly irresistible. The creamy peanut butter, the rich chocolate, and that unmistakable kick of Skrewball whiskey – it’s a combination that’s simply divine.
Why are these a must-try? Because they’re the perfect balance of sweet and salty, smooth and crunchy, and boozy and… well, more boozy! They’re a guaranteed crowd-pleaser at parties, a delightful homemade gift, or just a little something special to treat yourself after a long day. Plus, they’re so much fun to make!
But the best part? The possibilities are endless! Feel free to experiment with different variations to suit your own taste.
Serving Suggestions and Variations:
* Dusting Delights: Instead of cocoa powder, try dusting your Skrewball Whiskey Balls with powdered sugar, finely chopped nuts (like pecans or walnuts), or even crushed pretzels for an extra salty crunch.
* Chocolate Choices: While I love using semi-sweet chocolate, you can easily swap it out for dark chocolate for a richer, more intense flavor, or milk chocolate for a sweeter, more classic taste. White chocolate would also be a fun and unexpected twist!
* Nutty Nuances: Add chopped peanuts, pecans, or walnuts directly into the whiskey ball mixture for an extra layer of texture and flavor. You could even use a flavored peanut butter, like chocolate peanut butter or honey roasted peanut butter, for a unique twist.
* Boozy Boost: For an even stronger whiskey flavor, you can add a little extra Skrewball whiskey to the mixture. Just be careful not to add too much, or the balls might become too soft to roll. You can also try using other flavored whiskeys, like a maple whiskey or a cinnamon whiskey, for a different flavor profile.
* Presentation Perfection: Serve these Skrewball Whiskey Balls on a pretty platter, arrange them in a decorative box for gifting, or even skewer them on lollipop sticks for a fun and festive presentation. A drizzle of melted chocolate or a sprinkle of edible glitter can also add a touch of elegance.
* Ice Cream Companion: Crumble these whiskey balls over your favorite ice cream for an adult-friendly sundae. The contrast of the cold ice cream and the rich, boozy whiskey balls is simply heavenly.
I truly believe that once you try this recipe, you’ll be hooked. It’s a simple yet impressive treat that’s perfect for any occasion. So, gather your ingredients, put on some music, and get ready to have some fun in the kitchen!
Don’t be afraid to get creative and make these Skrewball Whiskey Balls your own. Experiment with different flavors, textures, and presentations until you find your perfect combination.
And most importantly, don’t forget to share your creations with me! I’d love to hear about your experiences and see your photos. Tag me on social media or leave a comment below to let me know how your Skrewball Whiskey Balls turned out. Happy baking (or no-baking!), and enjoy! I can’t wait to see what delicious variations you come up with!
Skrewball Whiskey Balls: The Ultimate Boozy Dessert Recipe
Boozy peanut butter and chocolate treats made with Skrewball Peanut Butter Whiskey. Perfect for parties or a unique dessert.
Ingredients
**Minor Suggestions:**
* **Ingredient Clarity:**
* Consider specifying the *type* of powdered sugar (confectioners’ sugar) for clarity.
* For the chocolate chips, you could add “good quality” or “your favorite brand” to encourage better results.
* **Instructional Nuances:**
* **Step 4 (Making the Peanut Butter Balls):** Add a note about *why* you scrape down the sides of the bowl. Something like: “Scrape down the sides of the bowl as needed to ensure all ingredients are fully incorporated.”
* **Step 2 (Forming and Chilling the Balls):** Add a note about the *size* of the cookie scoop. Something like: “Using a small cookie scoop (approximately 1 tablespoon) or a spoon…”
* **Step 1 (Melting the Chocolate):** Emphasize the importance of *low and slow* melting, especially in the microwave. Something like: “Microwave in 30-second intervals, stirring *thoroughly* after each interval, until melted and smooth. *It’s crucial to avoid overheating the chocolate, as it can seize up.*”
* **Step 2 (Dipping the Peanut Butter Balls):** Add a note about the temperature of the chocolate. Something like: “If the chocolate starts to thicken during the dipping process, gently re-warm it using the microwave or double boiler method.”
* **Tips and Variations:**
* **Nut Allergies:** Add a warning about cross-contamination if using a kitchen that also processes peanuts. Something like: “If you have a severe nut allergy, be sure to use a kitchen and equipment that is free from peanut contamination.”
* **Whiskey Choice:** Mention that the alcohol content will be reduced but not completely eliminated during the process.
**Why these suggestions?**
* **Clarity for Beginners:** The more specific you are, the easier it is for someone with less baking experience to succeed.
* **Preventing Common Mistakes:** Highlighting potential pitfalls (like overheating chocolate) can save people time and frustration.
* **Safety:** Addressing allergy concerns is always important.
**Overall:**
This is a fantastic recipe! The formatting is excellent, the instructions are clear, and the tips are helpful. The minor suggestions above are just to make it even more foolproof and user-friendly. Great job!
Instructions
- In a large mixing bowl, cream together the softened butter and peanut butter using an electric mixer on medium speed until light and fluffy (2-3 minutes).
- Slowly pour in the Skrewball Peanut Butter Whiskey while the mixer is running on low speed. Mix until well combined.
- Stir in the vanilla extract and salt. Mix until evenly distributed.
- Gradually add the powdered sugar, one cup at a time, mixing well after each addition. Scrape down the sides of the bowl as needed. Add a little extra powdered sugar if the dough is too sticky, but be careful not to add too much. The goal is to have a dough that is firm enough to hold its shape but still soft and pliable.
- Cover the bowl with plastic wrap and refrigerate for at least 30 minutes, or up to an hour.
- Line a baking sheet with parchment paper or wax paper. Have a small bowl of powdered sugar ready for dusting your hands.
- Once the dough is chilled, remove it from the refrigerator. Using a small cookie scoop or a spoon, scoop out portions of the dough and roll them into 1-inch balls. Lightly dust your hands with powdered sugar to prevent sticking. Place the rolled balls on the prepared baking sheet, leaving a little space between each one.
- Return the baking sheet to the refrigerator and chill for another 30 minutes.
- In a heat-safe bowl, combine the semi-sweet chocolate chips and vegetable shortening (or coconut oil). Melt the chocolate using one of the following methods:
- Microwave Method: Microwave in 30-second intervals, stirring well after each interval, until melted and smooth. Be careful not to overheat.
- Double Boiler Method: Fill a saucepan with about an inch of water and bring it to a simmer. Place the heat-safe bowl with the chocolate and shortening over the simmering water (making sure the bottom of the bowl doesn’t touch the water). Stir constantly until melted and smooth.
- Remove the chilled peanut butter balls from the refrigerator. Using a fork or dipping tools, carefully dip each ball into the melted chocolate, making sure it is completely coated. Gently tap off any excess chocolate.
- Place the chocolate-covered balls back on the parchment-lined baking sheet.
- If desired, sprinkle the tops of the chocolate-covered balls with chopped peanuts while the chocolate is still wet.
- Return the baking sheet to the refrigerator and chill for at least 30 minutes, or until the chocolate is completely set.
- Once the chocolate is set, the Skrewball Whiskey Balls are ready to serve!
- Store in an airtight container in the refrigerator for up to a week. For longer storage, freeze the balls in a single layer on a baking sheet until solid, then transfer to a freezer-safe bag or container. Thaw in the refrigerator before serving.
Notes
**Strengths:**
* **Clear and Concise Language:** The instructions are written in plain language, avoiding jargon and unnecessary complexity.
* **Well-Organized:** The recipe is logically divided into sections (Making the Balls, Forming and Chilling, Dipping in Chocolate, Serving and Storing), making it easy to navigate.
* **Detailed Instructions:** Each step is explained thoroughly, leaving little room for ambiguity. The inclusion of specific times (e.g., “2-3 minutes” for creaming butter and peanut butter) is very helpful.
* **Helpful Tips and Variations:** The “Tips and Variations” section provides valuable suggestions for customizing the recipe and addressing potential dietary concerns.
* **Equipment List:** Including an equipment list ensures that the baker has everything they need before starting.
* **Safety Considerations:** The recipe mentions being careful not to overheat the chocolate when using the microwave method.
* **Storage Instructions:** Clear instructions are provided for both short-term refrigeration and long-term freezing.
* **Yield Information:** Knowing the approximate yield (36 balls) helps with planning.
* **Prep, Chill, and Cook Times:** Providing these times helps the baker manage their time effectively.
**Minor Suggestions for Improvement (Mostly Nitpicks):**
* **Powdered Sugar Measurement:** While the recipe states “3 cups powdered sugar, plus more for dusting,” it might be helpful to give a *range* for the total amount of powdered sugar needed. For example, “3 to 3.5 cups powdered sugar, plus more for dusting.” This acknowledges that the exact amount needed can vary based on humidity and the specific peanut butter used.
* **Chill Time Consistency:** The recipe mentions chilling the dough for “at least 30 minutes, or up to an hour.” While this is fine, it might be more consistent to say “30 minutes to 1 hour” to avoid any confusion.
* **Chocolate Dipping Technique:** Consider adding a sentence about how to best dip the balls to get a smooth, even coating. For example, “Use a fork or dipping tools to carefully dip each ball into the melted chocolate, swirling to ensure complete coverage. Gently tap off any excess chocolate against the side of the bowl.”
* **Freezing Instructions Detail:** For freezing, you could add a note about preventing freezer burn. For example, “Wrap the frozen balls tightly in plastic wrap before placing them in a freezer-safe bag or container to prevent freezer burn.”
* **Nut Allergy Note:** While you mention substituting peanut butter for nut allergies, it’s worth explicitly stating to check all other ingredients for potential allergens as well.
**Overall:**
This is an excellent recipe! The suggestions above are minor and intended to make it even more foolproof. The clarity, detail, and helpful tips make it a recipe that bakers of all skill levels can successfully follow. The inclusion of the Skrewball Whiskey makes it a unique and appealing dessert.