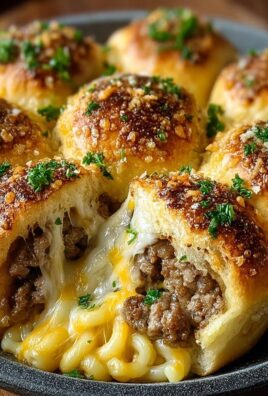
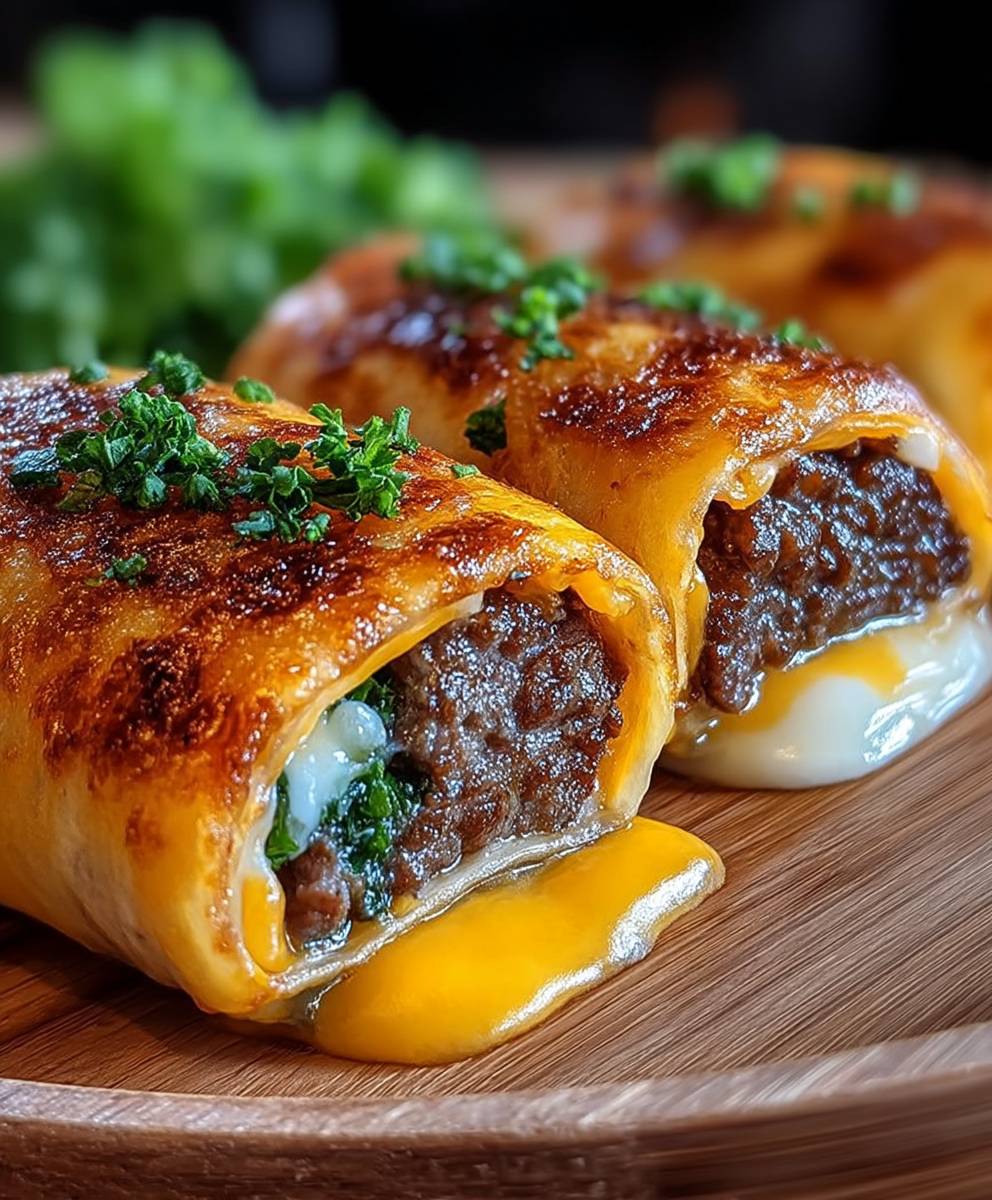
Garlic Butter Cheeseburger Rollups: Prepare to have your taste buds completely captivated! Imagine the savory delight of a juicy cheeseburger, infused with the rich, aromatic essence of garlic butter, all conveniently wrapped in a flaky, golden-brown roll. This isn’t just a recipe; it’s an experience, a handheld explosion of flavor that will have everyone begging for more.
While the exact origins of cheeseburger rollups are shrouded in mystery, their appeal is undeniable. They cleverly combine the classic American cheeseburger with the comforting portability of a pastry. Think of them as a modern twist on the traditional meat pie, perfect for potlucks, game day gatherings, or even a quick and satisfying weeknight meal. The beauty of these Garlic Butter Cheeseburger Rollups lies in their simplicity and adaptability.
People adore this dish for several reasons. First, the taste is simply irresistible. The combination of seasoned ground beef, melted cheese, and that glorious garlic butter creates a symphony of flavors that dance on your palate. Second, the texture is divine – the crispy, buttery exterior gives way to a soft, cheesy, and savory interior. Finally, they are incredibly convenient. They are easy to make, easy to eat, and easy to transport, making them the perfect crowd-pleaser for any occasion. So, let’s get rolling and create these delectable treats together!

Ingredients:
- 1 pound ground beef (80/20 blend recommended for flavor)
- 1 tablespoon olive oil
- 1 medium yellow onion, finely chopped
- 2 cloves garlic, minced
- 1 teaspoon dried Italian seasoning
- 1/2 teaspoon salt
- 1/4 teaspoon black pepper
- 1 (10 ounce) can refrigerated pizza dough
- 4 ounces cream cheese, softened
- 1 cup shredded cheddar cheese
- 1/2 cup shredded mozzarella cheese
- 1/4 cup chopped fresh parsley
- Garlic Butter:
- 4 tablespoons (1/2 cup) unsalted butter, melted
- 2 cloves garlic, minced
- 1/4 teaspoon garlic powder
- 1/4 teaspoon dried parsley
- Pinch of red pepper flakes (optional)
- Sesame seeds for topping (optional)
Preparing the Beef Filling
- Brown the Ground Beef: Heat the olive oil in a large skillet over medium-high heat. Add the ground beef and cook, breaking it up with a spoon, until it’s browned and no longer pink. Drain off any excess grease. This is crucial for preventing soggy rollups!
- Sauté the Aromatics: Add the chopped onion to the skillet with the browned beef. Cook until the onion is softened and translucent, about 5-7 minutes. Then, add the minced garlic and cook for another minute until fragrant. Be careful not to burn the garlic, as it can become bitter.
- Season the Beef Mixture: Stir in the Italian seasoning, salt, and pepper. Mix well to ensure the spices are evenly distributed throughout the beef. Taste and adjust seasonings as needed. You might want to add a pinch more salt or pepper depending on your preference.
- Cool the Filling: Remove the skillet from the heat and let the beef mixture cool slightly. This will prevent the cream cheese from melting when you mix it in.
Preparing the Cream Cheese Mixture
- Soften the Cream Cheese: Make sure your cream cheese is softened to room temperature. This will make it much easier to mix with the other ingredients. If you forget to take it out ahead of time, you can microwave it in 15-second intervals until softened, but be careful not to melt it.
- Combine with Cheese and Parsley: In a medium bowl, combine the softened cream cheese, cheddar cheese, mozzarella cheese, and chopped fresh parsley. Mix well until everything is evenly combined. The parsley adds a nice freshness to the filling.
- Incorporate the Beef: Add the slightly cooled beef mixture to the cream cheese mixture. Stir until everything is thoroughly combined. Make sure there are no large clumps of cream cheese.
Assembling the Rollups
- Prepare the Pizza Dough: Lightly flour a clean work surface. Unroll the refrigerated pizza dough onto the floured surface. If the dough is sticky, sprinkle a little more flour on top.
- Shape the Dough: Use a rolling pin to roll the pizza dough into a large rectangle, about 12×16 inches. Try to keep the thickness even for consistent cooking.
- Spread the Filling: Evenly spread the beef and cheese mixture over the entire surface of the pizza dough, leaving a small border (about 1/2 inch) along one of the long edges. This will help seal the rollups.
- Roll Up the Dough: Starting from the long edge opposite the border, tightly roll up the dough into a log. Be sure to roll it tightly to prevent gaps in the rollups.
- Seal the Seam: Pinch the seam along the edge to seal it closed. This will prevent the filling from spilling out during baking.
- Slice the Rollups: Use a sharp, serrated knife to slice the log into 1-inch thick rollups. You should get about 12-16 rollups.
Preparing the Garlic Butter
- Melt the Butter: In a small bowl, melt the butter. You can do this in the microwave or in a small saucepan over low heat.
- Add Garlic and Seasonings: Add the minced garlic, garlic powder, dried parsley, and red pepper flakes (if using) to the melted butter. Stir well to combine. The garlic powder enhances the garlic flavor, and the red pepper flakes add a touch of heat.
Baking the Rollups
- Preheat the Oven: Preheat your oven to 375°F (190°C).
- Prepare the Baking Sheet: Line a baking sheet with parchment paper. This will prevent the rollups from sticking and make cleanup easier.
- Arrange the Rollups: Place the rollups, cut-side up, on the prepared baking sheet. Leave a little space between each rollup to allow for even baking.
- Brush with Garlic Butter: Generously brush the tops of the rollups with the garlic butter mixture. Make sure to get into all the crevices.
- Sprinkle with Sesame Seeds (Optional): If desired, sprinkle the tops of the rollups with sesame seeds for added flavor and texture.
- Bake: Bake for 20-25 minutes, or until the rollups are golden brown and the cheese is melted and bubbly. Keep an eye on them, as baking times may vary depending on your oven.
- Cool Slightly: Remove the baking sheet from the oven and let the rollups cool for a few minutes before serving. This will prevent you from burning your mouth on the hot cheese.
Serving Suggestions
These Garlic Butter Cheeseburger Rollups are best served warm. They make a great appetizer, snack, or even a light meal. Here are a few serving suggestions:
- Serve with your favorite dipping sauce, such as ranch dressing, ketchup, or mustard.
- Pair them with a side salad for a complete meal.
- Bring them to a potluck or party – they’re always a crowd-pleaser!
Tips and Variations
- Cheese Variations: Feel free to experiment with different types of cheese. Pepper jack cheese would add a spicy kick, while provolone cheese would provide a milder flavor.
- Meat Variations: You can substitute ground turkey or ground chicken for the ground beef.
- Vegetarian Option: For a vegetarian version, replace the ground beef with cooked lentils or crumbled veggie burgers.
- Add Vegetables: Add finely chopped bell peppers, mushrooms, or spinach to the beef mixture for added nutrients and flavor.
- Make Ahead: You can assemble the rollups ahead of time and store them in the refrigerator until ready to bake. Just add a few extra minutes to the baking time.
- Freezing Instructions: To freeze the rollups, bake them as directed, let them cool completely, and then wrap them individually in plastic wrap. Place them in a freezer bag and freeze for up to 2 months. To reheat, bake them in a preheated oven at 350°F (175°C) until heated through.
Enjoy!
I hope you enjoy making and eating these delicious Garlic Butter Cheeseburger Rollups! They’re a fun and easy way to satisfy your cheeseburger cravings.
Conclusion:
So there you have it! These Garlic Butter Cheeseburger Rollups are truly a game-changer for any occasion, from weeknight dinners to weekend gatherings. I genuinely believe this recipe is a must-try because it perfectly balances ease of preparation with incredible flavor. Think about it: all the comforting goodness of a classic cheeseburger, amplified by the richness of garlic butter and conveniently wrapped in a flaky, golden-brown crust. What’s not to love?
The beauty of this recipe also lies in its versatility. While I’ve shared my go-to version, feel free to get creative and adapt it to your own preferences. Craving a little heat? Add a pinch of red pepper flakes to the garlic butter or incorporate some diced jalapeños into the beef mixture. Want to sneak in some extra veggies? Finely chopped mushrooms, onions, or bell peppers would be delicious additions. For a lighter twist, consider using ground turkey or chicken instead of beef. You could even experiment with different cheeses – pepper jack for a spicy kick, or provolone for a milder, meltier option.
Serving these rollups is just as fun as making them! They’re fantastic on their own as a satisfying snack or appetizer. But if you’re looking to create a complete meal, consider pairing them with a crisp green salad, some sweet potato fries, or a bowl of creamy tomato soup. For dipping, classic ketchup and mustard are always a hit, but don’t be afraid to venture out and try ranch dressing, barbecue sauce, or even a tangy sriracha mayo. I personally love them with a side of homemade coleslaw – the cool, creamy crunch provides a wonderful contrast to the warm, savory rollups.
And speaking of serving, these Garlic Butter Cheeseburger Rollups are perfect for parties! They’re easy to eat, require no utensils, and are always a crowd-pleaser. Imagine bringing a platter of these to your next potluck or game night – they’re guaranteed to disappear in minutes! Plus, they can be made ahead of time and reheated, making them a stress-free option for entertaining. Just bake them until golden brown, let them cool slightly, and then store them in an airtight container in the refrigerator. When you’re ready to serve, simply pop them back in the oven for a few minutes until they’re warmed through.
But honestly, the best part about this recipe is the sheer joy of biting into one of these warm, cheesy, garlicky rollups. The combination of flavors and textures is simply irresistible. I’ve made these for my family and friends countless times, and they’re always a huge hit. I’m confident that you’ll love them just as much as we do.
So, what are you waiting for? Gather your ingredients, preheat your oven, and get ready to experience the magic of Garlic Butter Cheeseburger Rollups! I truly believe this will become a staple in your recipe repertoire.
I’m so excited for you to try this recipe and I really want to know how it turns out! Please, please, please, leave a comment below and let me know what you think. Did you make any variations? What did you serve them with? What was the reaction of your family and friends? I’m eager to hear all about your experience. And don’t forget to share your photos on social media using [Your Hashtag] – I can’t wait to see your creations! Happy cooking!
Garlic Butter Cheeseburger Rollups: Easy Recipe & Delicious Twist
Savory Garlic Butter Cheeseburger Rollups filled with seasoned ground beef, creamy cheese, and baked to golden perfection. A fun and easy appetizer or snack!
Ingredients
- 1 pound ground beef (80/20 blend recommended for flavor)
- 1 tablespoon olive oil
- 1 medium yellow onion, finely chopped
- 2 cloves garlic, minced
- 1 teaspoon dried Italian seasoning
- 1/2 teaspoon salt
- 1/4 teaspoon black pepper
- 1 (10 ounce) can refrigerated pizza dough
- 4 ounces cream cheese, softened
- 1 cup shredded cheddar cheese
- 1/2 cup shredded mozzarella cheese
- 1/4 cup chopped fresh parsley
- 4 tablespoons (1/2 cup) unsalted butter, melted
- 2 cloves garlic, minced
- 1/4 teaspoon garlic powder
- 1/4 teaspoon dried parsley
- Pinch of red pepper flakes (optional)
- Sesame seeds for topping (optional)
Instructions
- Heat the olive oil in a large skillet over medium-high heat. Add the ground beef and cook, breaking it up with a spoon, until it’s browned and no longer pink. Drain off any excess grease.
- Add the chopped onion to the skillet with the browned beef. Cook until the onion is softened and translucent, about 5-7 minutes. Then, add the minced garlic and cook for another minute until fragrant.
- Stir in the Italian seasoning, salt, and pepper. Mix well to ensure the spices are evenly distributed throughout the beef. Taste and adjust seasonings as needed.
- Remove the skillet from the heat and let the beef mixture cool slightly.
- Make sure your cream cheese is softened to room temperature.
- In a medium bowl, combine the softened cream cheese, cheddar cheese, mozzarella cheese, and chopped fresh parsley. Mix well until everything is evenly combined.
- Add the slightly cooled beef mixture to the cream cheese mixture. Stir until everything is thoroughly combined.
- Lightly flour a clean work surface. Unroll the refrigerated pizza dough onto the floured surface. If the dough is sticky, sprinkle a little more flour on top.
- Use a rolling pin to roll the pizza dough into a large rectangle, about 12×16 inches.
- Evenly spread the beef and cheese mixture over the entire surface of the pizza dough, leaving a small border (about 1/2 inch) along one of the long edges.
- Starting from the long edge opposite the border, tightly roll up the dough into a log.
- Pinch the seam along the edge to seal it closed.
- Use a sharp, serrated knife to slice the log into 1-inch thick rollups. You should get about 12-16 rollups.
- In a small bowl, melt the butter. You can do this in the microwave or in a small saucepan over low heat.
- Add the minced garlic, garlic powder, dried parsley, and red pepper flakes (if using) to the melted butter. Stir well to combine.
- Preheat your oven to 375°F (190°C).
- Line a baking sheet with parchment paper.
- Place the rollups, cut-side up, on the prepared baking sheet. Leave a little space between each rollup to allow for even baking.
- Generously brush the tops of the rollups with the garlic butter mixture.
- If desired, sprinkle the tops of the rollups with sesame seeds for added flavor and texture.
- Bake for 20-25 minutes, or until the rollups are golden brown and the cheese is melted and bubbly.
- Remove the baking sheet from the oven and let the rollups cool for a few minutes before serving.
Notes
- Cheese Variations: Feel free to experiment with different types of cheese. Pepper jack cheese would add a spicy kick, while provolone cheese would provide a milder flavor.
- Meat Variations: You can substitute ground turkey or ground chicken for the ground beef.
- Vegetarian Option: For a vegetarian version, replace the ground beef with cooked lentils or crumbled veggie burgers.
- Add Vegetables: Add finely chopped bell peppers, mushrooms, or spinach to the beef mixture for added nutrients and flavor.
- Make Ahead: You can assemble the rollups ahead of time and store them in the refrigerator until ready to bake. Just add a few extra minutes to the baking time.
- Freezing Instructions: To freeze the rollups, bake them as directed, let them cool completely, and then wrap them individually in plastic wrap. Place them in a freezer bag and freeze for up to 2 months. To reheat, bake them in a preheated oven at 350°F (175°C) until heated through.
- Serve with your favorite dipping sauce, such as ranch dressing, ketchup, or mustard.
- Pair them with a side salad for a complete meal.