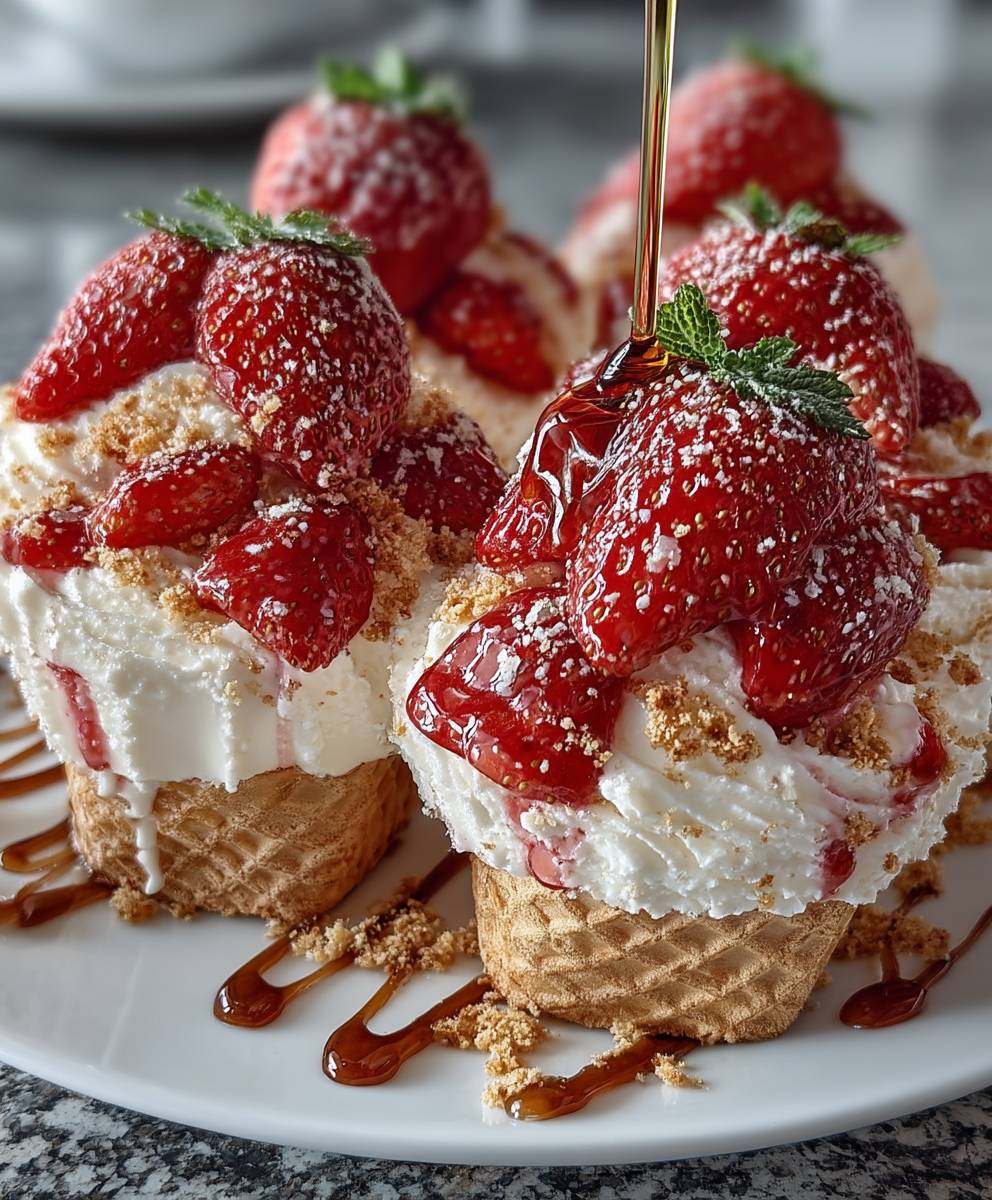
Strawberry Crunch Cheesecake Cones: Prepare to be transported back to your childhood summers with a sophisticated twist! Remember those iconic strawberry shortcake ice cream bars, the ones with the irresistible crunchy coating? Well, we’ve taken that nostalgic flavor and elevated it to a whole new level with these delightful, easy-to-make treats.
While the exact origins of the strawberry crunch topping are shrouded in a bit of dessert mystery, its popularity exploded alongside the rise of ice cream novelties in the mid-20th century. It quickly became a beloved flavor combination, evoking feelings of sunshine, picnics, and pure, unadulterated joy.
What makes these Strawberry Crunch Cheesecake Cones so special? It’s the perfect marriage of creamy, tangy cheesecake filling and that signature sweet and crunchy strawberry coating. The contrast in textures is simply divine, and the individual cone format makes them incredibly convenient for parties, picnics, or just a fun afternoon treat. Plus, who can resist the charm of a perfectly portioned, handheld dessert? Get ready to experience a burst of flavor and a wave of nostalgia with every single bite!

Ingredients:
- For the Cheesecake Filling:
- 24 ounces cream cheese, softened
- 1 cup granulated sugar
- 1 teaspoon vanilla extract
- 1/2 cup sour cream
- 2 large eggs
- For the Strawberry Crunch Coating:
- 1 box (14.3 ounces) Golden Oreo cookies
- 1 package (3 ounces) strawberry gelatin powder
- 1/2 cup freeze-dried strawberries, crushed
- 1/4 cup melted butter
- For the Cones:
- 12 waffle cones
- 4 ounces white chocolate, melted (optional, for sealing the cones)
- For the Strawberry Swirl (Optional):
- 1 cup fresh strawberries, hulled and sliced
- 2 tablespoons granulated sugar
- 1 tablespoon lemon juice
Preparing the Strawberry Swirl (Optional):
If you’d like to add a strawberry swirl to your cheesecake filling, this step is for you! It adds a burst of fresh strawberry flavor that complements the crunch perfectly. I highly recommend it!
- In a small saucepan, combine the sliced strawberries, sugar, and lemon juice.
- Cook over medium heat, stirring occasionally, until the strawberries soften and release their juices, about 5-7 minutes.
- Continue cooking, stirring frequently, until the mixture thickens slightly and resembles a jam-like consistency, about 5-10 more minutes. Be careful not to burn it!
- Remove from heat and let cool completely. You can speed this up by placing it in the refrigerator.
Making the Strawberry Crunch Coating:
This is where the magic happens! The strawberry crunch is what makes these cheesecake cones so irresistible. It’s sweet, crunchy, and bursting with strawberry flavor. Trust me, you’ll want to make extra!
- Place the Golden Oreo cookies in a food processor and pulse until they are finely crushed. If you don’t have a food processor, you can place them in a large zip-top bag and crush them with a rolling pin.
- In a large bowl, combine the crushed Oreo cookies, strawberry gelatin powder, and crushed freeze-dried strawberries. Mix well to ensure the gelatin powder is evenly distributed.
- Pour the melted butter over the mixture and stir until everything is evenly coated. The mixture should resemble wet sand.
- Set aside while you prepare the cheesecake filling.
Preparing the Cheesecake Filling:
Now for the heart of the cheesecake cones – the creamy, dreamy cheesecake filling! Make sure your cream cheese is softened to room temperature for the smoothest possible texture. Nobody wants lumpy cheesecake!
- In a large mixing bowl, beat the softened cream cheese with an electric mixer until smooth and creamy. This usually takes about 2-3 minutes.
- Gradually add the granulated sugar and continue beating until the mixture is light and fluffy. Scrape down the sides of the bowl as needed to ensure everything is well combined.
- Add the vanilla extract and sour cream and mix until just combined. Be careful not to overmix at this stage.
- Add the eggs one at a time, mixing well after each addition. Again, avoid overmixing. Overmixing can incorporate too much air into the batter, which can cause the cheesecake to crack during baking (not that we’re baking these, but still good practice!).
- If you made the strawberry swirl, gently fold it into the cheesecake filling. Be careful not to overmix, as you want to maintain the distinct swirl pattern.
Sealing the Cones (Optional):
This step is optional, but I highly recommend it! Sealing the cones with melted white chocolate helps prevent them from becoming soggy and keeps the cheesecake filling from leaking out. Plus, it adds a touch of extra sweetness!
- Melt the white chocolate in a microwave-safe bowl in 30-second intervals, stirring in between, until smooth. Be careful not to overheat the chocolate, as it can burn easily.
- Dip the inside of each waffle cone in the melted white chocolate, coating it evenly. You can use a small spoon or pastry brush to help spread the chocolate.
- Place the cones upside down on a wire rack lined with parchment paper to allow the chocolate to set completely. This usually takes about 15-20 minutes.
Assembling the Strawberry Crunch Cheesecake Cones:
The final step – putting everything together! This is the fun part where you get to create your own delicious masterpieces. Get ready for some serious strawberry crunch goodness!
- Fill a piping bag or a large zip-top bag with the cheesecake filling. If using a zip-top bag, cut off one of the bottom corners to create a piping tip.
- Pipe the cheesecake filling into each waffle cone, filling it to the top. You can swirl the filling for a more decorative look.
- Immediately dip the top of each filled cone into the strawberry crunch coating, pressing gently to ensure the coating adheres to the cheesecake filling.
- Place the assembled cones on a tray lined with parchment paper.
- Refrigerate the cones for at least 30 minutes to allow the cheesecake filling to firm up and the strawberry crunch coating to set. This will also help prevent the cones from becoming soggy.
Tips and Variations:
Want to customize your Strawberry Crunch Cheesecake Cones? Here are a few ideas to get you started:
- Different Flavors: Experiment with different flavors of gelatin powder, such as raspberry, cherry, or lime. You can also use different types of cookies for the crunch coating, such as chocolate Oreos or vanilla wafers.
- Chocolate Drizzle: Drizzle melted chocolate over the finished cones for an extra touch of decadence.
- Fresh Fruit: Top the cones with fresh strawberries, blueberries, or raspberries for a burst of fresh fruit flavor.
- Mini Cones: Use mini waffle cones for bite-sized treats.
- No-Bake Cheesecake Bars: Press the strawberry crunch mixture into the bottom of a baking dish, pour the cheesecake filling over the top, and refrigerate until firm. Cut into bars for a no-bake cheesecake bar version.
- Add Sprinkles: After dipping the cones in the strawberry crunch, sprinkle them with colorful sprinkles for a festive touch.
- Use Graham Crackers: Substitute the Golden Oreos with graham crackers for a different flavor profile in the crunch coating.
- Make it Vegan: Use vegan cream cheese, vegan butter, and vegan cookies to make a vegan version of this recipe.
Storage Instructions:
These Strawberry Crunch Cheesecake Cones are best enjoyed fresh, but they can be stored in the refrigerator for up to 2 days. To prevent the cones from becoming soggy, store them in an airtight container lined with parchment paper. You can also wrap each cone individually in plastic wrap.
I hope you enjoy making and eating these delicious Strawberry Crunch Cheesecake Cones! They’re the perfect treat for parties, picnics, or any time you’re craving something sweet and crunchy. Happy baking!
Conclusion:
And there you have it! These Strawberry Crunch Cheesecake Cones are truly a must-try dessert that will impress everyone, from seasoned bakers to those just starting out. The delightful combination of creamy cheesecake filling, the satisfying crunch of the strawberry topping, and the fun, portable cone format makes them utterly irresistible. Seriously, what’s not to love?
I know, I know, you might be thinking, “Cheesecake in a cone? Is that even possible?” Trust me, it is, and it’s even better than you imagine. The slight tang of the cream cheese perfectly complements the sweetness of the strawberries, and the cone adds a playful element that makes these treats perfect for parties, picnics, or just a special afternoon snack. Plus, they’re surprisingly easy to make! The recipe is straightforward, and even if you’re not a confident baker, I’m sure you’ll be able to whip up a batch of these beauties in no time.
But the best part? The variations are endless! Feel free to get creative and experiment with different flavors and toppings. Imagine these with a chocolate cheesecake filling and crushed Oreo cookies on top! Or perhaps a lemon cheesecake with a graham cracker crumble. You could even try using different types of cones, like waffle cones or chocolate-dipped cones, for an extra touch of indulgence. For a healthier twist, consider using a lighter cream cheese and adding fresh blueberries or raspberries instead of the strawberry crunch. The possibilities are truly limitless!
Speaking of serving suggestions, these Strawberry Crunch Cheesecake Cones are fantastic on their own, but they also pair well with a scoop of vanilla ice cream or a dollop of whipped cream. For a more sophisticated presentation, you could arrange them on a platter with fresh strawberries and a drizzle of chocolate sauce. They’re also a great addition to any dessert table, adding a touch of whimsy and elegance. And if you’re feeling extra fancy, you could even garnish them with edible flowers or a sprinkle of gold dust.
I’m so excited for you to try this recipe and experience the joy of these delightful treats for yourself. I truly believe that these Strawberry Crunch Cheesecake Cones will become a new favorite in your household. They’re the perfect balance of sweet, creamy, and crunchy, and they’re guaranteed to put a smile on everyone’s face.
So, what are you waiting for? Gather your ingredients, preheat your oven, and get ready to embark on a delicious adventure. I promise you won’t regret it! And when you do make them, please, please, please share your experience with me! I’d love to see your creations and hear about any variations you try. You can tag me on social media using [Your Social Media Handle] or leave a comment below. I can’t wait to see what you come up with! Happy baking, and enjoy your Strawberry Crunch Cheesecake Cones! I hope this recipe brings as much joy to you as it has to me.
Strawberry Crunch Cheesecake Cones: The Ultimate Dessert Recipe
Creamy cheesecake filling piped into waffle cones, then dipped in a sweet and crunchy strawberry Oreo coating. A fun and delicious no-bake dessert!
Ingredients
Instructions
Recipe Notes
- Make sure your cream cheese is softened to room temperature for the smoothest cheesecake filling.
- Be careful not to overmix the cheesecake filling after adding the eggs.
- Sealing the cones with white chocolate is optional but recommended to prevent sogginess.
- Store in an airtight container in the refrigerator for up to 2 days.
- Customize with different flavors of gelatin, cookies, or toppings!