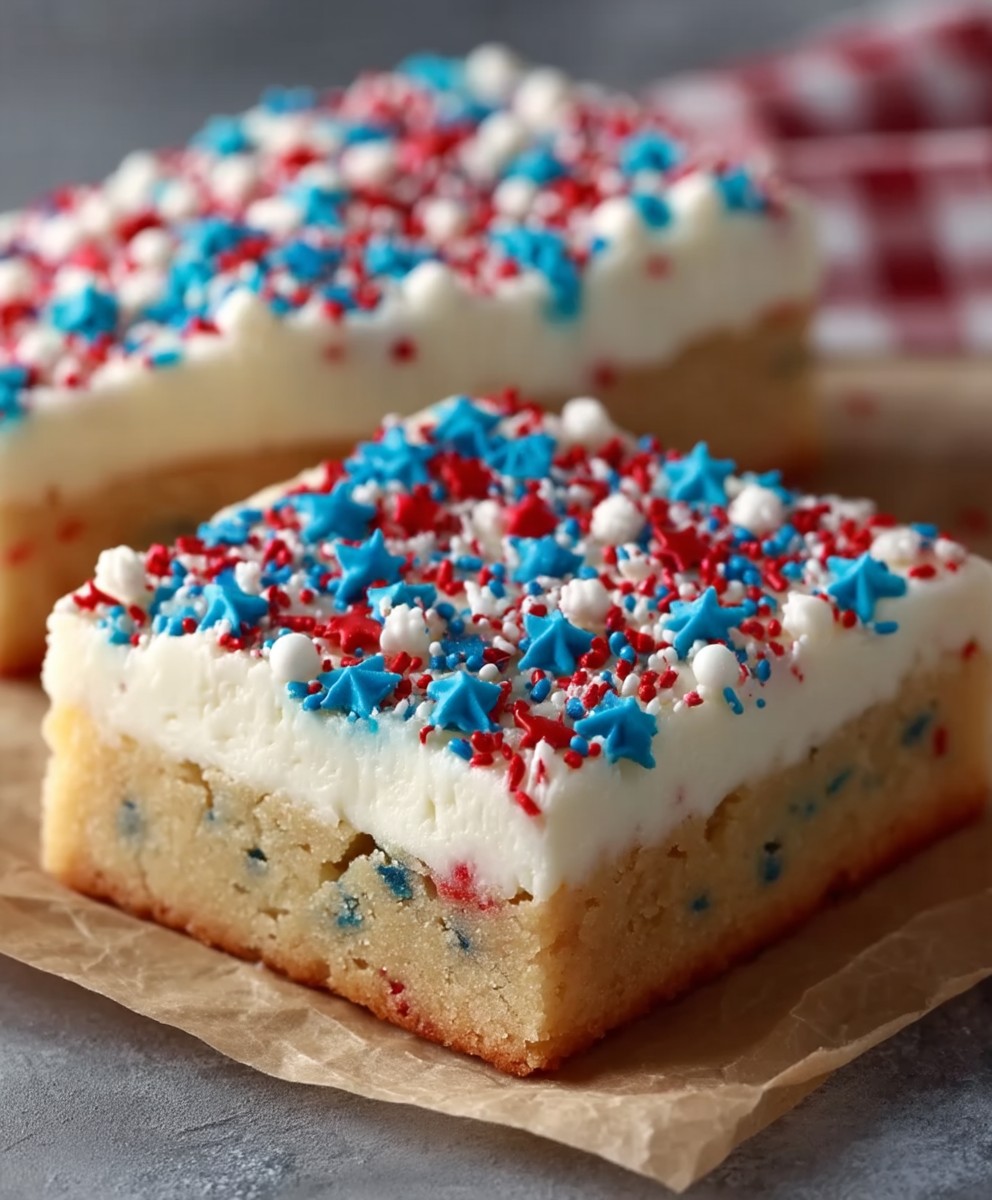
Patriotic Sugar Cookie Bars are the perfect dessert to celebrate any American holiday, from Memorial Day to the Fourth of July! Imagine sinking your teeth into a soft, chewy sugar cookie base, topped with a creamy, sweet frosting and adorned with vibrant red, white, and blue sprinkles. These bars aren’t just delicious; they’re a festive explosion of flavor and color that will instantly brighten up any gathering.
Sugar cookies themselves have a rich history, tracing back to 7th-century Persia, where sugar became widely available. They gradually made their way to Europe and eventually to America, evolving into the beloved treat we know today. Transforming them into bars makes them even easier to share and enjoy!
What makes these Patriotic Sugar Cookie Bars so irresistible? It’s the delightful combination of textures – the soft, slightly chewy cookie base contrasting with the smooth, melt-in-your-mouth frosting. The sweetness is perfectly balanced, and the festive decorations add a touch of whimsy and fun. Plus, they are incredibly convenient to make and transport, making them ideal for potlucks, picnics, and parties. Get ready to wow your friends and family with this easy and delicious dessert!

Ingredients:
- For the Cookie Base:
- 1 cup (2 sticks) unsalted butter, softened
- 1 ½ cups granulated sugar
- 2 large eggs
- 1 teaspoon vanilla extract
- 3 cups all-purpose flour
- 1 teaspoon baking powder
- ½ teaspoon salt
- For the Frosting:
- ½ cup (1 stick) unsalted butter, softened
- 3 cups powdered sugar
- 3-4 tablespoons milk
- 1 teaspoon vanilla extract
- For the Patriotic Decorations:
- Red, white, and blue sprinkles
- Red, white, and blue sanding sugar
- Red, white, and blue candy stars
- Optional: Red and blue gel food coloring (for tinting frosting)
Preparing the Cookie Base:
- Cream the Butter and Sugar: In a large bowl, or the bowl of your stand mixer, cream together the softened butter and granulated sugar until light and fluffy. This usually takes about 3-5 minutes. Make sure to scrape down the sides of the bowl occasionally to ensure everything is evenly mixed. This step is crucial for a tender cookie base, so don’t rush it!
- Add the Eggs and Vanilla: Beat in the eggs one at a time, mixing well after each addition. Then, stir in the vanilla extract. The mixture should be smooth and well combined.
- Combine Dry Ingredients: In a separate medium bowl, whisk together the all-purpose flour, baking powder, and salt. Whisking ensures the baking powder and salt are evenly distributed throughout the flour, which is important for the texture and rise of the cookies.
- Gradually Add Dry Ingredients to Wet Ingredients: Gradually add the dry ingredients to the wet ingredients, mixing on low speed until just combined. Be careful not to overmix the dough, as this can result in tough cookies. Mix until the flour is just incorporated, and then stop. A few streaks of flour are okay at this point.
- Press Dough into Pan: Preheat your oven to 350°F (175°C). Grease and flour a 9×13 inch baking pan. Alternatively, you can line the pan with parchment paper, leaving an overhang on the sides for easy removal. This is my preferred method! Press the cookie dough evenly into the prepared pan. You might find it easiest to use your hands or the back of a spoon to spread the dough. Make sure the layer is uniform in thickness for even baking.
Baking the Cookie Base:
- Bake the Cookie Base: Bake in the preheated oven for 18-22 minutes, or until the edges are lightly golden brown and a toothpick inserted into the center comes out clean or with a few moist crumbs. The baking time can vary depending on your oven, so keep a close eye on it.
- Cool Completely: Remove the pan from the oven and let the cookie base cool completely in the pan before frosting. This is important because if you frost it while it’s still warm, the frosting will melt and become runny. Patience is key!
Preparing the Frosting:
- Cream the Butter: In a large bowl, or the bowl of your stand mixer, cream the softened butter until smooth and creamy. This usually takes about 2-3 minutes.
- Gradually Add Powdered Sugar: Gradually add the powdered sugar to the butter, mixing on low speed until combined. Add about a cup at a time to prevent a powdered sugar cloud.
- Add Milk and Vanilla: Add the milk and vanilla extract, and beat until the frosting is smooth and creamy. Add more milk, one tablespoon at a time, if needed to reach your desired consistency. The frosting should be spreadable but not too thin.
- Optional: Tint the Frosting: If you want to tint the frosting, divide it into separate bowls and add a few drops of red or blue gel food coloring to each bowl. Mix well until the color is evenly distributed. Remember, a little food coloring goes a long way!
Frosting and Decorating:
- Frost the Cookie Base: Once the cookie base is completely cool, spread the frosting evenly over the top. If you’ve tinted the frosting, you can create a marbled effect by dolloping different colors of frosting onto the cookie base and then swirling them together with a knife or toothpick.
- Add Patriotic Decorations: Immediately sprinkle the red, white, and blue sprinkles, sanding sugar, and candy stars over the frosting. The frosting needs to be soft for the decorations to adhere properly. Get creative with your designs! You can create stripes, stars, or any other patriotic pattern you like.
- Chill (Optional): For easier cutting, you can chill the frosted cookie bars in the refrigerator for about 30 minutes before cutting. This will help the frosting set and prevent it from smearing when you cut the bars.
- Cut into Bars: Cut the cookie bars into squares or rectangles using a sharp knife. Wipe the knife clean between cuts for neat edges.
- Serve and Enjoy!: Serve the patriotic sugar cookie bars and enjoy! These are perfect for Fourth of July celebrations, Memorial Day picnics, or any other patriotic occasion.
Tips and Variations:
- Make Ahead: The cookie base can be made ahead of time and stored in an airtight container at room temperature for up to 2 days. You can also freeze the baked cookie base for up to 2 months. Thaw completely before frosting.
- Frosting Variations: For a different flavor, try adding a teaspoon of almond extract or lemon extract to the frosting. You can also add a few drops of peppermint extract for a festive holiday flavor.
- Decoration Ideas: Get creative with your decorations! You can use different types of sprinkles, candies, or even edible glitter to create a unique and festive look. You can also use a piping bag to pipe designs onto the frosting.
- Gluten-Free Option: To make these cookie bars gluten-free, substitute the all-purpose flour with a gluten-free all-purpose flour blend. Make sure to use a blend that contains xanthan gum for best results.
- Vegan Option: To make these cookie bars vegan, substitute the butter with vegan butter, the eggs with flax eggs (1 tablespoon of ground flaxseed mixed with 3 tablespoons of water per egg), and the milk with plant-based milk.
- Storage: Store the cookie bars in an airtight container at room temperature for up to 3 days or in the refrigerator for up to 5 days.
- Freezing: You can freeze the frosted cookie bars for up to 2 months. Wrap them individually in plastic wrap and then place them in a freezer-safe container. Thaw completely before serving.
Troubleshooting:
- Cookie Base Too Dry: If the cookie base is too dry, try adding a tablespoon or two of milk to the dough. Be careful not to add too much, as this can make the dough too sticky.
- Cookie Base Too Sticky: If the cookie base is too sticky, try adding a tablespoon or two of flour to the dough. Be careful not to add too much, as this can make the cookies tough.
- Frosting Too Thick: If the frosting is too thick, add a tablespoon or two of milk until it reaches your desired consistency.
- Frosting Too Thin: If the frosting is too thin, add a tablespoon or two of powdered sugar until it reaches your desired consistency.
Enjoy your delicious and festive Patriotic Sugar Cookie Bars! They’re sure to be a hit at your next celebration.
Conclusion:
This recipe for Patriotic Sugar Cookie Bars is truly a must-try, and I’m confident it will become a staple in your summer celebrations! The combination of the soft, chewy sugar cookie base with the creamy, sweet frosting and festive red, white, and blue sprinkles is simply irresistible. It’s a guaranteed crowd-pleaser, easy to make, and visually stunning – what more could you ask for? These bars are perfect for everything from backyard barbecues and potlucks to Fourth of July parties and Memorial Day gatherings. They’re also a fantastic way to get the kids involved in the kitchen; decorating the bars is a fun and creative activity that everyone will enjoy.
But the best part? The recipe is incredibly versatile! While I’ve presented it with a classic vanilla frosting and patriotic sprinkles, the possibilities are endless. For a richer flavor, try using a cream cheese frosting. You could also add a hint of lemon or almond extract to the frosting for a unique twist. If you’re feeling adventurous, consider swirling in some red and blue food coloring to create a marbled effect.
Serving Suggestions and Variations:
* Serve these bars chilled or at room temperature. They’re delicious either way!
* Cut them into squares, rectangles, or even fun shapes using cookie cutters.
* Add a scoop of vanilla ice cream on top for an extra decadent treat.
* Drizzle with melted white chocolate or a homemade berry sauce.
* For a different flavor profile, try using a chocolate sugar cookie base instead of vanilla.
* Consider using different types of sprinkles or candies to match the occasion. Think green and red for Christmas, pastel colors for Easter, or orange and black for Halloween.
* If you’re short on time, you can use store-bought sugar cookie dough and frosting. Just be sure to add your own personal touch with the sprinkles and decorations.
* For a gluten-free option, substitute the all-purpose flour with a gluten-free blend.
I truly believe that this patriotic sugar cookie bars recipe is a winner. It’s simple enough for beginner bakers, yet impressive enough to wow your guests. The taste is divine, the presentation is beautiful, and the memories you’ll create while baking and sharing these bars are priceless.
So, what are you waiting for? Gather your ingredients, preheat your oven, and get ready to bake up a batch of these delightful treats. I promise you won’t be disappointed!
And most importantly, I’d love to hear about your experience! Once you’ve tried the recipe, please come back and leave a comment below. Let me know what you thought, what variations you tried, and any tips or tricks you discovered along the way. Sharing your feedback helps me improve the recipe and inspires other bakers to give it a try. Happy baking, and I hope you enjoy these Patriotic Sugar Cookie Bars as much as I do! I can’t wait to hear all about your baking adventures!
Patriotic Sugar Cookie Bars: A Festive & Delicious Recipe
Festive Patriotic Sugar Cookie Bars! Soft, buttery cookie base topped with creamy frosting and red, white, and blue decorations. Perfect for patriotic celebrations!
Ingredients
Instructions
Recipe Notes
- Make Ahead: The cookie base can be made ahead of time and stored in an airtight container at room temperature for up to 2 days. You can also freeze the baked cookie base for up to 2 months. Thaw completely before frosting.
- Frosting Variations: For a different flavor, try adding a teaspoon of almond extract or lemon extract to the frosting. You can also add a few drops of peppermint extract for a festive holiday flavor.
- Decoration Ideas: Get creative with your decorations! You can use different types of sprinkles, candies, or even edible glitter to create a unique and festive look. You can also use a piping bag to pipe designs onto the frosting.
- Gluten-Free Option: To make these cookie bars gluten-free, substitute the all-purpose flour with a gluten-free all-purpose flour blend. Make sure to use a blend that contains xanthan gum for best results.
- Vegan Option: To make these cookie bars vegan, substitute the butter with vegan butter, the eggs with flax eggs (1 tablespoon of ground flaxseed mixed with 3 tablespoons of water per egg), and the milk with plant-based milk.
- Storage: Store the cookie bars in an airtight container at room temperature for up to 3 days or in the refrigerator for up to 5 days.
- Freezing: You can freeze the frosted cookie bars for up to 2 months. Wrap them individually in plastic wrap and then place them in a freezer-safe container. Thaw completely before serving.
- Cookie Base Too Dry: If the cookie base is too dry, try adding a tablespoon or two of milk to the dough. Be careful not to add too much, as this can make the dough too sticky.
- Cookie Base Too Sticky: If the cookie base is too sticky, try adding a tablespoon or two of flour to the dough. Be careful not to add too much, as this can make the cookies tough.
- Frosting Too Thick: If the frosting is too thick, add a tablespoon or two of milk until it reaches your desired consistency.
- Frosting Too Thin: If the frosting is too thin, add a tablespoon or two of powdered sugar until it reaches your desired consistency.