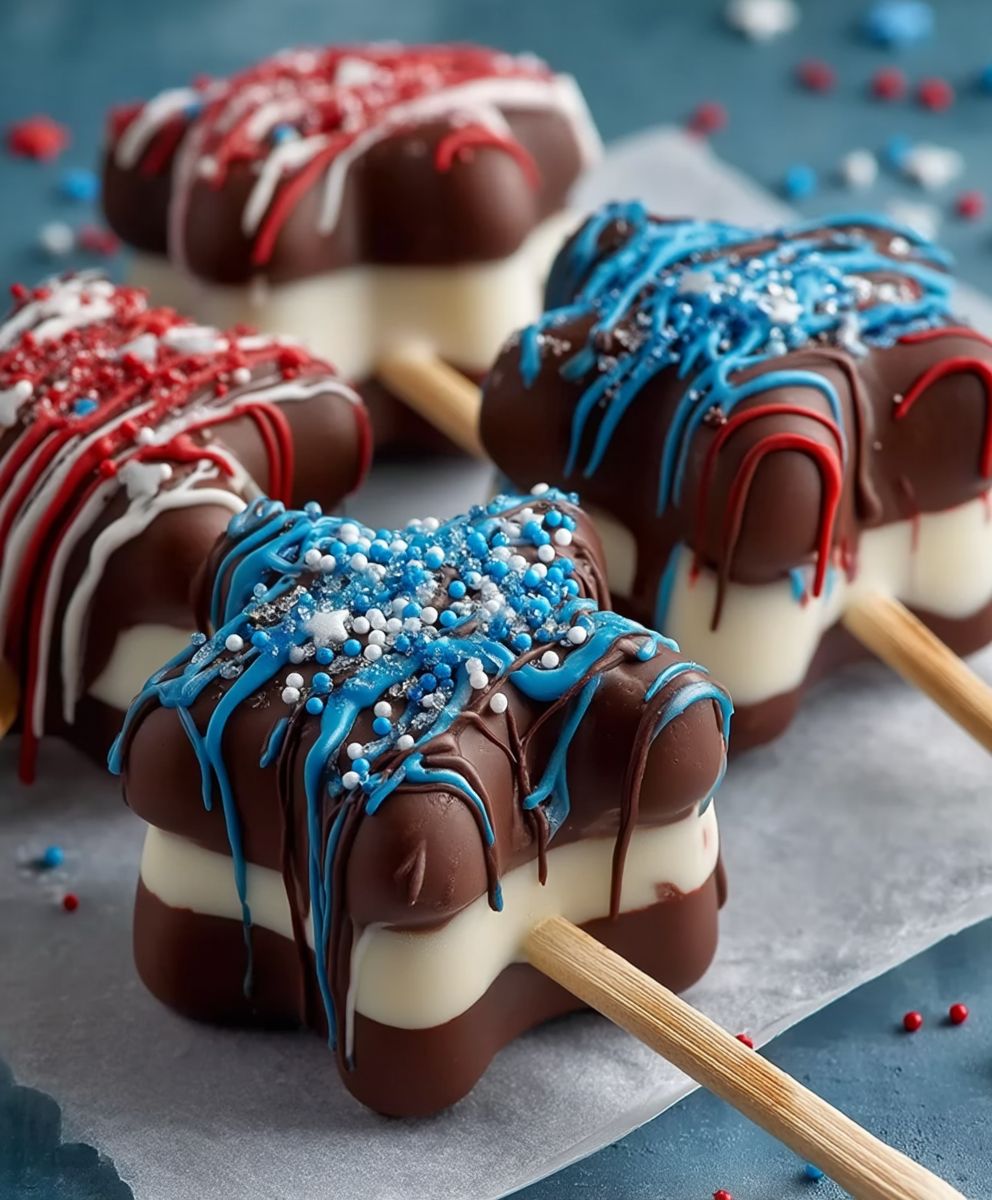
Fourth July cheesecake pops are the perfect patriotic treat to celebrate Independence Day! Imagine biting into a creamy, dreamy cheesecake filling, perfectly portioned and dipped in vibrant red, white, and blue – it’s a firework display for your taste buds! These aren’t just desserts; they’re miniature celebrations on a stick, guaranteed to be a hit at any Fourth of July gathering.
While cheesecake itself has a history stretching back to ancient Greece, the modern version we know and love gained popularity in America in the late 19th century. Transforming it into a fun, portable pop is a relatively recent innovation, making it ideal for outdoor barbecues and picnics. What better way to honor American ingenuity than with a delicious, easy-to-eat treat?
People adore cheesecake for its rich, decadent flavor and smooth, velvety texture. It’s a classic dessert that satisfies cravings like no other. But let’s be honest, sometimes a whole slice can be a bit much. That’s where Fourth July cheesecake pops come in! They offer the perfect bite-sized indulgence, allowing you to enjoy all the goodness of cheesecake without the guilt. Plus, the festive decorations make them visually appealing and incredibly fun to eat. Get ready to impress your friends and family with these adorable and delicious patriotic pops!

Ingredients:
- For the Cheesecake Filling:
- 8 ounces cream cheese, softened to room temperature
- 1/2 cup granulated sugar
- 1/4 cup sour cream
- 1 teaspoon vanilla extract
- 1/4 teaspoon lemon zest (optional, but adds a nice zing!)
- For the Cake Pops:
- 1 box (10.25-12 ounces) vanilla cake mix (plus ingredients called for on the box, usually eggs, oil, and water)
- For the Coating:
- 12 ounces white chocolate melting wafers (or almond bark)
- 1 tablespoon vegetable shortening (helps with smooth melting)
- Red, white, and blue sprinkles (for that Fourth of July flair!)
- Equipment:
- Cake pop sticks
- Parchment paper or wax paper
- Double boiler or microwave-safe bowl
- Mixing bowls
- Electric mixer (handheld or stand mixer)
- Baking pan (as specified on cake mix box)
Baking the Cake:
- Prepare the Cake Batter: Follow the instructions on the vanilla cake mix box to prepare the cake batter. Usually, this involves combining the cake mix with eggs, oil, and water. Mix until just combined, being careful not to overmix. Overmixing can lead to a tough cake.
- Bake the Cake: Pour the cake batter into a baking pan that has been greased and floured (or lined with parchment paper). Bake according to the instructions on the cake mix box. The baking time will vary depending on the size of the pan, so keep a close eye on it. A toothpick inserted into the center should come out clean when the cake is done.
- Cool the Cake: Once the cake is baked, remove it from the oven and let it cool in the pan for about 10-15 minutes. Then, invert the cake onto a wire rack to cool completely. This is important because you don’t want to work with a warm cake – it will be too crumbly.
Making the Cheesecake Filling:
- Cream the Cream Cheese: In a large mixing bowl, beat the softened cream cheese with an electric mixer until it is smooth and creamy. This usually takes about 2-3 minutes. Make sure there are no lumps!
- Add Sugar and Sour Cream: Gradually add the granulated sugar to the cream cheese, beating until well combined. Then, add the sour cream and beat until the mixture is smooth and creamy. The sour cream adds a nice tang and helps to keep the filling moist.
- Add Vanilla and Lemon Zest: Stir in the vanilla extract and lemon zest (if using). Mix until everything is evenly distributed. Taste the filling and adjust the sweetness or tanginess to your liking.
- Chill the Filling: Cover the bowl with plastic wrap and refrigerate the cheesecake filling for at least 30 minutes. This will help it firm up and make it easier to work with. You can even chill it for a few hours or overnight if you prefer.
Assembling the Cheesecake Pops:
- Crumble the Cake: Once the cake is completely cool, crumble it into a large bowl. You can use your hands or a fork to do this. Make sure there are no large chunks of cake remaining. You want a fine, even crumb.
- Combine Cake and Cheesecake Filling: Add the chilled cheesecake filling to the crumbled cake. Use your hands or a spoon to mix the cake and filling together until they are well combined. The mixture should be moist enough to hold its shape when you roll it into balls, but not too wet. If the mixture seems too dry, you can add a little more sour cream, a tablespoon at a time, until it reaches the desired consistency.
- Roll into Balls: Roll the cake and cheesecake mixture into small, even balls, about 1-inch in diameter. Place the balls on a baking sheet lined with parchment paper or wax paper.
- Chill the Cake Pops: Place the baking sheet with the cake pops in the freezer for at least 30 minutes. This will help them firm up and prevent them from falling apart when you dip them in the melted chocolate. You can even freeze them for longer if you want to make them ahead of time.
Dipping and Decorating:
- Melt the White Chocolate: In a double boiler or microwave-safe bowl, melt the white chocolate melting wafers with the vegetable shortening. If using a double boiler, heat water in the bottom pot until it simmers. Place the bowl with the chocolate and shortening on top of the simmering water, making sure the bottom of the bowl doesn’t touch the water. Stir occasionally until the chocolate is completely melted and smooth. If using a microwave, heat the chocolate and shortening in 30-second intervals, stirring in between, until melted and smooth. Be careful not to overheat the chocolate, as it can burn.
- Dip the Cake Pops: Remove the cake pops from the freezer. Dip the tip of a cake pop stick into the melted white chocolate and then insert it into the center of a cake pop ball. This will help the cake pop stay securely on the stick. Dip each cake pop into the melted white chocolate, making sure it is completely coated. Gently tap off any excess chocolate.
- Decorate with Sprinkles: Immediately after dipping, sprinkle the cake pops with red, white, and blue sprinkles. The chocolate will set quickly, so you need to add the sprinkles right away. Get creative with your decorations! You can use different types of sprinkles, or even add edible glitter.
- Let the Chocolate Set: Place the decorated cake pops on a baking sheet lined with parchment paper or wax paper. Let the chocolate set completely, which usually takes about 15-20 minutes. You can speed up the process by placing the baking sheet in the refrigerator.
Tips and Tricks:
- Softened Cream Cheese is Key: Make sure your cream cheese is completely softened to room temperature before you start making the cheesecake filling. This will ensure that it is smooth and creamy and that there are no lumps.
- Don’t Overmix the Cake Batter: Overmixing the cake batter can lead to a tough cake. Mix until just combined, being careful not to overmix.
- Chill the Cake Pops: Chilling the cake pops in the freezer before dipping them in the melted chocolate is essential. This will help them firm up and prevent them from falling apart.
- Melt the Chocolate Slowly: Melt the white chocolate slowly and carefully to prevent it from burning. Use a double boiler or microwave in 30-second intervals, stirring in between.
- Work Quickly: The chocolate will set quickly, so you need to add the sprinkles right away. Have your sprinkles ready to go before you start dipping the cake pops.
- Use High-Quality Chocolate: Using high-quality white chocolate melting wafers will result in a smoother, more flavorful coating.
- Add Flavor Extracts: Experiment with different flavor extracts in the cheesecake filling. Almond extract, peppermint extract, or even a little bit of coffee extract can add a unique twist.
- Drizzle with Colored Chocolate: For an extra touch of flair, drizzle the finished cake pops with melted red or blue candy melts.
- Store Properly: Store the finished cake pops in an airtight container in the refrigerator for up to 3 days.
Troubleshooting:
- Cake Pops Falling Off the Sticks: If your cake pops are falling off the sticks, make sure you are dipping the tip of the stick into the melted chocolate before inserting it into the cake pop. This will help the stick adhere to the cake pop. Also, make sure the cake pops are well-chilled before dipping.
- Chocolate Not Melting Smoothly: If your chocolate is not melting smoothly, try adding a little more vegetable shortening. You can also try adding a tablespoon of milk or cream. Be careful not to overheat the chocolate.
- Sprinkles Not Sticking: If your sprinkles are not sticking to the chocolate, make sure you are adding them immediately after dipping the cake pops. The chocolate will set quickly, so you need to add the sprinkles right away.
- Cake Pops Too Crumbly: If your cake pops are too crumbly, add a little more sour cream to the cake and cheesecake mixture. A tablespoon at a time should do the trick.
Variations:
- Chocolate Cake Pops: Use chocolate cake mix instead of vanilla cake mix.
- Red Velvet Cake Pops: Use red velvet cake mix instead of vanilla cake

Conclusion:
And there you have it! These Fourth of July cheesecake pops are more than just a dessert; they’re a miniature celebration on a stick! I truly believe this recipe is a must-try for anyone looking to add a touch of festive fun and deliciousness to their Independence Day celebrations, or really, any summer gathering. The creamy, tangy cheesecake filling combined with the sweet crunch of the coating is a flavor explosion that will leave everyone wanting more. Plus, they’re incredibly easy to make, even if you’re not a seasoned baker. The simplicity of the recipe makes it perfect for getting the kids involved in the kitchen, turning it into a fun family activity.
But the best part? The customization! While I’ve outlined a classic red, white, and blue theme perfect for the Fourth, don’t be afraid to get creative. Think about using different colored sprinkles to match other holidays or events. For a birthday party, you could use sprinkles that match the party’s theme. Or, for a more sophisticated touch, try dipping the pops in melted dark chocolate and drizzling them with white chocolate. You could even add a sprinkle of sea salt for a sweet and salty treat.
Serving suggestions are endless! These cheesecake pops are fantastic on their own, but they also pair well with other summer favorites. Imagine serving them alongside a scoop of vanilla ice cream or a refreshing fruit salad. They’re also a great addition to a dessert platter, adding a pop of color and a burst of flavor. For a truly indulgent experience, try dipping them in a chocolate fondue.
Beyond the sprinkles, consider experimenting with the cheesecake filling itself. A swirl of strawberry jam or a hint of lemon zest can add a unique twist. You could even incorporate crushed Oreos or graham crackers for added texture and flavor. The possibilities are truly endless, so don’t be afraid to let your imagination run wild!
I’m confident that once you try this recipe, it will become a staple in your summer dessert rotation. It’s the perfect combination of easy, delicious, and festive. And let’s be honest, who can resist a bite-sized cheesecake on a stick?
So, what are you waiting for? Gather your ingredients, put on some festive music, and get ready to create these delightful Fourth of July cheesecake pops. I promise you won’t be disappointed.
Now, for the most important part: I want to hear from you! Once you’ve tried the recipe, please share your experience in the comments below. Did you make any variations? What did your family and friends think? I’m always eager to hear your feedback and see your creative twists on my recipes. Don’t forget to tag me in your photos on social media using #CheesecakePopCreations – I can’t wait to see your masterpieces! Happy baking, and happy Fourth of July! Let’s make some unforgettable memories, one cheesecake pop at a time. I hope you enjoy this Fourth July cheesecake pops recipe as much as I do!
Fourth July Cheesecake Pops: A Festive & Delicious Recipe
Festive Fourth of July cake pops featuring a creamy cheesecake filling, dipped in white chocolate, and decorated with patriotic red, white, and blue sprinkles.
By: TessaCategory: DessertDifficulty: EasyCuisine: AmericanYield: 24 cake popsDietary: VegetarianIngredients
Instructions
Recipe Notes
- Softened cream cheese is key for a smooth filling.
- Don’t overmix the cake batter.
- Chilling the cake pops before dipping is essential.
- Melt the chocolate slowly and carefully.
- Work quickly when decorating with sprinkles.
- Use high-quality chocolate for the best results.
- Experiment with different flavor extracts in the cheesecake filling.
- Drizzle with colored chocolate for an extra touch of flair.
- Store the finished cake pops in an airtight container in the refrigerator for up to 3 days.
Frequently Asked Questions
→ How do I ensure the bread stays moist?Use fresh, ripe ingredients and avoid overmixing the batter. Store in an airtight container.→ Can I substitute ingredients?Yes, you can substitute similar ingredients while maintaining the basic ratios for best results.→ How long does this bread keep?Store tightly wrapped at room temperature for 2-3 days, or refrigerate for up to a week.→ What if I don't have all the spices?You can adjust spices to taste or substitute with similar warming spices.→ Can I freeze this bread?Yes, wrap individual slices and freeze for up to 3 months. Thaw at room temperature before serving.