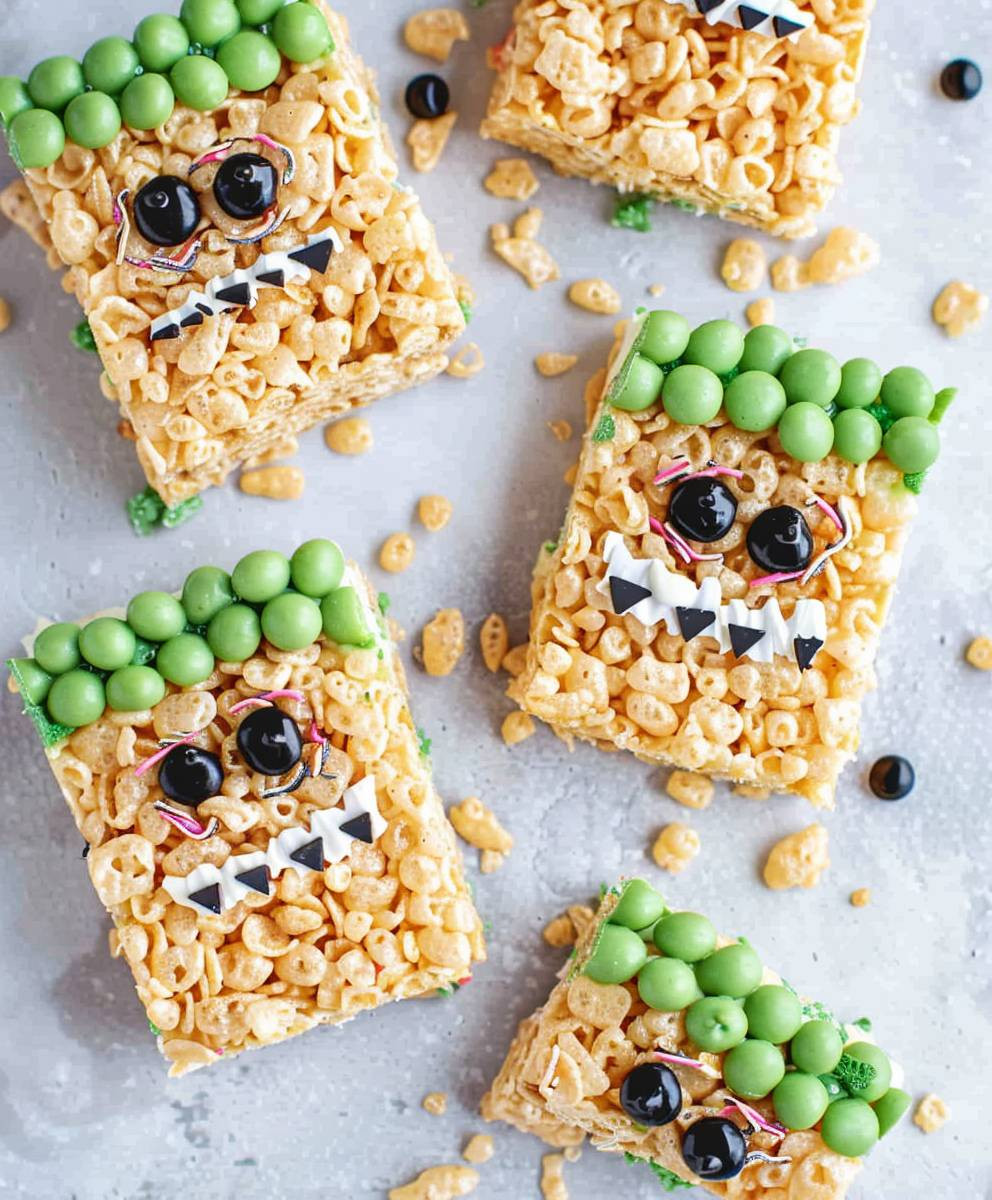
Monster Rice Krispies Treats
Monster Rice Krispies Treats: Have you ever craved a Rice Krispies treat that’s not just a treat, but a truly epic culinary adventure? Then prepare yourself for a recipe that will transform your ordinary snack into a delightfully monstrous creation! Forget those dainty squares; we’re talking about oversized, gooey, marshmallowy masterpieces that are guaranteed to be the star of any Halloween gathering, or frankly, any day you need a little extra fun.
While the classic Rice Krispies treat holds a cherished place in many childhood memories, this recipe takes inspiration from that beloved simplicity and elevates it to monstrous proportions. The history of the Rice Krispies treat itself is fascinating; a happy accident born from the invention of Rice Krispies cereal in the 1920s. From humble beginnings, it evolved into a beloved staple, a testament to the power of simple ingredients and a little bit of imagination. But our Monster Rice Krispies Treats are a modern twist, a playful rebellion against the ordinary.
What makes these treats so irresistible? It’s the perfect balance of textures, of course! The crispiness of the Rice Krispies contrasts beautifully with the gooey, stretchy marshmallow center. The sheer size of these treats is also a major draw; they’re substantial enough to satisfy any sweet tooth, yet still manageable enough to enjoy in one (or maybe two!) generous bites. And let’s be honest, the sheer fun factor of creating and devouring these monstrous delights is unparalleled. So, gather your ingredients, embrace your inner monster, and let’s get baking these unforgettable Monster Rice Krispies Treats!

Ingredients:
- 6 tablespoons (3 ounces) unsalted butter
- 1 (10 ounce) bag of marshmallows (mini marshmallows work best for this recipe, but large marshmallows can be used if you chop them finely)
- 6 cups Rice Krispies cereal (or other similar crispy rice cereal)
- 1 cup chocolate chips (semi-sweet, milk chocolate, or dark chocolate – your choice!)
- 1/2 cup peanut butter (creamy or crunchy, depending on your preference)
- 1/2 cup pretzels, roughly crushed
- 1/4 cup candy corn (optional, for a fall twist)
- 1/4 cup gummy worms (optional, for a spooky effect)
- Green food coloring (optional, for a monster-like hue)
- Red food coloring (optional, for monster-like hue)
- Black food coloring (optional, for monster-like hue)
- Sprinkles (various colors, optional, for extra monster flair)
- Candy eyes (optional, for a truly monstrous effect)
- Cooking spray
Preparing the Marshmallow Mixture:
- First, I like to grease a 9×13 inch baking pan generously with cooking spray. This prevents sticking and makes cleanup a breeze!
- Next, in a large, heavy-bottomed saucepan (I find a non-stick one works best), melt the butter over medium-low heat. Stir occasionally to prevent burning. Low and slow is key here!
- Once the butter is completely melted, add the marshmallows. Stir constantly with a wooden spoon or spatula until the marshmallows are completely melted and smooth. This takes a little patience, but it’s worth it for a perfectly gooey mixture.
- If you’re adding food coloring, now is the time! I usually start with a small amount and add more until I achieve the desired color. Remember, a little goes a long way!
- Once the marshmallows are melted and the color is perfect, remove the pan from the heat. This prevents the marshmallows from burning or getting too sticky.
Combining the Cereal and Other Ingredients:
- Carefully pour the Rice Krispies cereal into the marshmallow mixture. Stir gently but thoroughly until all the cereal is evenly coated. Be careful not to overmix, as this can make the treats too dense.
- Now for the fun part! Add the chocolate chips, peanut butter, and crushed pretzels to the cereal mixture. Stir until everything is well combined. If you’re using candy corn or gummy worms, add them in now as well.
- If you’re using sprinkles, reserve about 1/4 cup for decoration and mix the rest into the treat mixture.
Shaping and Decorating the Monster Treats:
- Quickly transfer the mixture to your prepared baking pan. Work quickly, as the mixture will start to cool and set.
- Using lightly oiled hands or a spatula, press the mixture evenly into the pan. I like to make it about an inch thick for optimal monster-making.
- Once the mixture is evenly distributed, let it cool completely. This usually takes about 30-45 minutes, depending on the room temperature. Patience is a virtue, especially when making monster treats!
- Once the treats are completely cool, you can start decorating! Get creative! Use the reserved sprinkles, candy eyes, and any other candies you have on hand to create your monstrous masterpieces. You can make different monsters, each with its own unique personality.
- For extra monster fun, you can use a cookie cutter to cut out monster shapes before decorating. This is a great option if you want to make smaller, individual monster treats.
- Once you’re happy with your monster creations, let them sit for another 15-20 minutes to allow the decorations to set.
Cutting and Serving:
- Once the treats are completely set and decorated, you can cut them into squares or other fun shapes using a sharp knife. I find a serrated knife works best for clean cuts.
- Serve immediately and enjoy your monstrously delicious Rice Krispies treats! They’re perfect for Halloween parties, spooky movie nights, or any time you need a sweet treat with a fun twist.
- Store leftover treats in an airtight container at room temperature for up to 3 days. They’ll stay gooey and delicious!
Conclusion:
So there you have it – my recipe for Monster Rice Krispies Treats! I truly believe this recipe is a must-try for several reasons. First, it’s incredibly easy. Even the most novice baker can whip up a batch of these spooky-delicious treats in under 30 minutes. Second, the flavor combination is simply irresistible. The classic Rice Krispies treat base gets a delightful boost from the rich, creamy peanut butter and the intense chocolate flavor. And let’s not forget the fun, festive monster-themed decoration – it’s perfect for Halloween parties, classroom treats, or just a fun weekend baking project with the kids.
The versatility of this recipe is another huge plus. You can easily customize it to your liking. Want to add a little extra crunch? Toss in some chopped nuts, pretzels, or even some colorful sprinkles. Feeling adventurous? Try swapping out the peanut butter for another nut butter, like almond butter or cashew butter. Or, if you’re not a peanut butter fan, you could even experiment with a different type of spread, like Nutella or a cream cheese frosting. The possibilities are truly endless!
For serving suggestions, I recommend cutting the treats into fun monster shapes using cookie cutters. You can also arrange them on a platter with other Halloween goodies, like candy corn and caramel apples, for a truly impressive spread. They’re perfect for a Halloween party, a spooky movie night, or even as a fun after-school snack. They’re also great for packing in lunchboxes – just make sure to cut them into smaller, more manageable portions.
Beyond the Halloween season, these Monster Rice Krispies Treats can be enjoyed year-round. Simply adjust the decorations to suit the occasion. For Christmas, you could use red and green sprinkles and candy canes. For a birthday party, you could use colorful candies and frosting to create a festive design. The base recipe remains delicious and adaptable no matter the time of year.
I’ve personally found that these treats are best enjoyed slightly warm, straight from the pan. However, they also store well in an airtight container at room temperature for several days. This makes them perfect for making ahead of time for parties or events.
Don’t forget the finishing touches!
Remember, the fun part of this recipe is the decorating! Get creative with your monster designs. Use different colored candies, sprinkles, and even pretzel sticks for arms and legs. Let your imagination run wild and create your own unique monster masterpieces. The more creative you get, the more fun it will be for everyone involved.
Ready to give it a try?
I sincerely hope you’ll give my Monster Rice Krispies Treats recipe a try. I’m confident that you and your family will love them. They’re a guaranteed crowd-pleaser, perfect for any occasion. Once you’ve made them, I’d love to hear about your experience! Share your photos and feedback on social media using the hashtag #MonsterRiceKrispiesTreats. I can’t wait to see your monstrous creations!
Happy baking, and happy haunting!
Monster Rice Krispies Treats: A Giant Recipe for Halloween
Spooky Rice Krispies treats customized with candy and food coloring to create monstrous masterpieces!
Ingredients
Instructions
Recipe Notes
- Low and slow melting of the butter and marshmallows is crucial to prevent burning.
- Don’t overmix the cereal mixture, or the treats will be too dense.
- Get creative with your monster designs! The possibilities are endless.