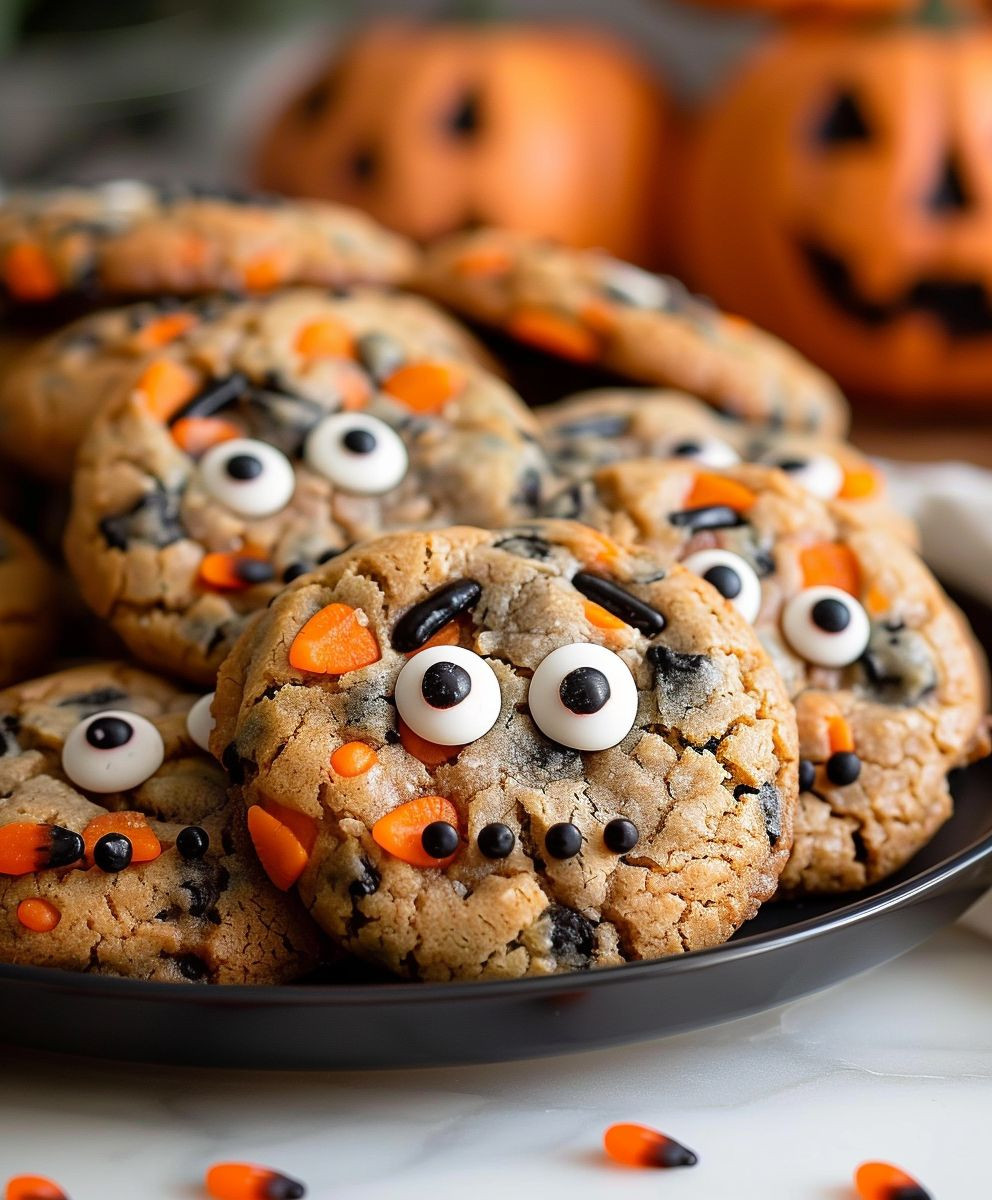
Halloween Cookies
Halloween Cookies: Are you ready to conjure up some spooky deliciousness in your kitchen this Halloween? Forget store-bought treats; this year, I’m sharing my secret recipe for incredibly fun and frightfully flavorful Halloween Cookies. These aren’t your average sugar cookies; we’re talking about a delightful blend of crisp edges, soft centers, and a customizable design that will make your Halloween gathering the talk of the town.
While the precise origins of Halloween cookies are difficult to pinpoint, the tradition of baking special treats for autumnal celebrations, particularly those involving spirits and folklore, dates back centuries. Think of the spiced gingerbread men of old, or the elaborate iced biscuits enjoyed during harvest festivals. Our Halloween Cookies recipe draws inspiration from these rich traditions, offering a modern twist on a timeless custom.
What makes these cookies so irresistible? It’s the perfect balance of sweet and subtly spiced dough, the satisfying crunch with each bite, and the endless possibilities for decoration. From classic ghosts and pumpkins to more intricate designs, these cookies offer a creative outlet for both adults and children. They’re also incredibly convenient to make ahead of time, allowing you to focus on other Halloween preparations. Whether you’re hosting a party or simply want a delicious treat to enjoy with your family, these Halloween Cookies are guaranteed to be a hit.
So, grab your aprons, gather your ingredients, and let’s embark on this spooky baking adventure together! I promise, you won’t be disappointed.

Ingredients:
- 2 1/2 cups all-purpose flour
- 1 teaspoon baking soda
- 1/2 teaspoon baking powder
- 1/2 teaspoon salt
- 1 cup (2 sticks) unsalted butter, softened
- 1 3/4 cups granulated sugar
- 2 large eggs
- 2 teaspoons vanilla extract
- 1 cup buttermilk
- 1 cup semi-sweet chocolate chips
- 1 cup orange candy melts, chopped
- 1/2 cup purple candy melts, chopped
- 1/2 cup green candy melts, chopped
- Black food coloring gel
- Orange food coloring gel
- Purple food coloring gel
- Green food coloring gel
- Sprinkles (various Halloween colors)
- Miniature marshmallows
- Candy corn
- Pretzel sticks
Preparing the Batter
- Preheat your oven to 375°F (190°C). Line baking sheets with parchment paper. This will prevent sticking and make cleanup a breeze!
- In a medium bowl, whisk together the flour, baking soda, baking powder, and salt. Make sure to whisk thoroughly to avoid lumps.
- In a large bowl, cream together the softened butter and granulated sugar until light and fluffy. I usually use an electric mixer for this step – it saves time and effort. If you’re doing it by hand, be prepared for a bit of a workout!
- Beat in the eggs one at a time, then stir in the vanilla extract. Scrape down the sides of the bowl to ensure everything is well combined.
- Gradually add the dry ingredients to the wet ingredients, alternating with the buttermilk, beginning and ending with the dry ingredients. Mix until just combined – don’t overmix!
- Stir in the chocolate chips. I like to reserve a few chocolate chips for decorating later.
Dividing and Coloring the Dough
- Divide the cookie dough into four equal portions. I find using a kitchen scale is the most accurate way to do this, but you can also eyeball it if you’re comfortable.
- Leave one portion plain. This will be your base cookie dough.
- To the second portion, add a few drops of orange food coloring gel and mix until evenly distributed. Start with a small amount and add more as needed to achieve the desired color. Don’t be afraid to experiment with the color intensity!
- To the third portion, add a few drops of purple food coloring gel and mix until evenly distributed. Again, start with a small amount and add more as needed.
- To the fourth portion, add a few drops of green food coloring gel and mix until evenly distributed.
Shaping and Baking the Cookies
- Using a cookie scoop or two spoons, drop rounded tablespoons of each colored dough onto the prepared baking sheets, leaving about 2 inches between each cookie. This will give them enough room to spread.
- Bake for 9-11 minutes, or until the edges are lightly golden brown. Oven temperatures can vary, so keep a close eye on them!
- Remove the baking sheets from the oven and let the cookies cool on the sheets for a few minutes before transferring them to a wire rack to cool completely. This prevents them from breaking.
Decorating the Cookies
- Once the cookies are completely cool, it’s time for the fun part – decorating! Melt the orange, purple, and green candy melts according to package directions. You can use a double boiler or the microwave.
- Using a spoon or piping bag, drizzle the melted candy melts onto the cookies in a spooky design. Get creative! You can create spiderwebs, ghosts, or jack-o’-lanterns.
- While the candy melts are still wet, add sprinkles, miniature marshmallows, candy corn, and pretzel sticks to create different Halloween elements. Let your imagination run wild!
- For extra spooky detail, use a toothpick to draw on faces or other designs with the black food coloring gel. You can also use the black gel to create spider legs using the melted candy melts as glue.
- Let the decorated cookies sit for a few minutes to allow the candy melts to set before serving or storing. Enjoy your delicious and spooky Halloween cookies!
Tips and Variations
- For a richer flavor, use brown butter instead of regular butter.
- Add different types of candy chips, such as peanut butter chips or white chocolate chips.
- Use different colored sprinkles and candies to create unique designs.
- Get the kids involved in the decorating process – it’s a fun activity for the whole family!
- Store the cookies in an airtight container at room temperature for up to a week.
Conclusion:
So there you have it – my recipe for the most spooktacular Halloween Cookies! I truly believe this recipe is a must-try for several reasons. First, the flavor combination is simply irresistible. That perfect balance of sweet and subtly spiced cookie dough, combined with the rich, creamy frosting, creates a truly unforgettable taste experience. It’s not overly sweet, allowing the individual spice notes to shine through, making it a sophisticated treat even for the most discerning palate. And let’s be honest, who doesn’t love a good, chewy cookie?
Second, these Halloween Cookies are incredibly versatile. The basic recipe is easy to follow, even for beginner bakers, but the decorating possibilities are endless! I’ve given you a few ideas, but feel free to let your creativity run wild. Think beyond the classic ghosts and pumpkins. Try creating spooky spiders with pretzel sticks and candy eyes, or use different colored frosting to make adorable bats. You can even incorporate different sprinkles, candies, or even edible glitter to add extra sparkle and flair.
Third, these cookies are perfect for any Halloween gathering. Whether you’re hosting a party, attending a potluck, or simply want a delicious treat to enjoy with your family, these cookies are guaranteed to be a hit. They’re easy to transport, store well, and are sure to impress your guests with their delicious taste and creative designs. They’re also a fantastic alternative to the usual store-bought Halloween candy, offering a more homemade and personalized touch.
Serving Suggestions:
For the ultimate Halloween experience, serve these cookies alongside a mug of hot cocoa or apple cider. The warm, comforting drinks perfectly complement the rich, spiced flavor of the cookies. You could also create a Halloween-themed cookie platter, arranging the cookies with other spooky treats like caramel apples or popcorn balls. For a more sophisticated touch, serve them with a scoop of vanilla ice cream or a dollop of whipped cream.
Variations to Try:
Want to experiment with different flavors? Try adding a teaspoon of peppermint extract to the cookie dough for a refreshing twist. Or, for a more intense spice flavor, add a pinch of cinnamon or nutmeg. You can also substitute the butter with coconut oil for a vegan-friendly version. Feel free to experiment with different types of frosting, too! A cream cheese frosting would be a delicious alternative to the buttercream frosting I’ve used in the recipe.
Don’t be afraid to get creative and make these cookies your own! The beauty of baking is that you can personalize your recipes to suit your own tastes and preferences. I encourage you to try different flavor combinations, decorating techniques, and serving suggestions to create your own unique Halloween cookie masterpiece.
Share Your Creations!
I would absolutely love to see your Halloween Cookies creations! Once you’ve tried the recipe, please share your photos and experiences on social media using the hashtag #SpookyCookieChallenge. I can’t wait to see what delicious and creative treats you come up with. Happy baking, and have a spooktacular Halloween!
Remember: Baking is a journey, not a race. Have fun with it, and don’t be afraid to experiment! These Halloween Cookies are a guaranteed crowd-pleaser, and I’m confident you’ll enjoy making and sharing them as much as I do.
Halloween Cookies: Spooky Recipes & Decorating Ideas
Fun, colorful Halloween cookies made with four different colored doughs and decorated with festive candies and sprinkles.
Ingredients
Instructions
Recipe Notes
- Oven temperatures vary; keep a close eye on cookies while baking.
- For richer flavor, use brown butter.
- Add other candy chips (peanut butter, white chocolate).
- Get kids involved in decorating!
- Store cookies in an airtight container at room temperature for up to a week.