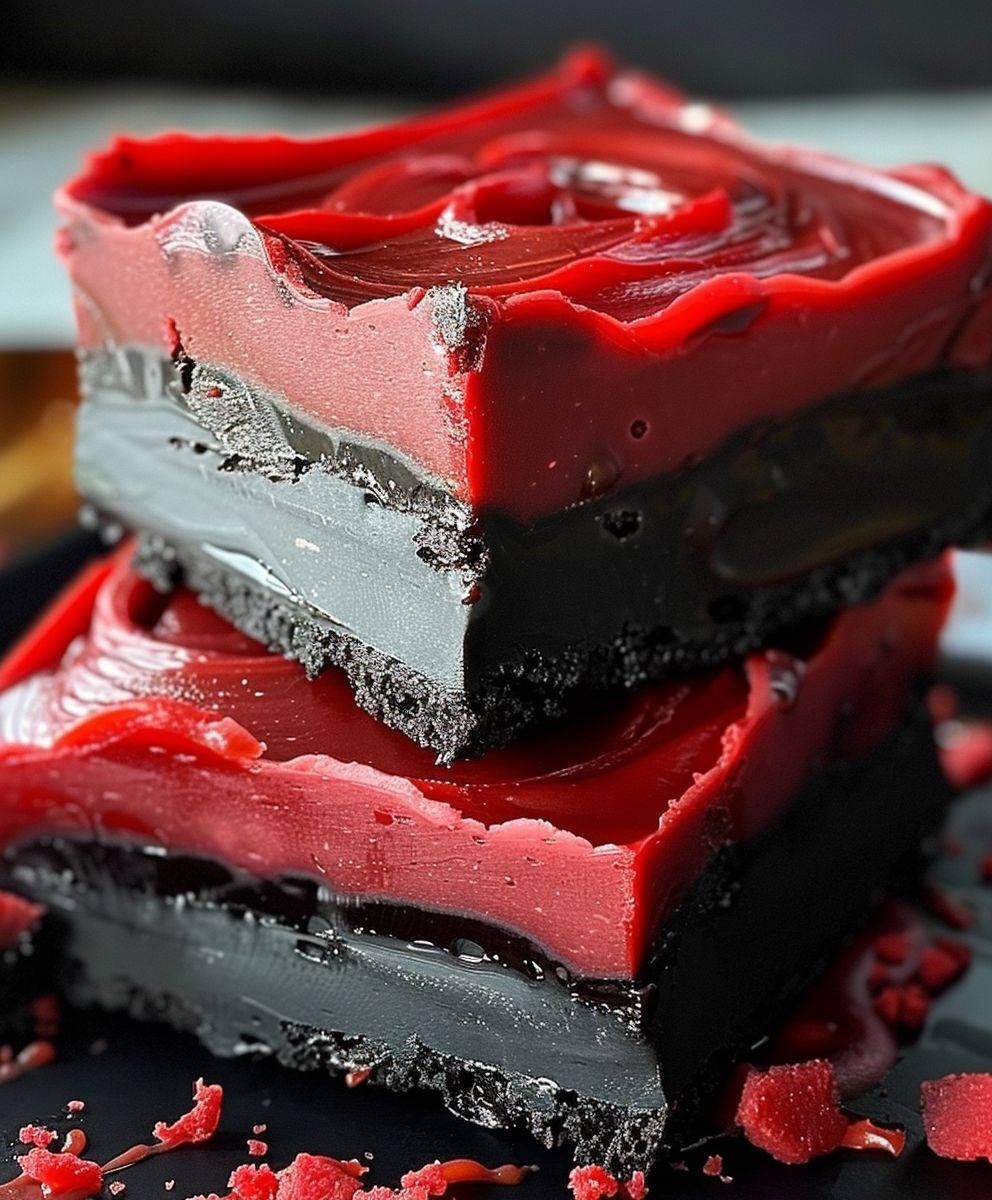
Vampire Fudge
Vampire Fudge: the name alone conjures images of spooky deliciousness, perfect for Halloween gatherings or any time you crave a rich, decadent treat. But this isn’t just any chocolate fudge; it’s a recipe steeped in a playful twist on tradition, offering a unique sensory experience that will leave you craving more.
While I can’t claim a centuries-old lineage for this particular Vampire Fudge recipe, its inspiration draws from the classic American fudge, a dessert that has delighted generations. The creamy, melt-in-your-mouth texture of traditional fudge is a beloved comfort, and this recipe builds upon that foundation. I’ve added a touch of the macabre with a deep, dark chocolate base and a surprising ingredient that gives it a truly unique, almost “blood-like” appearance – a secret I’ll reveal in the recipe itself!
What makes this Vampire Fudge so irresistible? It’s the perfect balance of sweet and slightly bitter chocolate, the incredibly smooth texture that practically dissolves on your tongue, and the ease of preparation. Even novice bakers can confidently tackle this recipe, making it ideal for busy schedules or last-minute dessert needs. Plus, the dramatic presentation – that captivating “blood” effect – makes it a guaranteed conversation starter at any gathering. So, are you ready to embrace the darkness and create your own batch of this hauntingly delicious Vampire Fudge?

Ingredients:
- 1 cup (2 sticks) unsalted butter
- 1 (14 ounce) can sweetened condensed milk
- 1 (12 ounce) bag semi-sweet chocolate chips
- 1 (12 ounce) bag milk chocolate chips
- 1 cup creamy peanut butter
- 1 teaspoon vanilla extract
- 1/2 cup powdered sugar
- 1/4 cup unsweetened cocoa powder
- Red food coloring gel (a small amount, for dramatic effect)
- Optional: Pretzel sticks, crushed graham crackers, or other toppings for garnish
Preparing the Chocolate Base
- I always start by lining an 8×8 inch baking pan with parchment paper, leaving an overhang on the sides to easily lift the fudge out later. This is a crucial step for easy cleanup and perfect fudge presentation!
- In a large, heavy-bottomed saucepan over low heat, I melt the butter completely. Low and slow is key here to prevent burning. Stir occasionally to ensure even melting.
- Once the butter is melted, I carefully pour in the sweetened condensed milk. Stir constantly to combine thoroughly. This mixture will be quite thick.
- Next, I add both the semi-sweet and milk chocolate chips to the saucepan. I continue to stir constantly until the chocolate is completely melted and the mixture is smooth and glossy. This usually takes about 5-7 minutes, depending on your stovetop.
- Remove the saucepan from the heat and stir in the peanut butter and vanilla extract. Make sure everything is well incorporated. The mixture will thicken as it cools.
Creating the “Blood” Swirl
- Now for the fun part! In a small bowl, I whisk together the powdered sugar and cocoa powder until there are no lumps. This will be our “blood” swirl for the vampire fudge.
- I add a tiny amount of red food coloring gel to the cocoa mixture. Start with just a drop or two and add more until you achieve the desired shade of dark red. Remember, a little goes a long way with gel food coloring!
- I carefully pour about half of the chocolate mixture into a separate bowl. Then, I gently fold in the red cocoa mixture into this half. I don’t want to overmix; I want to retain some of the marbled effect.
Assembling and Setting the Fudge
- I pour half of the plain chocolate mixture into the prepared baking pan and spread it evenly. I use a spatula to create a smooth, even layer.
- Next, I carefully spoon the red chocolate mixture on top of the plain chocolate. I use a knife or toothpick to swirl the two colors together, creating a dramatic blood-like effect. Don’t over-swirl; a slightly marbled look is more appealing.
- I pour the remaining plain chocolate mixture over the red swirl and spread it evenly to create a top layer. Again, I use a spatula to ensure a smooth surface.
- If desired, I sprinkle some crushed pretzels, graham crackers, or other toppings over the top before the fudge sets. This adds a nice textural contrast.
- I cover the baking pan with plastic wrap and refrigerate the fudge for at least 4 hours, or preferably overnight, to allow it to set completely. This ensures a firm, sliceable fudge.
Cutting and Serving
- Once the fudge is completely set, I carefully lift it out of the pan using the parchment paper overhang. This prevents the fudge from sticking and breaking.
- I cut the fudge into small squares using a sharp knife. I wipe the knife clean between cuts to ensure clean edges.
- I serve the vampire fudge chilled. It’s best enjoyed cold, showcasing the rich chocolate and the dramatic red swirl.
- Store leftover fudge in an airtight container in the refrigerator for up to a week.
Tips for Success
- Use high-quality chocolate for the best flavor and texture.
- Don’t overheat the chocolate; low and slow is the key to preventing seizing.
- Allow the fudge to set completely before cutting for the best results.
- Get creative with your toppings! Experiment with different nuts, sprinkles, or candies.
- This recipe is easily adaptable. You can adjust the amount of red food coloring to achieve your desired intensity.
Conclusion:
So there you have it – my incredibly decadent Vampire Fudge recipe! I truly believe this recipe is a must-try for several reasons. First, the flavor combination is simply divine. The rich, dark chocolate base, infused with the subtle bitterness of espresso and the surprising sweetness of raspberry, creates a truly unforgettable taste experience. It’s a sophisticated treat that’s far from ordinary, offering a complex depth that will tantalize your taste buds.
Secondly, the texture is perfection. This Vampire Fudge is wonderfully smooth and creamy, melting in your mouth with each bite. It’s the kind of fudge that you’ll find yourself reaching for again and again, a little indulgence that’s hard to resist. And let’s be honest, who doesn’t love a good, rich fudge?
Finally, the recipe itself is surprisingly easy to follow, even for beginner bakers. The simple steps and readily available ingredients make it a perfect dessert for any occasion, from a casual weeknight treat to a more formal gathering. You don’t need any fancy equipment or specialized skills; just a little time and a whole lot of love (and maybe a little bit of vampire-inspired flair!).
Serving Suggestions & Variations:
While this recipe is delicious on its own, there are plenty of ways to elevate your Vampire Fudge experience. For a truly spooky presentation, consider serving it in small, individual cups or parchment paper squares, perhaps garnished with a few fresh raspberries or a dusting of cocoa powder. You could even add a tiny, edible “blood” drip using red food coloring and a little melted chocolate for an extra touch of Halloween flair.
Feeling adventurous? Try experimenting with different flavor combinations! Swap the raspberries for other berries like blueberries or strawberries. Add a pinch of sea salt to enhance the chocolate’s richness. For a more intense coffee flavor, use a stronger espresso powder or even add a shot of espresso to the melted chocolate. The possibilities are endless!
For those who prefer a less intense chocolate flavor, you could reduce the amount of dark chocolate and add a touch of milk chocolate for a milder taste. You could also experiment with adding different nuts, like chopped pecans or walnuts, for added texture and flavor. The beauty of this recipe is its adaptability; feel free to personalize it to your liking!
Don’t Forget to Share!
I truly hope you enjoy making (and eating!) this Vampire Fudge recipe as much as I do. It’s a dessert that’s guaranteed to impress, whether you’re serving it to friends, family, or simply indulging in a little self-care. Once you’ve tried it, I’d love to hear about your experience! Share your photos and feedback on social media using #VampireFudge – I can’t wait to see your creations.
So, what are you waiting for? Grab your ingredients, put on your apron, and get ready to create some seriously delicious and spooky Vampire Fudge. Trust me, you won’t regret it. This recipe is a guaranteed crowd-pleaser, and the perfect way to add a touch of gothic glamour to your next dessert spread. Happy baking!
Ready to Embrace the Darkness?
Don’t delay, the deliciousness of this Vampire Fudge awaits! Click the link above to get started and prepare for a truly unforgettable treat. Let the baking begin!
Vampire Fudge: A Spooky Sweet Treat Recipe
Spooky red and chocolate swirl fudge, perfect for Halloween. Easy to make, chilling time required.
Ingredients
Instructions
Recipe Notes
- Use high-quality chocolate for best results.
- Low and slow melting prevents seizing.
- Allow fudge to set completely before cutting.
- Get creative with toppings!
- Adjust the amount of red food coloring to your preference.