Halloween Deviled Eggs are here to cast a delicious spell on your next spooky gathering! Forget the mundane; it’s time to transform a beloved classic into an extraordinary, eye-catching appetizer that perfectly captures the spirit of the season. As your friendly guide in the kitchen, I’m absolutely thrilled to share a recipe that takes the universally adored, creamy, and tangy deviled egg and infuses it with a delightful touch of ghoulish charm.
For centuries, deviled eggs have graced tables as a go-to party snack, celebrated for their irresistible taste and satisfying texture. However, when October rolls around, we have the unique opportunity to elevate this simple pleasure into something truly magical. People adore this dish not just for its comforting familiarity and delicious, savory flavor, but also for its incredible versatility – and for Halloween, that means creative, spooky fun!
Imagine serving platters adorned with these vibrant, cleverly decorated bites that are both a feast for the eyes and a delight for the palate. These aren’t just snacks; they’re conversation starters, a playful nod to the holiday’s playful frights. Get ready to impress your guests and add an unforgettable culinary highlight to your celebration with these fantastic Halloween Deviled Eggs!

Ingredients:
- 12 large eggs, preferably a week or two old (fresher eggs are harder to peel, trust me on this!)
- ½ cup good quality mayonnaise, I usually go for a classic like Hellmann’s or Duke’s, but feel free to use your favorite creamy brand.
- 1 tablespoon Dijon mustard, for that essential tangy kick. Yellow mustard can work in a pinch if you prefer, but Dijon offers a more complex flavor profile.
- 1 teaspoon white vinegar or fresh lemon juice. This really brightens up the yolk mixture and enhances the other flavors.
- ¼ teaspoon fine sea salt, plus more to taste. Seasoning is key to delicious deviled eggs!
- ⅛ teaspoon freshly ground black pepper, or more to your liking. Freshly ground makes a difference, I promise.
- For the Spooky Halloween Colors:
- Gel food coloring in vivid green, eerie orange, mysterious purple, and stark black. Gel colors give the most vibrant results without thinning your filling too much.
- For Decoration (this is where the Halloween magic happens!):
- 1 small can (about 2.25 oz) pitted black olives, drained and rinsed. These are going to be our creepy crawly spiders!
- Fresh chives or dill sprigs, for spider legs or a general fresh garnish, if desired.
Preparing Your Perfect Hard-Boiled Eggs
Achieving perfectly cooked and easily peelable hard-boiled eggs is the foundation of any fantastic deviled egg, especially our spooky Halloween Deviled Eggs. It might seem simple, but there are a few tricks I’ve learned over the years to get them just right every time.
- Choose Your Eggs Wisely: I always recommend using eggs that are at least a week old, if not two. Super fresh eggs, straight from the chicken or the store shelf, tend to bond more tightly to their shells, making them incredibly frustrating to peel without tearing the beautiful whites. A little age allows the egg’s pH to change, making for a much smoother peeling experience. If you only have fresh eggs, don’t despair, but be prepared for a bit more careful peeling.
- The Gentle Boil Method: Carefully place your 12 eggs in a single layer at the bottom of a large saucepan. You want a pan that’s big enough so the eggs aren’t crowded, but not so large that they roll around too much, which can cause cracking. Now, fill the pan with cold water, ensuring the water covers the eggs by at least an inch. Add a pinch of salt to the water; some people believe this helps prevent cracking and makes peeling easier, though it’s not strictly essential. Place the pan on the stove over high heat and bring the water to a rolling boil.
- The Off-Heat Steep: As soon as the water reaches a full, vigorous boil, immediately turn off the heat. Do not let the eggs continue to boil actively! Cover the pan tightly with a lid and let the eggs sit undisturbed in the hot water for exactly 12 minutes. This method cooks the eggs gently and evenly, preventing that unsightly green ring around the yolk that indicates overcooking. For smaller eggs, you might go with 10-11 minutes; for extra-large, up to 13 minutes. I find 12 minutes is perfect for large eggs.
- The Crucial Ice Bath: As soon as the 12 minutes are up, immediately drain the hot water from the pan. Then, fill the pan with ice water (or transfer the eggs to a large bowl filled with ice water). Let the eggs chill in this ice bath for at least 10-15 minutes. This rapid cooling halts the cooking process, preventing overcooked yolks, and, perhaps most importantly, causes the egg white to contract, separating it from the shell membrane. This is your secret weapon for easy peeling! Don’t skip this step.
- The Art of Peeling: Once the eggs are completely cool, it’s time to peel. Gently tap each egg on a hard surface, like your countertop, to create small cracks all over the shell. Then, roll the egg between your hands to further shatter the shell into tiny pieces. I find it easiest to start peeling from the wider end of the egg, where there’s usually a small air pocket. Peeling under a gentle stream of cold running water can be incredibly helpful, as the water can get under the membrane, assisting in the separation and washing away tiny shell fragments. Be patient and gentle to keep those whites pristine – they’re the canvas for our Halloween Deviled Eggs!
Crafting the Spooky & Flavorful Yolk Filling
Now that we have our beautifully peeled egg whites, it’s time to create the creamy, dreamy, and most importantly, spooky filling. This is where we inject the fun Halloween colors!
- Halve and Scoop: Carefully slice each peeled hard-boiled egg in half lengthwise. A sharp, thin knife works best for clean cuts. Gently scoop out the bright yellow yolks into a medium-sized mixing bowl. Try to keep the egg white halves intact and clean; these will be our little edible serving cups.
- Mash to Perfection: Using a fork, thoroughly mash the egg yolks until they are completely smooth and free of lumps. I sometimes even push them through a fine-mesh sieve if I’m aiming for an ultra-creamy, incredibly smooth filling, but a good mashing with a fork is usually sufficient. The smoother the yolks, the silkier your final filling will be, which is ideal for piping.
- Mix in the Magic Base: To the mashed yolks, add your mayonnaise, Dijon mustard, white vinegar (or lemon juice), salt, and black pepper. Stir everything together until it’s completely combined and wonderfully creamy. Take a moment to taste the mixture. This is your chance to adjust the seasoning! Does it need a little more salt? A touch more tang from the vinegar? Perhaps a tiny bit more pepper for a kick? Don’t be shy; personalizing the flavor profile is what makes your deviled eggs truly special. I always aim for a balanced flavor that’s tangy, savory, and rich.
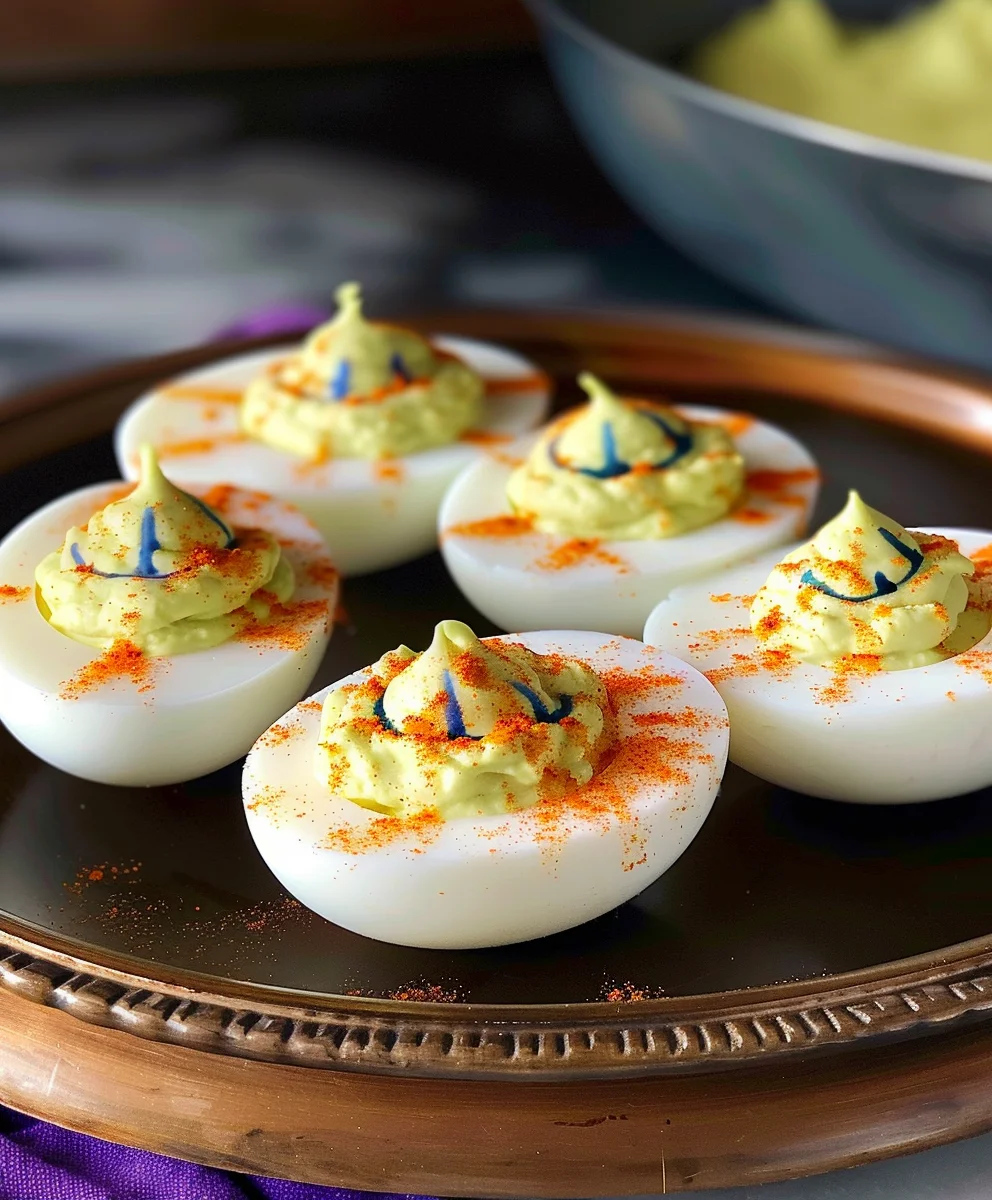
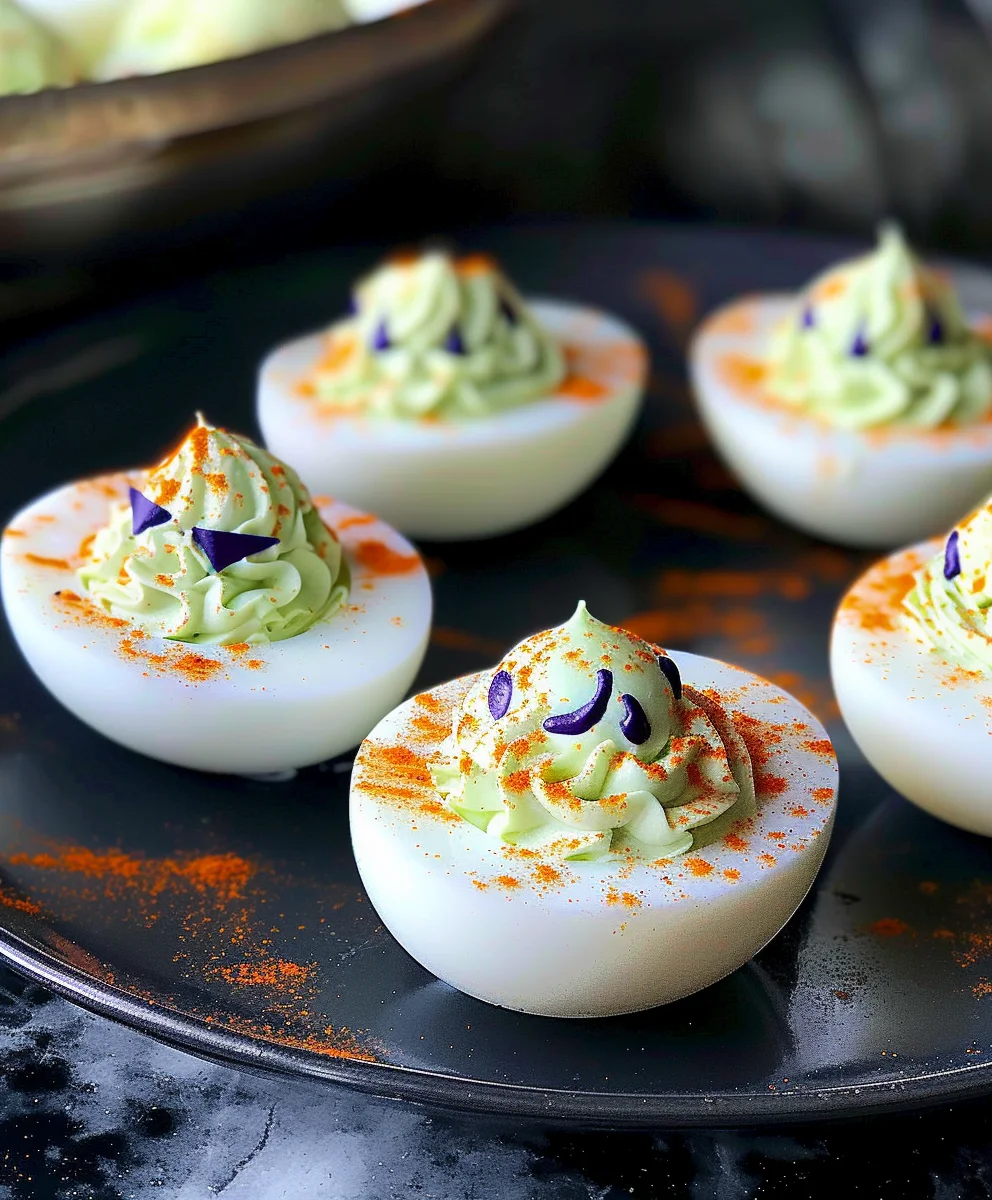
- Divide and Conquer with Color: Now for the Halloween transformation! Divide your creamy yolk mixture into separate small bowls – one for each color you plan to use. I typically go for three or four distinct colors: green, orange, purple, and black. Having separate bowls ensures your colors stay pure and vibrant.
-
Infuse with Spooky Hues:
- Green Goo: Add a tiny drop of green gel food coloring to one bowl of yolk mixture. Stir vigorously until the color is evenly distributed and you achieve your desired shade of ghoulish green. Remember, a little gel color goes a long way, so start small and add more if needed. You want a bright, almost neon green for maximum Halloween impact.
- Eerie Orange: Repeat the process with orange gel food coloring in another bowl. Stir until you have a vibrant, pumpkin-like orange that screams autumn and trick-or-treating.
- Mysterious Purple: For the purple, again, add a tiny amount of purple gel coloring. This color adds a fantastic contrast and a truly magical, spooky touch to your platter.
- Stark Black (Optional, but highly recommended for drama!): This one is a showstopper. Add black gel food coloring to your final bowl. You’ll need a bit more black coloring than the other colors to achieve a true, deep black, as the yellow of the yolk will try to make it grayish. Keep adding and stirring until you get a rich, inky black. This black filling will make your orange and green pop even more!
Important Tip: Always add food coloring incrementally. It’s much easier to add more color than it is to try and lighten it. Also, try to use gel food coloring as liquids can alter the consistency of your filling. Make sure each color is thoroughly mixed, with no streaks of yellow remaining.
Assembling Your Ghoulish Halloween Deviled Eggs
The final stage is where our Halloween Deviled Eggs truly come to life! This is the fun part – piping and decorating. Get ready to unleash your inner mad scientist!
- Prepare Your Piping Bags: For the neatest and most professional-looking deviled eggs, I highly recommend using piping bags. You can use disposable piping bags or even sturdy Ziploc bags with a corner snipped off. If you have different piping tips, a star tip (like a Wilton 1M) creates a beautiful, swirly effect. If not, simply snipping off a ¼-inch corner of the bag will give you a smooth, round mound. Fill each piping bag with one of your colored yolk mixtures. This keeps everything clean and makes the filling process quick and easy.
- Fill the Egg Whites with Flair: Pick up an egg white half and, holding your piping bag about a half-inch above the cavity, gently squeeze to pipe the colored yolk mixture into the center. You can create a classic mound, a swirly rosette, or even a spiky, irregular shape for a more Frankenstein-esque look. Feel free to mix and match colors on your platter; an alternating pattern of green, orange, and purple eggs looks incredibly festive. You could even do a base of one color and a swirl of another on top for an extra creative touch, though this requires a bit more finesse with two piping bags per egg. Ensure each egg white is filled generously, but not so much that the filling spills over.
-
Crafting the Spooky Olive Spiders: This is my absolute favorite part of making Halloween Deviled Eggs!
- The Body: Take a whole pitted black olive and carefully place it on top of the piped yolk filling. This will be the spider’s body. If you want a more distinct head, you can cut off a small sliver from one end of the olive.
- The Legs: Now for the eight creepy legs! Take another black olive and slice it lengthwise into very thin strips – aim for 8 strips per olive. Each strip will be a spider leg.
- Arranging the Legs: Gently insert four olive strips into the yolk mixture on each side of the whole olive body, angling them slightly to mimic the look of spider legs. You can bend them a little to make them look more natural and dynamic, as if the spider is scuttling across the egg. Repeat this process for all your colored deviled eggs. The black spiders against the vibrant green, orange, and purple yolks create such a striking and undeniably Halloween-y effect!
- Alternative Legs (Chives/Dill): If you’re not keen on olive legs or want another texture, thin strips of fresh chives or small sprigs of dill can also make convincing spider legs, offering a fresh herbaceous note.
- Final Touches and Garnish: Once all your spiders are in place, take a step back and admire your ghoulish creations. You can add a very tiny sprinkle of smoked paprika over any plain-colored eggs if you opted for some without spiders, or just for a touch of smoky flavor. A light dusting of black salt can also add an extra mysterious sparkle.
- Chill and Serve: Arrange your finished Halloween Deviled Eggs on a festive platter. For best flavor and safety, cover the platter loosely with plastic wrap and refrigerate for at least 30 minutes before serving. This allows the flavors to meld beautifully and ensures they are nicely chilled. Deviled eggs are best enjoyed within a day or two of preparation. These are always a massive hit at any Halloween party, and I guarantee your guests will be impressed by both their taste and their frightfully fun appearance! Enjoy making these, and Happy Halloween!
Conclusion:
And there you have it, my friends! We’ve journeyed through the simple yet incredibly rewarding process of crafting a truly unforgettable appetizer. I honestly believe that this recipe isn’t just another dish; it’s an experience, a conversation starter, and a guaranteed hit at any gathering, especially during the spooky season. What makes these particular deviled eggs a must-try, you ask? Well, it’s the perfect harmony of creamy, savory richness encapsulated in each vibrant bite, elevated by that hint of zest and the playful, slightly eerie aesthetic that makes them utterly irresistible. The contrast of the smooth, velvety yolk filling against the firm egg white creates a textural delight, while the careful balance of seasonings ensures that every morsel is packed with satisfying flavor, making it incredibly difficult to stop at just one. I’ve found that even those who claim not to be huge fans of deviled eggs often find themselves reaching for a second, or even a third, once they taste this rendition. It’s the kind of recipe that looks impressive without demanding hours of complicated culinary acrobatics, making it accessible for home cooks of all skill levels to achieve a professional-looking and tasting result. This ease of preparation combined with the significant visual impact is precisely why this recipe stands out in a crowded field of appetizer ideas.
Serving Suggestions & Creative Variations to Elevate Your Dish
Once you’ve mastered the basic technique, the fun truly begins with how you present and customize your creations. For serving, I always recommend arranging your spectacular Halloween Deviled Eggs on a stark white or dark platter to truly make their vibrant colors pop. A sprinkling of fresh chopped chives or finely diced parsley can add a touch of green and freshness, contrasting beautifully with the orange and black elements. Consider placing them amongst a scattering of plastic spiders or cobwebs for an extra layer of spooky charm. For a larger Halloween spread, these make an excellent anchor for a snack table, complementing everything from mini mummy hot dogs to witch finger cookies. They’re fantastic as a standalone appetizer or as part of a larger brunch or dinner party offering. You could even arrange them strategically around a bowl of spooky dip, creating a visually cohesive theme for your entire food presentation, ensuring every guest feels the festive spirit from the moment they approach the table.
Now, let’s talk variations, because this is where you can truly make this recipe your own and unleash your inner culinary mad scientist! Want to deepen the smoky flavor? A pinch of smoked paprika or even a tiny dash of liquid smoke can add an intriguing layer to the filling, creating a wonderfully complex profile. For those who love a bit of heat, a few drops of your favorite hot sauce or a tiny amount of finely minced jalapeño (seeds removed for less intensity) will give them a wonderful kick that excites the palate. Don’t be afraid to experiment with different types of mustard – Dijon can offer a sharper, more sophisticated edge, while a stone-ground mustard can add textural interest and a rustic appeal. For a truly decadent twist, finely crumbled, crispy bacon bits stirred into the yolk mixture, or sprinkled on top as a garnish, are always a crowd-pleaser and add an irresistible savory crunch. If you’re feeling particularly adventurous, a little bit of finely grated horseradish can add a surprising and delightful zing that cuts through the richness beautifully, offering a refreshing contrast. Beyond flavor, think about visual variations! Instead of simple paprika, you could use a small edible black olive half to create a pupil, surrounded by tiny veins drawn with a food-safe marker, transforming each egg into a realistic, albeit delicious, eyeball. A tiny sprinkle of black sesame seeds can also add a subtle, elegant, and mysterious textural contrast. Imagine creating a delicate web design on top of the yolk using a squeeze bottle filled with black food coloring or thinned balsamic glaze – the possibilities are truly endless and only limited by your imagination. Remember, each small tweak offers a chance to personalize the experience, whether it’s for a themed party or just a fun family meal, making each batch uniquely yours.
Your Turn: Embrace the Spooky and Share Your Success!
So, now it’s your turn! I implore you to roll up your sleeves, gather your ingredients, and dive into the delightful process of making these incredible treats. I promise you, the joy of seeing your guests’ faces light up when they encounter these festive delights is incredibly rewarding and makes every effort worthwhile. Don’t be shy about adding your own creative flair, experimenting with the suggestions I’ve offered, or even inventing entirely new twists! The kitchen is a place for exploration and fun, and this recipe is a perfect canvas for your culinary artistry. Once you’ve whipped up your batch, I would absolutely love to hear about your experience. Did you add a secret ingredient that truly elevated the flavor? Did you get particularly creative with the garnishes, perhaps crafting miniature edible monsters or intricate designs? Please, please share your triumphs, your clever ideas, and even any hilarious kitchen mishaps in the comments below or tag me on social media with your creations. Your feedback and shared experiences inspire not only me but also countless other home cooks who are looking for fresh, exciting ways to celebrate the season. Let’s make this Halloween the most delicious one yet, one perfectly spooky egg at a time! Happy cooking, and happy haunting!
Halloween Deviled Eggs: Spooky & Delicious Party Appetizer!
Transform classic deviled eggs into a spooky and delicious Halloween appetizer! These eye-catching bites feature vibrant green, orange, purple, and black yolk fillings, creatively piped into egg white halves and adorned with creepy olive spiders. Perfect for any Halloween gathering, they’re both a feast for the eyes and a delight for the palate.
Ingredients
-
6 large eggs
-
Water (to cover eggs)
-
1 splash white vinegar (for boiling)
-
3 tbsp mayonnaise
-
1 tsp mustard (Dijon or yellow)
-
1 tsp apple cider vinegar
-
Pinch of salt
-
Pinch of pepper
-
Gel food coloring (black, purple, green, orange)
-
1 small can (2.25 oz) pitted black olives, drained
-
Fresh chives or dill sprigs (optional, for decoration)
-
Paprika, chia seeds, or parsley (optional, for garnish)
Instructions
-
Step 1
Place 6 eggs in a saucepan, cover with cold water by 1 inch. Add a splash of white vinegar. Bring to a rolling boil, then immediately turn off heat, cover, and let steep for 12 minutes. -
Step 2
Drain hot water, transfer eggs to an ice bath for 10-15 minutes. Once cool, gently peel eggs under cold running water. -
Step 3
Halve eggs lengthwise, scoop yolks into a bowl. Mash yolks until smooth. -
Step 4
Add mayonnaise, mustard, apple cider vinegar, salt, and pepper to mashed yolks. Stir until creamy. Taste and adjust seasoning. -
Step 5
Divide yolk mixture into small bowls. Add different gel food colorings (green, orange, purple, black) to each bowl, stirring until vibrant and evenly mixed. -
Step 6
Fill piping bags (or Ziploc bags with snipped corners) with each colored yolk mixture. Pipe colored filling into egg white halves. -
Step 7
For each egg, place a whole black olive for the spider body. Slice another olive into 8 thin strips for legs. Gently insert 4 olive strips on each side of the body into the yolk filling. -
Step 8
Arrange deviled eggs on a platter. Optionally garnish with paprika, chia seeds, parsley, chives, or dill. Cover loosely and refrigerate for at least 30 minutes before serving.
Important Information
Nutrition Facts (Per Serving)
It is important to consider this information as approximate and not to use it as definitive health advice.
Allergy Information
Please check ingredients for potential allergens and consult a health professional if in doubt.