Stuffed Mushroom Eyeballs might sound like something out of a haunted cookbook, but I promise you, these delightful bites are far more delicious than they are terrifying! Imagine a platter of savory, earthy mushrooms, each one transformed into a surprisingly realistic, yet utterly appetizing, ‘eyeball’ complete with a vibrant green olive pupil. They’re the perfect conversation starter and a guaranteed showstopper at any gathering, eliciting gasps of surprise and delight in equal measure.
While traditional stuffed mushrooms have graced appetizer tables for decades, this whimsical, ghoulish twist truly comes into its own during the Halloween season or any spooky-themed party. It’s a playful nod to the macabre that appeals to both adults and children, making even the most squeamish guests eager to try one. These culinary creations aren’t just food; they’re an experience, adding an element of playful fright to your feast.
Beyond their undeniably captivating appearance, these Stuffed Mushroom Eyeballs are incredibly easy to prepare and absolutely burst with flavor. The tender mushroom caps are filled with a rich, seasoned breadcrumb and cheese mixture, offering a satisfying blend of textures – soft, savory, and slightly crunchy. They’re incredibly versatile, allowing for various fillings, and their bite-sized nature makes them the ultimate fuss-free appetizer. I find them to be utterly irresistible, disappearing from the platter almost as quickly as I can make them!

Ingredients:
- For the Stuffed Mushroom Eyeballs:
- 12-16 large cremini mushrooms (also known as baby bellas) or small portobello mushrooms, about 2-2.5 inches in diameter. When selecting your mushrooms, look for ones with a good, firm cap that is well-rounded and can hold a generous amount of filling. Uniform size will ensure even baking.
- 2 tablespoons olive oil, divided, plus extra for brushing the mushroom caps. Using quality olive oil enhances the overall flavor of the dish.
- 1 small yellow onion, very finely minced. A finely minced onion ensures it cooks down smoothly into the filling without leaving any noticeable raw or crunchy chunks, allowing it to integrate perfectly.
- 3-4 cloves garlic, minced. Fresh garlic provides the best, most aromatic flavor for our savory filling; avoid pre-minced jarred garlic if possible for superior taste.
- 8 ounces cream cheese, softened to room temperature. This is absolutely crucial for a smooth, lump-free, and creamy filling that is easy to mix and pipe (if you choose to do so).
- ½ cup freshly grated Parmesan cheese, plus 2 tablespoons for topping. Freshly grated cheese makes a significant difference in both flavor and how it melts, compared to the pre-grated varieties.
- ¼ cup plain breadcrumbs (Panko breadcrumbs also work wonderfully for a slightly crispier texture within the filling and as a binder).
- 2 tablespoons fresh chives, finely chopped. These add a delicate, fresh oniony flavor and a touch of vibrant green color to the filling.
- 2 tablespoons fresh parsley, finely chopped. Fresh parsley brightens up the flavor profile and adds a herbaceous note that complements the other ingredients beautifully.
- ½ teaspoon onion powder. This enhances the onion flavor without adding additional moisture to the filling, providing a concentrated savory depth.
- ¼ teaspoon smoked paprika (optional, but highly recommended as it adds a lovely depth of flavor, a subtle smoky essence, and a delicate reddish hue to the filling, which can subtly contribute to the “eyeball” aesthetic).
- Salt and freshly ground black pepper to taste. Start with ½ teaspoon salt and ¼ teaspoon pepper, then adjust according to your preference and the saltiness of your cheese.
- For the Eyeball Details:
- 12-16 small black olives (such as Kalamata or ripe black olives), pitted. These will be carefully sliced into rings or small pieces to form the distinct “pupils” of our “Stuffed Mushroom Eyeballs,” providing that essential dark center.
- Optional: ½ small red bell pepper or 2-3 jarred pimentos, finely diced or cut into tiny slivers. These vibrant red elements can be used to create a striking reddish “iris” effect around the black olive pupil, adding another layer of detailed realism to your spooky treats.
- Optional: Red food coloring (gel or liquid) and a tiny amount of cream cheese (about 1 teaspoon) for creating “bloodshot” veins. Alternatively, a tiny drizzle of sriracha or your favorite hot sauce can give a similar effect with an added spicy kick. This is perfect for truly enhancing the ghoulish presentation.
Instructions:
Phase 1: Preparing Your Canvas – The Mushroom Caps
- Preheat and Prepare Your Workspace: Begin by preheating your oven to a steady 375°F (190°C). An accurately preheated oven is crucial for even cooking and proper browning of your “Stuffed Mushroom Eyeballs.” While the oven is coming to temperature, line a large baking sheet with parchment paper or a silicone baking mat. This simple step will not only prevent the mushrooms from sticking but also make your cleanup significantly easier after baking.
- Clean and Destem the Mushrooms with Care: Gently wipe each mushroom cap with a slightly damp paper towel to meticulously remove any dirt or lingering debris. It’s important to avoid rinsing them directly under running water, as mushrooms are incredibly porous and will absorb water like sponges, leading to soggy “Stuffed Mushroom Eyeballs” and a diluted flavor profile. Once clean, carefully twist or gently pull out the stems from the mushroom caps. You are aiming to create a nice, deep cavity in each mushroom, which will serve as the perfect vessel for our generous and delicious filling. While we won’t be using the stems in this particular “Stuffed Mushroom Eyeballs” recipe, don’t discard them! They are excellent for making flavorful vegetable broth or can be finely chopped and added to other savory dishes. For this recipe, a clean, hollow cap is absolutely key to our “eyeball” design.
- Season and Arrange the Caps: Lightly brush the outside of each mushroom cap with a small amount of olive oil using a pastry brush. This crucial step helps them to brown beautifully during baking, prevents them from drying out, and enhances their earthy flavor. Arrange the prepared mushroom caps, ensuring the cavity-side is facing up, on your lined baking sheet. Give them a little space so they can bake evenly without steaming each other.
Phase 2: Crafting the Creamy Eyeball Filling
- Sauté the Aromatics to Perfection: In a medium-sized skillet, heat 1 tablespoon of olive oil over medium heat. Add your very finely minced yellow onion and cook, stirring occasionally, until it becomes wonderfully soft, translucent, and slightly golden, which typically takes about 5-7 minutes. You want the onion to be extremely tender so it melts seamlessly into the cream cheese filling, providing flavor without any harsh texture.
- Infuse with Garlic Aroma: Stir in the minced garlic and continue to cook for just another 1-2 minutes, until it becomes beautifully fragrant. Exercise caution here to avoid burning the garlic, as burnt garlic can impart a bitter, unpleasant taste to your “Stuffed Mushroom Eyeballs.” The goal is to release its aromatic qualities, which will significantly enhance the overall savory profile of our filling.
- Build the Cream Cheese Base: In a large mixing bowl, combine your softened cream cheese, the ½ cup of freshly grated Parmesan cheese, the plain breadcrumbs (or Panko), your finely chopped fresh chives, and finely chopped fresh parsley. Now, add the carefully sautéed onion and garlic mixture to this bowl.
- Season and Thoroughly Mix the Filling: Season the mixture with ½ teaspoon of salt and ¼ teaspoon of freshly ground black pepper, along with the onion powder and smoked paprika (if you’re using it). Using a sturdy spoon or a rubber spatula, mix all the ingredients together thoroughly until they are well combined and the mixture is perfectly smooth and uniform. This step is absolutely crucial for an evenly flavored and textured filling. You might even find it helpful to use your hands (wearing clean gloves, of course) to ensure everything is perfectly incorporated and boasts that ideal smooth consistency. Take a moment to taste the mixture and adjust the seasonings as needed. Remember, the mushrooms themselves are quite mild, so the filling needs to carry the bulk of the flavor. If it tastes a little bland, do not hesitate to add a pinch more salt or pepper, or even a dash more onion powder or paprika to really make the flavors sing. This attention to detail will make your “Stuffed Mushroom Eyeballs” truly outstanding.
Phase 3: Assembling Your Stuffed Mushroom Eyeballs
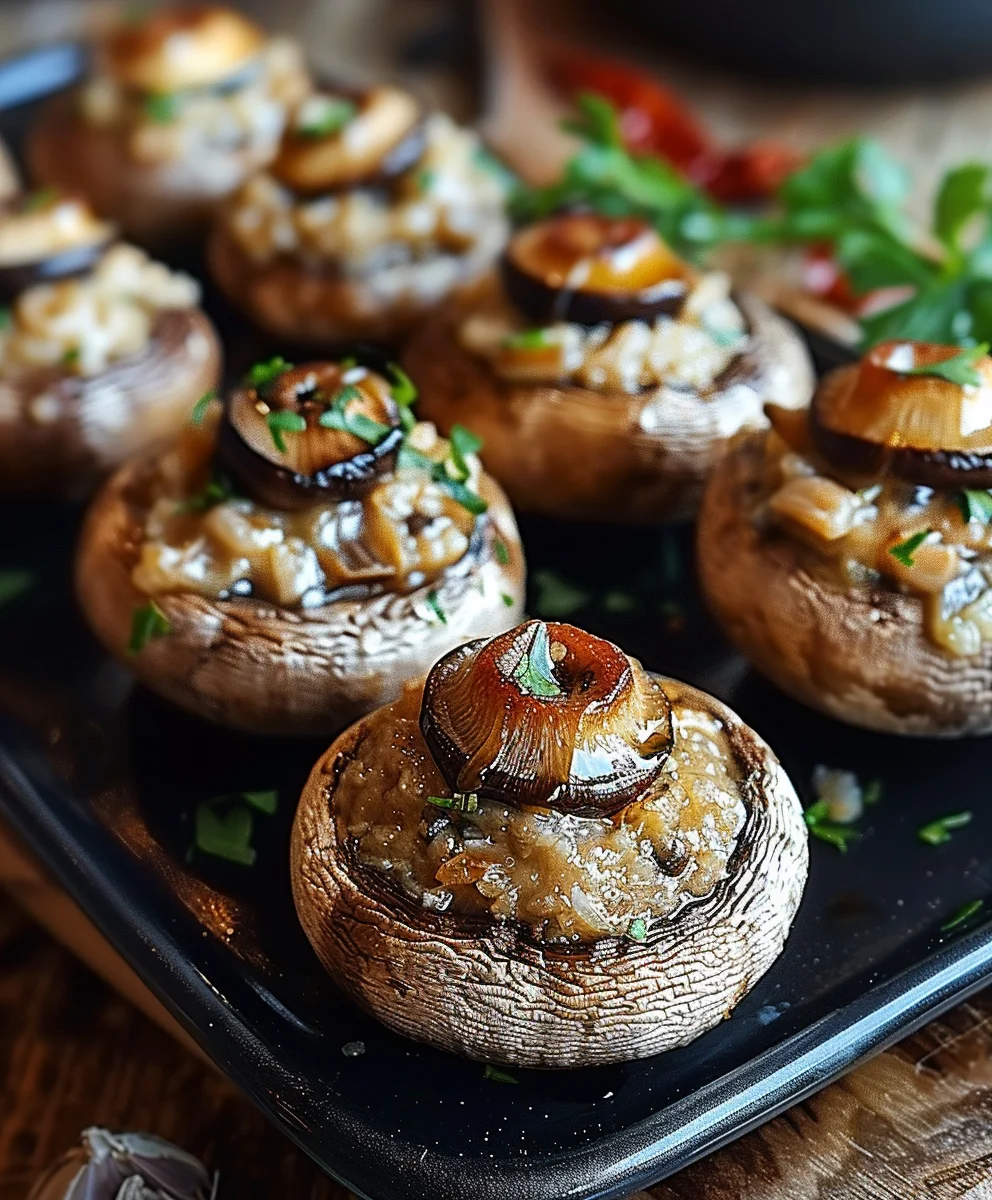
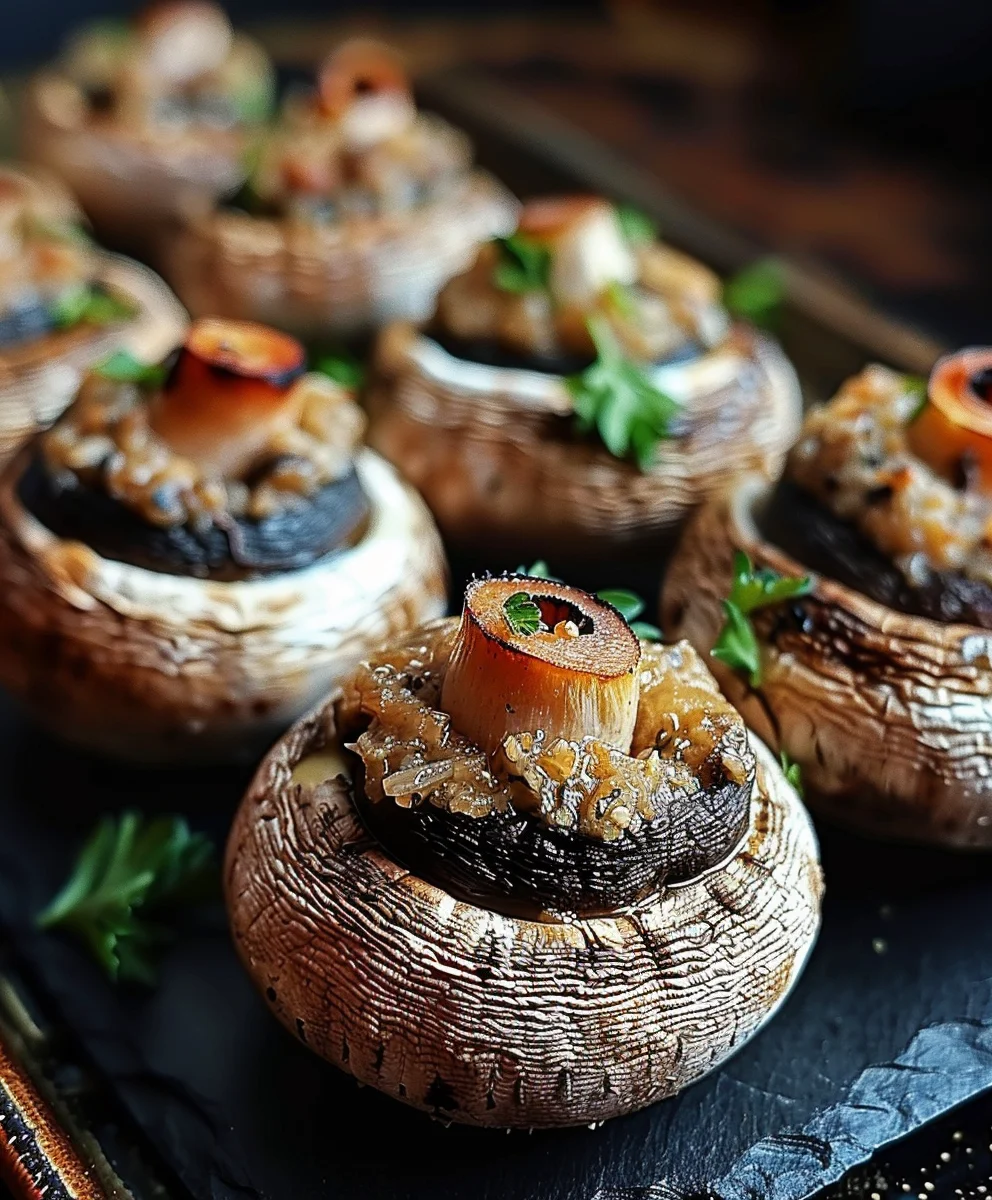
- Generously Fill the Mushroom Caps: Using a small spoon or even a small cookie scoop, generously fill each mushroom cap with the creamy, savory cream cheese mixture. Gently press the filling down to ensure it’s compact and then mound it nicely over the opening of the mushroom. You want a substantial amount of filling in each mushroom to truly create a plump, rounded “eyeball” shape. Don’t be shy here; a well-filled “Stuffed Mushroom Eyeball” is a satisfying “Stuffed Mushroom Eyeball”! The filling should form a slight, inviting dome over the cap’s opening.
- Add the Parmesan Topping: Now, evenly sprinkle the remaining 2 tablespoons of freshly grated Parmesan cheese over the top of each generously filled mushroom. This final touch of Parmesan will create a beautiful golden crust as they bake, adding another delightful layer of texture and an extra burst of savory goodness to our “Stuffed Mushroom Eyeballs.”
- Create the Striking “Pupils”: This is where the magic of transformation happens – turning them into realistic “eyeballs”! Take your pitted black olives. For the most visually authentic effect, you can slice them into thin, even rings and carefully place one ring directly in the absolute center of the cheese topping on each mushroom. Alternatively, if your olives are very small, you can simply place a whole small olive, or a tiny, carefully cut piece of a larger olive, in the center. The deep black olive forms the perfect, unmistakable “pupil” for our spooky and delicious treats.
- Add Optional “Iris” Details for Realism: If you’re aiming for an extra level of intricate detail, carefully arrange tiny, finely diced pieces or delicate slivers of red bell pepper or pimento around the black olive “pupil.” This creates a vivid reddish “iris” effect, making your “Stuffed Mushroom Eyeballs” even more visually striking, ghoulishly realistic, and appealingly artistic. This step is entirely optional, of course, but it truly adds a fantastic and memorable touch, especially for Halloween-themed parties or gatherings where presentation is key.
Phase 4: Baking and Finishing Touches
- Bake to Golden Perfection: Carefully transfer the baking sheet, adorned with your beautifully assembled “Stuffed Mushroom Eyeballs,” to your preheated oven. Bake for approximately 20-25 minutes, or until the mushroom caps are wonderfully tender, the rich filling is heated through and bubbly, and the Parmesan cheese topping has achieved a glorious golden-brown color and a slightly crispy texture. The exact baking time may vary slightly depending on the specific size of your mushrooms and the calibration of your individual oven, so keep a watchful eye on them, especially towards the end, to prevent any over-browning. You’ll know they’re perfectly done when they emanate an absolutely divine aroma and look irresistibly inviting and spooky.
- Optional “Bloodshot” Veins (Post-Bake Artistry): For an ultimate ghoulish effect and to truly push the “eyeball” illusion, once your “Stuffed Mushroom Eyeballs” are fresh out of the oven, you can create realistic “bloodshot” veins. In a tiny bowl, mix a mere drop or two of red food coloring (gel works best for intensity) with about a teaspoon of softened cream cheese until you achieve a vibrant, deep red hue. Using a very fine, clean paintbrush (a brand-new one or a dedicated food-safe brush!) or even a toothpick, carefully draw thin, delicate, and squiggly lines radiating outwards from the black olive “pupil” over the lighter white or tan filling. Alternatively, a very thin, artful drizzle of sriracha or your favorite hot sauce can achieve a remarkably similar reddish, veiny look, simultaneously adding a delightful little kick of spice. This final, artistic touch truly elevates the spooky aesthetic of your “Stuffed Mushroom Eyeballs” to an unforgettable level!
- Rest and Serve for Optimal Enjoyment: Allow the “Stuffed Mushroom Eyeballs” to cool for just a few minutes on the baking sheet before carefully transferring them to your chosen serving platter. They are undoubtedly best served warm, as the flavors are most vibrant and the filling most creamy, but I can tell you from experience, they are also quite delicious and perfectly enjoyable at room temperature, making them excellent for party buffets.
Phase 5: Serving Suggestions and Tips for Your Stuffed Mushroom Eyeballs
- Masterful Presentation: Artfully arrange your “Stuffed Mushroom Eyeballs” on a platter. For an impactful Halloween party display, consider scattering some eerie fake spiderwebs, a few plastic spiders, or even some dry ice (used safely, of course) around the platter to truly enhance the thematic experience. A vibrant bed of fresh, dark leafy greens, such as arugula or spinach, can also make the “eyeballs” pop visually, providing a lovely contrasting backdrop to their ghoulish charm.
- Perfect Pairing Companions: These savory “Stuffed Mushroom Eyeballs” are absolutely fantastic as a standalone appetizer, but they also pair wonderfully with a variety of other finger foods. Consider serving them alongside a vibrant crudité platter, a sophisticated cheese board, or even small bowls of complementary dips like a creamy hummus or a savory spinach dip. Their rich flavor profile makes them versatile.
- Smart Make-Ahead Tips: To streamline your party prep, you can prepare the entire mushroom filling mixture up to 24 hours in advance. Simply store it in an airtight container in the refrigerator. You can also clean and destem the mushrooms a day ahead, keeping them loosely covered in the fridge. When you’re ready to bake, simply fill the mushrooms, add the intricate “eyeball” details, and then bake as directed. If you’re baking them directly from a chilled state, you might need to add an extra 5-10 minutes to the baking time to ensure they heat through properly.
- Storing Leftovers: Any leftover “Stuffed Mushroom Eyeballs” can be stored safely in an airtight container in the refrigerator for up to 3 days. To reheat them, gently warm them in the oven at 300°F (150°C) until they are heated through, which helps maintain their texture. While a microwave can be used, be aware that the texture of the mushrooms and filling might become slightly softer.
-
Exciting Variations to Explore:
- A Dash of Spice: For those who truly enjoy a bit of heat, consider adding a generous pinch of red pepper flakes directly into the filling mixture. This provides a delightful subtle warmth that can awaken the palate.
- Herbaceous Twist: Feel free to experiment with different fresh herbs such as a tiny amount of fresh thyme or finely chopped fresh oregano, but use them sparingly as their flavors are much stronger and more assertive than chives or parsley.
- Heartier Meat Lover’s Option: For a more substantial and robust version, you could sauté a tablespoon of finely crumbled cooked sausage or crispy bacon bits and thoroughly mix it into the cream cheese filling. This would introduce an incredible extra layer of savory depth and umami to your “Stuffed Mushroom Eyeballs.”
- Vegan-Friendly Adaptation: To create a delicious plant-based version, simply swap out the dairy cream cheese for a high-quality dairy-free cream cheese alternative, use nutritional yeast in place of Parmesan for that cheesy flavor, and ensure that your chosen breadcrumbs are certified vegan. The striking “eyeball” details can remain exactly the same!
- Creative Cheese Swap: While Parmesan is a timeless and classic choice, an intriguing blend of finely grated Gruyère and Fontina cheese could also offer a wonderfully rich, nutty, and exceptionally melty filling, adding another dimension of flavor.
Remember, the ultimate key to creating truly outstanding “Stuffed Mushroom Eyeballs” is to enjoy the entire creative process and feel free to customize them to perfectly suit your personal taste preferences and artistic vision! Happy spooky cooking!
Conclusion:
I genuinely believe that this recipe is an absolute treasure, a culinary gem that deserves a permanent spot in your repertoire. What makes these delightful morsels a true must-try isn’t just their undeniable charm and the sheer fun they bring to any table, but also their incredible versatility and surprisingly straightforward preparation. From the moment I first perfected the balance of textures and flavors, I knew I had stumbled upon something truly special. Each bite offers a harmonious symphony of earthy mushrooms, a rich, savory, and perfectly seasoned filling, creating an experience that is both comforting and exciting. They’re not overly complicated, meaning you don’t need to be a seasoned chef to achieve stunning results, which is a huge win in my book. The visual appeal alone makes them an instant conversation starter, but it’s the robust, satisfying taste that will have everyone reaching for more, making them a guaranteed crowd-pleaser for any gathering, big or small. Trust me when I say, the joy of seeing these delightful creations come to life in your own kitchen is immense.
When it comes to serving these fantastic bites, you have a wealth of options! They are absolutely divine served warm, straight from the oven, allowing the flavors to meld beautifully and the filling to remain perfectly tender. Arrange them artfully on a large platter, perhaps garnished with a sprinkle of fresh, vibrant parsley or delicate chives to add a pop of color and a touch of herbal freshness. For an extra layer of enjoyment, consider offering a light, creamy dipping sauce on the side – a simple garlic aioli, a zesty lemon-herb yogurt dip, or even a spicy sriracha mayo could elevate the experience. Don’t be afraid to get creative with your presentation; a rustic wooden board or a brightly colored ceramic dish can make them even more inviting. As for variations, the possibilities are truly endless, allowing you to tailor this recipe to your own taste and what you have on hand. Feeling cheesy? Experiment with different blends – a smoky gouda, a sharp cheddar, or even a creamy goat cheese could transform the filling. For a touch of heat, a pinch of red pepper flakes or a dash of hot sauce can add a delightful kick. You could also introduce finely diced sun-dried tomatoes for a burst of umami, or perhaps some toasted breadcrumbs mixed into the filling for an extra layer of texture. Vegetarian? The current recipe is perfect. Looking for a meatier option? A small amount of finely crumbled, cooked sausage or bacon could be incorporated into the filling for an even heartier appetizer. The beauty of these Stuffed Mushroom Eyeballs lies in their adaptability, making them a recipe you can truly make your own, time and time again.
Ready to Unleash Your Inner Chef?
Now that you’ve got the full scoop, I truly hope you’re feeling inspired, motivated, and excited to dive into your kitchen and give this incredible recipe a try. There’s a profound sense of accomplishment and immense satisfaction that comes from creating something so visually appealing and, more importantly, incredibly delicious from scratch. I promise you, the effort involved is minimal, but the culinary reward – both in terms of flavor and the pure joy of sharing something unique and memorable with your loved ones – is immeasurable. Imagine the delighted expressions on your guests’ faces as they discover these charming appetizers! Once you’ve whipped up your own batch, I would absolutely, unequivocally love to hear all about your experience. Did you stick to the recipe exactly, or did you find yourself putting your own creative spin on the filling? What did your friends and family think of these delightful bites? Please don’t be shy; share your photos, your triumphs, and any clever variations or serving suggestions you discover. Your feedback, your personal culinary adventures, and your unique perspectives truly inspire me and our entire community of enthusiastic home cooks. Let’s make some delicious memories together and spread the joy of incredible food!
Creepy Stuffed Mushroom Eyeballs: Perfect Halloween Appetizer
Stuffed Mushroom Eyeballs are a delightful and spooky appetizer, perfect for Halloween or any themed party. Savory, earthy mushrooms are transformed into realistic ‘eyeballs’ with a creamy, seasoned filling and an olive pupil. They’re easy to prepare, burst with flavor, and are sure to be a showstopper, eliciting gasps of surprise and delight.
Ingredients
-
16 large white or cremini mushrooms
-
8 oz cream cheese, softened
-
1/2 cup cooked ground beef (or crumbled beef bacon)
-
1/4 cup grated Parmesan cheese
-
1 clove garlic, minced
-
1 tablespoon fresh parsley, chopped
-
1/4 teaspoon salt
-
1/4 teaspoon black pepper
-
16 small black olives, pitted
-
Olive oil or cooking spray
Instructions
-
Step 1
Preheat oven to 375°F (190°C). Line a large baking sheet with parchment paper. Gently wipe mushrooms clean; remove stems. Lightly brush mushroom caps with olive oil and arrange cavity-side up on the baking sheet. -
Step 2
In a mixing bowl, combine softened cream cheese, cooked ground beef, Parmesan cheese, minced garlic, chopped fresh parsley, salt, and black pepper. Mix thoroughly until smooth and well combined. -
Step 3
Generously fill each mushroom cap with the cream cheese mixture, mounding it slightly to create a plump ‘eyeball’ shape. -
Step 4
Place one pitted black olive in the absolute center of the filling on each mushroom to form the ‘pupil’. -
Step 5
Bake for 20-25 minutes, or until mushroom caps are tender, filling is heated through and bubbly, and the tops are lightly golden. -
Step 6
(Optional): For a ghoulish effect, after baking, mix a tiny drop of red food coloring with a teaspoon of cream cheese or use a thin drizzle of sriracha to draw ‘bloodshot’ veins radiating from the olive ‘pupil’. Let cool for a few minutes before serving warm.
Important Information
Nutrition Facts (Per Serving)
It is important to consider this information as approximate and not to use it as definitive health advice.
Allergy Information
Please check ingredients for potential allergens and consult a health professional if in doubt.