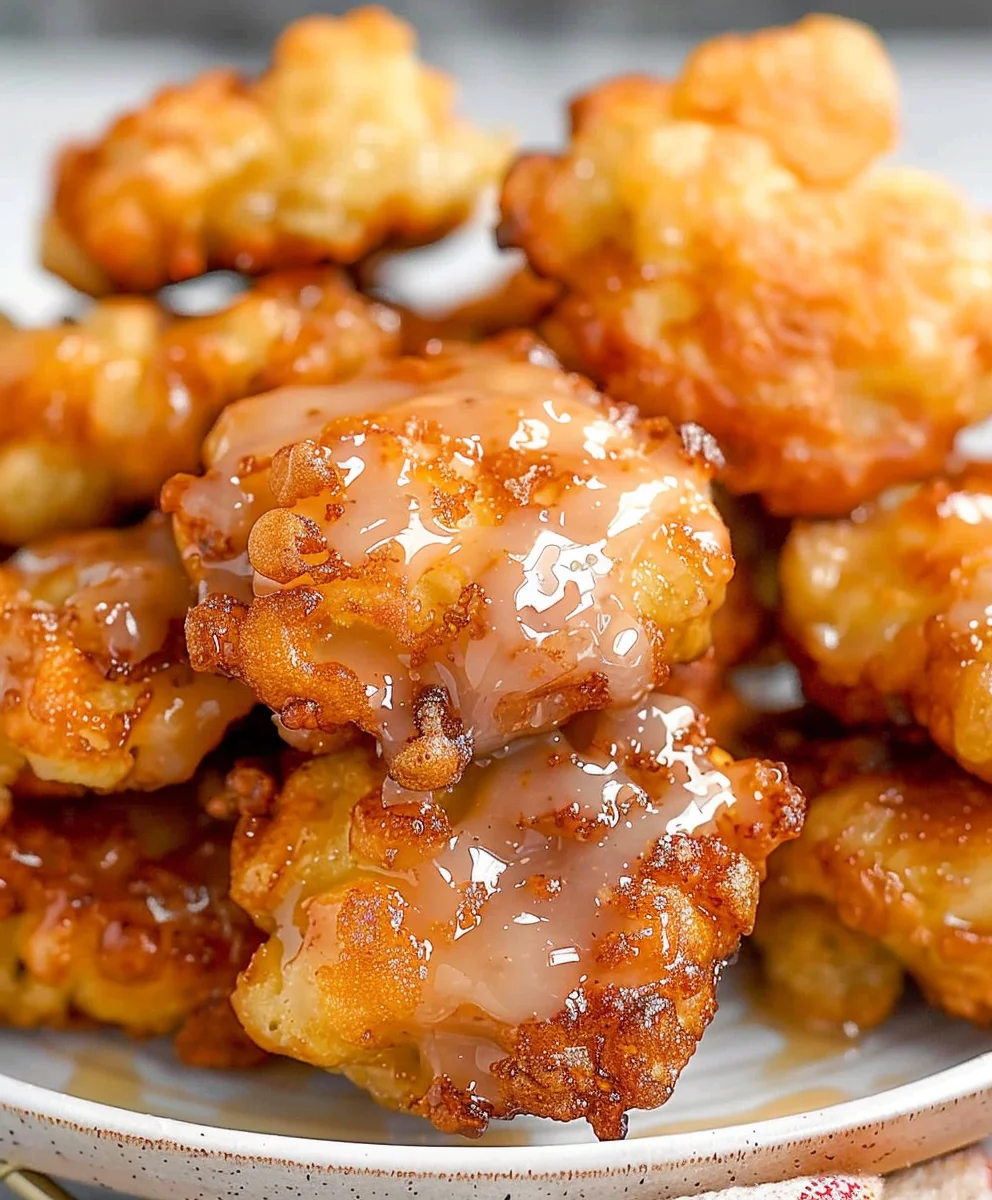
Air Fryer Apple Fritters offer a truly delightful twist on a beloved classic, promising all the comforting flavors and textures without the traditional deep-frying fuss. Imagine biting into a perfectly golden-brown fritter, crisp on the outside and wonderfully tender inside, bursting with warm, cinnamon-spiced apple chunks. For generations, apple fritters have graced breakfast tables and dessert plates, particularly during the autumn harvest season, symbolizing warmth, home, and simple pleasures. Traditionally, these sweet treats required a pot of hot oil, creating a delicious but often messy and less-than-light indulgence.
Embrace the Convenience of Air Fryer Apple Fritters
I know many of you cherish that nostalgic taste but might shy away from the clean-up and heavier feel of deep-fried foods. That’s precisely why the innovation of crafting these delicious Air Fryer Apple Fritters has become such a game-changer. It’s the perfect blend of tradition and modern convenience, allowing you to enjoy that irresistible combination of sweet apple and warm spice, encased in a delightfully crisp coating, all with significantly less oil. Get ready to experience the pure joy of a freshly made apple fritter, elevated for today’s kitchen.

Ingredients:
-
For the Air Fryer Apple Fritters:
- 1 ½ cups (180g) all-purpose flour, sifted
- ⅓ cup (65g) granulated sugar
- 2 teaspoons baking powder
- ½ teaspoon ground cinnamon
- ¼ teaspoon ground nutmeg
- ¼ teaspoon salt
- 1 large egg, at room temperature
- ½ cup (120ml) milk, at room temperature (I prefer whole milk for richness)
- 2 tablespoons unsalted butter, melted and slightly cooled
- 1 teaspoon vanilla extract
- 2 medium apples (about 1 ½ cups diced), such as Granny Smith or Honeycrisp, cored, peeled, and finely diced
- Cooking spray or a light brushing of oil for the air fryer basket
-
For the Sweet Glaze:
- 1 ½ cups (180g) powdered sugar (confectioners’ sugar), sifted
- 2-3 tablespoons milk (start with 2 and add more if needed for desired consistency)
- ½ teaspoon vanilla extract
Preparing the Apples and Wet Ingredients
- Prepare the Apples: First things first, let’s get those delicious apples ready. I like to choose a firm, slightly tart apple like a Granny Smith or a sweet-tart Honeycrisp. You’ll want to carefully core, peel, and then finely dice your apples. My personal tip here is to make sure the dice is quite small, about ¼-inch pieces. This ensures that the apple pieces soften beautifully during the air frying process and are evenly distributed throughout each of your delightful Air Fryer Apple Fritters. Larger pieces might not cook through as well or could make the batter more challenging to portion. Once diced, set them aside while we work on the other components.
- Combine Wet Ingredients: In a medium-sized mixing bowl, I like to bring together all of my liquid components. Whisk together the large egg (ensure it’s at room temperature; this helps it emulsify better with other ingredients), the milk (again, room temperature is ideal for a smoother batter), the melted and slightly cooled unsalted butter, and the fragrant vanilla extract. Whisk these until they are thoroughly combined and present a smooth, uniform mixture. This liquid base is crucial for developing the structure and flavor of our Air Fryer Apple Fritters, so don’t rush this step. We’re aiming for consistency and a good start to our batter.
Creating the Apple Fritter Batter
- Whisk Dry Ingredients: Now, let’s move on to the dry ingredients for our Air Fryer Apple Fritters. In a large mixing bowl – you’ll want a generous size for all the mixing – combine the sifted all-purpose flour, granulated sugar, baking powder, ground cinnamon, ground nutmeg, and salt. I always sift my flour to prevent lumps and to ensure a lighter, airier texture in the final fritter. Use a whisk to really incorporate these dry ingredients well. You want to make sure the baking powder and spices are evenly distributed throughout the flour mixture, which is key for consistent leavening and flavor in every bite. This careful mixing of dry ingredients sets the stage for a perfect fritter.
- Combine Wet and Dry Mixtures: It’s time to bring our wet and dry components together! Pour the combined wet ingredients from step 2 into the large bowl with your dry ingredients. Using a sturdy spatula or a wooden spoon, gently mix them until just combined. My go-to advice here is to avoid overmixing. Overmixing can develop the gluten in the flour too much, leading to tough Air Fryer Apple Fritters rather than the tender, light texture we’re aiming for. A few lumps in the batter are perfectly fine; in fact, they’re often a sign that you haven’t overmixed. We’re looking for a thick, shaggy batter at this stage.
- Fold in the Diced Apples: Finally, add your finely diced apples from step 1 into the batter. With your spatula, gently fold the apples into the batter until they are evenly distributed. Again, be careful not to overmix. The goal is to incorporate the apples throughout the batter without stirring vigorously. This step transforms our simple batter into the quintessential apple fritter batter, brimming with sweet, juicy apple pieces ready to be cooked into delicious Air Fryer Apple Fritters. The batter will be quite thick and somewhat sticky, which is exactly what we want for forming our fritters.
Air Frying the Apple Fritters
- Preheat Your Air Fryer: Before we start dropping batter, it’s crucial to preheat your air fryer. Set your air fryer to 350°F (175°C) and let it preheat for about 5 minutes. Preheating is a game-changer for air frying; it ensures an even cook and that lovely crisp exterior from the moment the food hits the basket. While it’s preheating, lightly spray the air fryer basket with cooking spray or brush it with a thin layer of oil. This prevents sticking and helps create that beautiful golden-brown crust on our Air Fryer Apple Fritters.
- Portion and Shape the Fritters: Now for the fun part! Using two spoons, or a small ice cream scoop, carefully drop spoonfuls of the apple fritter batter into the preheated and greased air fryer basket. I usually aim for about 2-3 tablespoons of batter per fritter. My top tip here is to flatten them slightly with the back of a spoon if they are too high, ensuring they cook through evenly. Remember, do not overcrowd the basket. Depending on the size of your air fryer, you’ll likely need to cook these Air Fryer Apple Fritters in batches. Overcrowding reduces air circulation, leading to steamed rather than crispy fritters. I can usually fit about 4-6 fritters in my air fryer at a time, leaving a little space between each one.
- Begin Air Frying – First Side: Place the basket back into the air fryer. Cook the Air Fryer Apple Fritters for 8-10 minutes on the first side. During this initial cooking phase, the fritters will begin to puff up and turn a light golden color on the bottom. Keep an eye on them; air fryer models can vary, so your exact timing might be slightly different. What we’re looking for is a firm exterior and a beginning of color development. This first cook is essential for setting the structure and starting the golden-brown crispness we all crave in a good apple fritter.
- Flip and Continue Air Frying: After the initial 8-10 minutes, carefully open the air fryer. Using tongs or a spatula, gently flip each Air Fryer Apple Fritter to the other side. This ensures both sides get equally crispy and golden. Once flipped, continue to air fry for another 5-7 minutes, or until the fritters are deeply golden brown, puffed up, and cooked through in the center. They should feel light and airy when gently pressed. The internal temperature, if you were to check with a thermometer, should reach around 200-210°F (93-99°C). This careful two-stage cooking process guarantees perfect Air Fryer Apple Fritters every time.
- Remove and Repeat Batches: Once your first batch of Air Fryer Apple Fritters is beautifully golden and cooked, carefully remove them from the air fryer basket and place them on a wire rack set over a baking sheet. The wire rack is important for allowing air to circulate around them, preventing the bottoms from becoming soggy while they cool slightly. If you have more batter, repeat steps 7-9, making sure to lightly grease the basket again if needed for subsequent batches. While one batch is cooking, I often start preparing the glaze so everything is ready to go as soon as the fritters are done.
Making the Irresistible Glaze
- Combine Glaze Ingredients: While your Air Fryer Apple Fritters are air frying or cooling slightly on the rack, let’s whip up that essential sweet glaze. In a small to medium bowl, combine the sifted powdered sugar, 2 tablespoons of milk, and the remaining ½ teaspoon of vanilla extract. Sifting the powdered sugar is just as important here as with the flour; it prevents lumps and ensures a silky-smooth glaze for our fritters.
- Whisk Until Smooth: Using a small whisk, thoroughly combine all the glaze ingredients. Start with 2 tablespoons of milk. If the glaze appears too thick and doesn’t flow easily, add the remaining tablespoon of milk, a tiny bit at a time, until you reach your desired consistency. I aim for a glaze that is thick enough to coat the back of a spoon, yet thin enough to drip off slowly. It should be smooth, without any lumps, and have a lovely pourable consistency. This homemade glaze is the perfect finishing touch, adding an extra layer of sweetness and moisture to our warm Air Fryer Apple Fritters.
Glazing and Serving Your Air Fryer Apple Fritters
- Dip the Warm Fritters: This is my favorite part! Once the Air Fryer Apple Fritters have cooled for just a few minutes – they should still be warm, but not piping hot – they are ready for their glaze bath. Gently dip each warm fritter into the prepared glaze, turning to coat both sides or just the top, depending on your preference. I like to submerge them completely for maximum sweetness! The warmth of the fritters helps the glaze set beautifully and adhere nicely to their surface.
- Allow Excess Glaze to Drip Off: After dipping, lift each fritter out of the glaze and allow any excess to drip back into the bowl for a few seconds. Then, return the glazed Air Fryer Apple Fritters to the wire rack set over the baking sheet. This setup catches any drips and allows the glaze to set properly without making a mess on your counter. Let them sit for about 5-10 minutes, or until the glaze has firmed up slightly. The glaze will form a thin, slightly crisp shell that perfectly complements the soft, apple-filled interior.
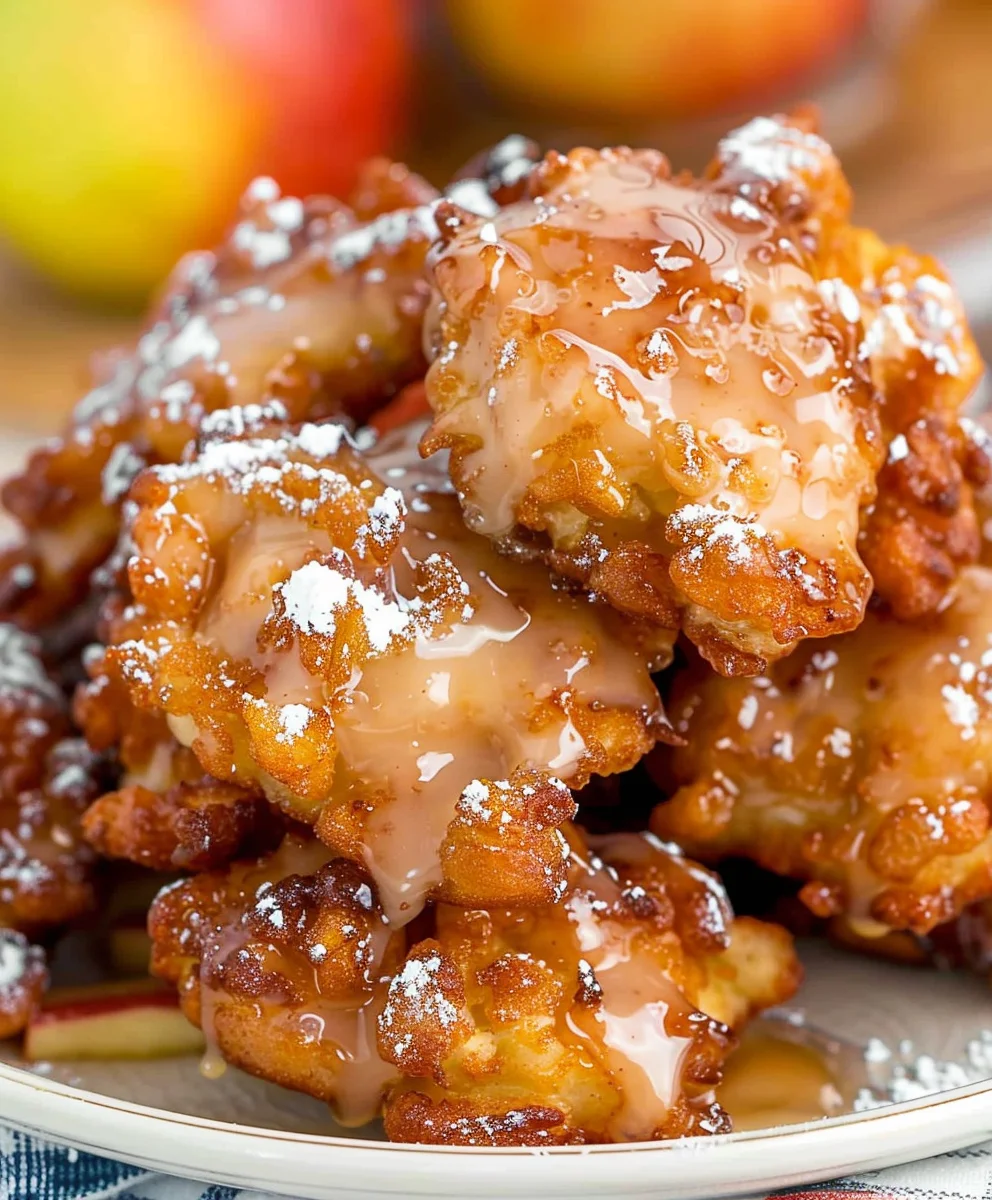
- Serve and Enjoy!: And there you have it – your absolutely delicious, homemade Air Fryer Apple Fritters are ready to be devoured! I find these are best enjoyed fresh and still slightly warm, when the glaze is perfectly set and the apples inside are tender and fragrant. They make an incredible breakfast treat, a delightful dessert, or a wonderful snack with a cup of coffee or tea. These Air Fryer Apple Fritters are a comforting classic made healthier and easier, proving that you don’t need a deep fryer to achieve amazing results. Enjoy every single bite!
Conclusion:
This recipe, dear friends, isn’t just another dessert; it’s an experience. I truly believe that once you try these, they’ll become a cherished part of your culinary repertoire. What makes these particular Air Fryer Apple Fritters so exceptional? It’s the magical combination of convenience, incredible flavor, and that perfectly crisp-on-the-outside, tender-on-the-inside texture that makes them utterly irresistible. Forget the mess and guilt often associated with deep-frying; our air fryer version delivers all the comforting deliciousness you crave with a fraction of the oil. They’re quick enough for a spontaneous weekend treat but impressive enough to share with guests, ensuring you can whip up a batch whenever a craving strikes. The aroma alone as they cook will have everyone gathering in the kitchen, eager for a taste, filling your home with a cozy, inviting scent of cinnamon and sweet apples. This isn’t just about making fritters; it’s about creating warmth, joy, and delicious memories that linger long after the last bite. The simplicity of the ingredients paired with the ease of the air fryer method makes this a truly approachable recipe for bakers of all skill levels, guaranteeing a delightful result every single time.
Now, let’s talk about taking your fritter experience to the next level. While they are absolutely divine straight out of the air fryer with just a simple dusting of powdered sugar, I love experimenting with different toppings and serving styles. Here are some of my favorite ways to enjoy these delectable treats, offering both classic comfort and exciting new twists:
- Classic Glaze: A simple powdered sugar glaze (made with powdered sugar, a touch of milk, and a splash of vanilla extract) is always a winner. It adds an extra layer of sweetness and a beautiful sheen that makes them look even more professional and appealing. This glaze sets perfectly, offering a slight crackle with each bite.
- Maple Pecan Drizzle: For a more autumnal or sophisticated feel, try a rich maple glaze with chopped toasted pecans sprinkled generously on top. The nutty crunch and the deep, caramelized maple flavor complement the sweet, spiced apples within the fritters beautifully, creating a truly gourmet experience.
- Ice Cream Dream: Serve warm Air Fryer Apple Fritters with a generous scoop of high-quality vanilla bean ice cream. The contrast of the warm, crisp fritter and the cold, melting ice cream is pure bliss. A dollop of fresh whipped cream or a decadent drizzle of homemade caramel sauce would also be a fantastic addition, elevating this to a truly indulgent dessert.
- Savory-Sweet Twist: While fritters are typically a sweet indulgence, you could slightly reduce the sugar in the batter and serve them alongside a scoop of thick Greek yogurt mixed with a hint of honey and cinnamon for a healthier, tangier breakfast or brunch option. The creamy yogurt provides a wonderful counterpoint to the fritter’s texture.
- Fruit Variations: Don’t limit yourself solely to apples! Once you’ve mastered the Air Fryer Apple Fritters, feel free to get creative. Try substituting the apples with other firm fruits like ripe pears, tender peaches (especially when they’re in season), or even chunks of pineapple for a delightful tropical twist. Just be sure to pat any wetter fruits very dry before incorporating them into the batter to avoid a soggy texture.
- Spice It Up: Play with your spices! Beyond the classic cinnamon, a pinch of nutmeg, allspice, or even a tiny bit of ground cardamom can add wonderful depth and warmth to the flavor profile. Imagine a chai-spiced fritter for a cozy evening treat – an aromatic adventure for your taste buds!
- Citrus Zest: Add a tablespoon of finely grated orange or lemon zest to the batter for a brighter, more aromatic fritter. This subtle zing provides a delightful freshness and works particularly well if you’re planning a lighter, more delicate glaze or simply enjoying them plain.
I genuinely hope that you feel inspired to give this recipe for Air Fryer Apple Fritters a try very soon. It’s incredibly rewarding to create something so delicious with your own hands, and I promise you, the smiles these fritters will bring to your family and friends will be worth every moment in the kitchen. Don’t be shy – dive in and experience the joy of homemade goodness!
Share Your Masterpiece!
I absolutely love hearing from you and seeing your culinary creations. Once you’ve whipped up a batch of these glorious fritters, please consider sharing your experience. Did you add a unique twist? What was your favorite topping? Did your family devour them in minutes, asking for more? I’d be thrilled to know! Your feedback, tips, and photos not only make my day but also inspire other readers in our community to try new things and find their own love for cooking. You can leave a comment below with your thoughts, triumphs, and any clever variations you discovered. Let’s build a delightful collection of Air Fryer Apple Fritters stories together, sharing the joy and deliciousness!
Remember, cooking should always be an adventure, a joyous exploration of flavors and textures. This recipe is your canvas; feel free to paint with your own culinary brush. Happy air frying, and enjoy every single bite!
Crispy Air Fryer Apple Fritters – A Sweet & Easy Treat
Air Fryer Apple Fritters offer a truly delightful twist on a beloved classic, promising all the comforting flavors and textures without the traditional deep-frying fuss. Imagine biting into a perfectly golden-brown fritter, crisp on the outside and wonderfully tender inside, bursting with warm, cinnamon-spiced apple chunks.
Ingredients
-
1.5 cups gluten-free flour
-
¼ cup brown sugar
-
2.5 teaspoon baking powder
-
1 teaspoon salt
-
1 teaspoon pumpkin spice
-
2 large eggs
-
2 teaspoon vanilla extract
-
3 large apples
-
2 tablespoon butter
-
½ regular lemon juice
Instructions
-
Step 1
Core, peel, and finely dice 3 large apples into ¼-inch pieces. Set aside. -
Step 2
In a medium bowl, whisk 2 large eggs, 2 tsp vanilla extract, 2 tbsp melted butter, and ½ tsp lemon juice until smooth. -
Step 3
In a large bowl, whisk 1 ½ cups gluten-free flour, ¼ cup brown sugar, 2 ½ tsp baking powder, 1 tsp salt, and 1 tsp pumpkin spice until well combined. -
Step 4
Pour wet ingredients into dry. Mix gently until just combined, avoiding overmixing. Fold in diced apples until evenly distributed. Batter will be thick. -
Step 5
Preheat air fryer to 350°F (175°C) for 5 minutes; lightly spray the basket. Drop 2-3 tablespoons of batter per fritter, flattening slightly. Air fry for 8-10 minutes. -
Step 6
Carefully flip fritters. Air fry for another 5-7 minutes until deeply golden brown, puffed up, and cooked through (internal temperature 200-210°F/93-99°C). Transfer cooked fritters to a wire rack. -
Step 7
Repeat frying for remaining batter, lightly greasing the basket if needed for subsequent batches. -
Step 8
In a small bowl, combine 1 ½ cups sifted powdered sugar, 2-3 tablespoons milk (start with 2 and add more if needed for desired consistency), and ½ teaspoon vanilla extract. Whisk thoroughly until smooth and pourable. -
Step 9
Dip warm fritters into the prepared glaze, coating both sides or just the top. Allow any excess glaze to drip off, then return to the wire rack to set for 5-10 minutes. Serve immediately and enjoy!
Important Information
Nutrition Facts (Per Serving)
It is important to consider this information as approximate and not to use it as definitive health advice.
Allergy Information
Please check ingredients for potential allergens and consult a health professional if in doubt.