Cheesy Halloween Breadstick Bones Recipe: Are you ready to elevate your Halloween party menu from merely mundane to monstrously delicious and delightfully spooky? We are absolutely thrilled to share a recipe that promises to be the star of your ghoulish gathering – a dish that combines a beloved comfort food with the playful spirit of All Hallow’s Eve. Halloween is a time for embracing both the eerie and the exciting, and what better way to do that than with edible creations that captivate the imagination and tantalize the taste buds?
This particular treat perfectly encapsulates the festive joy of the season. Imagine warm, golden-brown breadsticks, expertly shaped to resemble spooky bones, each one generously adorned with melted, gooey cheese. It’s a combination that’s incredibly easy to prepare, making it a fantastic, stress-free addition to any celebration. People adore this dish not just for its undeniable visual appeal, which makes for fantastic party photos, but also for its irresistibly savory taste and wonderfully soft texture. The convenience of preparing a fun, themed snack that requires minimal effort yet delivers maximum impact is truly a win for any host. This Cheesy Halloween Breadstick Bones Recipe is not only a fantastic visual treat but also a delightful savory snack that perfectly balances the sweetness of typical Halloween candies, offering a much-needed savory respite.

Ingredients:
- For the Dough:
- 4 ½ cups (about 540-570g) all-purpose flour, plus extra for dusting
- 2 ¼ teaspoons (one standard packet) instant dry yeast
- 2 tablespoons granulated sugar
- 1 ½ teaspoons fine sea salt
- 1 ½ cups warm water (around 105-115°F / 40-46°C)
- ¼ cup olive oil, plus more for greasing the bowl
- For the Cheesy Filling/Topping:
- 2 cups (about 8 oz / 225g) shredded low-moisture mozzarella cheese
- ½ cup (about 2 oz / 55g) grated Parmesan cheese
- 1 tablespoon garlic powder
- 1 teaspoon onion powder
- 1 teaspoon dried oregano
- ½ teaspoon dried basil
- ¼ teaspoon red pepper flakes (optional, for a little warmth)
- For the Egg Wash:
- 1 large egg
- 1 tablespoon water
- For Serving:
- 2 cups marinara sauce, warmed (for dipping)
Preparing the Dough for Our Bones
- Activate the Yeast and Hydrate: In a large mixing bowl, or the bowl of your stand mixer, combine the warm water, granulated sugar, and instant dry yeast. It’s crucial that your water is warm, but not too hot. If it’s too hot, it will kill the yeast; if it’s too cold, the yeast won’t activate properly. A good temperature range is like a warm bath. Give it a gentle stir and then let it sit undisturbed for about 5-10 minutes. You should see a foamy layer developing on the surface, which indicates that your yeast is alive and ready to work its magic. This bubbling action is proof of fermentation starting, giving our breadsticks their light and airy texture.
- Combine Dry Ingredients: While the yeast is activating, in a separate medium-sized bowl, whisk together 4 cups of the all-purpose flour, the fine sea salt, and the remaining 1 tablespoon of granulated sugar (if you like a slightly sweeter dough, otherwise you can omit this extra sugar and just use 2 tbsp for yeast activation). I usually reserve the last ½ cup of flour to add gradually, as the exact amount needed can vary depending on humidity and how the flour absorbs liquid. This blend ensures the salt and sugar are evenly distributed throughout the flour, preventing pockets of intensely salty or sweet dough.
- Mix Wet and Dry Ingredients: Once your yeast mixture is foamy, pour in the ¼ cup of olive oil. Then, gradually add the dry flour mixture to the wet ingredients, mixing with a wooden spoon or using the dough hook attachment of your stand mixer on low speed. Start slow to avoid a cloud of flour! Mix until a shaggy, sticky dough forms, incorporating as much flour as the liquid will absorb. At this point, the dough might still look a bit messy, but trust the process.
- Knead the Dough for Development: Turn the dough out onto a lightly floured surface (using some of your reserved ½ cup flour) and begin to knead it by hand. If you’re using a stand mixer, switch to medium speed with the dough hook. Knead the dough vigorously for about 8-10 minutes by hand, or 5-7 minutes in a stand mixer. This process is absolutely essential for developing the gluten, which is the protein network that gives bread its structure and elasticity. As you knead, you’ll notice the dough transform from a sticky, uneven mass into a smooth, elastic, and pliable ball that springs back when gently poked. If the dough feels too sticky, add a very small amount of the remaining flour, a tablespoon at a time, until it’s manageable but still soft. Avoid adding too much flour, as this can result in tough breadsticks. We’re aiming for a supple, slightly tacky dough that’s a joy to work with.
- First Rise: Lightly grease a clean large bowl with a little olive oil. Place the kneaded dough ball into the bowl, turning it once to coat the entire surface with oil. This prevents a dry skin from forming. Cover the bowl tightly with plastic wrap or a clean kitchen towel. Find a warm, draft-free spot in your kitchen for the dough to rise. This could be near a sunny window, on top of a warm oven (not turned on!), or even in a turned-off oven with the light on. Let the dough rise for about 1 to 1 ½ hours, or until it has doubled significantly in size. Patience is a virtue here! A proper first rise contributes immensely to the final texture and flavor of our breadsticks. When it’s ready, an indentation made with your finger will remain.
Crafting Our Cheesy Skeleton Crew
- Prepare the Cheesy Filling: While your dough is on its first rise, let’s prepare the delicious cheesy filling that will make these breadsticks truly irresistible. In a medium bowl, combine the shredded mozzarella cheese, grated Parmesan cheese, garlic powder, onion powder, dried oregano, dried basil, and the optional red pepper flakes. Use your clean hands or a spoon to gently toss everything together until the spices are evenly distributed throughout the cheese mixture. This blend of cheeses and herbs provides that classic Italian-American flavor profile that pairs perfectly with marinara. Set this aside; we’ll be using it soon.
- Punch Down and Divide the Dough: Once your dough has doubled in size, gently punch it down to release the accumulated gases. This redistributes the yeast and helps create a finer, more even crumb. Turn the dough out onto a lightly floured surface. Using a sharp knife or a dough scraper, divide the dough into approximately 16-20 equal pieces. I usually aim for pieces about the size of a golf ball, maybe a little larger. For more precise results, you could weigh the entire dough and then divide by the number of desired breadsticks.
- Roll and Flatten Each Piece: Take one piece of dough and, on your lightly floured surface, roll it out into a rectangle, roughly 4-5 inches long and 2-3 inches wide. Aim for about ¼ inch thickness. It doesn’t have to be perfectly geometric; remember, we’re making spooky, rustic bones! The key is to create enough surface area for our cheesy filling. Repeat this process with each piece of dough. If the dough springs back too much, let it rest for a minute or two (this allows the gluten to relax) and then continue rolling.
-
Fill and Shape Our Bones: Now for the fun part – shaping our breadstick bones!
- Add the Cheese: Take one rolled-out dough rectangle. Spoon about 1-2 tablespoons of your prepared cheesy filling down the center of the rectangle, leaving a small border around the edges. Don’t overfill, or it might be hard to seal!
- Seal the Dough: Fold one long side of the dough over the filling, then fold the other long side to meet and slightly overlap. Pinch the seam firmly along the entire length to seal the cheese inside. This creates a log shape. Gently roll the log back and forth a few times to ensure the seam is secure and the filling is evenly distributed.
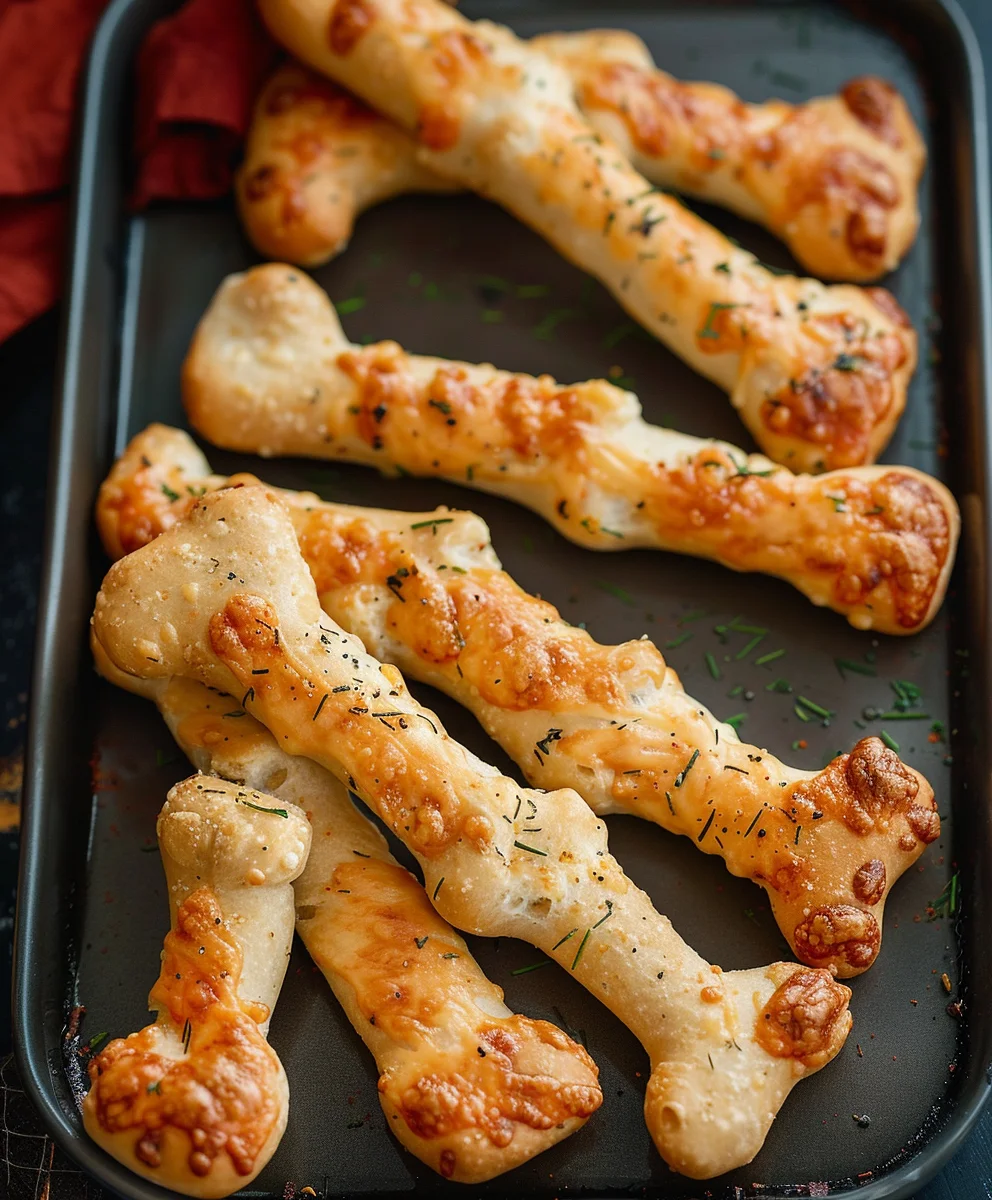
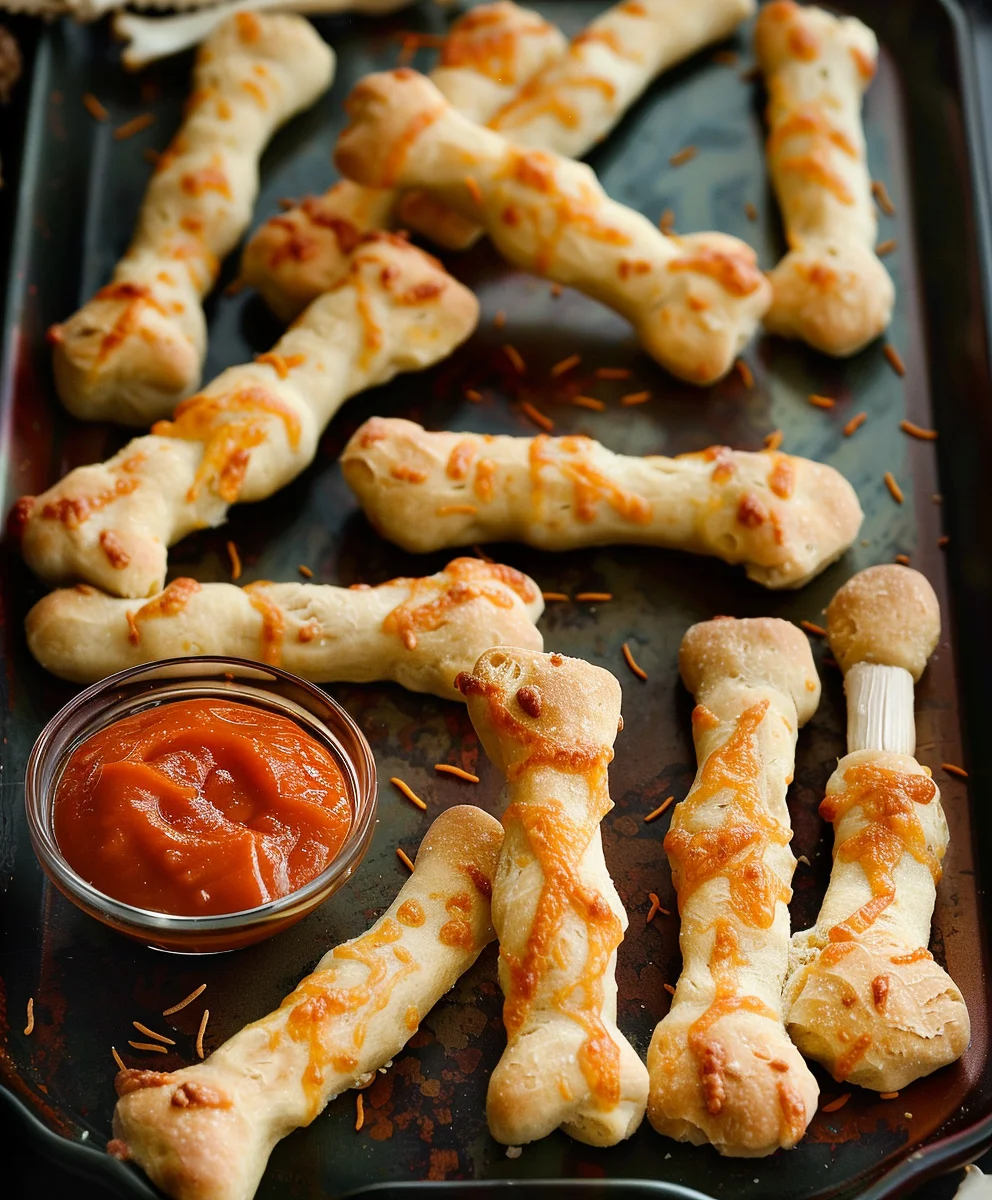
- Shape the Bones: Now, let’s make them look like bones! Using your fingers, gently flatten and press the dough at both ends of the log, about ¾ of an inch from the very tip, creating a “knuckle” effect. Then, make a small slit (about ½ inch long) with a sharp knife or kitchen shears right in the middle of each flattened end. This will create the iconic “bone” shape, resembling the knobby ends of a femur or radius bone. Don’t cut too deep, just enough to separate the “knuckles.” You’re aiming for a whimsical, slightly eerie bone shape, perfect for Halloween! Repeat this process with all the remaining dough pieces and cheesy filling.
- Prepare Baking Sheets: As you shape each breadstick bone, carefully transfer them to baking sheets lined with parchment paper, leaving about 1-2 inches of space between each bone to allow for expansion during baking. Depending on the size of your baking sheets, you may need two or three.
- Brief Second Rise (Optional but Recommended): Once all your breadstick bones are shaped and on the baking sheets, loosely cover them with a clean kitchen towel. Let them rest in a warm, draft-free place for another 20-30 minutes. This short second rise (often called “proofing”) allows the dough to relax further and puff up slightly, resulting in a lighter, softer breadstick. You’ll notice they look a bit plumper, and the bone shapes will become a little more defined.
Baking Our Spooky Breadstick Bones
- Preheat the Oven: About 15-20 minutes before you’re ready to bake, preheat your oven to 400°F (200°C). Make sure to place an oven rack in the middle position for even baking. Getting the oven to the correct temperature beforehand is vital for achieving that perfect golden-brown crust and fully cooked interior.
- Prepare and Apply the Egg Wash: In a small bowl, whisk together the large egg and 1 tablespoon of water until well combined. This is our egg wash. Just before placing the breadsticks into the oven, gently brush the tops and sides of each shaped breadstick bone with the egg wash. The egg wash is not just for shine; it helps achieve that beautiful golden-brown color and slightly crisp exterior, making our Halloween bones look even more appetizing. Be thorough but avoid over-saturating the dough.
- Bake to Golden Perfection: Carefully transfer the baking sheets with the egg-washed breadstick bones into the preheated oven. Bake for 15-20 minutes, rotating the baking sheets halfway through the baking time (if you’re using more than one sheet, swap their positions and rotate them). You’re looking for a beautiful, deep golden-brown color on the outside. The cheese inside should be melted and gooey, and the dough should be cooked through. If your oven has hot spots, keep a close eye on them to prevent uneven browning. The aroma filling your kitchen will be absolutely incredible – a sure sign of deliciousness!
- Cool Slightly and Serve Warm: Once baked, remove the Cheesy Halloween Breadstick Bones from the oven and transfer them to a wire rack to cool for 5-10 minutes. While they are still warm, the cheese inside will be wonderfully molten, and the crust will be perfectly crisp. Serve them immediately with warm marinara sauce for dipping. The combination of savory cheese, aromatic herbs, and soft bread, dipped in tangy marinara, is a Halloween treat that will have everyone reaching for another “bone”! These are best enjoyed fresh, straight from the oven, when the cheese is at its gooey peak.
Conclusion:
There you have it, my friends! We’ve journeyed through the simple steps to create a truly unforgettable Halloween treat, and I sincerely hope you’re feeling as excited as I am about bringing these to life in your own kitchen. This isn’t just another snack; it’s an invitation to infuse genuine fun and deliciousness into your spooky season celebrations. Imagine the delighted gasps when your guests or family members first lay eyes on these perfectly shaped, golden-brown wonders, especially when they discover the warm, gooey, cheesy delight within. It’s truly a must-try recipe because it effortlessly combines ease of preparation with maximum visual appeal and incredible taste, making it a guaranteed crowd-pleaser for any Halloween gathering, big or small. The aroma alone, as they bake, is enough to set a festive and comforting mood, promising a treat that is both whimsical and deeply satisfying.
What I adore most about this recipe is its undeniable ability to spark joy and create memorable moments. From the moment you start shaping those “bones” to the first savory bite, it’s an experience that’s designed to be shared. The softness of the bread, perfectly complemented by the crisp, golden crust and the stretchy, melted cheese, makes every single breadstick a delightful sensation. It’s comforting, it’s cheesy, and it carries just the right amount of playful spookiness to be a hit with both kids and adults. Plus, the ease with which you can whip these up means less stress for you, the host, and more time enjoying the festivities. Trust me when I say this recipe will quickly become a cherished part of your annual Halloween traditions.
Now, let’s talk about enhancing your Cheesy Halloween Breadstick Bones experience. While they are absolutely divine straight out of the oven, a little dipping sauce can elevate them to new heights. My personal favorite pairings include a classic warm marinara sauce, which offers a lovely tangy contrast to the savory cheese. However, don’t be afraid to get creative! A creamy ranch dressing can be a fantastic, cooling option, or perhaps a homemade garlic herb butter for an extra layer of richness. For those who enjoy a bit of heat, a spicy queso dip would be an absolute sensation, adding a fiery kick that perfectly complements the mild cheese and bread. Consider serving them alongside a hearty bowl of pumpkin chili or a rich, dark “witches brew” soup for a truly complete and thematic meal. They also make an excellent accompaniment to a spooky charcuterie board, adding a warm, bready element that guests will adore.
But wait, the fun doesn’t stop there! This recipe is wonderfully adaptable, allowing you to personalize it to your taste. While the classic cheesy interior is fantastic, you could experiment with different types of cheese to vary the flavor profile. Imagine using a sharp cheddar for a bolder taste, a smoky gouda for an earthy depth, or even a blend of mozzarella and provolone for an extra gooey pull. For an adult-friendly twist, a sprinkle of red pepper flakes before baking can add a subtle, spicy warmth. You could also brush them with a light coating of garlic oil and Parmesan cheese after baking for an even more aromatic finish. For an extra touch of “gore” (if you’re feeling particularly macabre!), a tiny dab of beet juice or food coloring on the “knuckles” after baking can give them a truly gruesome, yet delicious, appearance. The possibilities for creative expression are truly endless, making each batch uniquely yours.
So, what are you waiting for? This Halloween, don’t just decorate your home; decorate your table with the magic of this fantastic Cheesy Halloween Breadstick Bones Recipe. I genuinely encourage you to give it a try. Gather your ingredients, get your hands a little floury, and prepare to delight everyone with your culinary creativity. It’s an incredibly rewarding experience, and I promise you’ll be so proud of the delicious and adorable results. Your Halloween spread is about to get a serious upgrade! Once you’ve made them, I would absolutely love to hear about your experience. Did you try any fun variations? How did your family and friends react? Please share your thoughts, your tips, and especially your photos! Tag me or drop a comment to let me know how your bony creations turned out. Seeing your success stories truly brightens my day and inspires me to keep sharing more delightful recipes with you all.
Embrace the spirit of the season with warmth, good food, and shared laughter. These breadstick bones are more than just food; they’re a centerpiece for making beautiful memories. Happy baking, and have a wonderfully spooky and delicious Halloween!
Cheesy Halloween Breadstick Bones
Warm, golden-brown breadsticks shaped like spooky bones, generously filled with melted, gooey cheese. A fun, easy, and savory treat perfect for Halloween parties, served with warm marinara for dipping.
Ingredients
-
4 ½ cups all-purpose flour, plus extra
-
2 ¼ teaspoons instant dry yeast
-
2 tablespoons granulated sugar
-
1 ½ teaspoons fine sea salt
-
1 ½ cups warm water (105-115°F)
-
¼ cup olive oil, plus more for greasing
-
2 cups shredded low-moisture mozzarella cheese
-
½ cup grated Parmesan cheese
-
1 tablespoon garlic powder
-
1 teaspoon onion powder
-
1 teaspoon dried oregano
-
½ teaspoon dried basil
-
¼ teaspoon red pepper flakes (optional)
-
1 large egg
-
1 tablespoon water (for egg wash)
-
2 cups marinara sauce, warmed (for dipping)
Instructions
-
Step 1
In a large bowl, combine warm water, 2 tbsp sugar, and yeast; let sit 5-10 minutes until foamy. Add olive oil, then gradually mix in 4 cups flour and salt until a shaggy dough forms. Knead on a lightly floured surface or with a stand mixer for 8-10 minutes (5-7 mins in mixer) until smooth and elastic, adding small amounts of extra flour if needed. -
Step 2
Lightly grease a bowl with olive oil, place dough in it, turning to coat. Cover and let rise in a warm, draft-free spot for 1-1.5 hours, or until doubled in size. -
Step 3
While dough rises, combine mozzarella, Parmesan, garlic powder, onion powder, oregano, basil, and optional red pepper flakes in a medium bowl. Toss until spices are evenly distributed. -
Step 4
Punch down dough, divide into 16-20 equal pieces. Roll each piece into a 4-5 inch long, 2-3 inch wide rectangle (approx. ¼ inch thick). Spoon 1-2 tbsp cheese filling down the center, fold dough over the filling, and firmly pinch the seam to seal, forming a log. Gently flatten and press the dough at both ends (approx. ¾ inch from the tip) to create ‘knuckles’. Make a ½ inch slit with a knife or kitchen shears in the middle of each flattened end to form a bone shape. Place shaped bones on parchment-lined baking sheets, leaving space between them. -
Step 5
Loosely cover the shaped breadstick bones with a clean kitchen towel and let them rest in a warm, draft-free place for another 20-30 minutes, allowing them to puff up slightly. -
Step 6
Preheat oven to 400°F (200°C). In a small bowl, whisk 1 large egg with 1 tbsp water for egg wash. Gently brush the tops and sides of each breadstick bone with the egg wash. Bake for 15-20 minutes, rotating baking sheets halfway through, until deep golden-brown and the cheese is melted and gooey. -
Step 7
Remove from oven and transfer to a wire rack to cool for 5-10 minutes. Serve warm with marinara sauce for dipping. Best enjoyed fresh.
Important Information
Nutrition Facts (Per Serving)
It is important to consider this information as approximate and not to use it as definitive health advice.
Allergy Information
Please check ingredients for potential allergens and consult a health professional if in doubt.