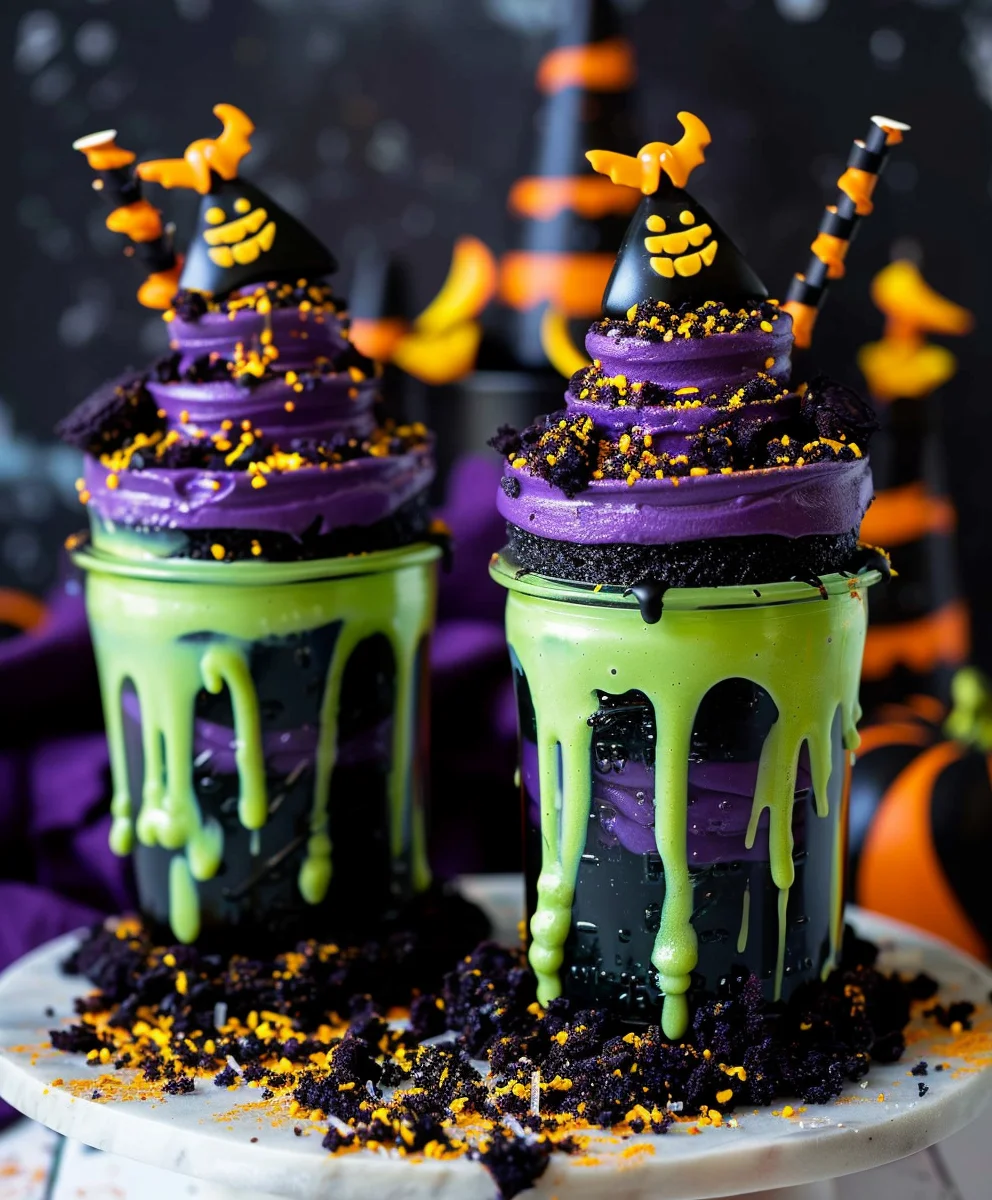
Witches Brew Halloween Cake Jars. Are you ready to conjure up some truly enchanting Halloween magic right in your own kitchen this season? As the crisp autumn air descends and the spirit of All Hallow’s Eve fills the air, there’s a unique joy in crafting treats that are both delightfully spooky and utterly delicious. I’m absolutely thrilled to share a recipe that perfectly encapsulates this festive charm: individual cake jars inspired by the mystical concoctions of folklore.
Why Everyone Adorably Adores These Spooky Sweets
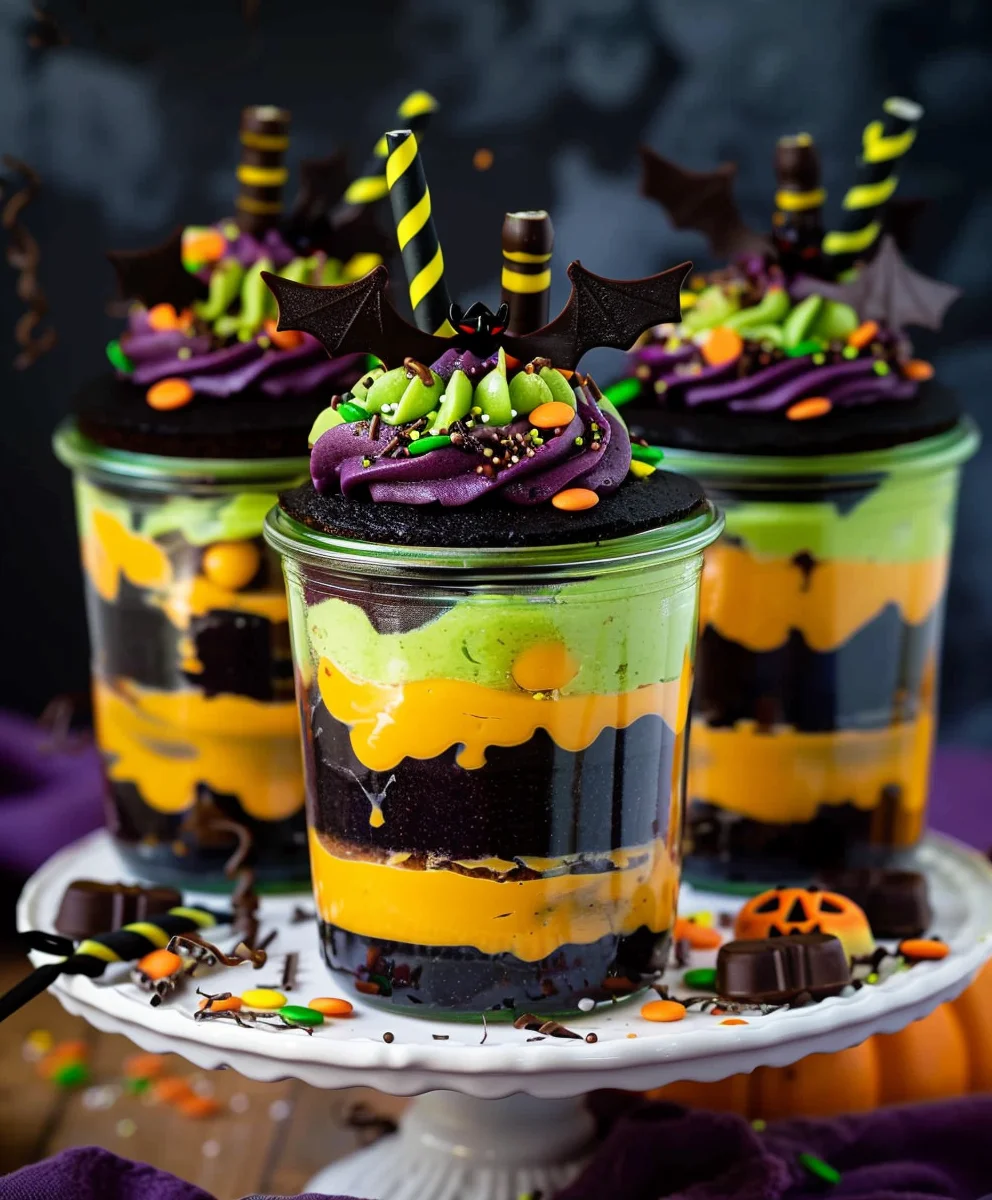
This creative dessert pays homage to the ancient traditions of Halloween, a time when whimsical tales of witches and their bubbling cauldrons were shared. Our modern interpretation, however, is far less ominous and infinitely more palatable! People adore these cake jars not just for their stunning visual appeal – each one a vibrant, layered spectacle reminiscent of a bubbling potion – but also for their incredible convenience and delectable taste. Imagine moist, flavorful cake layered with velvety frosting, perhaps even a hint of “magical” sparkle, all perfectly portioned in a charming jar. They are an absolute dream for entertaining, offering a mess-free, grab-and-go dessert solution that guarantees smiles. The rich textures and captivating flavors make these Witches Brew Halloween Cake Jars a truly unforgettable addition to any spooky celebration, promising a sweet surprise in every spoonful.

<h2>Ingredients:</h2>
<h4>For the Spooky Green Vanilla Cake:</h4>
<ul>
<li>2 ½ cups (300g) all-purpose flour, sifted</li>
<li>2 teaspoons baking powder</li>
<li>½ teaspoon salt</li>
<li>1 cup (226g) unsalted butter, softened to room temperature</li>
<li>1 ¾ cups (350g) granulated sugar</li>
<li>3 large eggs, at room temperature</li>
<li>1 cup (240ml) whole milk, at room temperature</li>
<li>2 teaspoons pure vanilla extract</li>
<li>Green gel food coloring (I prefer gel for vibrant color without adding excess liquid)</li>
</ul>
<h4>For the Bewitching Purple Buttercream:</h4>
<ul>
<li>1 cup (226g) unsalted butter, softened to room temperature</li>
<li>4-5 cups (480-600g) powdered sugar, sifted</li>
<li>¼ cup (60ml) heavy cream or whole milk, plus more if needed</li>
<li>1 teaspoon pure vanilla extract</li>
<li>Pinch of salt</li>
<li>Purple gel food coloring</li>
</ul>
<h4>For the Gooey Green “Witches Brew” Slime:</h4>
<ul>
<li>1 cup (240ml) water</li>
<li>½ cup (100g) granulated sugar</li>
<li>2 tablespoons fresh lime juice</li>
<li>1 tablespoon cornstarch</li>
<li>Green gel food coloring (for extra vibrancy)</li>
<li>Optional: ¼ teaspoon mint extract for a subtle flavor twist</li>
</ul>
<h4>For Assembly & Decoration:</h4>
<ul>
<li>6-8 (8-ounce) wide-mouth mason jars</li>
<li>Halloween sprinkles</li>
<li>Edible candy eyeballs</li>
<li>Gummy worms or other creepy crawly candies</li>
<li>Chocolate “spiderweb” decorations (melted chocolate piped onto parchment paper and chilled)</li>
<li>Piping bags and large round or star tips (optional, but helpful)</li>
</ul<
<h3>Preparing the Spooky Green Vanilla Cake</h3>
<ol>
<li><strong>Preheat and Prepare:</strong> First things first, let’s get our oven ready. Preheat your oven to 350°F (175°C). Then, generously grease and flour two 8-inch round cake pans, or line them with parchment paper circles. This ensures our beautiful green cakes don’t stick!</li>
<li><strong>Combine Dry Ingredients:</strong> In a medium bowl, whisk together your sifted all-purpose flour, baking powder, and salt. Sifting the flour beforehand is a small but mighty step that helps ensure your cake is light and free of lumps. Set this dry mixture aside.</li>
<li><strong>Cream Butter and Sugar:</strong> In a large mixing bowl, using either an electric mixer with a paddle attachment or a hand mixer, beat the softened unsalted butter on medium speed for about 1-2 minutes until it’s light and creamy. Gradually add the granulated sugar, beating for another 3-5 minutes until the mixture is truly light, fluffy, and pale in color. This creaming process incorporates air, which is crucial for a tender cake texture. <h5>Tip: Don’t rush this step; it’s fundamental to the cake’s structure!</h5></li>
<li><strong>Add Eggs:</strong> Crack your large eggs one at a time into the creamed butter and sugar mixture, beating well after each addition. Make sure each egg is fully incorporated before adding the next. Scrape down the sides of the bowl as needed to ensure everything is mixing evenly.</li>
<li><strong>Alternate Dry and Wet Ingredients:</strong> Now it’s time to bring everything together. With the mixer on low speed, gradually add about one-third of the dry ingredient mixture to the wet mixture, mixing just until combined. Then, pour in half of the whole milk and vanilla extract, mixing until just incorporated. Repeat this process, adding another third of the dry ingredients, then the remaining milk, and finally the last third of the dry ingredients. <strong>Be careful not to overmix!</strong> Overmixing can develop the gluten in the flour too much, leading to a tough cake.</li>
<li><strong>Color the Batter:</strong> Add several drops of green gel food coloring to the batter. Start with a moderate amount and mix until the color is uniform. If you want a more intense, spooky green, add a few more drops until you achieve your desired “witches brew” hue. Gel colors are fantastic because they provide rich color without thinning your batter.</li>
<li><strong>Bake the Cakes:</strong> Divide the green cake batter evenly between your two prepared 8-inch cake pans. Smooth the tops with an offset spatula. Bake for 25-30 minutes, or until a wooden skewer or toothpick inserted into the center of the cakes comes out clean. The exact baking time can vary depending on your oven, so keep an eye on them!</li>
<li><strong>Cool Completely:</strong> Once baked, remove the cakes from the oven and let them cool in their pans on a wire rack for about 10-15 minutes. <h5>Crucial step: Do not try to remove them sooner, or they might break!</h5> After this initial cooling, carefully invert the cakes onto the wire rack to cool completely. They must be <strong>fully cooled</strong> before you attempt to cut or frost them, otherwise, your buttercream will melt and your layers will slide.</li>
</ol>
<h3>Crafting the Bewitching Purple Buttercream</h3>
<ol>
<li><strong>Whip the Butter:</strong> In a large mixing bowl, beat the softened unsalted butter on medium-high speed for about 5 minutes until it’s very light, fluffy, and pale. This aeration is key for a light and ethereal buttercream that pipes beautifully.</li>
<li><strong>Add Powdered Sugar:</strong> Reduce the mixer speed to low. Gradually add the sifted powdered sugar, one cup at a time, mixing well after each addition until fully incorporated. You’ll want to scrape down the sides of the bowl frequently to ensure everything is mixing evenly and no pockets of unmixed sugar remain. Sifting the sugar is a non-negotiable step here to prevent gritty buttercream!</li>
<li><strong>Add Liquids and Flavor:</strong> Once all the powdered sugar is incorporated, add the heavy cream (or milk), pure vanilla extract, and a pinch of salt. Increase the mixer speed to medium-high and beat for another 3-5 minutes until the buttercream is incredibly light and fluffy. The salt helps to balance the sweetness of the sugar, creating a more well-rounded flavor profile.</li>
<li><strong>Color the Buttercream:</strong> Add several drops of purple gel food coloring to the buttercream. Mix on medium speed until the color is evenly distributed and you’ve achieved a rich, bewitching purple. If the buttercream seems too thick, you can add another teaspoon of heavy cream or milk at a time until it reaches your desired piping consistency. If it’s too thin, you can add a tablespoon or two more sifted powdered sugar until it stiffens up.</li>
</ol>
<h3>Mixing the Gooey Green “Witches Brew” Slime</h3>
<ol>
<li><strong>Combine Dry Ingredients:</strong> In a small saucepan, whisk together the granulated sugar and cornstarch. This helps to prevent lumps when you add the liquid.</li>
<li><strong>Add Liquids and Heat:</strong> Gradually whisk in the water and fresh lime juice until smooth. Place the saucepan over medium heat, stirring constantly. Continue to cook and stir until the mixture thickens considerably and comes to a gentle boil. It should become clear and gelatinous. This usually takes about 5-7 minutes. <h5>Don’t stop stirring, or it will clump!</h5></li>
<li><strong>Cool and Color:</strong> Remove the saucepan from the heat. Stir in the green gel food coloring until you achieve a vibrant, eerie green. If you’re using mint extract, add it now. Transfer the “slime” to a heatproof bowl or container and allow it to cool completely to room temperature. As it cools, it will thicken even further, becoming that perfect gooey consistency we’re looking for. You can pop it in the refrigerator for about 30 minutes to speed up the cooling process if you’re in a hurry.</li>
</ol>
<h3>Assembling Your Witches Brew Halloween Cake Jars</h3>
<ol>
<li><strong>Prepare the Cake:</strong> Once your green vanilla cakes are completely cooled, use a large round cookie cutter or a drinking glass that is slightly smaller than the opening of your mason jars to cut out rounds of cake. You’ll need about 2-3 rounds per jar, depending on the height of your jars and how many layers you want. Don’t worry about the cake scraps; they make for a delicious snack or can be crumbled for another dessert!</li>
<li><strong>Prepare the Frosting & Slime:</strong> Transfer your bewitching purple buttercream into a piping bag fitted with a large round or star tip (or just snip off the corner of a sturdy Ziploc bag for a simple pipe). Give your cooled green “witches brew” slime a good stir; if it’s too thick, you can whisk in a tiny bit of water to loosen it slightly, but it should be gooey.</li>
<li><strong>Start Layering:</strong>
<ul>
<li>Place one cake round at the bottom of each mason jar. Gently press it down to create a stable base.</li>
<li>Pipe a generous layer of the purple buttercream over the cake round. You can pipe a swirl or just spread it evenly with a small spoon or knife. Aim for about ½ to ¾ inch thick.</li>
<li>Drizzle a good spoonful or two of the gooey green “witches brew” slime over the buttercream. Let some of it drip down the sides of the jar for that authentic potion look!</li>
<li>Carefully place another cake round on top of the slime layer.</li>
<li>Repeat the layers: another layer of purple buttercream, followed by more green slime.</li>
<li>Finish with a final cake round on top.</li>
</ul>
</li>
<li><strong>The Grand Finale: Decorate!</strong>
<ul>
<li>Pipe a final, beautiful swirl of purple buttercream on top of the last cake layer in each jar. This is where you can get really creative!</li>
<li>Immediately adorn your Witches Brew Halloween Cake Jars with a generous scattering of Halloween sprinkles. They add color, texture, and a festive crunch.</li>
<li>Carefully place edible candy eyeballs onto the buttercream swirl. Two eyes staring back from your jar are perfectly creepy!</li>
<li>Drape gummy worms or other small creepy crawly candies over the edge of the buttercream or have them peeking out from the “slime” layer. They add a wonderful playful and spooky element.</li>
<li>If you prepared chocolate spiderwebs, gently place one on top or leaning against the side of the buttercream.</li>
</ul>
</li>
</ol>
<h3>Pro Tips for Perfect Potion Jars</h3>
<h4>Storage and Make-Ahead:</h4>
<p>These Witches Brew Halloween Cake Jars are wonderful because they can be made a day or two in advance. Once assembled and decorated, simply screw on the lids of your mason jars and store them in the refrigerator. The sealed jars help to keep the cake moist and fresh. Just be sure to let them come to room temperature for about 30 minutes before serving for the best flavor and cake texture. The cake will be softer and the buttercream more enjoyable at room temperature.</p>
<h4>Food Coloring Wisdom:</h4>
<p>When working with gel food coloring, remember that a little goes a long way! Start with a small amount (like the tip of a toothpick) and gradually add more until you reach your desired intensity. Gel colors are highly concentrated and won’t thin out your batter or buttercream like liquid food coloring can. For truly deep and vibrant colors, I often use professional-grade gel colors.</p>
<h4>Flavor Variations:</h4>
<p>While I love the vanilla cake, purple buttercream, and lime slime combination, feel free to experiment with different flavors!</p>
<ul>
<li><strong>Cake:</strong> A chocolate cake base dyed black (using black cocoa powder and black gel coloring) could make for a “graveyard” effect. Or a lemon cake for a zesty “potion.”</li>
<li><strong>Buttercream:</strong> Raspberry, orange, or even a cream cheese buttercream would be delicious. Adjust the color accordingly – an orange buttercream for a “pumpkin patch” jar, for instance.</li>
<li><strong>Slime:</strong> You could use a strawberry or cherry sauce for a “blood” effect, or a vibrant orange mango purée. A simple berry compote would also work wonderfully and add fresh fruit flavor.</li>
</ul>
<h4>Decorating Extravaganza:</h4>
<p>Don’t limit yourself to just these decorations! Think about other spooky elements you could add:</p>
<ul>
<li>Mini chocolate chips for “dirt” or “bugs.”</li>
<li>Crushed Oreo cookies for a similar “dirt” effect.</li>
<li>Edible glitter or shimmer dust sprinkled over the buttercream for a magical glow.</li>
<li>Small plastic spiders or bats (just make sure they’re easily removable before eating!).</li>
<li>Pretzel sticks shaped like witches’ broomsticks.</li>
<li>Homemade fondant cutouts of ghosts, bats, or pumpkins.</li>
</ul>
<p>The key is to have fun with it and let your Halloween creativity run wild! These Witches Brew Halloween Cake Jars are not just a dessert; they’re an experience, a miniature edible spooky scene that’s perfect for parties or a special treat.</p>
Conclusion:
So there you have it, my friends! We’ve journeyed through the enchanting process of creating these utterly delightful and wickedly fun treats. I truly believe that this recipe for our special Witches Brew Halloween Cake Jars isn’t just another dessert; it’s an experience waiting to unfold in your kitchen. Why is it a must-try? Well, for starters, it perfectly encapsulates the playful spirit of Halloween without requiring advanced baking wizardry. These jars are not only incredibly satisfying to eat, with layers of moist cake and creamy, vibrant frosting, but they are also a visual spectacle, guaranteed to elicit gasps of delight and many compliments from your guests. Imagine the smiles when everyone receives their own individual, perfectly portioned, miniature masterpiece. It takes the stress out of serving and adds an element of whimsical charm that’s hard to beat. The convenience of individual servings means less fuss during your Halloween festivities, allowing you more time to enjoy the spooky season with your loved ones. Plus, the sheer joy of assembling these colorful layers is a treat in itself, making it a wonderful activity to share with family, especially younger helpers eager to create something magical.
Serving Up Your Spooky Creations!
When it comes to enjoying these magical concoctions, the possibilities are as endless as a witch’s spellbook! Naturally, these Witches Brew Halloween Cake Jars are absolutely ideal for your Halloween party spread. Line them up on a rustic wooden board, perhaps adorned with some faux cobwebs or mini plastic spiders, for an impressive centerpiece that doubles as a delightful dessert station. But don’t limit yourself to just the big day! They make fantastic edible gifts for friends and neighbours, a thoughtful and homemade treat that shows you care, especially when tied with a spooky ribbon. Imagine dropping one off on a colleague’s desk – instant cheer and a perfect afternoon pick-me-up! They’re also perfect for school bake sales, providing a unique and highly desirable item that stands out from the usual cupcakes and brownies, often selling out quickly due to their individual appeal. For a cozy night in, simply grab a spoon and dive in for a guilt-free (or perhaps, delightfully guilty) personal indulgence. If you want to elevate the serving experience, consider adding a dollop of freshly whipped cream just before serving, or a sprinkle of edible glitter for an extra touch of enchantment. A tiny plastic spider ring slipped onto the lid of each jar can also add a fun, thematic flair that children, and adults alike, will adore, turning each jar into a small, edible prize.
Unleash Your Inner Alchemist: Variations and Personalizations
One of the aspects I adore most about this recipe is its incredible versatility. While the core concept of the Witches Brew Halloween Cake Jars is fantastic as is, I wholeheartedly encourage you to let your creativity run wild! Don’t feel confined by my specific cake or frosting flavor suggestions. You could easily swap the vanilla cake for a rich chocolate sponge, a zesty lemon, or even a spiced pumpkin cake for an autumnal twist. Experiment with different food colorings for your frosting; perhaps a blood-red “vampire’s kiss” layer, a ghostly white “spirit mist” swirl, or even a deep purple “potion” effect. For toppings, think outside the box: crushed chocolate cookies for “dirt,” gummy worms slithering out of the “earth,” candy eyes peeking from the “brew,” or even mini meringue ghosts floating atop the frosting. Little pieces of licorice or chocolate bat cutouts can also add to the ghoulish charm. If you’re catering to dietary restrictions, feel free to substitute with your favourite gluten-free cake mix or dairy-free frosting alternatives – the individual jar format makes it incredibly easy to adapt specific servings without altering the entire batch. For those who enjoy a bit of an adult kick, a tiny splash of a complementary liqueur (like Irish cream, coffee liqueur, or a raspberry cordial for a “bloody” effect) can be brushed onto the cake layers for a boozy, decadent twist (just remember to label them accordingly and keep them away from younger party-goers!). This recipe is truly a canvas for your Halloween imagination, allowing you to tailor each jar to your personal taste and the preferences of your guests, making every batch a unique creation.
So, what are you waiting for? Embrace the spirit of the season, gather your ingredients, and embark on this deliciously spooky baking adventure. I promise you, creating these Witches Brew Halloween Cake Jars will be as much fun as devouring them! And please, please, please, once you’ve whipped up your own batch of these incredible treats, I would absolutely love to hear about your experience. Share your photos, your triumphs, and even your funny kitchen mishaps with me. Tag me on your social media channels or drop a comment below. Your unique creations and feedback inspire not just me, but our entire community of fellow baking enthusiasts, showing us all the wonderful ways this recipe can come to life. Let’s make this Halloween the most delicious one yet, one magical cake jar at a time! Happy baking, and may your cauldrons (or rather, your cake jars) overflow with joy and deliciousness!
Witches Brew Halloween Cake Jars
Conjure up enchanting Halloween magic with these Witches Brew Halloween Cake Jars! This recipe offers a ghoulishly good, layered dessert featuring moist green vanilla cake, velvety purple buttercream, and gooey green ‘witches brew’ slime, all adorned with festive spooky decorations. Perfect for entertaining, these convenient, mess-free cake jars are a vibrant, delectable, and unforgettable treat for any spooky celebration.
Ingredients
-
330g all-purpose flour, sifted
-
1½ tsp baking powder
-
½ tsp salt
-
360g unsalted butter, softened
-
360g granulated sugar
-
6 large eggs, room temperature
-
90ml whole milk, room temperature
-
2 tsp vanilla extract
-
Green gel food coloring
-
400g salted butter, softened
-
800g powdered sugar, sifted
-
2 tbsp milk or cream, plus more as needed
-
1¼ tsp vanilla extract
-
Pinch of salt
-
Purple gel food coloring
-
240ml water
-
100g granulated sugar
-
2 tbsp fresh lime juice
-
1 tbsp cornstarch
-
Electric green food coloring
-
Optional: ¼ tsp mint extract
-
6-8 (8-ounce) wide-mouth mason jars
-
Halloween sprinkles
-
Edible candy eyeballs
-
Gummy worms
-
Chocolate spiderwebs
-
Piping bags & tips
-
Optional: 250g orange fondant
Instructions
-
Step 1
Preheat oven to 350°F (175°C). Grease two 8-inch round cake pans. Whisk together 330g all-purpose flour, 1½ tsp baking powder, and ½ tsp salt. In a large bowl, cream 360g softened unsalted butter and 360g granulated sugar for 3-5 minutes. Beat in 6 large eggs one at a time. Gradually add dry mixture and 90ml whole milk with 2 tsp vanilla extract, mixing until just combined. Stir in green gel food coloring to desired hue. -
Step 2
Divide batter evenly between prepared pans. Bake for 25-30 minutes, or until a toothpick inserted into the center comes out clean. Cool cakes in pans for 10-15 minutes, then invert onto a wire rack to cool completely. -
Step 3
In a large bowl, beat 400g softened salted butter on medium-high speed for 5 minutes until light and fluffy. Gradually add 800g sifted powdered sugar, mixing until incorporated. Add 2 tbsp milk or cream (plus more if needed), 1¼ tsp vanilla extract, and a pinch of salt. Beat for 3-5 minutes until very light and fluffy. Mix in purple gel food coloring until a rich purple color is achieved. -
Step 4
In a small saucepan, whisk together 100g granulated sugar and 1 tbsp cornstarch. Gradually whisk in 240ml water and 2 tbsp fresh lime juice. Cook over medium heat, stirring constantly, until mixture thickens and gently boils (5-7 minutes). Remove from heat, stir in electric green food coloring and optional ¼ tsp mint extract. Cool completely until gooey. -
Step 5
Once cakes are cooled, use a round cookie cutter to cut cake rounds (2-3 per jar). Transfer purple buttercream to a piping bag. Place one cake round at the bottom of each 8-ounce mason jar. Pipe a generous layer of buttercream, then drizzle with green slime. Repeat layers, finishing with a final cake round. -
Step 6
Pipe a final swirl of purple buttercream on top of each jar. Adorn with Halloween sprinkles, edible candy eyeballs, gummy worms, chocolate spiderwebs, and optional orange fondant. Serve or store in the refrigerator with lids on.
Important Information
Nutrition Facts (Per Serving)
It is important to consider this information as approximate and not to use it as definitive health advice.
Allergy Information
Please check ingredients for potential allergens and consult a health professional if in doubt.