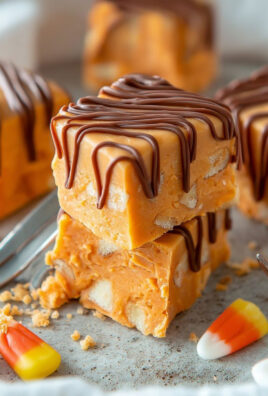
Pumpkin Fudge. As the crisp autumn air descends and the leaves transform into glorious hues of gold and crimson, our palates instinctively crave the warm, comforting flavors of the season. There’s a particular magic in a homemade treat that encapsulates this feeling so perfectly, and today, I am thrilled to share with you a recipe for a truly enchanting confection that does just that.
Historically, the pumpkin has been a cornerstone of autumn harvests for centuries, deeply woven into the fabric of American traditions, from festive gatherings to Thanksgiving feasts. Fudge, a beloved candy, boasts its own rich history of bringing joy through its rich, sweet indulgence. When these two cherished elements unite, they create something truly extraordinary: a sweet, subtly spiced delight that embodies the very spirit of fall.
Why We Adore This Irresistible Seasonal Treat
What makes this particular dish so universally adored? It’s the impeccable combination of its creamy texture and its irresistible flavor. Each bite of our homemade Pumpkin Fudge melts delicately on the tongue, releasing the quintessential notes of sweet pumpkin pie spice – cinnamon, nutmeg, and a hint of clove – perfectly balanced by the rich, velvety sweetness of the fudge itself. It’s not only a remarkably convenient dessert to prepare, often requiring minimal baking, but it also makes for a thoughtful, homemade gift that spreads autumnal cheer. Prepare to fall in love with the comforting simplicity and profound deliciousness of this seasonal favorite.

Ingredients:
- 1 (15-ounce) can pumpkin puree: Be absolutely sure it’s puree and not pumpkin pie filling, which already contains spices and sugar. This distinction is crucial for the flavor balance of our pumpkin fudge.
- 3 cups granulated sugar: This provides the sweetness and structure for the fudge.
- 1/2 cup (1 stick) unsalted butter: We’re looking for that rich, creamy texture, and unsalted butter gives us control over the final salt content.
- 2/3 cup evaporated milk: This is a key ingredient for the characteristic smoothness and creaminess of our pumpkin fudge. Don’t substitute with regular milk; evaporated milk is much thicker and richer.
- 1 teaspoon pumpkin pie spice: To give our fudge that quintessential autumnal flavor. If you don’t have a pre-made blend, you can use a mix of cinnamon, nutmeg, ginger, and cloves.
- 1/2 teaspoon salt: A touch of salt is essential to balance the sweetness and enhance all the other flavors. Don’t skip it!
- 7-ounce jar marshmallow cream (or 2 cups mini marshmallows): This is the secret to super smooth, no-fail pumpkin fudge. It helps prevent crystallization and gives that wonderful melt-in-your-mouth texture.
- 1 teaspoon pure vanilla extract: Added at the end, vanilla brightens all the flavors and adds a lovely aromatic finish.
- Optional additions:
- 1 cup chopped pecans or walnuts: If you love a bit of crunch in your fudge, toasted nuts are a fantastic addition.
- 1 cup white chocolate chips: For an extra layer of sweetness and a different texture, white chocolate chips melt beautifully into the fudge.
Preparation Phase: Gathering & Initial Steps
Alright, let’s get ready to make some absolutely irresistible pumpkin fudge! The first phase is all about setting ourselves up for success, because in candy making, a little preparation goes a very long way. Trust me on this; once the cooking starts, things move pretty quickly, and you won’t want to be scrambling for ingredients or tools.
- Prepare Your Pan: First things first, grab an 8×8 inch or a 9×9 inch square baking pan. I personally prefer the 8×8 inch pan for a thicker piece of fudge, but a 9×9 inch will give you slightly thinner squares. Now, line the pan with parchment paper or aluminum foil, making sure to leave an overhang on all sides. This overhang acts as a handy “sling” later, allowing you to easily lift the entire slab of pumpkin fudge out of the pan once it’s set. A little cooking spray on the foil or parchment before you pour will also ensure absolutely no sticking, making for a beautifully clean release. This is a crucial step for easy cutting and presentation of your delicious pumpkin fudge.
- Measure Everything Out: Candy making is a science as much as it is an art, and precision is key. Before you even think about turning on the stove, measure out all your ingredients. Seriously, get them all laid out on your counter. This is what professional chefs call “mise en place,” and it makes the process so much smoother and less stressful. Make sure your pumpkin puree is measured, your sugar is ready, your butter is cut into pieces for easier melting, your evaporated milk is measured, and your pumpkin pie spice and salt are combined in a small bowl. Have your marshmallow cream (or mini marshmallows) open and ready to go, and your vanilla extract measured and nearby. If you’re adding any optional nuts or white chocolate chips, have those measured and ready as well.
- Get Your Tools Ready: Beyond the pan and ingredients, make sure you have a heavy-bottomed saucepan (at least 3-quart capacity, preferably 4-quart, to prevent boil-overs) ready on the stove. A wooden spoon or a heat-proof silicone spatula for stirring will be essential. If you have one, a candy thermometer is going to be your best friend for making perfect pumpkin fudge. It takes the guesswork out of achieving the correct temperature, which is vital for the fudge to set properly. If you don’t have one, don’t worry, I’ll also explain the cold water test, but a thermometer offers more precision.
- A Note on Temperature: While not a “step” in the cooking process, it’s worth noting that the success of your pumpkin fudge often hinges on achieving the correct temperature for the sugar mixture. The goal is the “soft ball” stage, which is typically between 238-240°F (114-116°C). If you undercook it, your fudge might be too soft and won’t set firmly; if you overcook it, it could become crumbly or grainy. Having your thermometer clipped to the side of the pot and ready will make this part much easier.
The Cooking Phase: Bringing it All Together
Now that we’re all prepped and ready, it’s time for the exciting part: cooking up this glorious pumpkin fudge! This phase requires your full attention, as we’ll be dealing with hot sugar and precise timings. Don’t walk away from the stove during these steps; it happens fast!
- Combine Main Ingredients in Saucepan: In your heavy-bottomed 3 or 4-quart saucepan, combine the 15-ounce can of pumpkin puree, 3 cups of granulated sugar, 1/2 cup (1 stick) of unsalted butter (cut into pieces), 2/3 cup of evaporated milk, 1 teaspoon of pumpkin pie spice, and 1/2 teaspoon of salt. Make sure to scrape every last bit of that delicious pumpkin puree into the pot!
- Bring to a Rolling Boil: Place the saucepan over medium heat. Now, this is where your stirring arm gets a workout! You need to stir constantly as the butter melts and the sugar dissolves. This constant agitation is absolutely crucial to prevent the mixture from scorching on the bottom of the pan, which would impart an unpleasant burnt flavor to your otherwise delicious pumpkin fudge. Keep stirring until the mixture comes to a full, rolling boil. What’s a rolling boil? It’s when the bubbles are breaking all over the surface of the mixture and don’t disappear when you stir it. It’s a vigorous boil that signals the mixture is thoroughly heated and the sugar is fully dissolved.
-
Cook to Soft Ball Stage:
Using a Candy Thermometer: If you have a candy thermometer, clip it to the side of the pot, ensuring the bulb is submerged in the mixture but not touching the bottom. Continue to boil, stirring occasionally to prevent sticking and ensure even cooking, until the thermometer registers precisely 238°F (114°C). This can take anywhere from 5 to 10 minutes once it reaches the rolling boil, depending on your stovetop and saucepan. Precision here is key for perfect pumpkin fudge texture!
Without a Candy Thermometer (Cold Water Test): If you don’t have a thermometer, you’ll need to use the cold water test. Have a small bowl of very cold water (ice water is even better) ready. After the mixture has been at a rolling boil for about 5 minutes, drop a small spoonful of the hot mixture into the cold water. Let it cool for a few seconds, then pick up the mixture with your fingers. It should form a soft, pliable ball that can be easily flattened between your thumb and forefinger but still holds its shape. If it dissolves, it’s not ready. If it’s too hard, you’ve overcooked it slightly, but it might still be salvageable. Keep testing every minute or so until you achieve the soft ball stage. This method requires a bit more practice but is totally achievable for fantastic pumpkin fudge.
- Remove from Heat and Add Remaining Ingredients: As soon as your pumpkin mixture reaches the soft ball stage (238°F or passes the cold water test), immediately remove the saucepan from the heat. Do not let it cook any longer! Now, quickly add the 7-ounce jar of marshmallow cream (or 2 cups of mini marshmallows) and the 1 teaspoon of pure vanilla extract.
- Stir Until Smooth: This is a crucial step for achieving that incredibly smooth and creamy texture in your pumpkin fudge. With vigorous stirring, using your sturdy wooden spoon or heat-proof spatula, mix everything together. Stir constantly until the marshmallow cream is completely melted and fully incorporated into the hot pumpkin mixture. The mixture will become thick, glossy, and beautifully uniform. You won’t see any streaks of marshmallow or unmixed ingredients. This typically takes a couple of minutes of dedicated stirring. If you’re adding optional nuts or white chocolate chips, fold them in now, gently but thoroughly, ensuring they are evenly distributed throughout the fudge.
Setting and Finishing Phase: The Patient Wait
You’ve done the hard work of cooking; now comes the most challenging part for some – the waiting! The setting phase is crucial for your pumpkin fudge to firm up into sliceable, delightful pieces. Resist the urge to poke or prod too much, and let time and cool temperatures do their magic.
- Pour into Prepared Pan: Once your fudge mixture is perfectly smooth and glorious, immediately pour it into your parchment-lined 8×8 or 9×9 inch baking pan. Work quickly but carefully. Use your spatula to spread the mixture evenly into all corners of the pan. You want a flat, uniform surface for consistent pieces of pumpkin fudge. You can gently tap the pan on your counter a few times to help settle the mixture and release any air bubbles. Important tip: Try to avoid scraping the very bottom of the saucepan vigorously when pouring, as any slightly overcooked or caramelized bits that might be stuck there could cause your fudge to be grainy.
- Cool at Room Temperature: Now comes the first stage of cooling. Leave the pan of hot pumpkin fudge uncovered on a wire rack at room temperature for at least 1-2 hours. This initial cooling period allows the fudge to gradually firm up and develop its structure. While it might be tempting to rush it into the fridge, starting with room temperature cooling helps prevent cracking and ensures a smoother set. During this time, the glorious aroma of pumpkin and spice will fill your kitchen, a delightful preview of what’s to come!
- Chill to Firmness: After its initial cool down, transfer the pan of pumpkin fudge to the refrigerator. Allow it to chill for a minimum of 2-3 hours, but ideally for 4 hours or even overnight. Chilling is essential for the fudge to become completely firm and easy to cut into neat squares. The colder it gets, the cleaner your cuts will be. This dedicated chilling time is what transforms the warm, soft mixture into solid, ready-to-eat pumpkin fudge. Patience truly is a virtue here!
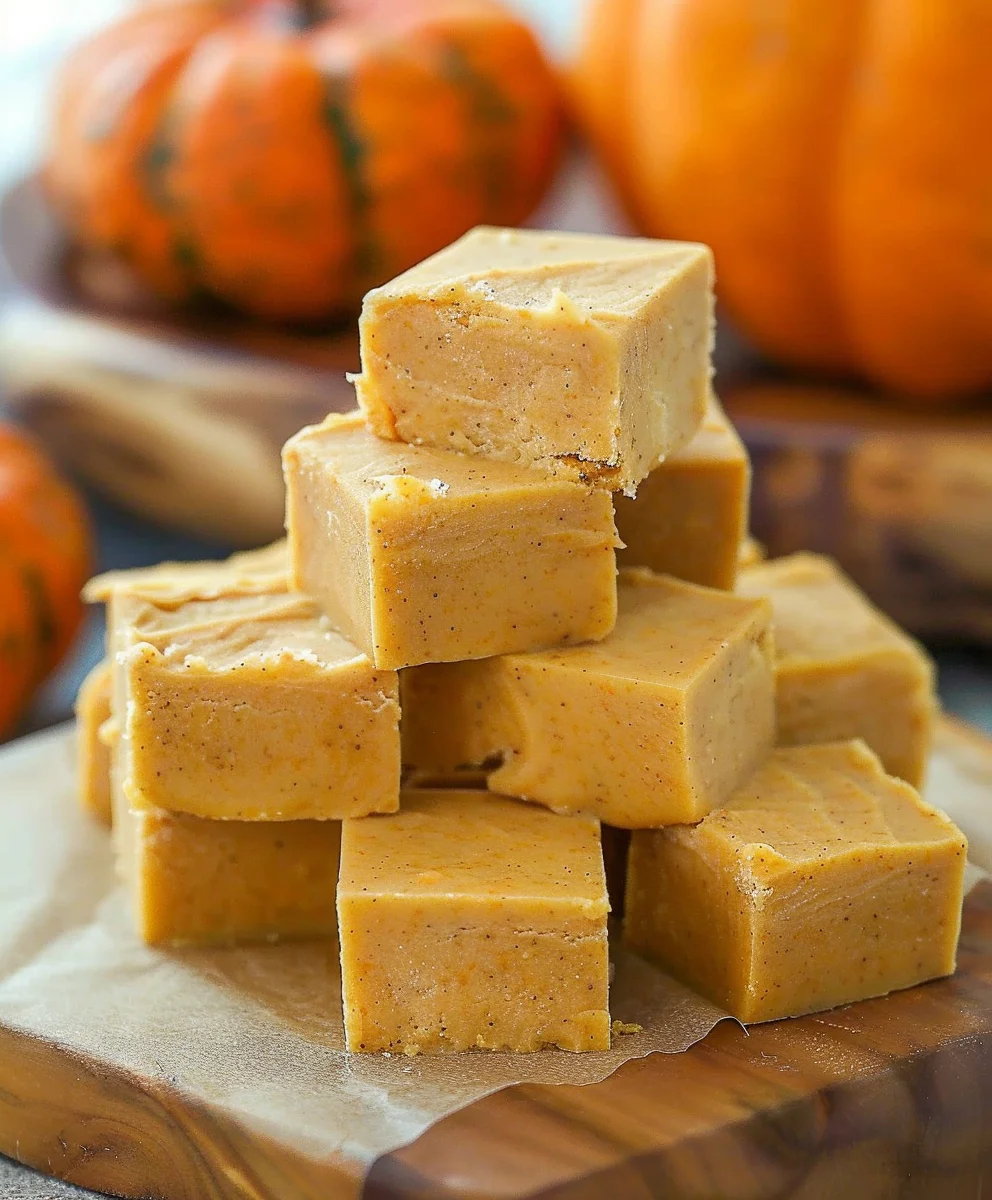
- Lift and Cut Your Fudge: Once your pumpkin fudge is thoroughly chilled and firm, use the parchment paper or foil overhang to carefully lift the entire slab out of the baking pan and onto a cutting board. This is where that handy “sling” really pays off! Now, using a large, sharp knife, cut the fudge into 1-inch squares. For the neatest cuts, wipe your knife clean with a damp cloth after every few cuts, especially if the fudge starts to stick. You can make them larger or smaller depending on your preference, but 1-inch squares are typically perfect for a rich treat like pumpkin fudge. Arrange them on a platter and admire your handiwork!
- Storage: To keep your homemade pumpkin fudge fresh and delicious, store it in an airtight container at room temperature for up to one week. If you prefer, or if your kitchen is particularly warm, you can also store it in the refrigerator for up to two weeks; just be aware that it might be a little firmer straight from the fridge. For longer storage, you can even freeze the fudge for up to three months. Just make sure it’s well-wrapped in parchment paper and then placed in an airtight container or freezer bag to prevent freezer burn. Thaw at room temperature before serving.
- Enjoy Your Hard Work!: Congratulations! You’ve successfully made a batch of incredibly creamy, spiced, and utterly delicious pumpkin fudge. It’s perfect for sharing with friends and family during the fall season, as a holiday treat, or simply as a well-deserved indulgence for yourself. Each bite offers that perfect balance of pumpkin warmth and sweet, smooth bliss. Enjoy every single piece of this delightful pumpkin fudge you’ve created!

Conclusion:
So there you have it, my friends! We’ve journeyed through the simple yet incredibly rewarding process of creating something truly magical in your own kitchen. This isn’t just another dessert recipe; it’s an invitation to capture the cozy, comforting spirit of the season in a bite-sized delight. I truly believe that once you experience the rich, velvety texture and the perfectly spiced aroma emanating from your stovetop, you’ll understand exactly why this particular treat has become such a beloved staple in my home. It’s the kind of confection that brings warmth to chilly evenings and a smile to every face, embodying the very essence of autumn. The ease of preparation, combined with the utterly irresistible outcome, makes this recipe an absolute must-try for both seasoned bakers and complete novices alike. You don’t need fancy equipment or a culinary degree to achieve perfection here; just a little patience and a lot of love.
What I adore most about this recipe is its undeniable ability to transport you straight into a world of vibrant fall colors and crisp, refreshing air with just one taste. The blend of sweet pumpkin, warm cinnamon, nutmeg, and cloves creates a symphony of flavors that dances on your palate, leaving a lingering, pleasant memory. It’s robust enough to satisfy a sweet craving but light enough not to overwhelm, making it the perfect post-dinner treat or an afternoon pick-me-up. Trust me when I say, this is the kind of recipe you’ll find yourself reaching for year after year, eager to recreate that distinctive taste of home and happiness. It’s more than just a sweet; it’s a moment of pure, unadulterated comfort wrapped up in a delightful square. The joy of pulling this luscious creation from the fridge, knowing you’ve made something so special with your own hands, is an unparalleled feeling.
Serving Suggestions & Creative Variations to Elevate Your Experience
Now that you’ve mastered the basic recipe, let’s talk about how you can truly make this treat your own and integrate it into various occasions. This versatile delight offers a plethora of serving suggestions and opportunities for creative variations that will impress anyone lucky enough to share in your culinary creation. Firstly, as a simple treat, it’s absolutely divine served alongside a steaming cup of coffee or a fragrant herbal tea, particularly on a brisk autumn morning or a lazy afternoon. Imagine sinking into your favorite armchair, a good book in hand, and a small plate of these irresistible squares nearby – pure bliss! It also makes for an elegant addition to any holiday dessert platter, adding a burst of seasonal flavor and vibrant color amongst your other festive offerings. Guests will undoubtedly be curious about the beautifully textured squares, and you’ll love seeing their reactions.
For those looking to get a little more adventurous, consider crumbling a few pieces over a scoop of vanilla bean ice cream for an extraordinary autumn-themed sundae. The slight chewiness of the confection combined with the creamy coldness of the ice cream creates a textural contrast that is simply heavenly. Alternatively, you could gently warm a piece in the microwave for a few seconds until it just begins to soften, then serve it with a dollop of fresh whipped cream and a sprinkle of toasted pecans for a more indulgent dessert experience. And speaking of pecans, incorporating toasted chopped pecans or walnuts directly into the mixture before it sets adds a wonderful crunch and a nutty undertone that complements the spices beautifully. A touch of sea salt sprinkled over the top just before chilling can also elevate the flavors, creating that ever-popular sweet and salty dynamic that so many of us adore.
If you’re feeling particularly creative, think about swirling in a layer of softened cream cheese before it sets for a delightful “cream cheese swirl” effect, adding a tangy counterpoint to the sweetness. Or, for a truly decadent twist, melt some white chocolate chips and drizzle them artfully over the cooled squares, allowing them to harden for an extra layer of sweetness and visual appeal. You could even experiment with different spice blends, perhaps adding a pinch of ground ginger or a dash of allspice to further customize the aromatic profile. For an adult-friendly version, a tablespoon of bourbon or rum added to the mixture can impart a sophisticated depth of flavor that is truly exquisite. The possibilities are truly endless, limited only by your imagination, making this recipe a fantastic canvas for your personal culinary expression. This flexibility means that every batch of Pumpkin Fudge you make can be uniquely yours, perfectly tailored to your mood or the occasion.
Your Turn: Embrace the Joy of Homemade Pumpkin Fudge!
Now, it’s your turn to roll up your sleeves and bring this incredible flavor to life in your own kitchen! I genuinely hope you feel inspired to give this recipe a try. There’s an immense satisfaction that comes from creating something delicious from scratch, especially when it results in such a crowd-pleasing treat. Don’t be shy; embrace the process, savor the aromas, and most importantly, enjoy the delicious outcome. Once you’ve made your batch, I would absolutely love to hear about your experience! Did you stick to the classic? Or did you venture into one of the variations I suggested? Perhaps you even came up with your own brilliant modification? Share your thoughts, your successes, and even your funny kitchen mishaps in the comments below. Your feedback and stories truly make this community vibrant and inspiring. And if you snap a photo of your magnificent creation, please consider sharing it – I’d be thrilled to see how your beautiful Pumpkin Fudge turned out!
Remember, cooking and baking are meant to be joyful, experimental, and a wonderful way to connect with others. This recipe is an excellent starting point for creating lasting memories and delicious moments. So go ahead, preheat your imagination, gather your ingredients, and prepare to delight your taste buds. Happy baking, everyone!
Pumpkin Fudge: Easy, Creamy & Delicious Treat!
An irresistible seasonal Pumpkin Fudge recipe featuring creamy white chocolate, sweet pumpkin, and warm spices. This easy-to-make, no-bake fudge embodies the spirit of fall, perfect for sharing as a homemade gift or enjoying as a delightful treat.
Ingredients
-
4 cups (24 oz) white chocolate chips
-
1 cup (8 oz) sweetened condensed milk
-
2 1/2 tablespoons 100% pumpkin puree
-
1 teaspoon vanilla extract
-
1 teaspoon cinnamon
-
1/4 teaspoon nutmeg
-
1/8 teaspoon cloves
Instructions
-
Step 1
Line an 8×8 or 9×9 inch baking pan with parchment paper or aluminum foil, ensuring an overhang. Lightly grease the lining. -
Step 2
In a microwave-safe bowl, combine white chocolate chips and sweetened condensed milk. Microwave in 30-second intervals, stirring thoroughly after each, until the mixture is completely smooth. Alternatively, melt over a double boiler. -
Step 3
Stir the pumpkin puree, vanilla extract, cinnamon, nutmeg, and cloves into the melted chocolate mixture until well combined and uniform. -
Step 4
Pour the fudge mixture into the prepared pan, spread evenly, and chill in the refrigerator for at least 2-4 hours, or until firm and set. -
Step 5
Once thoroughly chilled and firm, lift the fudge from the pan using the lining overhang. Place on a cutting board and cut into 1-inch squares using a sharp knife. -
Step 6
Store the pumpkin fudge in an airtight container at room temperature for up to one week, or refrigerate for up to two weeks. It can also be frozen for up to three months.
Important Information
Nutrition Facts (Per Serving)
It is important to consider this information as approximate and not to use it as definitive health advice.
Allergy Information
Please check ingredients for potential allergens and consult a health professional if in doubt.