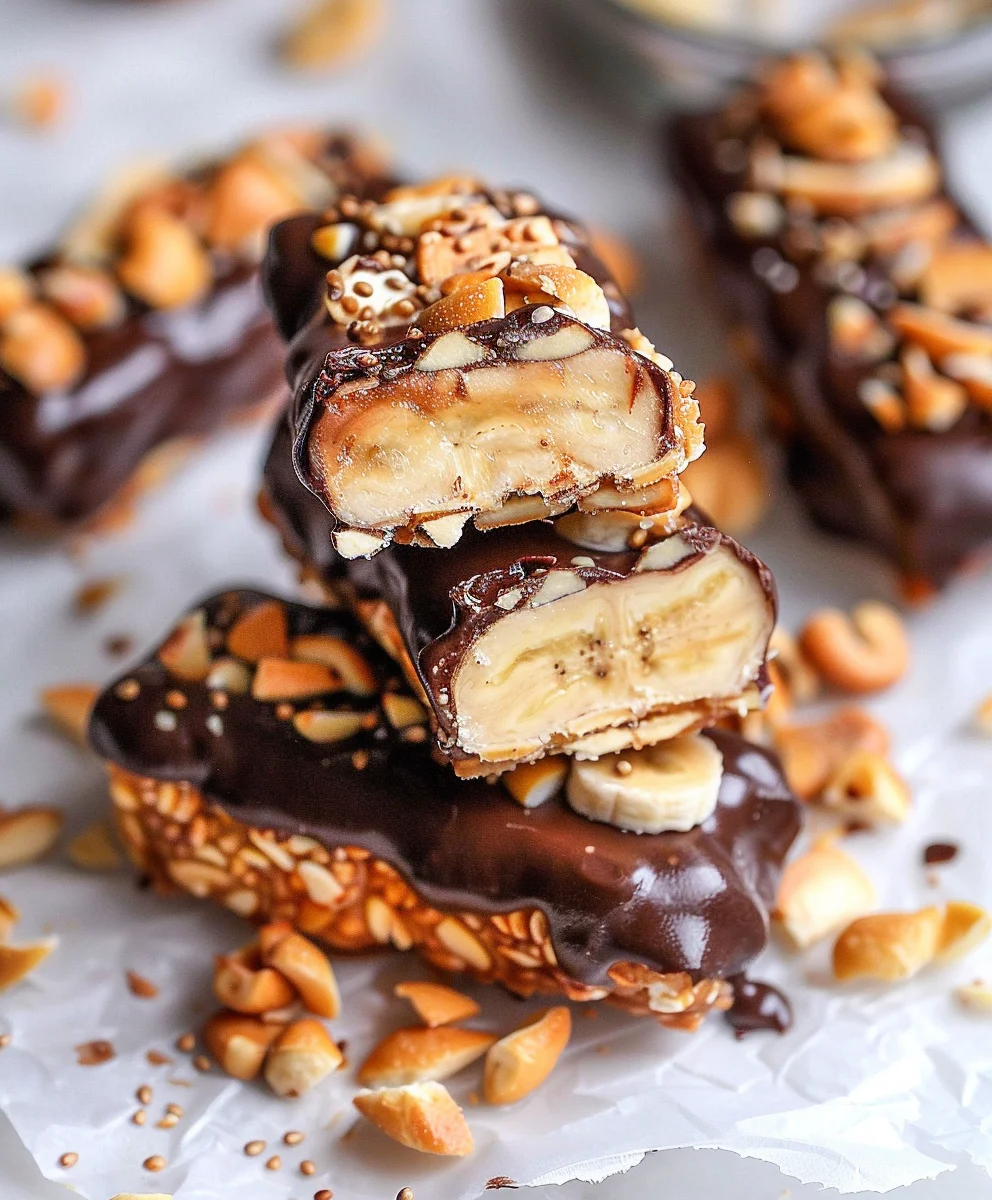
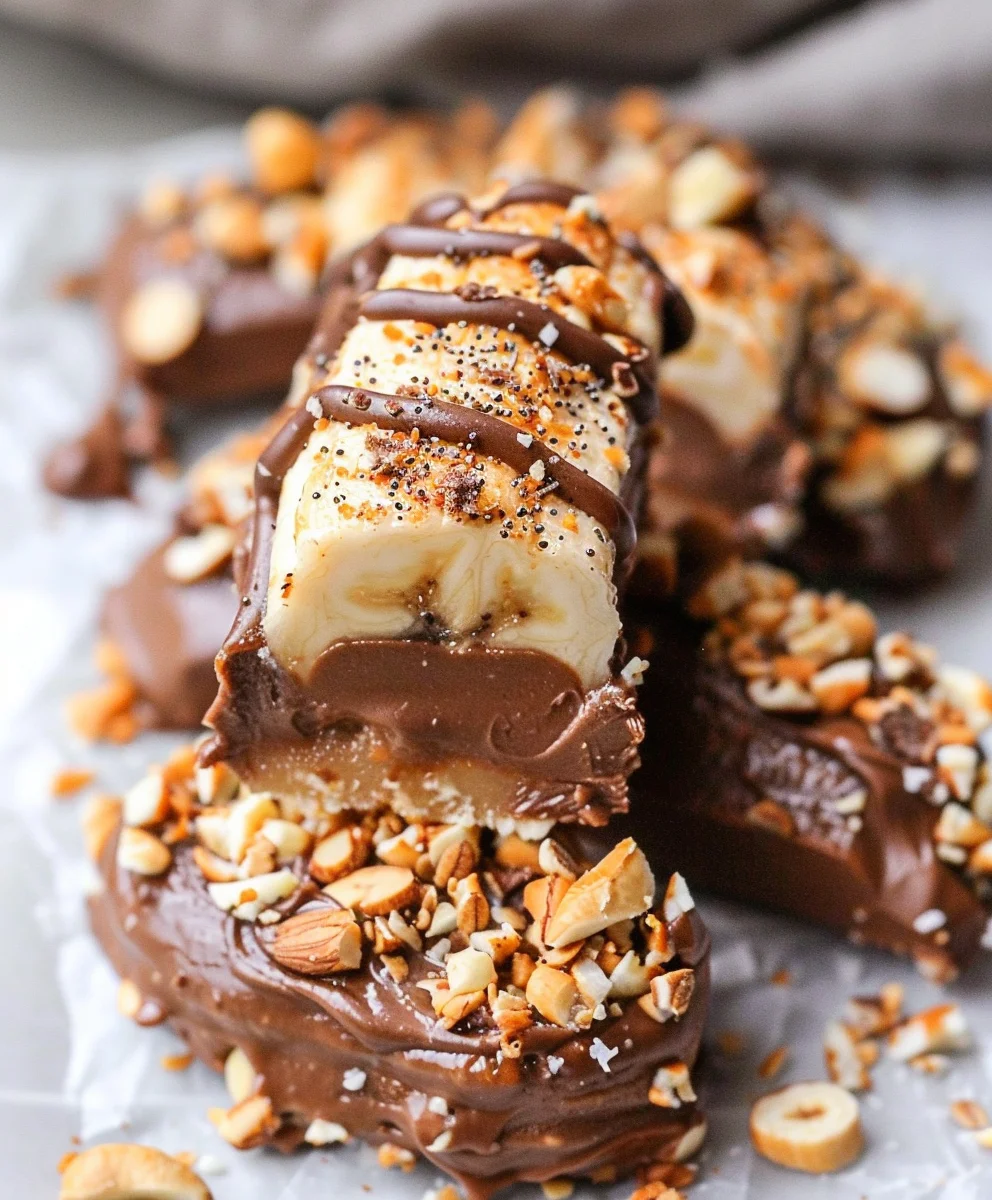
Frozen Banana Snickers have quickly become my go-to recipe for a treat that truly satisfies without the guilt. Imagine the classic combination of sweet, creamy banana, generously coated in rich chocolate, crunchy roasted peanuts, and a hint of caramel-like sweetness – all reminiscent of your favorite candy bar, but made with wholesome ingredients. I’ve found that this innovative take on a beloved classic is not just a dessert; it’s an experience. While it doesn’t boast centuries of culinary history like some dishes, its popularity stems from a modern desire for healthier, yet equally indulgent, alternatives to traditional sweets. It’s a testament to how simple ingredients can be transformed into something extraordinary.
Why This Dish Is a Must-Try: Taste, Texture, and Convenience!
People absolutely adore this dish for countless reasons. The vibrant interplay of textures, from the smooth, almost ice cream-like frozen banana to the satisfying crunch of the peanuts and the snap of the chocolate shell, creates a truly delightful mouthful. The flavor profile is equally captivating: the natural sweetness of the banana perfectly balances the slight bitterness of dark chocolate, while the roasted peanuts add a salty, nutty depth that truly elevates the entire experience. Furthermore, the sheer convenience of preparing these Frozen Banana Snickers cannot be overstated. With minimal effort and just a few simple ingredients, you can whip up a batch of these delectable treats, making them perfect for a quick snack, a refreshing dessert, or even a guilt-free indulgence after a long day. It’s an ideal recipe for anyone seeking a delicious, easy, and relatively healthier way to enjoy the iconic flavors of a Snickers bar.

Ingredients:
- 3-4 ripe but firm medium bananas: When selecting your bananas, I always look for ones that are yellow with perhaps just a few tiny brown spots, indicating they’re sweet but still hold their shape beautifully. Avoid overly green bananas, as they won’t be as naturally sweet, and definitely steer clear of very mushy, brown ones, as they’ll be difficult to work with for this recipe. We’re going to slice them lengthwise, so a medium size is ideal for creating those satisfying “Snickers bar” shapes. The ripeness level is truly crucial here for the best flavor balance.
- ½ cup creamy natural peanut butter: For this recipe, I highly recommend using a natural peanut butter with just peanuts and salt in the ingredient list. The smoother, creamier varieties tend to spread more easily and create a more uniform layer on your banana base. If you prefer a little extra crunch, a crunchy natural peanut butter could also work, but be mindful that it might be slightly trickier to spread smoothly. Feel free to substitute with any other nut butter like almond butter or cashew butter if you have allergies or dietary preferences; the core idea remains the same – a delicious, creamy layer.
- 1 cup pitted Medjool dates: These are the stars of our healthy caramel layer! Medjool dates are naturally very sweet, soft, and have a wonderfully rich, caramel-like flavor on their own. Make sure they are pitted, or pit them yourself before measuring. If your dates feel a bit dry or hard, a quick soak will make them much easier to blend into a smooth caramel. This is a non-negotiable ingredient for that authentic gooey center.
- 2 tablespoons coconut oil, melted (divided): This versatile ingredient serves two key purposes in our Frozen Banana Snickers. First, a tablespoon will be incorporated into our date caramel to give it a smoother texture and a slight richness. Second, and perhaps even more importantly, the remaining tablespoon will be mixed into our melted chocolate coating. This is my secret weapon for achieving a perfectly smooth, glossy, and thin chocolate shell that snaps beautifully when you bite into it, just like a classic Snickers bar. It also helps the chocolate harden more quickly and prevents it from being too brittle.
- 2-3 tablespoons unsweetened dairy-free milk: I typically reach for almond milk or oat milk, but any plant-based milk you have on hand will work perfectly for our date caramel. We’ll add this gradually to help achieve that ideal creamy, spreadable consistency. The exact amount can vary slightly depending on the moisture content of your dates, so it’s always best to start with less and add more as needed.
- 1 teaspoon vanilla extract: A touch of pure vanilla extract really elevates the flavor of our date caramel, adding a warm, aromatic note that complements the sweetness of the dates beautifully. It’s a small addition that makes a big difference in the overall depth of flavor.
- ¼ teaspoon sea salt (plus more for sprinkling): Salt is a magical ingredient that truly balances and enhances sweetness. We’ll add a pinch to our date caramel to keep it from being cloyingly sweet, giving it a more sophisticated flavor profile. And of course, a generous sprinkle of flaky sea salt over the finished chocolate coating is absolutely essential for that irresistible salty-sweet combination, mimicking the classic Snickers experience. Don’t skip this!
- ½ cup roasted peanuts, roughly chopped: For that iconic Snickers crunch! I prefer using roasted, unsalted peanuts so I can control the saltiness with the added sea salt. Roughly chopping them ensures you get a good distribution of nutty texture in every bite. If you can only find salted peanuts, simply reduce the amount of added sea salt in the caramel and on top of the chocolate.
- 1 ½ cups good quality chocolate chips or chopped chocolate bar: The final, glorious coating! I recommend using a good quality semi-sweet or dark chocolate (around 60-70% cocoa solids) for the best flavor and melting consistency. If you prefer a sweeter treat, milk chocolate would also work beautifully, but keep in mind it tends to be a bit softer when set. High-quality chocolate melts more smoothly and provides a superior taste and texture for our crunchy shell.
Phase 1: Crafting the Luxurious Date Caramel Layer
- Prepare the Dates for Blending: First things first, we need to ensure our Medjool dates are perfectly pliable for blending. If your dates feel soft and moist right out of the package, you might be able to skip the soaking step. However, if they feel a bit firm or dry, or if you’re unsure, I always recommend a quick soak. Place your 1 cup of pitted Medjool dates into a heat-proof bowl. Pour enough very hot (but not boiling) water over them to fully submerge them. Let them soak for about 5-10 minutes. This process softens them beautifully, making them much easier to blend into a silky-smooth caramel. Once softened, drain them thoroughly, discarding the soaking water. We want the dates to be plump, not waterlogged, as excess water will thin out our caramel too much.
- Blend the Caramel Base: Transfer your softened and drained dates to a high-speed blender or a food processor. Add 1 tablespoon of the melted coconut oil, 2 tablespoons of the unsweetened dairy-free milk, 1 teaspoon of vanilla extract, and ¼ teaspoon of sea salt. Now, this is where the magic happens! Begin blending on a low speed, gradually increasing to high. You’ll likely need to stop frequently to scrape down the sides of the blender or food processor with a rubber spatula. The mixture will initially look chunky and resistant, but with patience, it will start to come together.
- Achieve the Perfect Caramel Consistency: Continue blending and scraping until you achieve a wonderfully thick, smooth, and creamy caramel consistency. It should be spreadable, similar to a very thick peanut butter or a soft taffy. If your mixture seems too thick or isn’t blending smoothly after a few minutes, add the remaining 1 tablespoon of dairy-free milk, one teaspoon at a time, blending well after each addition until you reach the desired consistency. The goal is a caramel that’s firm enough to hold its shape but soft enough to spread easily without tearing the banana. Don’t rush this step; the texture of your caramel is paramount for the ultimate Frozen Banana Snickers experience! Once it’s perfectly smooth, transfer the date caramel to a small bowl and set aside.
Phase 2: Building the Banana “Snickers” Core
- Prepare Your Work Surface: Line a large baking sheet (or two smaller ones) with parchment paper. This non-stick surface is crucial for easily removing your frozen treats later. Ensure the paper lays flat.
- Slice the Bananas: Take your 3-4 ripe but firm bananas and carefully peel them. Now, gently slice each banana lengthwise down the middle, creating two long halves from each banana. The goal here is to create flat, even surfaces that will serve as the base for our Snickers layers. Depending on the size of your bananas, you should end up with 6 to 8 banana halves. Arrange these banana halves, cut-side up, on your prepared parchment-lined baking sheet, making sure they don’t touch each other.
- Apply the Peanut Butter Layer: Now for our first delicious layer! Take your ½ cup of creamy natural peanut butter. Using a small offset spatula or the back of a spoon, carefully spread an even layer of peanut butter over the cut side of each banana half. I aim for a layer that’s about ⅛ to ¼ inch thick, ensuring it goes almost to the edges of the banana without overflowing too much. The peanut butter acts as a wonderful adhesive for the next layer and provides that classic nutty flavor. Be gentle as you spread to avoid breaking the banana.
- Add the Date Caramel Layer: Next up, the star date caramel! Using a fresh, clean small offset spatula or the back of a spoon, carefully spread a layer of our homemade date caramel over the peanut butter on each banana half. This layer should be roughly the same thickness as your peanut butter layer, creating a satisfying, gooey center. The date caramel can be a bit sticky, so take your time, spreading it evenly and gently. If it’s too sticky, lightly oil your spatula or fingers. Make sure the caramel layer adheres well to the peanut butter.
- Sprinkle with Roasted Peanuts: Generously sprinkle the ½ cup of roughly chopped roasted peanuts over the date caramel layer on each banana half. Gently press the peanuts down into the caramel a little bit with your fingertips to ensure they adhere well and don’t fall off. This step adds that essential crunchy texture that makes these treats so reminiscent of a Snickers bar.
- Initial Freeze for Setting: Once all your banana halves are layered with peanut butter, date caramel, and peanuts, carefully transfer the baking sheet to your freezer. We need them to freeze completely solid before we attempt the chocolate coating. This typically takes a minimum of 2-3 hours, but I often leave them in for 4 hours or even overnight to ensure they are rock-hard. This initial freeze is absolutely critical; a solid frozen core prevents the banana layers from shifting or melting during the dipping process. You want them to be firm enough to handle without bending or breaking.
Phase 3: Preparing the Velvety Chocolate Coating
- Melt the Chocolate (Double Boiler Method): My preferred method for melting chocolate is a double boiler, as it provides gentle, even heat and reduces the risk of burning. Place your 1 ½ cups of good quality chocolate chips or chopped chocolate bar in a heat-proof bowl. Set this bowl over a small saucepan containing about 1-2 inches of simmering water, ensuring the bottom of the bowl does not touch the water. The steam from the simmering water will gently melt the chocolate. Stir occasionally with a clean, dry rubber spatula until the chocolate is almost completely melted and smooth. Remove the bowl from the heat while there are still a few small lumps of chocolate remaining; the residual heat will melt them as you stir.
- Melt the Chocolate (Microwave Method – Alternative): If you prefer to use a microwave, place the chocolate chips or chopped chocolate bar in a microwave-safe bowl. Heat in 30-second intervals on medium power, stirring thoroughly after each interval. Chocolate retains its shape even when melted, so it’s essential to stir to assess its consistency. Continue heating and stirring until the chocolate is smooth and fully melted, being very careful not to overheat it, which can cause it to seize and become grainy.
- Incorporate the Coconut Oil: Once your chocolate is beautifully melted and smooth, add the remaining 1 tablespoon of melted coconut oil to the bowl. Stir it in thoroughly until it is completely combined with the chocolate. The coconut oil is a game-changer here! It thins out the chocolate ever so slightly, making it much easier to achieve a thin, even coating on our frozen bananas. It also helps the chocolate set with a lovely snap and a glossy finish, truly mimicking that store-bought candy bar experience. Ensure the chocolate and coconut oil are perfectly combined into a uniform, smooth mixture before proceeding.
- Prepare for Dipping: Transfer the melted chocolate to a deeper, narrow bowl or a tall glass. This shape makes it much easier to fully submerge the banana halves without needing an excessive amount of chocolate. Keep the bowl of chocolate near your freezer for efficiency.
Phase 4: The Final Dip and Freeze
- Retrieve the Frozen Banana Bases: Once your banana Snickers bases are completely frozen and firm, remove them from the freezer. Work quickly, as you want them to remain as cold as possible during the dipping process.
- The Dipping Technique: Take one frozen banana half. Using a fork, a skewer, or two forks, gently hold the banana half and fully submerge it into the melted chocolate. Ensure the chocolate completely covers the top and sides, encasing all the layers. You might need to gently spoon chocolate over any exposed areas. The contrast in temperature between the very cold banana and the warm chocolate will cause the chocolate to start setting almost instantly.
- Allow Excess Chocolate to Drip: Lift the banana half out of the chocolate, allowing any excess chocolate to drip back into the bowl. Gently tap the fork or skewer against the edge of the bowl to help remove any drips and achieve a thinner, more even coating. This also prevents a thick “foot” of chocolate from forming around the base when you place it down.
- Add Optional Toppings Immediately: While the chocolate is still wet and before it fully sets (which will happen very quickly!), immediately sprinkle a little extra flaky sea salt over the chocolate-coated banana. If desired, you can also sprinkle a few more chopped peanuts for an extra flourish and texture. This quick action ensures the toppings adhere perfectly to the chocolate.
- Return to Freezer: Carefully place the chocolate-coated and garnished banana Snickers back onto the parchment-lined baking sheet in the freezer. Repeat the dipping and sprinkling process with the remaining banana halves, working efficiently to keep the bananas frozen and the chocolate at an ideal dipping temperature. If your chocolate starts to thicken too much, you can briefly reheat it in the double boiler or microwave for a few seconds to regain its fluidity.
- Final Freeze: Once all the banana Snickers are coated, return the baking sheet to the freezer for a final freeze. This usually takes at least 30 minutes to an hour to ensure the chocolate coating is completely firm and crisp. You want that satisfying snap when you bite into it!
Phase 5: Storage and Enjoyment
- Storing Your Frozen Banana Snickers: Once the chocolate coating is completely solid, carefully remove the banana Snickers from the parchment paper. To prevent them from sticking together or developing freezer burn, I recommend storing them in an airtight freezer-safe container. If you need to stack them, place a piece of parchment paper between layers to keep them from freezing into one solid block. Proper storage is key to maintaining their delicious texture and preventing ice crystals from forming.
- How to Enjoy: These Frozen Banana Snickers are best enjoyed straight from the freezer! The various layers — the creamy peanut butter, the gooey date caramel, the crunchy peanuts, and the crisp chocolate shell — come together to create an incredible texture and flavor explosion that’s truly satisfying. Allow them to sit at room temperature for just a minute or two if you find them too hard to bite into, but generally, the colder they are, the better they taste in my opinion. They are the perfect refreshing and indulgent treat for a hot day or whenever you crave something sweet and satisfying.
- Shelf Life: Stored properly in an airtight container, these delicious treats will keep well in your freezer for up to 2-3 weeks. Beyond that, the banana may start to lose some of its optimal texture, though they would still be perfectly safe to eat. However, I highly doubt they’ll last that long in your freezer once you discover how wonderfully addictive they are!
<h2>Conclusion:</h2>
<p>Well, my friends, we’ve reached the end of our delightful journey, and I genuinely hope you’re as excited as I am about this incredible recipe. If you’ve been searching for that perfect treat that strikes an impeccable balance between indulgence and something a little more wholesome, then look no further. This recipe isn’t just another dessert; it’s a revelation! It truly is a must-try for so many reasons. First and foremost, its simplicity is unmatched. You don’t need to be a gourmet chef or possess any fancy equipment to whip up a batch of these beauties. The steps are straightforward, making it an ideal project for a lazy afternoon, a fun activity with kids, or even a quick, satisfying treat when a craving hits unexpectedly.</p>
<p>But beyond its ease, what truly makes this recipe shine is the spectacular fusion of flavors and textures. Imagine biting into something that’s simultaneously creamy from the frozen banana, subtly sweet and rich from the date-caramel-like layer, crunchy from the peanuts, and then all enveloped in a crisp, decadent chocolate shell. It’s an experience that truly mimics the beloved candy bar, but with a freshness and a satisfying quality that feels both indulgent and surprisingly light. <strong>This isn’t just a snack; it’s a moment of pure bliss.</strong> It’s the kind of treat that makes you close your eyes and savor every single bite, completely forgetting that you might have been trying to eat “healthier.” It’s proof that you can absolutely have your cake (or your candy bar!) and eat it too, without any guilt. Trust me, once you try this, it’ll become a staple in your dessert repertoire, offering that perfect sweet escape whenever you need it most.</p>
<h4>Elevate Your Frozen Banana Snickers Experience with These Ideas!</h4>
<p>Now, while the core recipe for our <strong>Frozen Banana Snickers</strong> is absolutely perfect as is, I always encourage a little bit of culinary adventure! One of the best things about this recipe is its incredible versatility. Don’t be afraid to get creative with your toppings. For an extra layer of crunch and flavor, consider adding a sprinkle of toasted coconut flakes before the chocolate sets, or perhaps some finely chopped pretzels for a salty-sweet twist that’s absolutely addictive. A dash of flaky sea salt on top of the chocolate is also a game-changer, enhancing all the other sweet elements beautifully. If you’re feeling particularly fancy, a drizzle of white chocolate or even a contrasting colored chocolate could add a beautiful aesthetic touch, making them perfect for serving at gatherings or as a thoughtful homemade gift.</p>
<p>Thinking beyond just toppings, you can also experiment with the chocolate coating itself. While a classic semi-sweet or dark chocolate works wonders, a milk chocolate dip will lean even more into the traditional Snickers vibe, and a good quality white chocolate can offer a delightfully different, creamy sweetness. For those who love a bit of spice, a pinch of cayenne pepper in the melted chocolate before dipping can add a surprising and exciting kick! And if you want to swap out the peanuts, feel free to use almonds, cashews, or even sunflower seeds for a nut-free option. The “caramel” layer itself can also be tinkered with; a touch of almond butter or cashew butter instead of peanut butter, or even a tiny amount of maple extract, could introduce subtle new dimensions of flavor. For a more intense banana flavor, you could even try briefly charring the bananas before freezing them, adding a depth that is truly unique. You can also make a big batch and store them in an airtight container in the freezer for up to two weeks, making them perfect for meal prep or unexpected guests. <strong>The possibilities are truly endless, limited only by your imagination!</strong> These variations make the recipe exciting to revisit time and time again, ensuring you never get bored and always have something new to discover.</p>
<h4>Your Culinary Adventure Awaits!</h4>
<p>So, what are you waiting for? I wholeheartedly urge you to roll up your sleeves and give this recipe a try this week. Seriously, you won’t regret it. It’s the ideal way to satisfy that sweet tooth without feeling weighed down, and it’s an absolute crowd-pleaser for all ages. Imagine the joy on your family’s faces, or the impressed looks from your friends, when they bite into these homemade wonders. <strong>They’ll never guess how simple they were to make!</strong> And please, please, please, don’t keep this deliciousness to yourself! Once you’ve made your batch and savored every last piece, I would absolutely love to hear about your experience. Did you try any exciting variations? What was your favorite part? Share your photos and stories with me and the community! Tag me on social media, leave a comment below, or just drop me a line to let me know how it went. Your feedback and creations truly inspire me and make this culinary journey so much more rewarding for everyone. <strong>Go forth and create your own batch of deliciousness – your taste buds will thank you!</strong></p>
Healthy Frozen Banana Snickers
A guilt-free treat combining sweet, creamy frozen banana, generously coated in rich chocolate, crunchy roasted peanuts, and a sprinkle of sea salt. This healthy snack is reminiscent of a classic candy bar, made with wholesome ingredients and minimal effort.
Ingredients
-
2 medium ripe bananas
-
4 tbsp peanut butter
-
4 to 5 tbsp melted dark chocolate
-
1/4 tsp coconut oil
-
3 tbsp chopped peanuts
-
Sea salt, to taste
Instructions
-
Step 1
Slice 2 medium ripe bananas lengthwise to create 4 halves. Place them on a parchment-lined baking sheet. -
Step 2
Spread 4 tbsp of peanut butter evenly over the cut side of each banana half. -
Step 3
Freeze the banana halves on the baking sheet for at least 2 hours, or until completely firm. -
Step 4
Melt 4 to 5 tbsp dark chocolate with 1/4 tsp coconut oil until smooth. Transfer to a narrow, deep bowl. -
Step 5
Working quickly, dip each frozen banana half into the melted chocolate, ensuring it’s fully coated. Let excess chocolate drip off. Immediately sprinkle with 3 tbsp chopped peanuts and sea salt. -
Step 6
Return the chocolate-coated bananas to the freezer for another 30 minutes, or until the chocolate is completely set and crisp. -
Step 7
Store the Frozen Banana Snickers in an airtight freezer-safe container. Enjoy straight from the freezer for best taste and texture.
Important Information
Nutrition Facts (Per Serving)
It is important to consider this information as approximate and not to use it as definitive health advice.
Allergy Information
Please check ingredients for potential allergens and consult a health professional if in doubt.