Apple Cider Cookies Recipe is more than just a delightful autumn bake; it’s an invitation, I believe, to savor the very essence of the season. I always imagine the crisp, cool air, the vibrant hues of changing leaves, and the comforting aroma of freshly baked goods wafting through my home whenever I think of these cookies. That’s precisely the experience I aim for, and these cookies deliver it beautifully. For centuries, apples and their rich, concentrated cider have been staples in fall celebrations, from harvest festivals to Thanksgiving gatherings. I find that this particular cookie recipe perfectly encapsulates that tradition, transforming the beloved fall beverage into an irresistibly soft, chewy, and spiced confection.
I’ve seen people absolutely adore this dish not only for its unique balance of sweet and tangy flavors but also for its incredibly tender texture that practically melts in your mouth. The secret, as I’ve discovered, lies in reducing fresh apple cider to create a powerful flavor punch that permeates every bite, complemented by warm spices like cinnamon and nutmeg. It’s a taste that brings a profound sense of nostalgia and coziness, which I personally cherish. Whether you’re seeking the perfect accompaniment for a warm cup of coffee or a standout dessert for your next family get-together, I assure you that mastering this Apple Cider Cookies Recipe promises a truly rewarding culinary experience that will have everyone asking for more.

Ingredients:
- For the Apple Cider Reduction:
- 3 cups (720ml) unfiltered apple cider (I always recommend good quality for the best flavor!)
- For the Apple Cider Cookies:
- 2 ½ cups (300g) all-purpose flour, spooned and leveled (Don’t pack it, friends!)
- 1 teaspoon baking soda
- ½ teaspoon ground cinnamon
- ¼ teaspoon ground nutmeg (freshly grated if you have it, it makes a world of difference!)
- ¼ teaspoon salt
- 1 cup (226g) unsalted butter, softened to room temperature (This is crucial for a smooth dough!)
- ¾ cup (150g) granulated sugar
- ½ cup (100g) packed light brown sugar
- 1 large egg, at room temperature
- 1 large egg yolk, at room temperature (This adds such a lovely chewiness!)
- 2 tablespoons of the prepared apple cider reduction (Our star ingredient for that authentic apple cider flavor!)
- 1 teaspoon pure vanilla extract
- For the Apple Cider Glaze:
- 1 ½ cups (180g) powdered sugar, sifted (Sifting helps prevent lumps, trust me!)
- 3-4 tablespoons of the prepared apple cider reduction (Adjust to your desired consistency)
- ¼ teaspoon ground cinnamon (optional, but lovely!)
For the Apple Cider Reduction:
The foundation of this incredible Apple Cider Cookies Recipe is a concentrated apple cider reduction. This step might seem a little extra, but it’s where all that wonderful, crisp apple flavor gets intensified, making our cookies truly sing with autumnal joy. Please, don’t skip this part!
- Pour the cider: Grab a medium saucepan and pour in your 3 cups of unfiltered apple cider. I always suggest using a good quality, flavorful cider here because its essence will be the core of our cookies.
- Bring to a boil: Place the saucepan over medium-high heat and bring the cider to a rolling boil. You’ll see it start to bubble vigorously.
- Reduce the liquid: Once boiling, reduce the heat to medium-low, just enough to maintain a gentle simmer. You’ll want to let it simmer, uncovered, for about 25-35 minutes. Your goal is to reduce the cider down to about ¼ cup. It should become thick and syrupy. You’ll notice the color deepens, too, transforming into a beautiful amber hue.
- Monitor closely: It’s really important to keep an eye on it during the last 10 minutes or so. As the liquid volume decreases, it can go from perfect to burnt very quickly. Swirl the pan occasionally to prevent sticking.
- Cool and set aside: Once it reaches ¼ cup and has that lovely syrupy consistency, remove it from the heat. Pour the reduction into a small, heatproof bowl or jar and let it cool completely to room temperature. It will thicken even more as it cools. This concentrated apple cider reduction is a flavor powerhouse and absolutely essential for our Apple Cider Cookies Recipe. You’ll use it in both the cookie dough and the glaze!
Preparing the Apple Cider Cookie Dough:
Now that we have our beautiful apple cider reduction ready, it’s time to bring together the elements for our delicious Apple Cider Cookies. This part is where the magic really starts to happen!
- Prepare your dry ingredients: In a medium bowl, whisk together the 2 ½ cups of all-purpose flour, 1 teaspoon of baking soda, ½ teaspoon of ground cinnamon, ¼ teaspoon of ground nutmeg, and ¼ teaspoon of salt. Give it a good whisk until everything is well combined. I always say a proper whisk ensures even distribution, which means perfect flavor in every bite! Set this bowl aside for now.
- Cream the butter and sugars: In a large mixing bowl, using an electric mixer (either a stand mixer with the paddle attachment or a handheld mixer), beat the 1 cup of softened unsalted butter on medium speed for about 1 minute until it’s light and creamy. Then, add the ¾ cup of granulated sugar and ½ cup of packed light brown sugar. Continue beating on medium-high speed for 2-3 minutes, scraping down the sides of the bowl as needed. The mixture should become pale and fluffy. This creaming step is vital for incorporating air into your dough, which contributes to the cookies’ tender texture.
- Add the eggs and extracts: Reduce the mixer speed to medium-low. Add the large egg and the large egg yolk one at a time, beating well after each addition until just combined. Next, pour in the 2 tablespoons of our glorious apple cider reduction and 1 teaspoon of pure vanilla extract. Beat until they are fully incorporated. Don’t overmix at this stage; we just want everything to come together.
- Combine wet and dry ingredients: With the mixer on low speed, gradually add the dry ingredient mixture to the wet ingredients, a third at a time. Mix only until just combined and no streaks of flour remain. Be careful not to overmix the dough! Overmixing can develop the gluten too much, leading to tough cookies, and we definitely want soft, chewy Apple Cider Cookies. I usually stop the mixer when I still see a tiny bit of flour and finish mixing by hand with a rubber spatula to ensure I don’t go too far.
- Chill the dough: Cover the bowl tightly with plastic wrap and refrigerate the dough for at least 1 hour. Chilling the dough helps firm up the butter, which prevents the cookies from spreading too much in the oven. It also allows the flavors to meld beautifully, intensifying that wonderful apple cider goodness. You can even chill it overnight if you’re prepping ahead – just make sure to let it sit at room temperature for 10-15 minutes before scooping if it’s been in the fridge for a long time.
Baking the Apple Cider Cookies:
Alright, our dough is perfectly chilled and ready to transform into irresistible Apple Cider Cookies! This is where your kitchen will start smelling absolutely divine.
- Preheat your oven: About 15-20 minutes before you’re ready to bake, preheat your oven to 375°F (190°C). Arrange an oven rack in the center of the oven.
- Prepare baking sheets: Line two large baking sheets with parchment paper or silicone baking mats. This prevents sticking and ensures even baking, plus it makes cleanup a breeze!
- Scoop the dough: Using a 1.5-tablespoon cookie scoop or simply rolling spoonfuls, scoop rounds of dough onto the prepared baking sheets. Leave about 2 inches between each cookie, as they will spread a bit. I usually fit about 12 cookies per standard baking sheet.
- Bake the cookies: Bake one sheet at a time for 9-11 minutes. The exact baking time can vary depending on your oven, so keep an eye on them. The edges should be lightly golden brown, and the centers should still look slightly soft. They might even look a little puffy. Don’t overbake! A slightly underbaked cookie is usually a chewy, delicious cookie.
- Cool on the baking sheet: Once baked, remove the baking sheet from the oven. Let the cookies cool on the baking sheet for 5-10 minutes. They will continue to set up during this time. Attempting to move them too soon can cause them to break apart.
- Transfer to a wire rack: After the initial cooling period, carefully transfer the warm cookies to a wire rack to cool completely. This prevents the bottoms from becoming soggy and allows for even cooling. Repeat with the remaining cookie dough. While the first batch is cooling, feel free to start preparing your glaze! The aroma filling your kitchen right now is the beautiful promise of these fantastic Apple Cider Cookies.
For the Apple Cider Glaze:
What’s an Apple Cider Cookie without a glorious glaze to crown it? This apple cider glaze is the perfect finishing touch, adding an extra layer of sweetness and a final burst of that concentrated apple flavor. It’s incredibly simple to make and truly elevates our Apple Cider Cookies Recipe to perfection.
- Sift powdered sugar: In a medium bowl, measure out 1 ½ cups of powdered sugar. Sift it through a fine-mesh sieve into the bowl. Trust me on this one – sifting makes a huge difference in achieving a smooth, lump-free glaze. Nobody wants lumpy glaze on their perfect cookies!
- Add apple cider reduction: Begin by adding 3 tablespoons of our cooled apple cider reduction to the sifted powdered sugar. You want to use the reduction we made earlier, which is super concentrated and full of flavor.
- Whisk until smooth: Using a small whisk or a fork, stir the ingredients together vigorously until you achieve a completely smooth consistency. You’ll want the glaze to be thick enough to coat the back of a spoon but still pourable.
- Adjust consistency: If the glaze is too thick, add the remaining 1 tablespoon of apple cider reduction, a tiny bit at a time (like half a teaspoon), whisking well after each addition, until you reach your desired consistency. If, by some chance, it becomes too thin, simply whisk in a little more sifted powdered sugar until it thickens up. Remember, we want a glaze that sets nicely, not one that just runs off the cookie.
- Optional cinnamon: If you love that extra hint of spice, now is the time to whisk in ¼ teaspoon of ground cinnamon. It complements the apple cider flavor beautifully and adds a lovely visual touch with tiny specks of cinnamon.
- Set aside: Once your glaze is perfectly smooth and at the right consistency, set it aside. It’s ready to adorn our beautifully baked Apple Cider Cookies!
Glazing and Finishing Your Apple Cider Cookies:
Now for the grand finale! The cookies are baked and cooled, the glaze is ready, and it’s time to bring it all together to create the most delightful Apple Cider Cookies you’ve ever tasted.
- Ensure cookies are fully cooled: This is a critical step! Make absolutely sure your Apple Cider Cookies are completely cool to the touch before glazing them. If they are even slightly warm, the glaze will melt and run right off, leaving you with a sticky mess instead of a beautiful, set glaze. Patience is key here.
- Prepare your glazing station: Place your wire rack with the cooled cookies over a sheet of parchment paper or aluminum foil. This will catch any drips from the glaze, making cleanup much easier.
- Glaze the cookies: You have a few options for glazing, choose what works best for you:
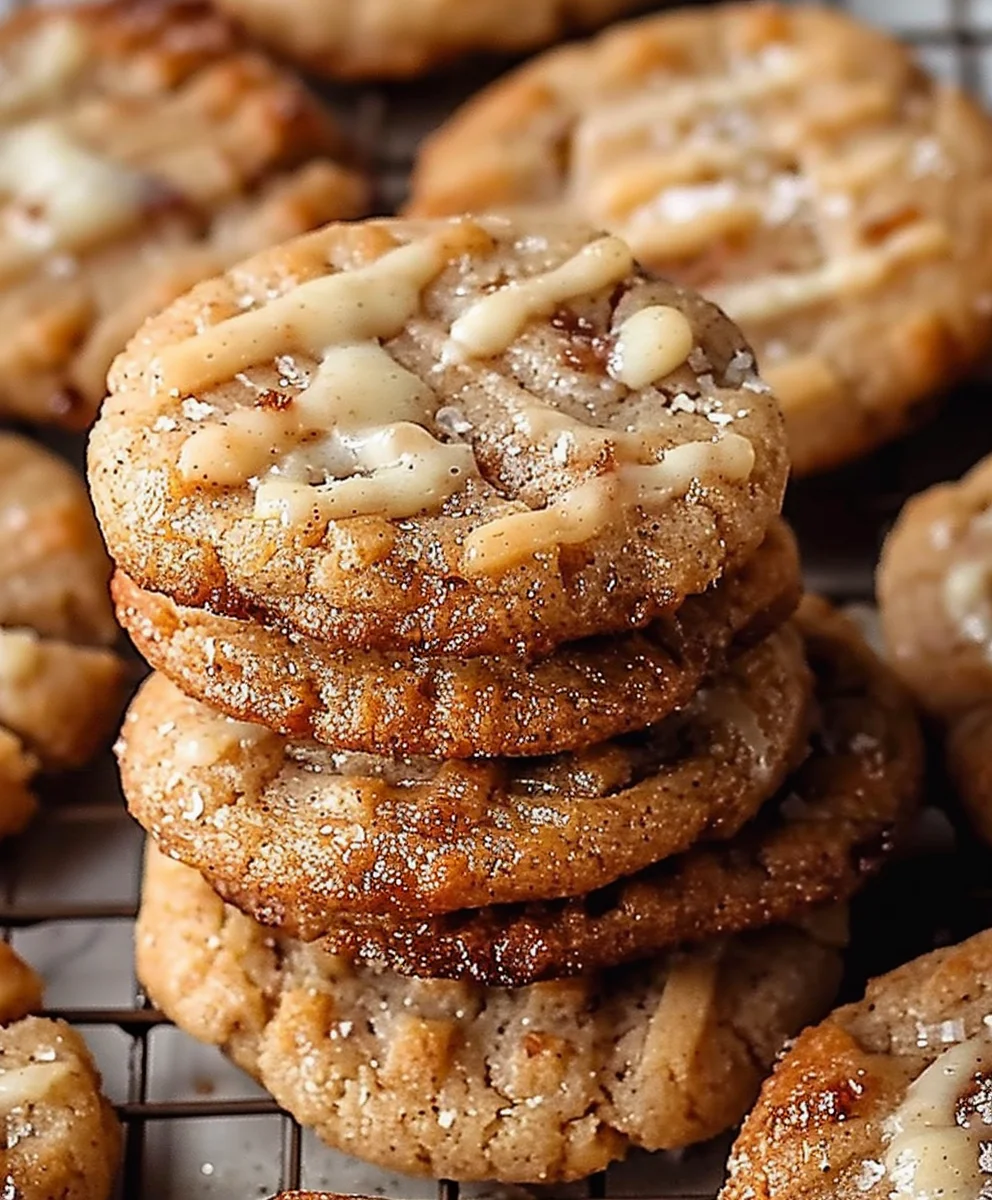
- Dipping Method (My personal favorite for a full coating): Gently hold the top of a cooled cookie and dip it upside down into the bowl of apple cider glaze. Swirl it around gently to coat the top evenly. Lift the cookie, allowing any excess glaze to drip off back into the bowl. Then, carefully flip it right-side up and place it back on the wire rack.
- Drizzling Method (For a lighter touch): Using a spoon, drizzle the glaze over the tops of the cookies in a decorative pattern. This creates a more rustic look and a lighter glaze application.
- Spreading Method (If your glaze is thicker): If your glaze is on the thicker side, you can use a small offset spatula or the back of a spoon to spread a thin layer evenly over the top of each cookie.
Repeat this process for all your glorious Apple Cider Cookies.
- Allow the glaze to set: Let the glazed cookies sit undisturbed on the wire rack for at least 30-60 minutes, or until the glaze has fully set and hardened. This ensures a clean, non-sticky finish. If you’re in a humid environment, it might take a little longer. You’ll know it’s set when you can touch it lightly without leaving a mark.
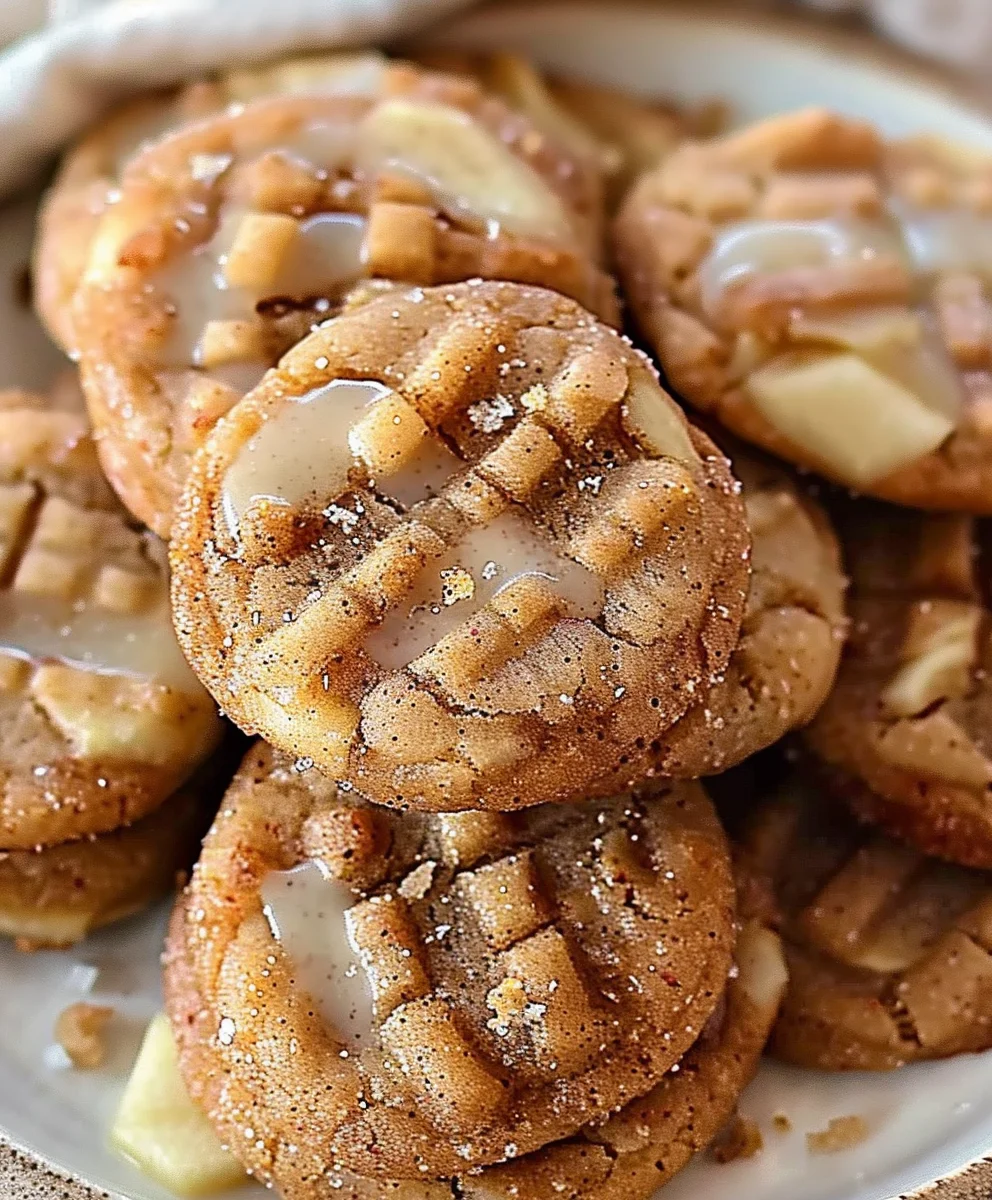
- Optional Garnish (for extra flair!): While the glaze is still wet, if you’re feeling fancy, you can sprinkle a tiny pinch of extra ground cinnamon or even a very fine dusting of freshly grated apple zest over the top of each cookie. This adds both visual appeal and another layer of aromatic goodness to your Apple Cider Cookies.
- Storage: Once the glaze is completely set, store your delightful Apple Cider Cookies in an airtight container at room temperature for up to 3-5 days. They tend to get even softer and more flavorful on the second day, in my opinion! These cookies are perfect for sharing with friends and family, or simply enjoying with a warm cup of coffee or, you guessed it, a hot mug of apple cider. Enjoy every single bite of this wonderful Apple Cider Cookies Recipe!
Conclusion:
As we reach the sweet culmination of our baking journey together, I genuinely hope you’re feeling as inspired as I am about this particular confection. Truly, if there’s one recipe that perfectly encapsulates the essence of autumn in a single, delightful bite, it has to be this one. I poured my heart into perfecting every detail, ensuring that each cookie you pull from your oven will be a testament to the comforting magic of homemade treats. It’s more than just a dessert; it’s an invitation to experience the season in its most delicious form, offering a unique blend of warmth, spice, and the irresistible tang of apples that truly sets it apart.
Why this is your new go-to fall favorite: First, let’s talk about that incredible flavor profile. The secret, as you now know, lies in the carefully reduced apple cider. This isn’t just a hint of apple; it’s a concentrated burst of crisp, autumnal apple essence, deepened and enriched to a caramelly sweetness that’s utterly unparalleled. When combined with a judicious blend of cinnamon, nutmeg, and just a whisper of clove, the result is a symphony of flavors that evoke cozy evenings, rustling leaves, and joyful gatherings. Then there’s the texture – oh, the texture! We’re talking about cookies that are gloriously soft and chewy on the inside, with just the right amount of delightful give, while maintaining a perfectly structured edge. They truly strike that ideal balance, never too cakey, never too crumbly. Every element has been thoughtfully designed to deliver maximum pleasure, making this Apple Cider Cookies Recipe not just a suggestion, but a truly indispensable addition to your baking repertoire, especially as the days grow shorter and the air turns crisp. It’s the kind of cookie that effortlessly becomes the star of any spread, drawing appreciative smiles and requests for the recipe from everyone who tries it. Imagine the cozy warmth emanating from your kitchen, the delightful anticipation as they bake, and the sheer joy of that first, perfect bite – it’s an experience I promise you won’t want to miss.
Serving Suggestions to Elevate Your Experience:
While these cookies are undeniably exquisite straight from the cooling rack, still faintly warm and fragrant, there are so many wonderful ways to enjoy them. Imagine pairing one (or two!) with a steaming mug of hot apple cider – perhaps even the same cider you used for the recipe – for an ultimate autumnal pairing. A robust cup of coffee or a delicate black tea also makes a fantastic companion, allowing the nuanced spice notes of the cookie to truly shine. For a truly decadent dessert experience, try serving them alongside a scoop of premium vanilla bean ice cream. The cold, creamy sweetness of the ice cream provides a beautiful contrast to the warm, spiced cookie. Or, consider a dollop of freshly whipped cream, perhaps infused with a hint of maple syrup, to add an extra layer of richness and velvety texture. Don’t shy away from crumbling a few over a bowl of plain Greek yogurt for a surprisingly gourmet breakfast or snack, adding texture and flavor to your morning routine. You could even create an impressive dessert platter by arranging them with other fall treats like candied nuts, dark chocolate squares, and a few fresh apple slices for a visual and gastronomic feast that will impress any guest.
Exciting Variations to Explore:
One of the joys of baking is the freedom to personalize, and this recipe is wonderfully adaptable. For an extra touch of autumnal sparkle, consider drizzling your cooled cookies with a simple glaze made from powdered sugar and a touch more reduced apple cider, or even a maple glaze. This adds a beautiful sheen and an extra layer of sweetness. If you love nuts, a sprinkle of finely chopped pecans or walnuts folded into the dough before baking would introduce a lovely crunch and a nutty depth. For those who enjoy a little zest, a teaspoon of orange zest can brighten the spice profile beautifully, adding a cheerful citrus note. Want to make them even more festive for the holidays? A handful of dried cranberries or chopped candied ginger would be a delightful addition, adding bursts of color and flavor that pop. And for my adventurous bakers out there, don’t be afraid to play with your spice cabinet! A tiny pinch of cardamom or allspice could lend an intriguing new dimension, making them uniquely yours. For those with dietary considerations, experimenting with gluten-free flour blends or plant-based butter alternatives is entirely possible with minor adjustments, allowing everyone to enjoy the comforting taste of these seasonal delights. Remember, the kitchen is your playground, and these cookies are just waiting for your personal touch!
Your Turn: Bake, Share, and Savor!
Now that you have all the knowledge, tips, and inspiration you need, it’s time for the most exciting part: getting into your kitchen and bringing this incredible Apple Cider Cookies Recipe to life! I promise you, the aroma alone as these bake will fill your home with an intoxicating fragrance that instantly signals “fall comfort.” There’s an immense satisfaction that comes from creating something so delicious from scratch, and these cookies deliver that joy in spades. Don’t just take my word for it; experience the pure delight of these spiced apple wonders for yourself. Once you’ve baked your batch, I would absolutely love to hear about your experience! Did you try a fun variation? What was your favorite serving suggestion? How did they taste? Please share your baking triumphs, your photos, and your thoughts. Baking is a community, and your stories inspire us all. So grab your apron, preheat your oven, and prepare to make some unforgettable memories (and cookies!). Happy baking, my friends, and may your homes be filled with the wonderful scent of freshly baked Apple Cider Cookies!
Apple Cider Cookies Recipe
These Apple Cider Cookies are a delightful autumn bake, inviting you to savor the essence of the season with their irresistibly soft, chewy, and spiced texture, offering a unique balance of sweet and tangy apple cider flavors.
Ingredients
-
2 cups apple cider
-
20 tablespoons unsalted butter, softened
-
2½ cups all-purpose flour
-
2 teaspoons apple pie spice or pumpkin spice
-
1 large egg, room temperature
-
1¼ cup light brown sugar, packed
-
¾ cup granulated sugar
-
1 teaspoon baking powder
-
1½ cups powdered sugar, sifted (for glaze)
-
Ground cinnamon (for topping/glaze)
Instructions
-
Step 1
In a medium saucepan, reduce 2 cups of apple cider to about ¼ cup of syrupy liquid over medium-low heat (approx. 25-35 minutes). Keep a close eye on it towards the end. Cool completely before use. -
Step 2
Whisk together 2½ cups all-purpose flour, 1 teaspoon baking powder, and 2 teaspoons apple pie spice (or pumpkin spice) in a medium bowl. Set aside. -
Step 3
In a large mixing bowl, cream 20 tablespoons softened unsalted butter with ¾ cup granulated sugar and 1¼ cup packed light brown sugar until light and fluffy. Beat in 1 large egg until just combined. Stir in 2 tablespoons of the cooled apple cider reduction until fully incorporated. -
Step 4
Gradually add the dry ingredient mixture to the wet ingredients, mixing on low speed until just combined and no streaks of flour remain. Do not overmix. Cover the dough tightly with plastic wrap and refrigerate for at least 1 hour (or overnight). -
Step 5
Preheat oven to 375°F (190°C). Line two large baking sheets with parchment paper. Scoop 1.5-tablespoon rounds of chilled dough onto the prepared sheets, spacing about 2 inches apart. Bake one sheet at a time for 9-11 minutes, until the edges are lightly golden brown and the centers still look slightly soft. Do not overbake. -
Step 6
Once baked, remove from the oven and let the cookies cool on the baking sheet for 5-10 minutes. Then, carefully transfer them to a wire rack to cool completely. -
Step 7
In a medium bowl, whisk 1½ cups sifted powdered sugar with 3-4 tablespoons of the cooled apple cider reduction until completely smooth. Adjust consistency with tiny additions of reduction or powdered sugar. Stir in ground cinnamon (for topping) if desired. -
Step 8
Ensure cookies are completely cool. Place the wire rack with cooled cookies over a sheet of parchment paper to catch drips. Dip or drizzle the tops of the cookies with the prepared glaze. Let the glazed cookies sit undisturbed on the wire rack for at least 30-60 minutes, or until the glaze has fully set and hardened. -
Step 9
Once the glaze is completely set, store your Apple Cider Cookies in an airtight container at room temperature for up to 3-5 days.
Important Information
Nutrition Facts (Per Serving)
It is important to consider this information as approximate and not to use it as definitive health advice.
Allergy Information
Please check ingredients for potential allergens and consult a health professional if in doubt.