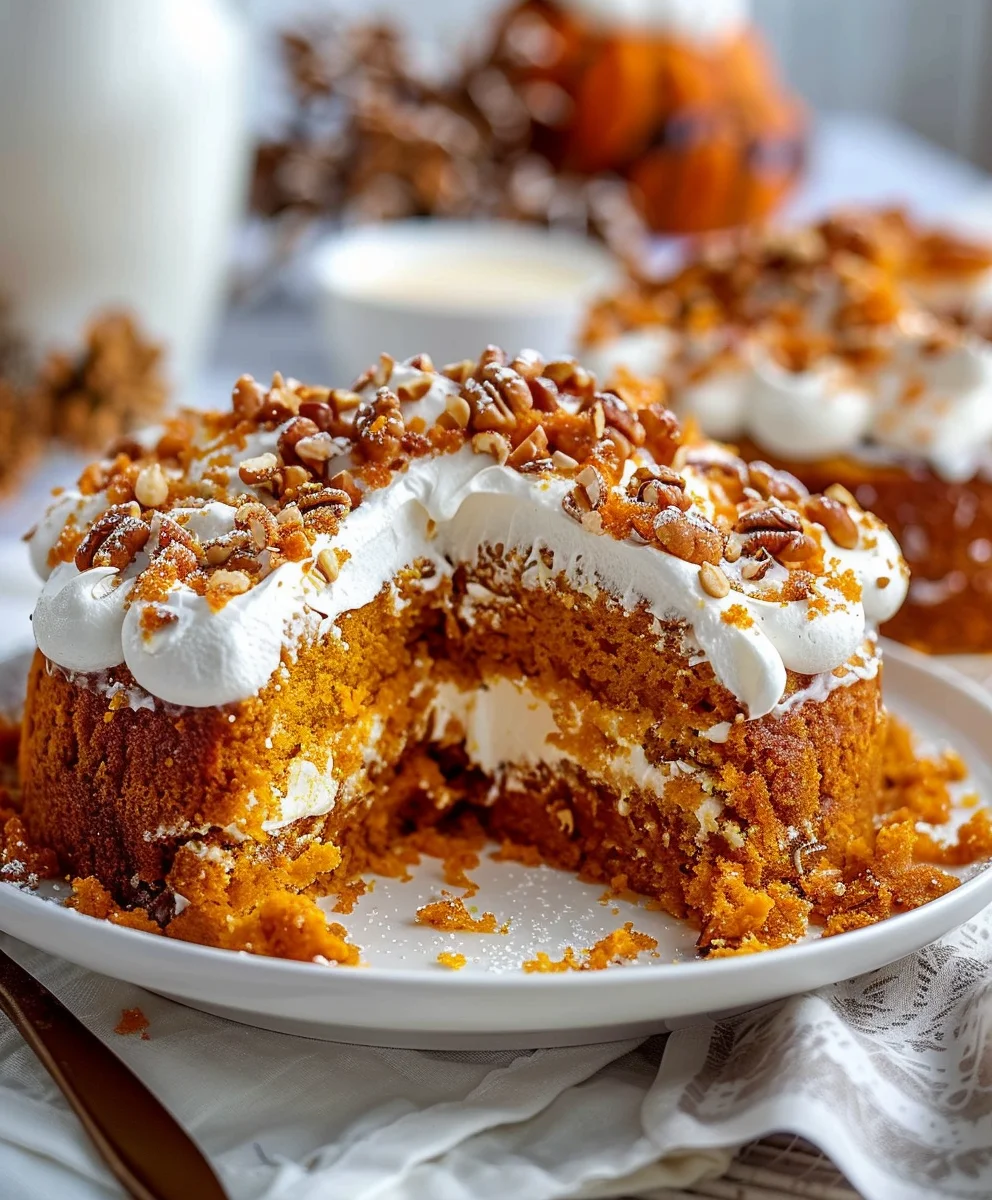
The magic of creating a delightfully moist and flavorful cake from just 1 box yellow cake mix (1525 oz) and 1 can pumpkin puree (not pumpkin pie mix, 15 oz) is a culinary secret I’m excited to unveil today. Imagine a dessert that effortlessly captures the cozy essence of autumn, delivering a comforting hug in every single bite, yet requires minimal effort. This isn’t just another pumpkin cake; it’s a revelation in simplicity and taste!
Pumpkin desserts hold a special place in our hearts, often associated with festive gatherings, harvest celebrations, and the warmth of home during the cooler months. While traditional pumpkin recipes can sometimes be time-consuming, this ingenious method streamlines the process, allowing you to whip up a stunning treat with incredible ease. People absolutely adore this dish not only for its rich, spiced flavor profile and wonderfully moist texture, but also for its sheer convenience. It truly exemplifies how humble pantry staples can be transformed into something extraordinary. You see, the beauty of this recipe lies in how effortlessly you can prepare the cake batter and then bake the cake to golden perfection, even if you’re a beginner baker. It’s the perfect solution for busy weeknights, last-minute potlucks, or simply when a craving for something sweet and satisfying strikes. I promise, you’ll be amazed at the deliciousness that emerges from combining a simple 1 box yellow cake mix with the natural goodness of pumpkin puree, creating a dessert that tastes far more complex than its ingredient list suggests.

Ingredients:
For the Spiced Pumpkin Cake:
- One 15.25-ounce box yellow cake mix: This is our secret weapon for convenience and a reliably delicious base. While any brand you love will work wonderfully, I often find that some premium brands offer an even finer crumb. Don’t worry about the ingredients listed on the back for the liquid additions, as we’ll be making some delightful substitutions!
- One 15-ounce can pumpkin puree: And I mean puree, not pumpkin pie mix! The pie mix has added spices and sweeteners that we don’t want interfering with our custom flavor profile. This is where all that beautiful, earthy pumpkin flavor and gorgeous orange hue come from, ensuring our cake is wonderfully moist and tender.
- 3 large eggs: These act as a crucial binder, adding richness and helping our cake achieve that perfect structural integrity and lift. Make sure they’re at room temperature if you have time, as they incorporate more smoothly into the batter.
- 1/2 cup vegetable oil: This contributes significantly to the cake’s tenderness and moisture. You could use canola oil or another neutral-flavored oil if you prefer.
- 1/2 cup water or milk: I usually opt for milk (whole milk, if I have it) for an extra touch of richness, but water works perfectly fine too, especially since the pumpkin puree is adding so much moisture. This helps thin the batter to the right consistency.
- 2 teaspoons pumpkin pie spice: Ah, the essence of autumn! This blend typically includes cinnamon, nutmeg, ginger, and cloves, bringing all those warm, comforting notes to our pumpkin cake. Feel free to adjust to your personal spice preference – I sometimes add a little extra!
- 1 teaspoon ground cinnamon: Because can you ever really have too much cinnamon with pumpkin? I think not! This extra boost really amplifies the cozy, inviting aroma and taste.
- 1 teaspoon pure vanilla extract: A staple in almost all baking, vanilla rounds out the flavors and adds a touch of aromatic sweetness. Always opt for pure extract over imitation for the best taste.
- Optional Add-ins: 1 cup chopped pecans or walnuts for a delightful crunch, or 1 cup chocolate chips (mini or regular) for an extra layer of decadence.
- Non-stick cooking spray or butter and flour: For preparing your baking pan, to ensure your beautiful cake comes out cleanly.
For the Cream Cheese Frosting:
- 8 ounces (1 block) cream cheese: Make sure it’s full-fat cream cheese, and critically, softened to room temperature. This is essential for a smooth, lump-free frosting. Low-fat versions can result in a runnier frosting.
- 1/2 cup (1 stick) unsalted butter: Also softened to room temperature. Like the cream cheese, room temperature butter whips up beautifully, creating that light and fluffy texture we all adore.
- 3-4 cups powdered sugar (confectioners’ sugar): Sifted, if you want the absolute silkiest frosting, though I often skip this step for speed. We’ll start with 3 cups and add more if needed for consistency and sweetness.
- 1 teaspoon pure vanilla extract: To complement the richness of the cream cheese and butter.
- Pinch of salt: A tiny bit of salt is a frosting’s best friend! It balances the sweetness and enhances all the other flavors, preventing the frosting from tasting overly sugary.
- 1-2 tablespoons milk or cream (optional): Use this sparingly to achieve your desired frosting consistency if it’s too thick.
Equipment You’ll Need:
- 9×13 inch baking pan (or two 8-inch or 9-inch round cake pans)
- Large mixing bowl
- Electric mixer (handheld or stand mixer)
- Whisk
- Rubber spatula
- Measuring cups and spoons
- Wire cooling rack
- Offset spatula or butter knife for frosting
Phase 1: Preparing the Cake Batter – Infusing the Magic
This is where we take a simple yellow cake mix and transform it into a truly special pumpkin creation. Don’t be shy with those spices!
-
Preheat Your Oven and Prepare Your Pan:
First things first, let’s get that oven ready! Preheat your oven to 350°F (175°C). This ensures a consistent baking temperature from the moment your cake goes in. Next, prepare your 9×13 inch baking pan. You can either lightly grease it with non-stick cooking spray, or for a truly pristine cake release, butter and flour the pan, tapping out any excess flour. If you prefer a layer cake, prepare two 8-inch or 9-inch round pans in the same manner. This crucial step prevents your beautiful cake from sticking, a baker’s worst nightmare!
-
Combine the Dry Mix with Wet Wonders:
In your spacious large mixing bowl – the one that comfortably holds all your baking ambitions – empty the entire contents of your 15.25-ounce box of yellow cake mix. Now, here’s where we deviate from the box instructions and infuse our cake with rich pumpkin goodness. Add the full 15-ounce can of pumpkin puree. Be sure it’s pure pumpkin and not the pie mix! Next, crack in your 3 large eggs (I always crack them into a separate small bowl first, just in case one isn’t quite right!). Pour in the 1/2 cup vegetable oil and the 1/2 cup water or milk. This combination of wet ingredients will ensure a beautifully moist and tender crumb for our pumpkin cake.
-
Spice It Up!:
Now for the aroma! Sprinkle in the 2 teaspoons of pumpkin pie spice and the additional 1 teaspoon of ground cinnamon. Don’t forget that lovely 1 teaspoon of pure vanilla extract. These spices are what will truly make this cake sing, bringing those warm, comforting, and utterly irresistible autumnal flavors to the forefront. This is the heart of our flavor profile!
-
Mix Until Just Combined:
Using your electric mixer on low speed, begin to mix all the ingredients together. Start slowly to avoid a “flour cloud” incident in your kitchen! Once the dry ingredients are moistened, increase the speed to medium and beat for about 2 minutes. You want the batter to be smooth and well-combined, but be careful not to overmix. Overmixing can develop the gluten in the flour too much, leading to a tougher, denser cake. A few small lumps are perfectly fine and will disappear during baking. Scrape down the sides of the bowl with your rubber spatula to ensure everything is incorporated evenly.
-
Fold in Optional Delights:
If you’re feeling extra fancy and decided to include them, gently fold in your 1 cup of chopped nuts or chocolate chips using your rubber spatula. This ensures they are evenly distributed throughout the batter without overworking it. I adore a little crunch from pecans in my pumpkin cake, but chocolate chips add a delightful surprise!
-
Transfer to Your Prepared Pan:
Carefully pour the luscious pumpkin cake batter into your prepared 9×13 inch baking pan. Use your rubber spatula to spread the batter evenly, ensuring it reaches all corners of the pan. Give the pan a gentle tap or two on the counter to release any large air bubbles that might be lurking within.
Phase 2: Baking the Cake – The Aromatic Transformation
The moment of truth! Your kitchen is about to be filled with the most incredible, comforting scent of pumpkin and spices.
-
Bake to Golden Perfection:
Carefully place your pan into the preheated 350°F (175°C) oven. The baking time will vary slightly depending on your oven and whether you’re making a sheet cake or layer cakes. For a 9×13 inch pan, you’re looking at approximately 30-35 minutes. If you’re using two 8-inch or 9-inch round pans, the baking time might be closer to 25-30 minutes. Start checking around the 25-minute mark. Every oven is a little different, so trust your instincts and your tools!
-
Check for Doneness:
You’ll know your cake is perfectly baked when it’s a beautiful golden-brown color and the edges have started to pull away slightly from the sides of the pan. The ultimate test is the toothpick test: insert a clean wooden toothpick into the center of the cake. If it comes out clean or with just a few moist crumbs attached, your cake is ready! If it comes out with wet batter, pop it back in for another 3-5 minutes and test again. Avoid opening the oven door too frequently, especially during the first 20 minutes, as this can cause the cake to sink.
-
Cooling is Key:
Once your cake passes the toothpick test, carefully remove it from the oven. Don’t be tempted to frost it immediately! Let the cake cool in the pan on a wire rack for about 10-15 minutes. This allows the cake to set fully and makes it easier to handle. After this initial cooling, gently invert the cake onto the wire rack to cool completely. If you baked a layer cake, remove the layers from their pans and cool them completely on the rack. It is absolutely crucial that the cake is entirely cool before you even think about frosting it. Frosting a warm cake will lead to a melty, messy disaster!
Phase 3: Crafting the Silky Cream Cheese Frosting – The Perfect Companion
A truly great pumpkin cake deserves a truly great cream cheese frosting. This recipe delivers a smooth, tangy, and sweet topping that perfectly complements the spiced cake.
-
Cream the Base:
In a clean, large mixing bowl, preferably with your electric mixer (stand mixer or handheld), combine the 8 ounces of softened cream cheese and the 1/2 cup (1 stick) of softened unsalted butter. It is imperative that both are at room temperature to achieve a silky-smooth, lump-free frosting. Beat these two together on medium speed for about 2-3 minutes, until the mixture is beautifully light, fluffy, and completely smooth. Scrape down the sides of the bowl frequently to ensure everything is incorporated.
-
Add the Sweetness and Flavor:
Reduce the mixer speed to low. Gradually add the 3 cups of powdered sugar, one cup at a time, mixing until each addition is just incorporated before adding the next. If you’re concerned about sugar flying everywhere, you can cover your mixer with a kitchen towel during this step! Once the sugar is mostly incorporated, add the 1 teaspoon of pure vanilla extract and the pinch of salt. The salt is a secret weapon here, enhancing all the flavors and cutting through the sweetness.
-
Whip to Perfection:
Increase the mixer speed to medium-high and beat for another 2-3 minutes. You want the frosting to be wonderfully light, airy, and fluffy. It should be easily spreadable but hold its shape. If the frosting seems a little too thick, you can add milk or cream, 1 tablespoon at a time, until you reach your desired consistency. If it’s too thin, you can add a little more sifted powdered sugar. Don’t overmix at this stage, as it can sometimes make the frosting less stable.
Phase 4: Assembling and Serving Your Delightful Pumpkin Cake
The final, satisfying step! Now it’s time to bring all your hard work together and present your masterpiece.
-
Frost with Care:
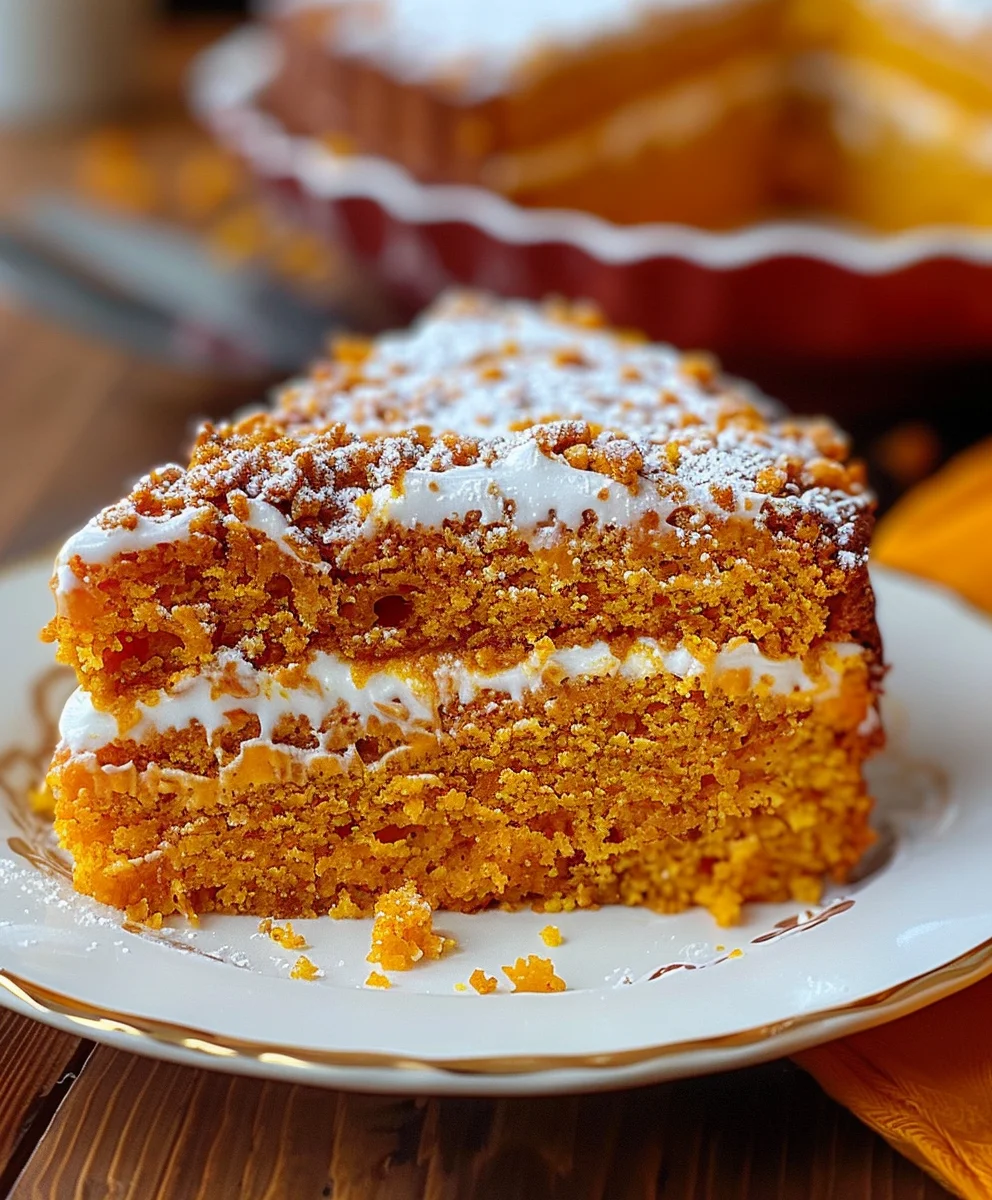
Once your pumpkin cake is completely cooled – I really can’t stress this enough! – it’s time to frost. If you’ve baked a 9×13 inch sheet cake, simply spread the cream cheese frosting evenly over the top of the cake using an offset spatula or the back of a spoon. Create beautiful swirls or keep it perfectly smooth – whatever your heart desires! If you baked two round layers, place one layer on your serving plate, spread a generous amount of frosting, then carefully place the second layer on top. Frost the top and sides of the entire cake. Take your time; this is where the presentation really shines!
-
Optional Garnishes for Visual Appeal:
To really make your cake pop, consider adding some optional garnishes. A light dusting of extra cinnamon or pumpkin pie spice on top of the frosting adds both visual appeal and an extra hint of flavor. You could also sprinkle some chopped pecans or walnuts over the top, echoing any nuts you might have added into the batter. For an elegant touch, a few candied pecans or a sprinkle of toasted coconut flakes would also be lovely. Get creative!
-
Chill (Optional, but Recommended):
While you can certainly dig in right away, I often find that cream cheese frosting benefits from a little chill time. Pop the frosted cake into the refrigerator for at least 30 minutes. This allows the frosting to firm up slightly, making for cleaner slices and a more stable cake. If you’ve made a layer cake, this step is even more important to ensure everything stays put.
-
Slice and Enjoy!:
When you’re ready to serve, remove the cake from the refrigerator a few minutes before slicing to allow the frosting to soften just slightly, making it easier to cut. Use a sharp knife to cut generous slices of your homemade spiced pumpkin cake with cream cheese frosting. Serve with a hot cup of coffee or tea, or perhaps a glass of cold milk. This cake is absolutely perfect for a fall gathering, a holiday dessert, or just a cozy treat on a cool evening. Prepare for rave reviews!
Pro-Tips for Pumpkin Cake Perfection:
- Room Temperature Ingredients are Non-Negotiable for Frosting: I’ve mentioned it a few times, but it bears repeating. For the cream cheese and butter in your frosting, room temperature ensures they cream together smoothly without any lumps. Cold ingredients will lead to a chunky, frustrating frosting. Plan ahead by taking them out of the fridge an hour or two before you begin.
- Don’t Overmix the Batter: When combining your cake ingredients, mix only until the flour streaks disappear. Overmixing develops gluten, which can lead to a tougher, less tender cake. A few small lumps are perfectly acceptable.
- Cool Completely Before Frosting: This is a golden rule in baking! Even slightly warm cake will melt your beautifully prepared cream cheese frosting, leading to a runny, messy situation. Patience is a virtue here.
- Store Properly: Because of the cream cheese frosting, your cake should be stored in an airtight container in the refrigerator. It will keep beautifully for 3-4 days. Allow slices to come to room temperature for about 15-20 minutes before serving for the best flavor and texture.
- Spice Adjustment: Feel free to customize the spice level in your cake. If you love a bolder spice, add another half teaspoon of pumpkin pie spice. If you prefer a milder flavor, you can slightly reduce it. Taste as you go, if you’re comfortable with that, especially in the frosting.
- Make it Gluten-Free: Many yellow cake mixes now come in gluten-free versions. If you need a GF option, simply swap in a gluten-free yellow cake mix and follow the rest of the instructions as written!
- Greasing Your Pan Effectively: For easy cake release, after greasing, consider lining the bottom of your pan with parchment paper, especially for layer cakes. Then grease the parchment paper as well. This guarantees your cake won’t stick!
Conclusion:
Well, my friends, we’ve reached the sweet end of our journey through this incredibly simple yet utterly transformative recipe. I genuinely hope you’re feeling inspired, because what we have here isn’t just another dessert; it’s a revelation. This isn’t one of those fussy, complicated bakes that demands hours of your precious time and an endless list of exotic ingredients. Quite the opposite! It’s a testament to how truly extraordinary flavors can emerge from the most humble beginnings, proving that sometimes, the simplest path leads to the most satisfying rewards.
Why is this a must-try, you ask? Oh, let me count the ways! First and foremost, the sheer ease of preparation is unparalleled. If you’ve ever felt intimidated by baking, this recipe is your perfect entry point. It’s forgiving, it’s quick, and it consistently delivers a show-stopping result. We’re talking about a moist, tender crumb that practically melts in your mouth, infused with the warm, comforting essence of autumn. The subtle sweetness, perfectly balanced by the earthy notes of pumpkin and just a whisper of spice, creates a symphony of flavors that will have everyone asking for seconds. You’ll be amazed at the depth of flavor you achieve with such minimal effort, making it ideal for busy weeknights, impromptu gatherings, or simply when you need a little pick-me-up. The aroma alone as it bakes will fill your home with an inviting warmth that promises pure culinary bliss.
Now, while this cake is absolutely divine on its own, I’m a big believer in elevating an already wonderful thing, and that’s where serving suggestions and variations come into play. For a classic, comforting experience, a generous dollop of freshly whipped cream or a scoop of vanilla bean ice cream is simply perfection. The cool creaminess provides a delightful contrast to the warm cake. If you’re feeling a bit more decadent, a drizzle of caramel sauce or a sprinkle of toasted pecans or walnuts adds an extra layer of texture and sweetness that’s truly irresistible. For those who adore chocolate, a handful of mini chocolate chips folded into the batter before baking, or a light chocolate glaze on top, transforms it into a pumpkin chocolate dream. Imagine serving this warm on a chilly evening, perhaps with a mug of hot cider or coffee – pure bliss!
But let’s not stop there with just serving suggestions; think about variations! This recipe is incredibly adaptable. While we used 1 box yellow cake mix (15.25 oz) as our foundation, you could experiment with a spice cake mix for an even bolder autumn flavor profile, or even a white cake mix if you prefer the pumpkin to be the absolute star without competing flavors. For an extra punch of spice, consider adding a pinch more cinnamon, nutmeg, or even a touch of ground ginger and cloves to the batter. A swirl of cream cheese frosting would make this an instant classic for any holiday table, turning it into a truly magnificent centerpiece. Don’t be afraid to make it your own!
I truly believe this recipe is going to become a staple in your kitchen. It’s a foolproof way to impress guests and treat your loved ones, or simply to indulge yourself in a moment of pure comfort. So, what are you waiting for? Gather your ingredients, including your trusty 1 can pumpkin puree (not pumpkin pie mix, 15 oz), and get ready to create something truly magical. The process is straightforward: you simply prepare the cake batter following the clear steps we’ve outlined, mix in our special ingredient, and then patiently wait for your oven to work its magic as you bake the cake to golden-brown perfection.
Your next baking adventure starts now!
I am so eager for you to try this recipe. Take the plunge, enjoy the delightful process, and savor every single bite. And please, please, please, once you’ve made it, come back and share your experience with me! Did you add a special topping? Did you try a unique variation? Post your comments, share your photos, and let me know how it turned out. Your insights and creations inspire me, and I love hearing about your kitchen triumphs. This isn’t just about a recipe; it’s about sharing the joy of baking and creating delicious memories. Happy baking, everyone!
Super Easy Pumpkin Cake: Yellow Cake Mix Dessert Idea
A delightfully moist pumpkin cake made from yellow cake mix and pumpkin puree, transformed into a delicious poke cake with sweetened condensed milk, Cool Whip, Heath bits, and caramel for an easy, flavorful dessert.
Ingredients
-
1 box yellow cake mix (15.25 oz)
-
1 can pumpkin puree (not pumpkin pie mix, 15 oz)
-
1 can sweetened condensed milk (fat-free is okay, 14 oz)
-
1 pkg Cool Whip (8 oz)
-
1/2 bag Heath bits (8 oz bag)
-
Caramel sundae sauce
Instructions
-
Step 1
Preheat oven to 350°F (175°C). Lightly grease a 9×13 inch baking pan. In a large mixing bowl, combine the 15.25 oz yellow cake mix and 15 oz pumpkin puree. Mix until smooth. Pour batter evenly into the prepared pan. -
Step 2
Bake for 30-35 minutes, or until a wooden toothpick inserted into the center of the cake comes out clean. -
Step 3
Remove the cake from the oven. While still warm, use the handle of a wooden spoon or a fork to poke holes evenly over the entire cake surface. Pour the 14 oz can of sweetened condensed milk slowly and evenly over the warm cake, ensuring it soaks into the holes. -
Step 4
Allow the cake to cool completely in the pan on a wire rack. Once at room temperature, refrigerate for at least 30 minutes to chill thoroughly. -
Step 5
Once the cake is chilled, spread the 8 oz Cool Whip evenly over the top. Sprinkle the 1/2 bag of Heath bits over the Cool Whip. -
Step 6
Drizzle generously with caramel sundae sauce. Store any leftovers in the refrigerator. Slice and enjoy!
Important Information
Nutrition Facts (Per Serving)
It is important to consider this information as approximate and not to use it as definitive health advice.
Allergy Information
Please check ingredients for potential allergens and consult a health professional if in doubt.