Pumpkin Patch Strawberries – doesn’t the name alone spark a sense of whimsical curiosity? I’m absolutely thrilled to introduce you to a truly delightful creation that bridges the warmth of autumn with the vibrant sweetness of summer. This isn’t just any fruit dish; it’s a celebration of seasonal harmony, a clever concept that, while perhaps new to some, has quickly become a beloved treat for its unique charm.
The magic of this dish lies in its unexpected pairing. Imagine ripe, juicy strawberries, usually associated with sunny summer days, artfully prepared to evoke the cozy, rustic feeling of a pumpkin patch. It’s a modern culinary concept born from a desire to blend comforting, earthy notes with the bright burst of fresh fruit, creating a dessert that feels both innovative and deeply satisfying. People adore these Pumpkin Patch Strawberries because they offer an unparalleled taste experience – a delicate balance of sweet and subtly spiced flavors, often accompanied by creamy textures and a beautiful presentation that captivates both the eye and the palate. It’s perfect for adding a touch of sophisticated fun to any gathering, making it memorable and uniquely delicious.

Ingredients:
- For the Pumpkin Spice Cream Cheese Dip:
- 16 ounces (two 8-ounce blocks) full-fat cream cheese, softened to room temperature
- 1/2 cup unsalted butter, softened to room temperature
- 1 cup powdered sugar (also known as confectioners’ sugar), sifted
- 1/2 cup pumpkin puree (ensure it’s 100% pure pumpkin, not pumpkin pie filling)
- 2 teaspoons pumpkin pie spice blend (or your own mix of cinnamon, nutmeg, ginger, and cloves)
- 1 teaspoon pure vanilla extract
- 1/4 teaspoon salt
- For the “Pumpkin Patch” Strawberries:
- 2 pounds fresh strawberries, firm and ripe, with green caps intact
- 12 ounces high-quality white chocolate, chopped or in chip form
- Orange gel food coloring (gel works best for chocolate, liquid can cause seizing)
- 2-3 ounces green candy melts or green food coloring for white chocolate (for stems/vines)
- Optional: Small amount of dark chocolate chips or chocolate melts for extra detail (e.g., “dirt” or faces)
- For the “Pumpkin Patch” Base:
- 1 cup graham cracker crumbs (about 1 sleeve of graham crackers, crushed)
- 2 tablespoons granulated sugar
- 2 tablespoons unsalted butter, melted
Preparing the Pumpkin Spice Cream Cheese Dip
My journey to creating the perfect “Pumpkin Patch Strawberries” always begins with a luscious, creamy dip. This isn’t just any dip; it’s the rich, autumnal “soil” for our strawberry patch, bursting with the warm flavors of fall. Getting this right sets the stage for the entire dessert.
- Softening the Stars: First things first, you’ll want to take your cream cheese and butter out of the refrigerator at least an hour, or even two, before you plan to start mixing. This step is absolutely crucial. Seriously, don’t skip it! If your cream cheese and butter aren’t sufficiently softened to room temperature, you’ll end up with a lumpy, inconsistent dip, and we’re aiming for silky smooth perfection. I usually cut them into smaller cubes to help them soften more evenly and quickly.
- Creaming the Foundation: In a large mixing bowl, preferably using a stand mixer with the paddle attachment or an electric hand mixer, combine the softened cream cheese and softened butter. Beat these two together on medium speed for about 3-4 minutes. You’re looking for a light, airy, and incredibly smooth consistency. Scrape down the sides of the bowl frequently to ensure everything is incorporated evenly. This aeration makes the dip wonderfully fluffy.
- Sweetening the Deal: Now it’s time to add the sweetness! Gradually add the sifted powdered sugar to the cream cheese and butter mixture. I always sift my powdered sugar because it helps prevent any pesky lumps, ensuring that super smooth texture we’re after. Start on low speed to avoid a sugary cloud erupting in your kitchen, then increase to medium and beat until fully combined and fluffy, another 2-3 minutes.
- Infusing the Autumnal Flavors: Next, incorporate the star of the show: pumpkin puree, pumpkin pie spice, vanilla extract, and salt. Add them all into the bowl. Again, start on low speed to gently mix everything in, then increase to medium-high and beat for another 2-3 minutes, or until the mixture is uniform in color and texture. The aroma alone at this stage is truly intoxicating! This is where our “Pumpkin Patch Strawberries” really start to get their signature flavor.
- Taste and Adjust: This is my favorite part! Give the dip a taste. Do you want it a little sweeter? Add a tablespoon or two more sifted powdered sugar. Craving more spice? Go ahead and add another half teaspoon of pumpkin pie spice. Remember, this is your creation, so tailor it to your liking!
- Chilling for Perfection: Once you’re happy with the flavor, cover the bowl with plastic wrap and refrigerate the dip for at least 2 hours. Chilling isn’t just for firming it up; it allows the flavors to meld beautifully, creating a much richer, more harmonious taste. A well-chilled dip is also much easier to spread and hold its shape for our “Pumpkin Patch.” While it’s chilling, we can move on to preparing our delightful strawberries!
Preparing the “Pumpkin” Strawberries
This is where the magic truly happens, transforming ordinary strawberries into adorable, edible pumpkins, perfect for our “Pumpkin Patch Strawberries” display. It’s a bit of an art form, but completely achievable with a few careful steps.
- Strawberry Preparation – The Golden Rule: Start by gently washing your 2 pounds of fresh strawberries under cool running water. Be careful not to bruise them. The absolute most critical step here is to dry them thoroughly. I mean really thoroughly. Any residual water on the strawberries will cause your melted chocolate to seize and become grainy, making it impossible to work with. I usually lay them out on paper towels or a clean kitchen towel and let them air dry for at least 30 minutes, turning them occasionally, or gently pat each one dry. Keep the green caps on; they’re essential for that “pumpkin” look!
- Melting the White Chocolate: Now for the creative part! You’ll need a double boiler for melting the white chocolate, or you can use a microwave with extreme caution.
- Double Boiler Method (Recommended): Place the chopped white chocolate in a heatproof bowl that fits snugly over a saucepan of simmering water. Ensure the bottom of the bowl does not touch the water. Stir constantly with a clean, dry spatula until the chocolate is completely melted and smooth. Remove from heat immediately once melted.
- Microwave Method: Place chopped white chocolate in a microwave-safe bowl. Microwave on 50% power in 30-second intervals, stirring thoroughly after each interval. White chocolate burns very easily, so be extra vigilant. Stop heating when there are still a few small lumps, and continue stirring; the residual heat will melt them.
Important Tip: Whichever method you choose, ensure no water or steam gets into the chocolate, as this will cause it to seize and become thick and unworkable.
- Coloring Our “Pumpkins”: Once the white chocolate is perfectly smooth, it’s time to transform it into a vibrant orange. Add your orange gel food coloring a tiny bit at a time, stirring well after each addition. Gel food coloring is preferred because it won’t add extra liquid that could seize the chocolate. You want a bright, cheerful pumpkin orange. Keep adding and stirring until you achieve your desired hue for your “Pumpkin Patch Strawberries.”
- Dipping the “Pumpkins”: Hold each dry strawberry by its green stem. Dip the strawberry into the melted orange chocolate, swirling it gently to fully coat about two-thirds to three-quarters of the strawberry, leaving the green cap exposed. Lift the strawberry out and gently tap the stem against the side of the bowl to allow any excess chocolate to drip off. This helps create a smooth, even coating.
- Setting the Chocolate: Place the dipped strawberries onto a baking sheet lined with parchment paper or a silicone mat. Repeat with all your strawberries. Once dipped, transfer the baking sheet to the refrigerator for about 10-15 minutes, or until the chocolate coating is completely set and firm. This firming process is vital before we add our decorative touches.
- Adding the “Pumpkin” Details (Stems and Vines): While your orange chocolate is setting, melt your green candy melts (or white chocolate colored with green gel food coloring) using the same double boiler or microwave method. Transfer the melted green chocolate to a small piping bag fitted with a very small round tip, or simply snip a tiny corner off a Ziploc bag.
- For Stems: Once your orange-coated strawberries are firm, pipe a small dollop of green chocolate right around the base of the green cap, where it meets the orange, to create a more defined “stem.”
- For Vines: Then, delicately pipe thin, swirling lines over the orange surface of the strawberry to mimic the look of pumpkin vines. You can also add a small, curled leaf shape if you’re feeling ambitious!
Alternatively, for an even simpler approach, you can just pipe simple green lines to represent the classic grooves of a pumpkin.
- Optional Dark Chocolate Details: If you want to get really creative, you can melt a small amount of dark chocolate and, using an even finer tip or a toothpick, draw tiny jack-o’-lantern faces onto some of your “Pumpkin Patch Strawberries.” This adds an extra layer of adorable detail and whimsy!
- Final Chill: Once all the details are added, return the strawberries to the refrigerator for another 5-10 minutes to allow the green (and any dark) chocolate details to set completely.
Assembling the “Pumpkin Patch”
This is where all our hard work comes together in a beautiful, edible centerpiece! Assembling the “Pumpkin Patch Strawberries” is not just about arranging; it’s about creating a scene that delights the eyes as much as the palate.
- Prepping the “Soil” Base: In a small bowl, combine the graham cracker crumbs, 2 tablespoons of granulated sugar, and 2 tablespoons of melted unsalted butter. Stir until the crumbs are evenly moistened. This mixture will become our rich, earthy “soil” for the pumpkin patch, adding a delightful textural contrast and a subtle sweetness that complements the pumpkin dip beautifully.
- Spreading the “Earth”: Retrieve your chilled pumpkin spice cream cheese dip from the refrigerator. Give it a quick stir to ensure it’s still smooth and pliable. Choose a large, flat serving platter, tray, or a shallow dish – something with a nice surface area to allow for a sprawling “patch.” Spread the pumpkin dip evenly over the platter, creating a generous layer. You can make it perfectly smooth, or create gentle undulations to give it a more organic, “hilly” look, mimicking a real pumpkin patch.
- Creating the “Soil” Layer: Now, take your prepared graham cracker crumb mixture and gently sprinkle it over the entire surface of the pumpkin dip. Don’t be afraid to be a little uneven; a natural, rustic look enhances the “pumpkin patch” theme. You can leave some areas slightly less covered to hint at the creamy dip beneath, like freshly tilled earth. The buttery graham cracker crumbs will provide a wonderful crunch and a visual element that truly grounds our “Pumpkin Patch Strawberries.”
- Arranging Your “Pumpkins”: Carefully retrieve your fully set “Pumpkin” Strawberries from the refrigerator. Begin arranging them on top of the graham cracker “soil.” There’s no single right way to do this; experiment with different arrangements. I like to group some together, scatter others individually, and orient them in various directions to mimic a natural pumpkin patch. Some can stand upright, while others can be nestled on their sides, showcasing their green caps and intricate green “vines.” Feel free to mix and match if you made some with dark chocolate faces and others without, creating a diverse little patch.
- Final Touches and Garnish: If you have any leftover green candy melts or frosting, you can pipe a few extra delicate green vines or tiny leaves directly onto the “soil” in between the strawberries to further enhance the “patch” illusion. A few strategically placed small chocolate chips or finely chopped nuts could also serve as extra “dirt” clods or fallen leaves, adding more texture and visual interest to your “Pumpkin Patch Strawberries.”
Your beautiful “Pumpkin Patch Strawberries” are now ready to be admired and, most importantly, devoured! This delightful dessert is not just a treat for the taste buds but also a feast for the eyes, perfect for autumn gatherings, Halloween parties, or any occasion where you want to bring a little seasonal cheer. The combination of the sweet, tangy fresh strawberries with the creamy, spiced pumpkin dip and the subtle crunch of the graham cracker “soil” is truly a match made in autumnal heaven. Enjoy sharing your homemade pumpkin patch!

Conclusion:
As we wrap up our culinary journey with this truly remarkable recipe, I genuinely hope you’re feeling as inspired as I am about the possibilities it offers. This isn’t just another dish; it’s an invitation to experience an unexpected harmony of flavors that will undoubtedly surprise and delight anyone who tries it. From the moment you begin preparing it, you’ll notice an enticing aroma filling your kitchen, a prelude to the incredible taste sensation that awaits. I truly believe this recipe is a must-try for its unparalleled ability to bridge seasonal ingredients in a way that feels both comforting and excitingly new. It’s the kind of treat that sparks conversation, brings smiles, and leaves a lasting impression, proving that sometimes the most unconventional pairings yield the most memorable results.
What I adore most about this creation is its inherent versatility and the sheer joy it brings. It manages to be sophisticated enough for a special occasion, yet delightfully simple to whip up for a casual weeknight treat. The vibrant colors, the intriguing textures, and that perfectly balanced flavor profile all come together to create something truly special. It’s a testament to the idea that deliciousness doesn’t have to be complicated. Whether you’re a seasoned baker or someone just starting their culinary adventure, you’ll find this recipe incredibly forgiving and rewarding. The simplicity of the steps belies the complexity of the final taste, making it a fantastic choice for anyone looking to impress without the stress.
Serving Suggestions & Delightful Variations:
Now, let’s talk about how you can best enjoy these beauties and truly make them your own. While they are absolutely divine enjoyed simply on their own, perhaps still slightly warm from preparation, the possibilities for serving are wonderfully extensive. Imagine them perched atop a generous scoop of creamy vanilla bean ice cream, allowing the warm, spiced notes to melt into the cold sweetness – pure bliss! They also make an exquisite topping for a stack of fluffy pancakes or golden waffles on a lazy Sunday morning, transforming breakfast into a gourmet experience. For a lighter touch, fold them into a bowl of Greek yogurt with a sprinkle of granola for a healthy yet indulgent snack. They can even serve as a unique and elegant garnish for a dessert cocktail or a festive punch, adding both visual appeal and an unexpected burst of flavor.
But don’t stop there! This recipe is incredibly adaptable, encouraging you to play and personalize. For those who love a bit of chocolate, a delicate drizzle of melted white chocolate or dark chocolate over the finished dish would be absolutely divine. A sprinkle of toasted chopped pecans or walnuts could add an extra layer of textural intrigue and nutty flavor. If you’re feeling adventurous, consider a tiny pinch of cardamom or a touch of allspice alongside the cinnamon to deepen the spice profile even further. For an adult-only twist, a splash of orange liqueur or a spiced rum could elevate the fruit to an entirely new dimension. The core magic lies in the unexpected blend, and adding your personal touch only enhances the experience.
Your Turn to Create and Share!
I genuinely encourage you, dear reader, to step into your kitchen and give this incredible recipe a try. It’s more than just a recipe; it’s an invitation to create something unique, something memorable, and something utterly delicious. I’m confident that once you taste the delightful fusion of flavors, these Pumpkin Patch Strawberries will quickly become a cherished favorite in your repertoire. Don’t hesitate to experiment with the serving suggestions and variations I’ve provided, or even invent your own! I absolutely adore seeing your culinary creations, so please, when you make them, snap a photo and share your experience. I can’t wait to hear how much you loved them and what creative twists you came up with. Your feedback and shared joy are what make this community so wonderful. Happy cooking, and get ready to fall in love with this truly special treat!
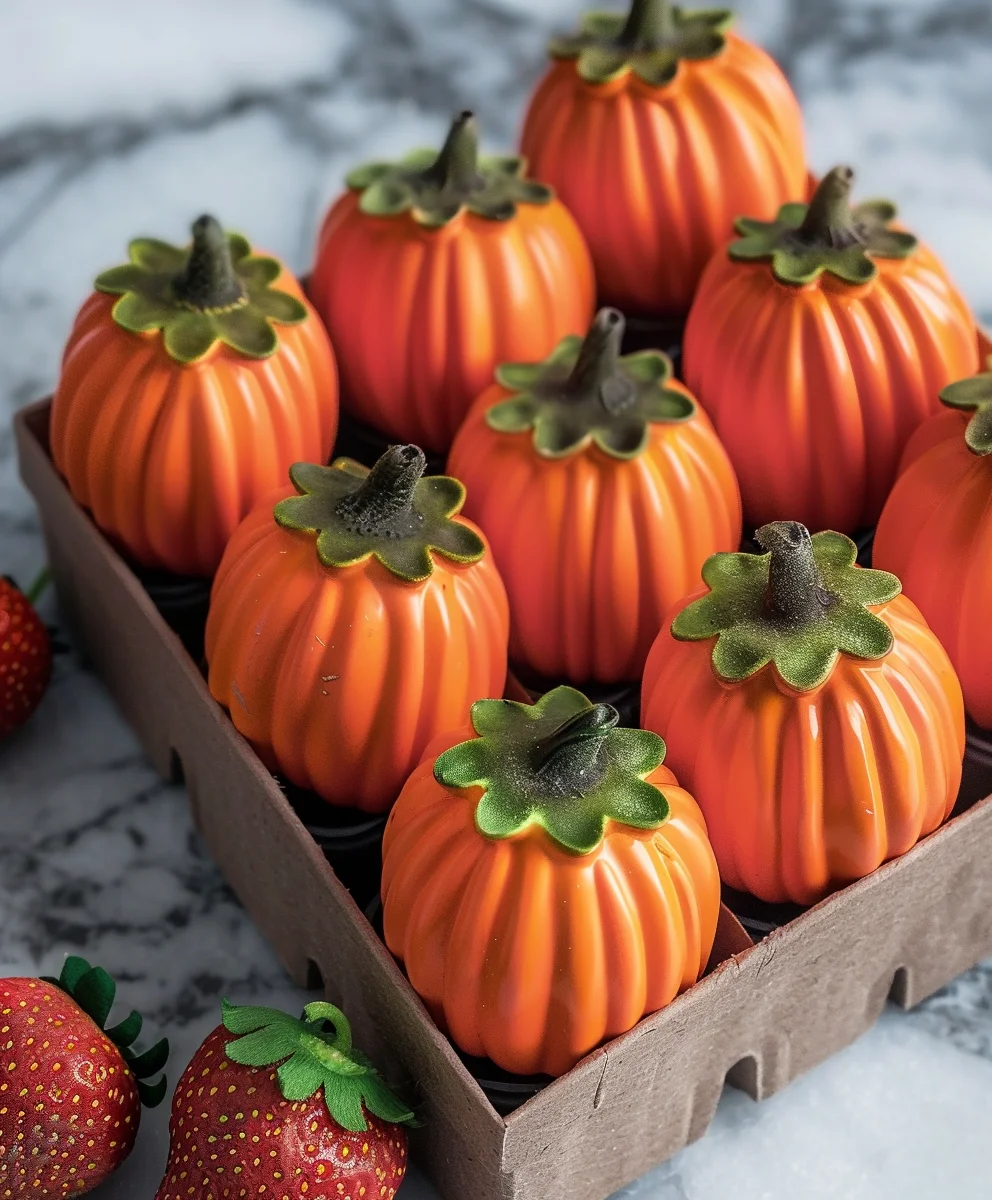
Pumpkin Patch Strawberries
A delightful and whimsical creation that bridges the warmth of autumn with the vibrant sweetness of summer. This unique dessert transforms fresh strawberries into adorable pumpkins, served on a ‘dirt’ base for an unparalleled taste experience—a delicate balance of sweet and subtly spiced flavors, often accompanied by creamy textures and beautiful presentation.
Ingredients
-
1 lb fresh strawberries
-
12 oz orange candy melts
-
1 tsp coconut oil or shortening (optional)
-
2-3 oz green candy melts
-
Small amount of dark chocolate chips (optional, for faces)
-
12 chocolate sandwich cookies, crushed
-
6 chocolate peanut butter cups or chocolate disks (optional)
Instructions
-
Step 1
Gently wash and thoroughly dry strawberries, keeping green caps intact. This is crucial; any water will cause chocolate to seize. -
Step 2
Melt 12 oz orange candy melts with optional coconut oil/shortening using a double boiler or microwave (50% power, 30-sec intervals, stirring until smooth). Reserve 2-3 tbsp of melted orange chocolate for later decoration. -
Step 3
Hold each dry strawberry by its green stem. Dip two-thirds to three-quarters into the melted orange chocolate, letting excess drip off. Place on a parchment-lined baking sheet. Refrigerate for 10-15 minutes until chocolate is fully set. -
Step 4
Melt green candy melts. Transfer to a small piping bag. Pipe small dollops around the base of the green caps for ‘stems’ and delicate, thin swirling lines over the orange surface to mimic ‘vines’. For a simpler look, pipe simple green lines. -
Step 5
If desired, melt a small amount of dark chocolate chips. Using a fine tip or toothpick, draw tiny jack-o’-lantern faces onto some of the strawberries. -
Step 6
Return the decorated strawberries to the refrigerator for another 5-10 minutes to allow all chocolate details to set completely. -
Step 7
Crush 12 chocolate sandwich cookies. If using, chop 6 chocolate peanut butter cups or chocolate disks and mix them with the crushed cookies to create the ‘dirt’ base. -
Step 8
Spread the prepared ‘dirt’ base evenly over a large serving platter or shallow dish. Carefully arrange the fully set ‘pumpkin’ strawberries on top of the ‘dirt’, grouping and scattering them to mimic a natural pumpkin patch. Optionally, drizzle the reserved melted orange chocolate over the ‘dirt’ for extra texture.
Important Information
Nutrition Facts (Per Serving)
It is important to consider this information as approximate and not to use it as definitive health advice.
Allergy Information
Please check ingredients for potential allergens and consult a health professional if in doubt.