Easy Roast Turkey: The thought of preparing a magnificent roast turkey often fills home cooks with a mix of excitement and trepidation. Visions of a golden-brown, succulent centerpiece dance in our heads, but the fear of dry meat or a complicated process can be daunting. Indeed, few dishes command such a presence at our most cherished holiday tables, particularly Thanksgiving and Christmas, embodying centuries of tradition and celebratory gatherings. It’s more than just a meal; it’s an experience, a symbol of togetherness and abundance.
The allure lies in its incredibly savory flavors, the crispy, aromatic skin, and the tender, juicy meat that promises deliciousness with every forkful. And let’s not forget the delightful array of leftovers! My mission today is to show you that achieving this culinary triumph doesn’t require expert-level skills or hours of stress. I’m here to guide you through an Easy Roast Turkey recipe that will make you feel like a seasoned pro, ensuring a perfectly cooked bird every single time. Get ready to impress your guests and savor every moment of this truly unforgettable meal.

Ingredients:
- One Whole Turkey: I typically go for a 12-16 pound turkey for a nice gathering. Make sure it’s fully thawed if you’re using a frozen bird – plan about 24 hours of refrigeration for every 4-5 pounds.
- For the Butter Rub:
- 1/2 cup (1 stick) unsalted butter, softened to room temperature. This is essential for getting that beautiful golden skin!
- 2 tablespoons olive oil (or more butter, if you prefer).
- 2 teaspoons sea salt.
- 1 teaspoon freshly ground black pepper.
- 1 tablespoon dried sage.
- 1 tablespoon dried thyme.
- 1 teaspoon smoked paprika (for color and a subtle smoky depth).
- For the Aromatics (inside the cavity and roasting pan):
- 1 large yellow onion, quartered.
- 2 carrots, roughly chopped into large pieces.
- 2 celery stalks, roughly chopped into large pieces.
- 4-6 cloves garlic, smashed. No need to peel perfectly, the skin will add flavor.
- 1 whole lemon, halved or quartered.
- A few sprigs of fresh rosemary and thyme.
- Optional: 1 small apple, quartered (adds a lovely subtle sweetness).
- For Basting and Roasting Pan:
- 2-3 cups low-sodium chicken or vegetable broth. This keeps everything moist and forms the base for fantastic gravy!
- Optional: 1 cup dry white wine (like Sauvignon Blanc) for an extra layer of flavor in the pan.
- Equipment:
- Large roasting pan with a V-rack.
- Meat thermometer (a digital, instant-read thermometer is your best friend here).
- Kitchen twine for trussing.
- Aluminum foil.
Prepping Your Turkey for Success
- The Thawing Process (if applicable): If you’ve purchased a frozen turkey, this is where your journey to an Easy Roast Turkey truly begins. I always recommend thawing it slowly in the refrigerator. A general rule of thumb is 24 hours for every 4-5 pounds of turkey. So, for a 16-pound bird, you’re looking at about 3-4 days. Place the turkey, still in its original packaging, on a baking sheet or in a large pan to catch any potential drips. You absolutely do not want to rush this by thawing at room temperature, as it can lead to unsafe bacterial growth. Once thawed, remove it from the packaging, take out the neck and giblets from both cavities (usually one in the neck and one in the main body cavity), and discard them or save them for gravy if you’re feeling ambitious!
- Patting Dry is Non-Negotiable: This step is surprisingly one of the most crucial for achieving that gorgeously crispy, golden-brown skin everyone craves from an Easy Roast Turkey. Using several sheets of paper towels, thoroughly pat the entire turkey, inside and out, until it’s as dry as you can possibly get it. Don’t skip any crevices! Moisture on the skin prevents browning and will result in a steamed rather than roasted finish. I sometimes even let it sit uncovered in the fridge for an hour or two after patting it dry to really ensure maximum dryness.
- The Flavorful Butter Rub: In a small bowl, combine your softened butter, olive oil, sea salt, black pepper, dried sage, dried thyme, and smoked paprika. Mix this until it’s a smooth, fragrant paste. Now, here’s my favorite part: gently loosen the skin over the breast and thigh areas with your fingers. Be careful not to tear it! Spoon about half of your butter mixture underneath the skin, directly onto the breast meat. Spread it evenly using your fingers to massage it all over. This creates a protective, flavorful layer that bastes the meat from the inside out and helps keep the breast juicy. Use the remaining butter mixture to generously rub the entire exterior of the turkey, paying special attention to the legs and wings. Don’t forget to season the inside cavity with a good sprinkle of salt and pepper too!
- Aromatic Cavity Stuffing (Not Bread Stuffing!): Now it’s time to fill the turkey’s cavity with your aromatics. Place the quartered onion, chopped carrots, chopped celery, smashed garlic cloves, lemon halves, and fresh rosemary and thyme sprigs inside the main cavity. This isn’t for eating, but rather for infusing the turkey with incredible flavor and moisture from the inside as it roasts. If you’re using an apple, tuck that in too. Be careful not to overstuff, as air circulation is still important for even cooking.
- A Simple Trussing: While not strictly mandatory for an Easy Roast Turkey, I find that trussing helps the turkey cook more evenly and makes for a much more attractive presentation. It also helps to keep the breast meat from drying out by tucking in the wings and legs. Simply take a piece of kitchen twine, approximately 3-4 feet long. Center the twine under the tail end of the turkey. Bring the twine up and cross it over the leg bones, tightening to pull the legs together. Then, wrap the twine around the wings to secure them close to the body. Tie a knot securely on the breast side. This keeps everything compact and ensures no delicate parts are overexposed to the heat.
- Preparing Your Roasting Pan: Arrange the remaining chopped carrots, celery, onion, and garlic on the bottom of your large roasting pan. This acts as a delicious bed for your turkey, preventing the skin from sticking and scorching, and adding incredible flavor to the pan drippings which are essential for gravy. Place your V-rack (or a sturdy wire rack) on top of these vegetables. Finally, place your beautifully prepped turkey, breast-side up, onto the rack. Pour about 2 cups of chicken or vegetable broth (and white wine, if using) into the bottom of the pan, around the vegetables. This liquid will prevent the drippings from burning and create a steamy environment that aids in juicy meat.
The Roasting Process: Achieving Golden Perfection
- Preheat Your Oven: This is an important step for an Easy Roast Turkey. Preheat your oven to a blazing 425°F (220°C). Starting at a higher temperature helps to quickly crisp up the skin and set the exterior, creating a barrier that locks in juices before you lower the heat for the majority of the cooking time. Make sure your oven has reached the target temperature before putting the turkey in.
- The Initial Roast & Temperature Adjustment: Place your prepared roasting pan with the turkey into the preheated 425°F (220°C) oven. Roast for 30 minutes. This initial high-heat blast is crucial for that beautiful browning. After 30 minutes, reduce the oven temperature to 325°F (160°C) without opening the oven door unnecessarily. You’ll continue roasting at this lower temperature for the remainder of the cooking time. The key to an Easy Roast Turkey is consistent, gentle heat after the initial sear.
- Basting for Moisture and Flavor: While some argue basting isn’t strictly necessary, I find it contributes to a more evenly browned skin and adds another layer of flavor. I like to baste my turkey every 45 minutes to an hour. Simply tilt the roasting pan slightly and spoon the pan juices (or the added broth/wine) over the breast and legs. If your pan drippings are running low, you can add a little more warm chicken broth to the bottom of the pan. This step is also a great opportunity to peek at the turkey’s progress.
- Monitoring Internal Temperature is Key: This is arguably the most critical step for a perfectly cooked and safe Easy Roast Turkey, ensuring it’s neither undercooked nor overcooked and dry. About halfway through the estimated cooking time (which we’ll discuss next), start checking the internal temperature using your instant-read meat thermometer. Insert the thermometer into the thickest part of the thigh, making sure not to touch any bone, which can give you an inaccurate reading. The turkey is fully cooked and safe to eat when it reaches an internal temperature of 165°F (74°C) in the thickest part of the thigh. I also like to check the breast, aiming for around 160-165°F (71-74°C). Remember, the temperature will rise a few degrees after it’s removed from the oven during the resting period.
- Controlling the Browning: If you notice the breast skin is browning too quickly during the roasting process, don’t panic! This is very common. Simply tent the breast loosely with a piece of aluminum foil. This will protect the skin from over-browning while allowing the rest of the turkey to continue cooking. Remove the foil for the last 30 minutes or so of roasting if you want to ensure the skin is perfectly crispy and golden. The goal is a beautifully caramelized skin all over.
-
Estimated Cooking Times (General Guideline for an Easy Roast Turkey): While a meat thermometer is your ultimate guide, here are some general estimates for an unstuffed turkey roasted at 325°F (160°C) after an initial high-heat blast:
- 8 to 12 lbs: 2.5 to 3 hours
- 12 to 14 lbs: 3 to 3.75 hours
- 14 to 18 lbs: 3.75 to 4.25 hours
- 18 to 20 lbs: 4.25 to 4.5 hours
- 20 to 24 lbs: 4.5 to 5 hours
Keep in mind that every oven is different, and these are just estimates. Always rely on that thermometer for accuracy! When the thermometer reads 165°F (74°C) in the thigh, it’s time to move to the next crucial step.
Resting and Carving: The Grand Finale
- The Critical Rest: Once your Easy Roast Turkey has reached the target internal temperature, remove the roasting pan from the oven. This next step is absolutely vital for a juicy, tender turkey, and it’s where many people make a mistake. Do NOT carve it immediately! Transfer the turkey from the roasting pan to a large cutting board. Loosely tent the entire bird with aluminum foil. Let it rest for a minimum of 20-30 minutes, or even up to 45 minutes for a larger bird. During this resting period, the juices that have migrated to the center of the turkey during cooking will redistribute throughout the meat. If you carve too soon, all those delicious juices will spill out onto your cutting board, leaving you with dry meat. This rest also allows the internal temperature to carry over and finish cooking, ensuring maximum tenderness.
- Making Glorious Gravy (Optional, but Highly Recommended!): While your turkey is resting, this is the perfect time to make a rich, flavorful gravy using those amazing pan drippings. Carefully pour the contents of the roasting pan (drippings, vegetables, and all) into a large heatproof measuring cup or fat separator. Let it sit for a few minutes to allow the fat to separate and rise to the top. Skim off most of the fat (you can save a tablespoon or two for a roux if desired). In the roasting pan or a saucepan, make a roux by melting a tablespoon of butter, whisking in a tablespoon of flour, and cooking for a minute or two until golden. Slowly whisk in the de-fatted pan drippings, scraping up any browned bits from the bottom of the pan. If you need more liquid, add some of your reserved chicken broth. Bring it to a simmer, whisking constantly, until thickened to your desired consistency. Season with salt and pepper to taste. You can also strain out the cooked vegetables from the drippings if you prefer a smoother gravy. This homemade gravy elevates your Easy Roast Turkey to another level!
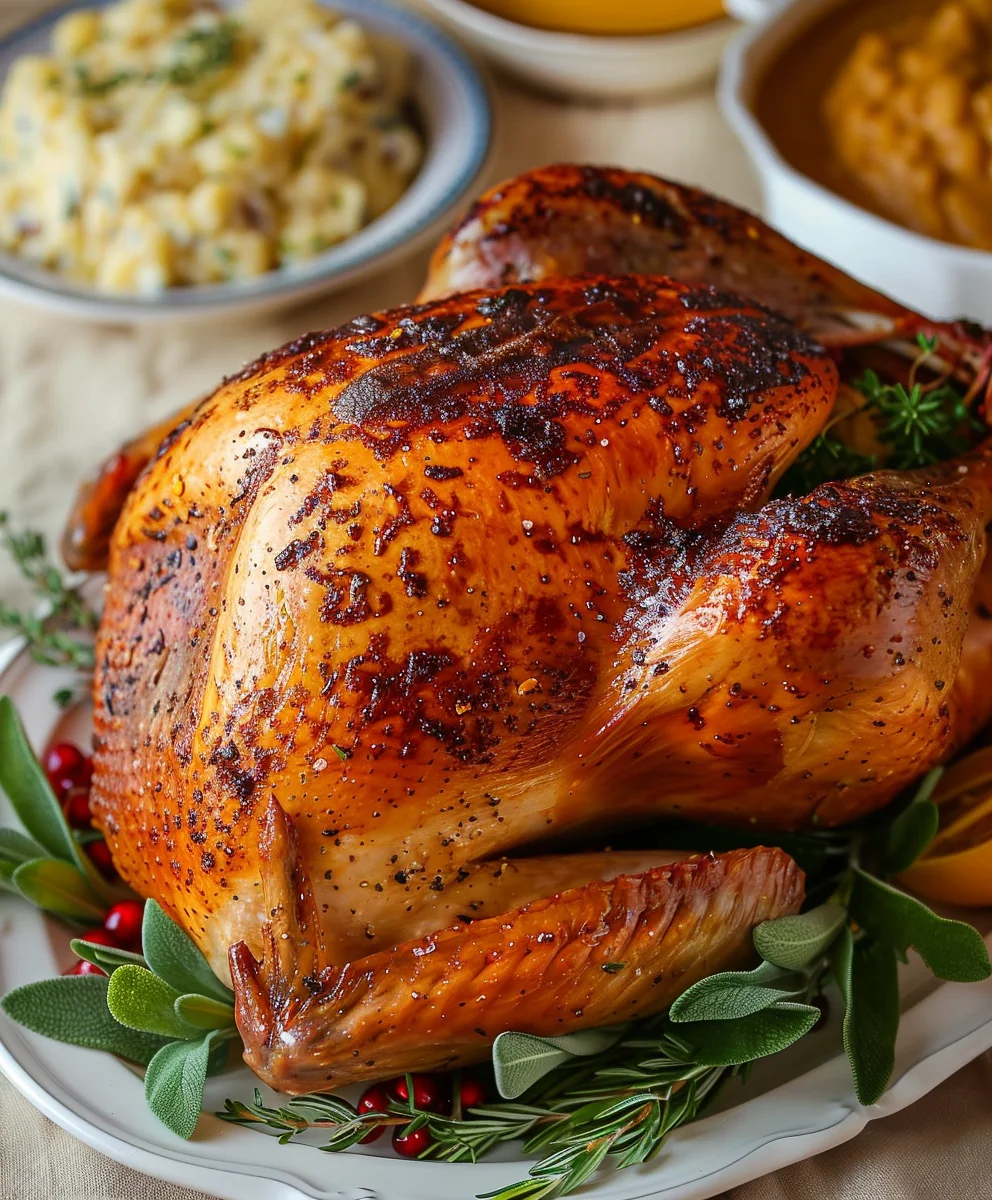
- Carving Your Masterpiece: After a sufficient rest, it’s time to carve your magnificent Easy Roast Turkey. Remove the kitchen twine. First, separate the legs and thighs from the body by slicing through the joint where they attach. You can then separate the drumsticks from the thighs. Next, slice down the breastbone to remove each breast half in one piece. Then, slice the breast meat against the grain into desired thickness. Don’t forget to remove the wings. Arrange all your beautifully carved turkey on a warm platter, ready to be served with that incredible gravy and your favorite holiday sides. Enjoy the fruits of your labor – a tender, juicy, and incredibly flavorful roast turkey!

Conclusion:
Well, my friends, we’ve reached the delicious crescendo of our culinary journey, and I genuinely hope you’re feeling as inspired as I am to get into the kitchen. After walking through the steps, you can see why I truly believe this isn’t just another turkey recipe; it’s the recipe you’ll come back to time and again. What makes this particular preparation stand out as a genuine must-try? It boils down to a few key factors that consistently deliver a show-stopping meal without the usual stress or intimidation. Firstly, and perhaps most importantly, it truly lives up to its name: this is an incredibly straightforward and Easy Roast Turkey method. Forget about complicated brines, endless basting, or the fear of a dry, flavorless bird. My goal with this recipe was to demystify the process, making it accessible for everyone, from seasoned home cooks to those embarking on their very first holiday meal. The techniques we’ve discussed are designed to guarantee a moist, tender, and incredibly flavorful turkey every single time. We’re talking about golden, crispy skin that shatters with every bite, and succulent, juicy meat all the way to the bone. It’s about achieving that perfect balance of textures and tastes that make a holiday spread or a special family dinner unforgettable. This recipe empowers you to create a magnificent centerpiece with confidence, allowing you to focus on the joy of the occasion rather than kitchen anxieties. You deserve to enjoy the process as much as the meal itself, and that’s precisely what this approach delivers.
But the journey doesn’t end with a perfectly roasted bird. Oh no, the magic truly unfolds when you consider the endless possibilities for serving and enhancing your masterpiece. While a classic presentation with all the traditional trimmings is always a winner, don’t shy away from making it your own. For those who adore the classics, imagine this glorious turkey alongside a rich, homemade gravy, creamy mashed potatoes swirling with butter, a savory sage and onion stuffing, and a vibrant cranberry sauce that cuts through the richness beautifully. A simple green bean casserole or honey-glazed carrots would complete a picture-perfect plate. For a slightly different twist, consider roasting a medley of root vegetables – carrots, parsnips, sweet potatoes – right in the roasting pan alongside the turkey during the last hour or so. They’ll soak up all those incredible pan drippings, becoming infused with unparalleled flavor.
Now, if you’re feeling a bit more adventurous, let’s talk variations! Think about experimenting with different herb rubs. Instead of the standard poultry seasoning, perhaps a Mediterranean blend with oregano, thyme, and a hint of lemon zest? Or a smoky paprika rub with a touch of brown sugar for a sweet and savory crust? You could even introduce a garlic-herb butter under the skin for an extra layer of moisture and aroma. For a slightly sweeter, glazed finish, a mixture of maple syrup and Dijon mustard brushed on during the final stages of roasting can create a beautiful caramelization. And let’s not forget the glorious leftovers! They are truly a gift that keeps on giving. Beyond the classic turkey sandwich, imagine hearty turkey noodle soup on a chilly evening, flavorful turkey pot pies, crispy turkey tacos for a fun weeknight meal, or even a sophisticated turkey Waldorf salad.
The versatility of a well-cooked turkey knows no bounds!
Each leftover meal is an opportunity to extend the joy and flavors of your initial creation, making your efforts incredibly rewarding.
So, there you have it. My invitation to you is simple, yet profound: please, please give this recipe a try. Don’t let the thought of roasting a whole turkey intimidate you any longer. This method is truly designed for success, aiming to make your cooking experience joyful and your meal truly spectacular. I promise you, the moment you carve into that beautifully golden, impossibly juicy turkey, you’ll be so proud of what you’ve accomplished. And the looks on the faces of your loved ones as they savor each bite? That’s the real reward. Cooking and sharing food is one of life’s greatest pleasures, a way to connect, celebrate, and create lasting memories. This recipe is your reliable companion on that delicious journey. Once you’ve cooked it, I would absolutely love to hear about your experience! Did you stick to the classic suggestions, or did you venture into exciting variations? What were your favorite parts? Did it become your new go-to? Please feel free to share your successes, your serving suggestions, or even your favorite leftover creations in the comments below. Your stories inspire me and help our whole cooking community thrive. So go ahead, preheat that oven, embrace the aroma that will soon fill your home, and get ready to create something truly magnificent. Happy cooking, and bon appétit!
Easy Roast Turkey: Simple, Flavorful, and Stress-Free Holiday Meal
The thought of preparing a magnificent roast turkey often fills home cooks with a mix of excitement and trepidation. Visions of a golden-brown, succulent centerpiece dance in our heads, but the fear of dry meat or a complicated process can be daunting. Indeed, few dishes command such a presence at our most cherished holiday tables, particularly Thanksgiving and Christmas, embodying centuries of tradition and celebratory gatherings. It’s more than just a meal; it’s an experience, a symbol of togetherness and abundance.
Ingredients
-
1 Whole Turkey (12-14 lbs), fully thawed
-
1/2 cup (1 stick) unsalted butter, softened
-
2 tbsp olive oil
-
2 tsp sea salt
-
1 tsp freshly ground black pepper
-
1 tbsp fresh sage, chopped
-
1 tbsp fresh thyme, chopped
-
1 tsp smoked paprika
-
1 large yellow onion, quartered
-
2 carrots, roughly chopped
-
2 celery stalks, roughly chopped
-
4-6 cloves garlic, smashed
-
1 whole lemon, halved or quartered
-
Few sprigs fresh rosemary
-
Few sprigs fresh thyme
-
2-3 cups low-sodium chicken or vegetable broth
-
1 cup non-alcoholic white wine alternative (optional)
Instructions
-
Step 1
Thaw turkey (24 hrs/4-5 lbs). Remove neck/giblets. Pat turkey completely dry, inside and out, with paper towels. -
Step 2
In a bowl, combine softened butter, olive oil, salt, pepper, sage, thyme, and paprika. Gently loosen skin over breast/thighs. -
Step 3
Rub half of butter mixture under skin onto breast meat, spread evenly. Rub remaining mixture over exterior. Season cavity with salt/pepper. Fill cavity with quartered onion, chopped carrots, chopped celery, smashed garlic, lemon halves, fresh rosemary, and thyme sprigs. -
Step 4
Truss turkey with kitchen twine, securing legs and wings. Arrange remaining chopped carrots, celery, onion, and garlic in a roasting pan. Place V-rack over vegetables, then place turkey breast-side up on rack. Pour 2-3 cups broth (and non-alcoholic white wine alternative, if using) into pan. -
Step 5
Preheat oven to 425°F (220°C). Roast turkey for 30 minutes. -
Step 6
Reduce oven temperature to 325°F (160°C). Continue roasting, basting every 45-60 minutes with pan juices, until thickest part of thigh reaches 165°F (74°C). (Tent with foil if breast browns too quickly.) -
Step 7
Remove turkey from oven. Transfer to a cutting board, tent loosely with foil, and rest for 20-45 minutes to redistribute juices. -
Step 8
While turkey rests, skim fat from pan drippings. Make a roux in the roasting pan or a saucepan, then slowly whisk in de-fatted drippings and additional broth. Simmer until thickened, season to taste. -
Step 9
Carve rested turkey: separate legs/thighs, slice breast against the grain. Arrange on a platter and serve with gravy and sides.
Important Information
Nutrition Facts (Per Serving)
It is important to consider this information as approximate and not to use it as definitive health advice.
Allergy Information
Please check ingredients for potential allergens and consult a health professional if in doubt.