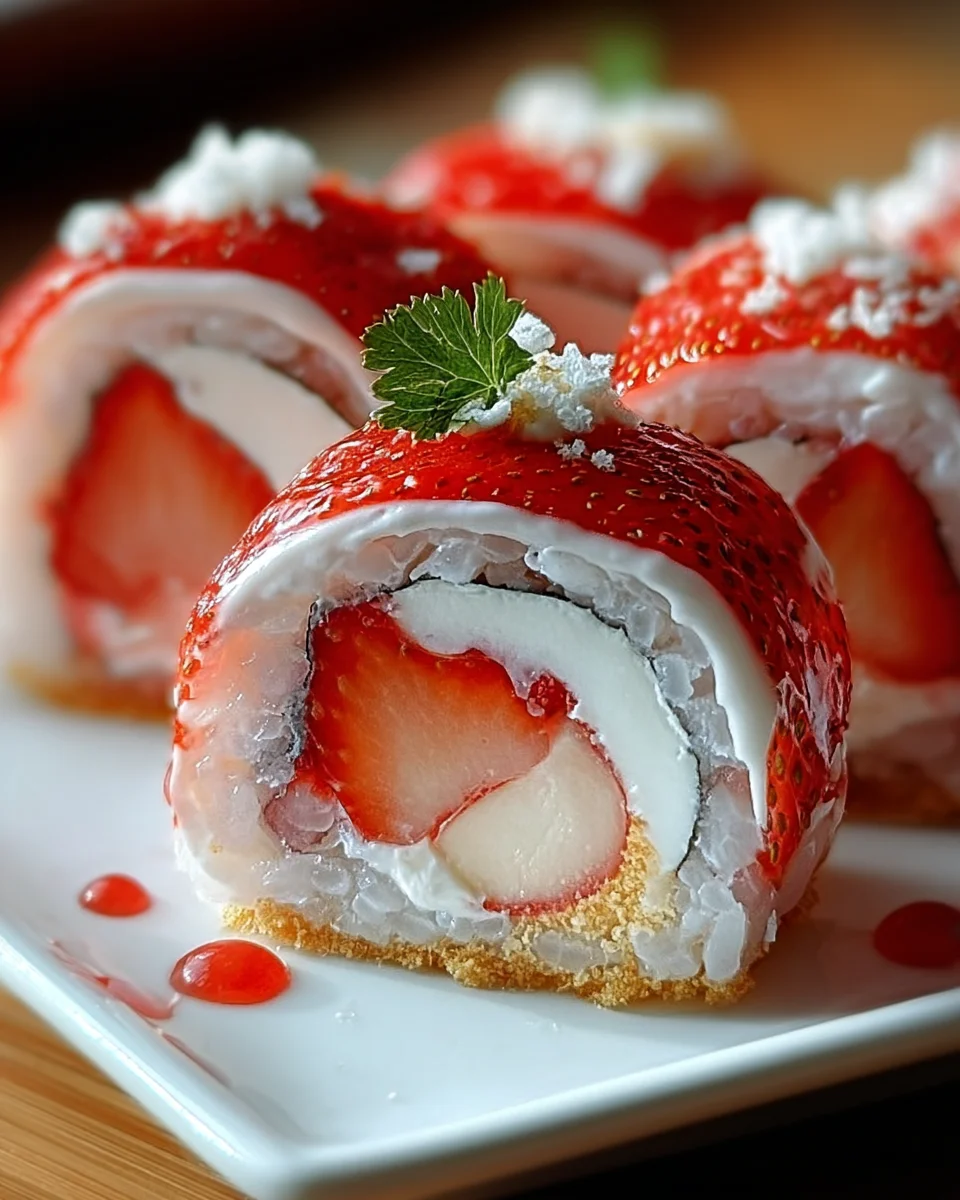
Strawberry Shortcake Sushi Roll – the very name conjures a delightful fusion of two beloved, yet distinct, culinary worlds. I’m incredibly excited to present a recipe that reimagines the classic comfort of strawberry shortcake into an unexpectedly elegant and playful dessert. While traditional sushi has deep roots in savory Japanese cuisine, and the strawberry shortcake holds a cherished place in American dessert history, this innovative creation celebrates the joyous spirit of modern culinary exploration. It’s a testament to how creative pairings can transcend expectations, transforming familiar flavors into something entirely new and exciting.
I find that people absolutely adore this dish not only for its stunning visual appeal, resembling beautifully crafted sushi, but also for its truly unique taste and texture. Imagine the delightful chewiness of sweet “sushi” rice, infused with subtle vanilla, giving way to the vibrant burst of fresh, ripe strawberries and the luscious creaminess of whipped topping. It’s a refreshing, light, and surprisingly easy-to-assemble treat that offers all the beloved elements of a shortcake in a fun, bite-sized presentation. This makes the Strawberry Shortcake Sushi Roll a perfect conversation starter and a guaranteed showstopper at any gathering, proving that sometimes, the best desserts are the ones that dare to be different.

Ingredients:
This Strawberry Shortcake Sushi Roll recipe marries the comforting, familiar flavors of classic strawberry shortcake with the exciting, innovative presentation of a sushi roll. It’s a truly delightful dessert that’s guaranteed to surprise and impress anyone lucky enough to try it!
For the Sweet Sushi Rice:
- 2 cups (approximately 400g) Japanese short-grain sushi rice
- 2 ½ cups (approximately 600ml) cold water, plus additional for thorough rinsing
- ½ cup (approximately 100g) granulated sugar
- ¼ cup (approximately 60ml) unseasoned rice vinegar (ensure it’s not the seasoned variety, unless you desire an even sweeter rice base)
- 1 teaspoon fine sea salt
For the Creamy Filling:
- 1 ½ cups (approximately 360ml) very cold heavy whipping cream (it’s crucial to use cream with at least 36% milk fat for optimal whipping)
- ¼ cup (approximately 50g) powdered sugar (also known as confectioners’ sugar)
- 1 teaspoon pure vanilla extract
For the Fresh Strawberries:
- 1 ½ lbs (approximately 680g) fresh, ripe strawberries, carefully hulled and thinly sliced
- 1 tablespoon granulated sugar (optional, for lightly macerating the berries to enhance their juiciness)
For Assembly and Garnish:
- A sturdy bamboo sushi rolling mat (makisu)
- Plenty of plastic wrap (cling film)
- A small bowl of water (for moistening hands when handling rice)
- Additional fresh mint leaves or small whole strawberries for an elegant garnish (optional)
- A light dusting of extra powdered sugar for presentation (optional)
Preparing the Sweet Sushi Rice
The foundation of our extraordinary Strawberry Shortcake Sushi Roll lies in perfecting the sweet sushi rice. It needs to be wonderfully sticky to maintain its shape, yet tender and imbued with a delicate sweetness. Precision in this step is key for a truly successful dessert.
- Rinse the Rice Thoroughly: Begin by placing the 2 cups of Japanese short-grain sushi rice into a large mixing bowl. Fill the bowl with cold water, and with your hand, gently swirl the rice. You’ll observe the water rapidly turning cloudy; this is the excess starch being released. Carefully drain this cloudy water and repeat the rinsing process a minimum of 5 to 7 times, or continue until the water runs mostly clear. This meticulous rinsing is absolutely vital for achieving individual, fluffy rice grains and preventing a gummy or overly sticky texture in your final roll.
- Soak the Rice for Hydration: After the final rinse, drain the rice completely and transfer it to a fine-mesh sieve. Allow it to sit and drain for approximately 30 minutes. This crucial resting period permits the rice to absorb any remaining surface moisture, leading to more even and consistent cooking.
- Cook the Rice (Stovetop Method for Perfection): Carefully transfer the soaked rice from the sieve into a heavy-bottomed pot equipped with a very tight-fitting lid. Pour in the measured 2 ½ cups of cold water. Place the pot on your stovetop and bring the water to a vigorous rolling boil over medium-high heat. As soon as a strong boil is achieved, immediately reduce the heat to the absolute lowest setting, securely cover the pot, and allow the rice to simmer undisturbed for precisely 15 minutes. It is imperative not to lift the lid at any point during this cooking time, as the steam trapped inside is essential for the rice to cook properly and evenly.
- Rest the Cooked Rice: Once the 15 minutes of simmering are complete, turn off the heat, but resist the urge to remove the lid. Let the rice rest, still covered, for an additional 10-15 minutes. This post-cooking rest allows the steam to redistribute throughout the grains, ensuring they fully cook and achieve a perfect, tender consistency without becoming mushy.
- Prepare the Sweet Vinegar Mixture: While your rice is resting, combine the ½ cup of granulated sugar, ¼ cup of rice vinegar, and 1 teaspoon of salt in a small saucepan. Place the saucepan over low heat, stirring continuously until both the sugar and salt are entirely dissolved. Be careful not to boil this mixture. As soon as it’s clear and dissolved, remove it from the heat and set it aside to cool down completely to room temperature.
- Season the Rice with Care: Transfer the still-hot cooked rice into a large, wide, non-metallic bowl or, if you have one, a traditional wooden hangiri (sushi rice tub). Pour the cooled sweet vinegar mixture evenly over the entire surface of the rice. Using a rice paddle or a wooden spoon, employ a gentle folding and “cutting” motion to incorporate the mixture into the rice. Simultaneously, use a fanning motion—either with a hand fan, a piece of cardboard, or simply by circulating air—as you mix. This fanning action helps to cool the rice quickly, evaporate excess moisture, and impart that desirable glossy sheen to each grain. Continue to mix and fan until the rice has cooled to approximately body temperature, or slightly warmer. The rice should be cool enough to handle comfortably but still pliable. Avoid letting it become cold, as this will cause it to harden and make rolling exceptionally difficult.
- Keep it Covered and Moist: Once the sushi rice is perfectly seasoned and cooled, cover the bowl with a damp kitchen towel or plastic wrap. This prevents the rice from drying out and becoming tough while you prepare the remaining delicious components for your Strawberry Shortcake Sushi Roll.
Preparing the Creamy Filling
No shortcake, especially a Strawberry Shortcake Sushi Roll, would be complete without its signature creamy element. For this recipe, we’re crafting a luscious, subtly sweet whipped cream that perfectly complements the vibrant strawberries and sweet rice.
- Chill Your Whipping Tools: For the most successful and stable whipped cream, it’s highly recommended to chill your mixing bowl (preferably a metal one) and your whisk attachment (if using a stand mixer) or beaters (if using a hand mixer) in the freezer for about 10-15 minutes prior to beginning. Cold equipment helps the cream whip up faster and hold its beautiful volume for longer.
- Whip the Heavy Cream: Pour the 1 ½ cups of very cold heavy whipping cream into your thoroughly chilled bowl. Begin whipping the cream on a medium-low speed, gradually increasing the speed to medium-high as the cream starts to aerate.
- Introduce Sweetener and Vanilla: As the cream begins to visibly thicken and you notice the formation of soft peaks (this typically occurs after a few minutes of whipping), gradually sprinkle in the ¼ cup of powdered sugar and add the 1 teaspoon of pure vanilla extract. Continue whipping.
- Whip to Stiff Peaks with Care: Continue whipping until firm, stiff peaks form. This means that when you lift the whisk, the peak of cream should stand up straight and hold its shape. It’s crucial to be vigilant here; stop whipping as soon as stiff peaks are achieved. Over-whipping will cause the cream to become grainy and eventually separate into butter, which we definitely don’t want for our dessert sushi! Look for that perfect, stable, yet wonderfully airy consistency.
- Chill Until Ready to Use: As soon as your whipped cream is perfect, cover the bowl and immediately transfer it to the refrigerator. While it’s best when used fresh, it can be stored in the fridge for a few hours without losing too much volume.
Preparing the Fresh Strawberries
The star component, the vibrant and juicy strawberries, brings the essential sweetness and delightful tang to our Strawberry Shortcake Sushi Roll. Their freshness is paramount.
- Wash and Hull the Strawberries: Gently wash all 1 ½ lbs of fresh strawberries under cool, running water. After washing, carefully pat them dry with paper towels to remove any excess moisture. Next, remove the green hulls by precisely scooping them out with a small paring knife or by using a dedicated strawberry huller.
- Slice the Strawberries Thinly: With a sharp knife, thinly slice the hulled strawberries. Aim for uniform slices, ideally about ⅛ to ¼ inch thick. These thin, consistent slices are much easier to roll within the sushi and will ensure that the delicious strawberry flavor is evenly distributed throughout every bite of your dessert.
- Optional Maceration for Enhanced Flavor: For an extra layer of sweetness and to draw out some of the strawberries’ natural juices, you have the option to gently toss the sliced strawberries with 1 tablespoon of granulated sugar. Allow them to sit for approximately 10-15 minutes. This step, while optional, can significantly enhance their sweetness and make the berries slightly softer, contributing to a more integrated and tender texture within the roll. If you choose to macerate, be sure to drain any excess liquid thoroughly before adding them to the roll, as too much moisture can potentially make the rice soggy.
Assembling the Strawberry Shortcake Sushi Roll
Now, the moment we’ve all been waiting for – bringing all these delectable components together to create your stunning and uniquely delicious Strawberry Shortcake Sushi Roll! This stage requires a gentle touch, a bit of patience, and attention to detail.
- Set Up Your Rolling Station: Lay your bamboo sushi rolling mat (makisu) perfectly flat on a clean, dry work surface. Completely cover the entire mat with a sheet of plastic wrap. This protective layer is absolutely crucial; it prevents the sticky sushi rice from adhering to the mat and makes the cleanup process significantly easier. If you don’t possess a bamboo mat, you can cleverly improvise by using a clean, flexible cutting board or even a thick kitchen towel, also thoroughly covered in plastic wrap.
- Prepare Your Hands for Rice: Keep a small bowl of water close by at your rolling station. Frequently dip your hands into the water and shake off the excess. This simple trick creates a barrier that prevents the sticky sushi rice from adhering to your fingers, making it much easier to handle. Re-wet your hands as often as needed throughout the assembly process.
- Spread the Sushi Rice Evenly: Take approximately 1 cup to 1 ½ cups of the sweetened sushi rice and spread it out evenly over the plastic-wrapped bamboo mat. Leave about a 1-inch border clear at the top edge of the mat (the edge furthest away from you). Gently but firmly press the rice into a uniform layer, aiming for a thickness of about ¼ to ⅓ inch. It’s paramount to achieve an even thickness across the entire rice rectangle to ensure a perfectly shaped, symmetrical roll.
- Layer the Creamy Filling: Using an offset spatula or the back of a spoon, gently spread a consistent layer of your chilled whipped cream over the rice. Similar to the rice, leave the top 1-inch border of the rice (the one without cream) clear. Be mindful not to apply an excessive amount of cream, as too much can make the roll challenging to seal and prone to bursting during slicing. A generous yet thin and even layer is ideal.
- Arrange the Fresh Strawberries: Carefully and artfully arrange a single, neat layer of your thinly sliced strawberries over the whipped cream. Overlap them slightly if necessary, ensuring a consistent and appealing layer across the entire surface of the cream. This meticulous arrangement guarantees that every single slice of your finished Strawberry Shortcake Sushi Roll will boast a delightful burst of fresh fruit flavor and vibrant color.
- The Art of Rolling Your Dessert Sushi! This is often considered the trickiest step, but with a gentle touch and careful attention, you will undoubtedly master it.
- Grasp the edge of the bamboo mat closest to you, lifting it gently but firmly. Simultaneously, use the mat to fold the rice over the filling, initiating the rolling motion.
- As you begin to roll, use your fingers to delicately hold the filling in place, ensuring it doesn’t shift or squeeze out.
- Continue to roll forward, applying gentle, even pressure with your fingers to compact the roll slightly as you progress. This helps create a firm, well-structured cylinder.
- Roll the mat completely over until the rice edge you started with meets the clear 1-inch border you left at the top. This border will now serve as a natural sealing point.
- Press gently along the entire length of the roll to seal it securely. If the rice doesn’t stick perfectly, you can lightly moisten your finger with a tiny bit of water and run it along the edge to aid adhesion.
- Once rolled, gently reshape the roll through the plastic wrap, molding it into a uniform cylinder. You can use the mat to subtly square off the ends or gently firm up the sides for a professional finish.
- Chill for Optimal Stability: Leave the newly formed Strawberry Shortcake Sushi Roll wrapped tightly in its plastic wrap. Transfer it to the refrigerator and allow it to chill for a minimum of 30 minutes, ideally 1 hour. This chilling period is absolutely crucial; it permits the rice to set, the whipped cream to firm up, and the entire roll to become much more stable and significantly easier to slice neatly without squishing. Do not, under any circumstances, skip this essential step for the best possible results!
Slicing and Serving Your Strawberry Shortcake Sushi Roll
The final, gratifying steps to present your beautiful and incredibly unique dessert!
- Prepare for Precise Slicing: Remove the chilled Strawberry Shortcake Sushi Roll from the refrigerator. Keep the plastic wrap around the roll for this initial stage.
- Utilize a Sharp, Wet Knife: For impeccably clean cuts and to prevent the rice and cream from sticking, it is paramount to use a very sharp knife. Dip the knife blade in water and thoroughly wipe it clean between each individual cut. This crucial technique ensures perfectly defined, attractive slices every time.
- Slice the Roll with Care: Gently unwrap the plastic from the roll. Carefully slice the roll into 6-8 even pieces, adjusting the thickness based on your preference (typically about ¾ to 1 inch thick). Make each slice with a single, decisive downward motion, rather than sawing back and forth, which can deform the roll. If you notice the roll beginning to flatten slightly, you can gently reshape it with your fingers while you slice.
- Artful Arrangement and Garnish: Carefully transfer your exquisite Strawberry Shortcake Sushi Roll slices to an elegant serving platter. For an added touch of sophistication and visual appeal, consider garnishing with a few fresh mint leaves, a single small whole strawberry placed alongside, or a delicate dusting of powdered sugar. For an adventurous twist, you could even drizzle a tiny bit of strawberry syrup or a very thin balsamic glaze for an extra pop of flavor and presentation.
- Serve Immediately for Best Experience: This innovative dessert is truly at its peak when enjoyed fresh. The harmonious blend of textures and vibrant flavors is most pronounced when served shortly after slicing. While it can be stored in an airtight container in the refrigerator for a few hours, keep in mind that the rice may firm up slightly and the cream might soften over extended periods.
There you have it! A truly unique and utterly delicious dessert that beautifully combines the nostalgic comfort of strawberry shortcake with the delightful artistry and fun of sushi. Each bite of this Strawberry Shortcake Sushi Roll offers a harmonious, multi-layered blend of sweet, creamy, and wonderfully fresh textures. It’s an ideal choice for parties, special celebrations, or simply as a fun, creative treat to prepare and savor at home. Enjoy the enjoyable process and the incredibly delicious outcome!
Conclusion:
Well, my friends, we’ve reached the sweet end of our culinary journey, and I genuinely hope you’re as excited as I am about this incredible creation. What we’ve just explored isn’t just another dessert recipe; it’s a truly ingenious fusion that promises to captivate your taste buds and impress anyone lucky enough to share it with you. This isn’t your average dessert; it’s a conversation starter, a delightful surprise, and a testament to how playful and imaginative baking can be. The sheer joy of taking beloved flavors – the tender sweetness of strawberries, the cloud-like embrace of cream, and the comforting crumble of cake – and reimagining them in an utterly unexpected form is what makes this recipe a must-try. It beautifully bridges the familiar with the exotic, offering a stunning visual appeal that belies its relatively straightforward preparation. If you’re looking for a showstopper that will have your guests asking for the recipe, or simply a unique treat to brighten your day, this is absolutely it.
Now that you’ve mastered the art of creating this masterpiece, let’s talk about how to truly savor it. The versatility of your homemade Strawberry Shortcake Sushi Roll is one of its most charming attributes. Imagine serving these vibrant, individual rolls on a beautiful platter at your next summer brunch, perhaps alongside a light prosecco or a refreshing mint tea. They make an exquisite and novel addition to any afternoon tea party, offering a whimsical twist on traditional pastries. For a more casual setting, consider them the perfect sophisticated snack to elevate a simple get-together with friends. They’re also fantastic for children’s parties, especially when cut into smaller, more manageable “maki” pieces – just be prepared for the excited squeals! To truly enhance the presentation, I love to garnish them with a few extra fresh strawberry slices, a delicate sprig of mint, or even a light dusting of powdered sugar just before serving. A small bowl of berry coulis on the side for dipping can also add another layer of indulgence, transforming each bite into an even more luxurious experience.
But why stop there? The beauty of this recipe lies in its adaptability. While the classic combination is undeniably delightful, I wholeheartedly encourage you to experiment and make this recipe truly your own. Think about variations that speak to your palate. Instead of strawberries, why not try vibrant raspberries, juicy blueberries, or even slices of ripe kiwi for a tropical twist? You could swap out the whipped cream for a richer mascarpone cream, a tangy cream cheese frosting, or even a dairy-free coconut cream for those with dietary restrictions. Imagine a chocolate sponge cake base for a decadent twist, or perhaps a lemon-flavored cake for a burst of citrusy brightness. For an added textural dimension, some finely chopped toasted nuts or even a sprinkle of shredded coconut could be incorporated into the filling. The possibilities are as endless as your imagination, allowing you to tailor this unique dessert to any occasion or preference. Don’t be afraid to play around with different flavor profiles and ingredients; that’s where the true joy of cooking and baking often lies.
Your Turn to Create!
So, my fellow dessert enthusiasts, what are you waiting for? This is your invitation to step into the kitchen and unleash your inner culinary artist. I promise you, the effort is minimal compared to the incredible reward of biting into your very own Strawberry Shortcake Sushi Roll. It’s a delightful journey from curiosity to creation, culminating in a dessert that is as fun to make as it is to eat. Don’t let the unique presentation intimidate you; it’s surprisingly simple to assemble, and the visual impact is simply stunning. Once you’ve experienced the magic of this recipe, I would absolutely love to hear about it! Share your creations with me, tell me about your chosen variations, and let me know how it was received by your loved ones. Your experiences and feedback not only inspire me but also help build our wonderful community of home bakers. So, grab those ingredients, get rolling, and prepare to delight everyone with this wonderfully innovative and undeniably delicious treat. Happy baking!
Sweet Strawberry Shortcake Sushi Rolls: Easy Dessert Recipe
A delightful fusion transforming classic strawberry shortcake into an elegant, playful dessert sushi roll. Experience the vibrant burst of fresh strawberries and luscious creaminess of whipped topping, all beautifully encased in a sweet cake base. A refreshing, light, and easy-to-assemble treat, perfect as a unique showstopper dessert for any gathering.
Ingredients
Instructions
Important Information
Nutrition Facts (Per Serving)
It is important to consider this information as approximate and not to use it as definitive health advice.
Allergy Information
Please check ingredients for potential allergens and consult a health professional if in doubt.