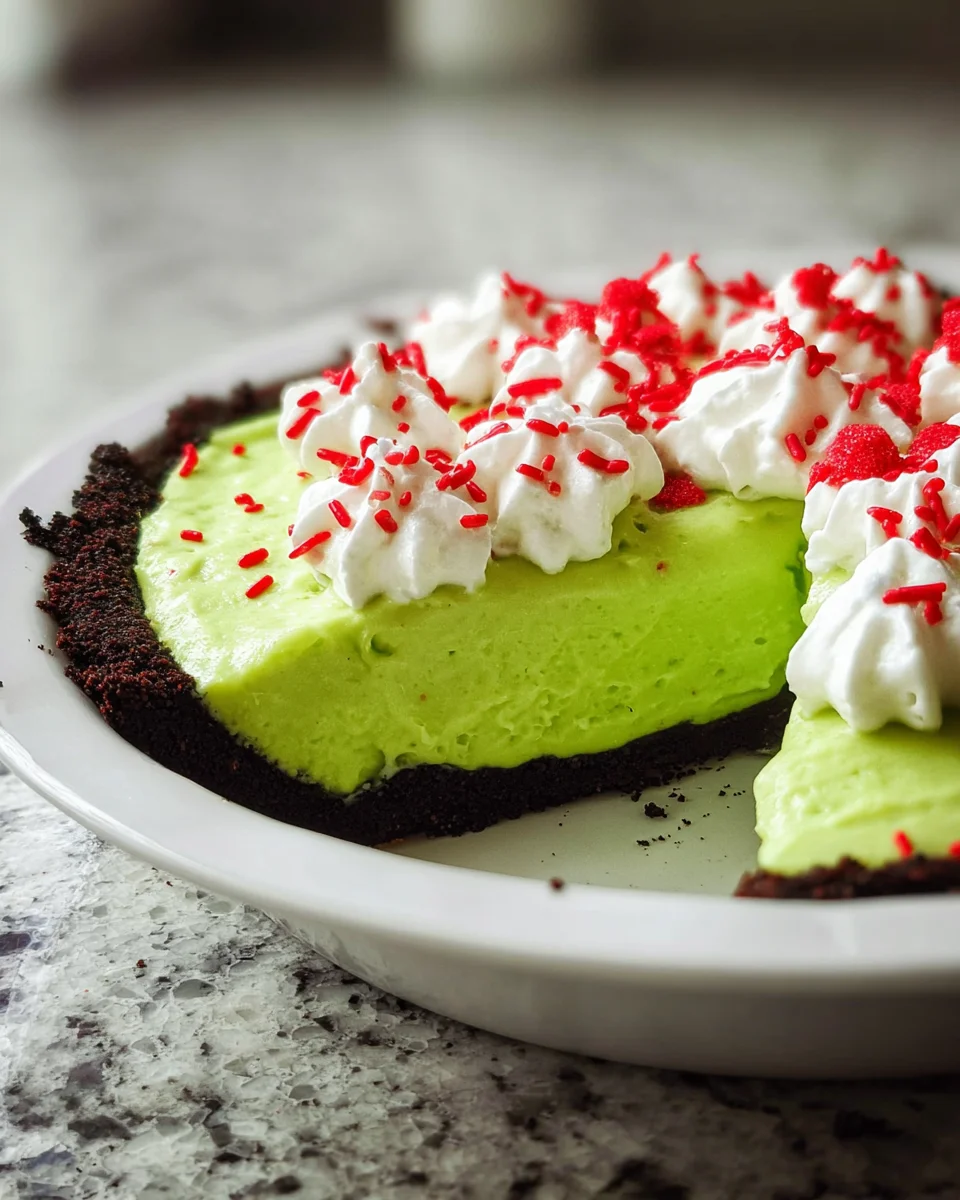
Grinch Pie is more than just a dessert; it’s a festive spectacle that promises to steal the show and maybe even grow a few hearts at your next holiday gathering! Picture this: a vibrant, eye-catching green pie that perfectly captures the playful, mischievous spirit of everyone’s favorite holiday character. Inspired by Dr. Seuss’s timeless tale, this delightful creation has become a beloved tradition in many homes, bringing smiles and a touch of whimsy to the Christmas season. It’s the kind of dish that instantly evokes childhood memories and adds a magical flourish to any dessert table.
What makes this particular Grinch Pie so universally adored? It’s a combination of irresistible factors. First, its stunning visual appeal instantly brightens any dessert spread, making it an absolute crowd-pleaser, especially with children and those young at heart. Beyond its captivating hue, the pie boasts a wonderfully creamy texture that practically melts in your mouth, offering a refreshing and perfectly balanced blend of tangy and sweet flavors. It’s a surprisingly light option amidst the richness of holiday meals, providing a refreshing palate cleanser that leaves everyone wanting just one more slice. I promise, once you experience its charm and flavor, this Grinch-inspired delight will quickly become a cherished part of your own holiday baking repertoire.

Ingredients:
-
For the Oreo Crust:
- 28-30 Oreo Cookies: Approximately one standard package (about 14.3 ounces). I prefer the classic chocolate Oreos for their deep color contrast against the vibrant green Grinch Pie filling.
- 6 tablespoons Unsalted Butter: Melted. This acts as the binder for our crumbly crust, giving it that perfect buttery richness.
-
For the Creamy Grinch Filling:
- 2 (8-ounce) packages Cream Cheese: Full-fat, softened to room temperature. This is the backbone of our luscious Grinch Pie filling, providing that delightful tang and creamy texture.
- 1 ½ cups Powdered Sugar: Also known as confectioners’ sugar. It dissolves beautifully, ensuring a smooth, lump-free filling.
- 2 teaspoons Pure Vanilla Extract: Use good quality vanilla! It enhances all the other flavors wonderfully.
- 1 teaspoon Peppermint Extract: Or, for a different twist, you could use lime extract or even almond extract. I love the cool, refreshing kick peppermint gives to this Grinch Pie, making it feel extra festive. Adjust to your taste, starting with less and adding more if desired.
- Green Food Coloring: Gel or liquid. I recommend gel food coloring for its vibrant intensity, allowing you to achieve that iconic Grinch-green color without adding too much liquid. You’ll need quite a bit to get a truly deep, Grinchy hue.
- 1 cup Heavy Whipping Cream: Chilled. This will be whipped into stiff peaks, adding airiness and lightness to our decadent filling.
-
For the Festive Topping:
- 1 cup Heavy Whipping Cream: Extra, chilled. For making fresh whipped cream to dollop generously on top of your finished Grinch Pie.
- 2 tablespoons Powdered Sugar: For sweetening the topping.
- ½ teaspoon Pure Vanilla Extract: For flavor in the whipped cream topping.
- Red Sprinkles or Small Red Candies: To represent the Grinch’s little heart or a festive touch. Think candy hearts, red sanding sugar, or even chopped red gummy candies.
- Optional: Crushed Oreo Cookies or Chocolate Shavings: For an extra textural element and visual appeal.
Preparing the Grinch Pie Crust: The Foundation of Flavor
- First things first, let’s get that oven preheating. While this is primarily a no-bake pie, a quick bake for the crust really helps to set it, making it less crumbly and giving it a lovely toasted flavor. So, set your oven to 350°F (175°C). If you’re opting for a completely no-bake version, you can skip the oven step, but I highly recommend it for superior structural integrity and taste. Prepare a 9-inch pie plate by lightly greasing it or spraying it with non-stick cooking spray. I find a standard glass pie plate works beautifully for this Grinch Pie.
- Now, let’s tackle those Oreos! You’ll need a food processor for this, which makes quick work of turning cookies into fine crumbs. Place all 28-30 Oreo cookies, including their creamy filling, into the bowl of your food processor. Pulse the cookies until they are finely ground into even crumbs. You want them to resemble damp sand – no large chunks should remain. If you don’t have a food processor, don’t fret! You can place the cookies in a large, heavy-duty Ziploc bag, seal it, and then crush them with a rolling pin or the bottom of a heavy pan. This method requires a bit more elbow grease but is just as effective for creating those perfect Grinch Pie crumbs.
- Once your Oreo crumbs are ready, transfer them to a medium-sized mixing bowl. In a separate small microwave-safe bowl or a saucepan, melt your 6 tablespoons of unsalted butter. Be careful not to overheat it; just until it’s fully liquid. Pour the melted butter over the Oreo crumbs.
- Using a fork or your clean hands, mix the melted butter and Oreo crumbs thoroughly until everything is well combined. The crumbs should be evenly moistened and clump together when you press them. This is crucial for a crust that holds its shape.
- Press the buttery Oreo mixture evenly into the bottom and up the sides of your prepared 9-inch pie plate. I like to start by pressing it into the bottom, then working my way up the sides. For a really compact crust, use the bottom of a flat-bottomed glass or a measuring cup to firmly press the crumbs down. The more compactly you press, the less likely your Grinch Pie crust is to crumble when sliced. Take your time with this step, as a good crust makes all the difference!
- Important Decision Point: Bake or No-Bake? If you chose to preheat your oven, place the pie plate with the crust into the preheated 350°F (175°C) oven and bake for 8-10 minutes. This short bake time helps to solidify the butter and toast the crumbs slightly, giving your Grinch Pie crust an incredible depth of flavor and a much better structure. Once baked, remove it from the oven and let it cool completely on a wire rack before proceeding. If you’re going for a truly no-bake Grinch Pie, place the pressed crust directly into the refrigerator for at least 30 minutes to firm up.
Crafting the Creamy Grinch Pie Filling: The Heart of the Holiday Dessert
- While your crust is cooling or chilling, let’s get started on the star of the show: the vibrantly green, creamy Grinch Pie filling! In a large mixing bowl, using an electric mixer fitted with the paddle attachment, or even a sturdy whisk if you prefer a good arm workout, beat the softened cream cheese on medium speed for about 2-3 minutes until it becomes incredibly smooth and creamy, with no lumps whatsoever. This initial step is critical for a silky smooth Grinch Pie filling. Make sure your cream cheese is truly at room temperature, or it will be difficult to get lump-free.
- Once the cream cheese is perfectly whipped, gradually add the powdered sugar, one cup at a time, mixing on low speed initially to prevent a sugar cloud from engulfing your kitchen, then increasing to medium until fully incorporated and the mixture is light and fluffy. Don’t forget to scrape down the sides and bottom of the bowl frequently with a rubber spatula to ensure everything is evenly combined. We want every bit of this Grinch Pie filling to be perfectly sweetened.
- Now for the flavor and color! Add the vanilla extract and, most importantly, the peppermint extract. Start with ½ teaspoon of peppermint extract, mix it in, and then taste. Peppermint can be quite potent, so you want to ensure it’s just right for your palate. You might want to add another ¼ or ½ teaspoon, depending on how strong you like the mint flavor. Remember, we’re aiming for a refreshing taste that complements the richness of the cream cheese.
- Next, for that iconic Grinch green! Begin adding your green food coloring, a few drops at a time if using liquid, or a small dab with a toothpick if using gel, mixing thoroughly after each addition. Continue adding and mixing until you achieve a vibrant, cheerful green that would make even the Grinch himself smile. Don’t be shy with the coloring! You really want a deep, unmistakable Grinch color. This is the fun part, so enjoy watching your Grinch Pie filling transform!
- In a separate, very cold mixing bowl (I often put my bowl and whisk attachment in the freezer for 10-15 minutes beforehand), pour your 1 cup of chilled heavy whipping cream. Using an electric mixer, beat the cream on medium-high speed until stiff peaks form. Stiff peaks mean that when you lift the whisk, the cream holds its shape firmly. Be careful not to overbeat, or you’ll end up with butter! This step adds a wonderful lightness and airiness to your Grinch Pie filling, making it truly irresistible.
- Gently fold about one-third of the whipped cream into the green cream cheese mixture using a rubber spatula. This lightens the cream cheese mixture, making it easier to incorporate the remaining whipped cream without deflating it. Once combined, gently fold in the remaining whipped cream until no streaks remain and the filling is uniform in color and texture. Be delicate here to maintain the airy consistency you just created. This gentle folding ensures your Grinch Pie will be wonderfully light and fluffy.
Assembling Your Grinch Pie: Bringing It All Together
- Once your crust is completely cooled (if baked) or thoroughly chilled (if no-bake), spoon the vibrant green Grinch Pie filling into the prepared Oreo crust. Use your rubber spatula to spread the filling evenly, creating a smooth, inviting surface. You can even create a slight mound in the center for a rustic look.
- Cover the pie loosely with plastic wrap or aluminum foil, making sure it doesn’t touch the surface of the filling if possible. This prevents condensation and keeps the pie fresh.
- Transfer the Grinch Pie to the refrigerator and chill for at least 4 hours, but preferably overnight. This chilling time is non-negotiable! It allows the Grinch Pie filling to set properly, ensuring clean slices and a firm, creamy texture. Rushing this step will result in a messy, unset pie, and nobody wants that when they’re expecting a perfect Grinch Pie! Patience is a virtue, especially when it comes to delicious desserts.
For the Festive Grinch Pie Topping: The Grand Finale
- Just before serving your beautifully chilled Grinch Pie, it’s time to prepare the topping. In another very cold mixing bowl (again, a chilled bowl helps immensely), combine the remaining 1 cup of heavy whipping cream, 2 tablespoons of powdered sugar, and ½ teaspoon of vanilla extract.
- Using an electric mixer, beat on medium-high speed until stiff peaks form. This should take a few minutes. Again, be careful not to overbeat. You want luscious, airy whipped cream, not butter!
- You have a couple of options for applying the whipped cream topping. You can either spoon dollops of whipped cream all over the top of the Grinch Pie, spreading it gently with a spatula, or for a more decorative touch, transfer the whipped cream to a piping bag fitted with a star tip and pipe beautiful rosettes or swirls around the edges or over the entire surface.
- Now for the ultimate Grinchy touch! Sprinkle your red sprinkles or small red candies over the whipped cream. This is meant to symbolize the Grinch’s tiny, growing heart, making your Grinch Pie not just delicious but also incredibly charming and thematic. If you like, you can also add a sprinkle of crushed Oreo cookies or chocolate shavings for extra texture and visual appeal.
- Slice and serve your magnificent Grinch Pie immediately. Each slice will reveal that vibrant green filling, ready to delight your guests. Store any leftovers loosely covered in the refrigerator for up to 3-4 days. While it’s best enjoyed within a day or two for peak freshness, this Grinch Pie tends to hold up quite well!
Pro Tips for Your Best Grinch Pie Ever: Elevating Your Dessert Game
-
Room Temperature Cream Cheese is Key!
I cannot stress this enough. If your cream cheese isn’t completely softened to room temperature, you will struggle to get a smooth, lump-free filling. Lumps of cream cheese in your Grinch Pie are a texture no-no! Plan ahead and take it out of the fridge at least an hour or two before you start mixing. If you’re in a hurry, you can unwrap it and microwave it on low power for 10-15 seconds at a time, flipping it, until slightly softened, but be very careful not to melt it.
-
Chill Everything for Whipped Cream:
For the fluffiest, most stable whipped cream (both for the filling and the topping), make sure your heavy cream, your mixing bowl, and your whisk attachment are all thoroughly chilled. A cold environment helps the fat molecules in the cream emulsify properly, leading to much better volume and stability. Pop them in the freezer for 15 minutes before you plan to whip. This simple trick makes a huge difference in the texture of your Grinch Pie.
-
Flavor Variations for Your Grinch Pie:
While I adore the peppermint flavor for a festive Grinch Pie, feel free to experiment! Lemon or lime extract can give it a tangy, refreshing zing, making it more like a key lime Grinch Pie. Almond extract offers a warm, nutty depth. You could even use a combination, like a hint of mint with vanilla. Just remember to taste as you go, as extracts can vary in strength.
-
Getting that Perfect Grinch Green:
Gel food coloring is your best friend here. It provides a much more concentrated color without adding excess liquid, which could thin out your Grinch Pie filling. Start with a small amount and gradually add more until you achieve that deep, vibrant hue. The goal is a color so bright and cheerful, it would make the Grinch’s heart grow three sizes!
-
Patience with Chilling:
I mentioned it in the instructions, but it bears repeating: the chilling time is absolutely essential for this Grinch Pie. Don’t rush it! A minimum of 4 hours, or ideally overnight, allows the filling to firm up completely, making it easy to slice and ensuring that delightful creamy texture. If you try to cut it too soon, it will be soft and messy, diminishing the overall experience of your wonderful Grinch Pie.
-
Storage and Make-Ahead Tips:
This Grinch Pie is a fantastic make-ahead dessert. You can prepare the entire pie, without the final whipped cream topping and sprinkles, up to 1-2 days in advance. Store it covered in the refrigerator. Add the fresh whipped cream and festive decorations just before serving for the best presentation. Leftovers should also be stored covered in the refrigerator and are best enjoyed within 3-4 days. The crust might soften slightly over time, but the filling remains delicious.
-
Presentation Matters for Your Grinch Pie:
Don’t underestimate the power of presentation! A beautifully decorated Grinch Pie is even more enjoyable. For a fun touch, consider making a small “Grinch heart” out of red candy melts or fondant and placing it centrally on your pie, surrounded by the red sprinkles. Or, use a fine-tipped food-safe marker to draw a small Grinch face on a white chocolate disc placed on top! Get creative and have fun with the theme. This pie is meant to bring smiles!
Conclusion:
And there you have it, my friends! We’ve reached the delicious culmination of our journey, and I genuinely hope you’re as excited as I am about the prospect of bringing this incredible dessert to life in your own kitchen. This isn’t just any pie; it’s a vibrant, joyful, and utterly irresistible creation that promises to be the talking point of any gathering. The sheer visual appeal of its bright, festive hue alone is enough to captivate, but it’s the delightful balance of creamy sweetness with a zesty tang that truly elevates this recipe into a league of its own. We’ve explored how straightforward it is to assemble, proving that you don’t need to be a pastry chef to create something truly spectacular.
Why This Pie is a Must-Try Culinary Masterpiece
From its playful aesthetic to its melt-in-your-mouth texture, this particular dessert is destined to become a staple in your recipe repertoire, especially during the festive season. Imagine the gasps of delight as you present your freshly made, perfectly chilled Grinch Pie. Its dazzling green color, reminiscent of a certain iconic holiday character, brings an immediate sense of whimsy and fun to the table, making it an instant mood-lifter. It’s the perfect antidote to any holiday grumpiness, offering a burst of flavor that’s both comforting and exciting. This pie effortlessly combines the familiar pleasure of a creamy dessert with a unique, eye-catching presentation that sets it apart from more traditional offerings. It’s surprisingly simple to prepare, yet it yields a dessert that tastes and looks incredibly sophisticated, allowing you to impress guests with minimal stress. The ease of preparation, coupled with its undeniable “wow” factor, truly makes this a must-try recipe for anyone looking to add a touch of magic to their dessert spread without spending hours in the kitchen.
Serving Suggestions and Creative Variations to Explore
Now, let’s talk about making your Grinch Pie truly shine! While magnificent on its own, a few thoughtful additions can transform it into an even more unforgettable experience. A generous dollop of freshly whipped cream, sweetened just a touch with vanilla, is practically non-negotiable and provides a beautiful cloud-like contrast to the pie’s vibrant color. For an extra festive flourish, consider sprinkling your slices with tiny red and green nonpareils, or perhaps a delicate dusting of powdered sugar for an elegant, snow-kissed effect. A single, glistening maraschino cherry perched atop each whipped cream swirl adds a perfect pop of contrasting color and a hint of fruity sweetness. For those who love a hint of mint, a few fresh mint leaves can not only garnish beautifully but also subtly complement the pie’s refreshing notes. Thinking outside the box, you could serve individual slices alongside a steaming mug of hot chocolate or a rich, dark coffee; the slight bitterness of these beverages cuts through the pie’s sweetness wonderfully, creating a balanced palate experience.
But the fun doesn’t stop there! This recipe is incredibly adaptable, inviting you to unleash your inner culinary artist. Why not experiment with a different crust? An Oreo cookie crust would introduce a delightful chocolatey depth, turning your pie into a chocolate-mint dream, or a ginger snap crust would lend a warm, spicy undertone, perfect for a cozy winter evening. For a bolder flavor profile, a tiny splash of peppermint extract could be added to the filling, transforming it into a truly festive minty delight. Alternatively, for an even brighter, more intense citrus kick, a bit of finely grated lime zest stirred into the filling can elevate its tanginess. If you’re hosting a larger gathering or simply prefer individual portions, consider preparing this delightful dessert in mini tartlet pans or even small ramekins; these single-serving treats are charming and perfectly portion-controlled. You could even swirl in a few tablespoons of raspberry or cranberry purée just before the final chill for a stunning marbled effect, truly embracing all the festive colors of the season. The possibilities are truly endless, limited only by your imagination!
Your Invitation to Bake and Share the Joy!
So, what are you waiting for? I wholeheartedly encourage you to clear your schedule, gather your ingredients, and embark on the joyous journey of creating your very own Grinch Pie. There is an immense satisfaction that comes from bringing such a visually stunning and incredibly delicious dessert to life from scratch. Imagine the smiles it will inspire, the conversations it will spark, and the pure, unadulterated joy of that first creamy, tangy, sweet bite. This isn’t just about following a recipe; it’s about creating memories and sharing happiness through the magic of food. Once you’ve whipped up your own festive masterpiece, please, please don’t keep it to yourself! I would absolutely adore seeing your magnificent creations. Snap a picture, tell me about any creative variations you tried, and share how much joy your Grinch Pie brought to your table and to the faces of your loved ones. Your culinary adventures inspire me, and I can’t wait to see what you create. Happy baking, and happy feasting!
Grinch Pie
Grinch Pie is a festive spectacle: a vibrant, eye-catching green dessert that perfectly captures the playful spirit of everyone’s favorite holiday character. This delightful creation boasts a wonderfully creamy texture and a perfectly sweet flavor, making it a crowd-pleaser that adds a magical flourish to any dessert table. Inspired by Dr. Seuss, this easy no-bake pie is sure to make hearts grow three sizes at your next holiday gathering!
Ingredients
Instructions
Important Information
Nutrition Facts (Per Serving)
It is important to consider this information as approximate and not to use it as definitive health advice.
Allergy Information
Please check ingredients for potential allergens and consult a health professional if in doubt.