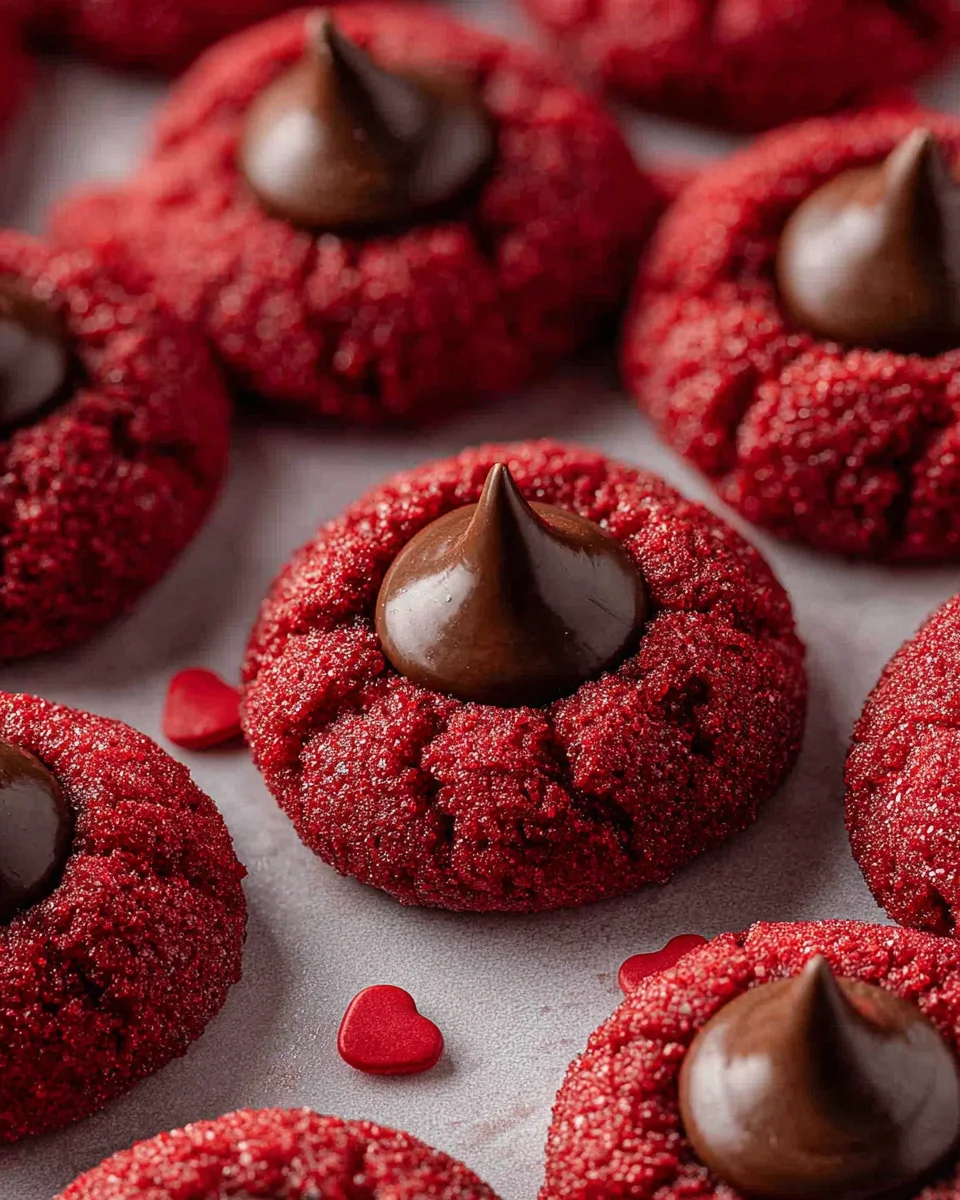
Red Velvet Blossoms Cookies are more than just a sweet treat; they are a delightful experience wrapped in stunning crimson and delicate white. Imagine biting into a soft, chewy cookie, rich with the signature subtle cocoa flavor and a hint of tang, perfectly balanced by a dusting of powdered sugar and crowned with a luscious chocolate kiss. These cookies don’t just taste incredible; they look like little jewels, making them an absolute showstopper on any dessert platter, especially during holidays or special gatherings.
The allure of red velvet itself traces back to a fascinating history, with tales of its origins ranging from luxurious Waldorf-Astoria Hotel creations to Southern comfort food during wartime rationing, where beets or cocoa powder with vinegar reacted to create its distinctive hue and tender crumb. While traditionally associated with cake, transforming this beloved flavor into a “blossom” cookie brings a charming twist to a classic. People adore these Red Velvet Blossoms Cookies not just for their striking visual appeal, which instantly brightens any occasion, but for their irresistible combination of textures and flavors. The soft, cake-like interior contrasts beautifully with the slight chewiness of the cookie and the melt-in-your-mouth chocolate center. It’s a sophisticated yet comforting flavor profile that truly captures hearts. Get ready to bake a batch that will surely earn you rave reviews!

Ingredients:
- 2 ½ cups all-purpose flour
- ½ cup unsweetened cocoa powder (natural or Dutch-processed, but natural will give a brighter red color when combined with baking soda)
- 1 teaspoon baking soda
- ¼ teaspoon salt
- 1 cup (2 sticks) unsalted butter, softened to room temperature
- 1 ¾ cups granulated sugar
- 2 large eggs, at room temperature
- 1 tablespoon vanilla extract (pure vanilla extract provides the best flavor)
- 1 tablespoon red liquid food coloring (or 1-2 teaspoons gel food coloring for a more vibrant hue)
- 1 tablespoon white vinegar (or 1 tablespoon buttermilk)
- ½ cup granulated sugar (for rolling the cookies)
- Approximately 36 unwrapped Hershey’s Kisses or similar chocolate candy, chilled slightly if your kitchen is warm
Preparing the Red Velvet Cookie Dough
- Bring your ingredients to room temperature: Before you even think about mixing, ensure your butter and eggs are at room temperature. This is a crucial step for achieving a smooth, well-emulsified dough that bakes evenly. Room temperature butter creams beautifully with sugar, incorporating air for a light texture, while cold butter might result in a lumpy mixture. Similarly, room temperature eggs integrate more seamlessly into the batter, preventing curdling. I usually take them out of the fridge about an hour before I plan to bake.
- Whisk together the dry ingredients: In a medium bowl, combine the all-purpose flour, unsweetened cocoa powder, baking soda, and salt. Whisk these dry ingredients together thoroughly for about 30 seconds to a minute. This ensures that the leavening agent (baking soda) and salt are evenly distributed throughout the flour, which is vital for uniform rising and consistent flavor in your finished Red Velvet Blossoms Cookies. Set this bowl aside for now.
- Cream the butter and sugar: In the bowl of a stand mixer fitted with the paddle attachment, or with a large bowl and a handheld electric mixer, cream together the softened unsalted butter and 1 ¾ cups of granulated sugar. Beat on medium-high speed for about 3-5 minutes, or until the mixture is light, fluffy, and pale in color. This process is called creaming, and it’s where you incorporate air into the butter and sugar, which contributes significantly to the cookie’s texture. Scrape down the sides of the bowl occasionally to ensure everything is well combined. You’ll notice the texture transform from dense to wonderfully airy.
-
Add eggs and flavorings: Reduce the mixer speed to medium-low and add the eggs, one at a time, beating well after each addition until just combined. Don’t overmix here; you just want to see the yolk disappear into the mixture. Follow with the vanilla extract, red liquid food coloring (or gel food coloring), and white vinegar. The vinegar, or buttermilk if you opted for that, reacts with the baking soda to create the characteristic tang of red velvet and helps to deepen the red color, especially if you’re using natural cocoa powder. Increase the speed to medium and beat until the color is evenly distributed and vibrant. This might take another minute or two. You want to see that beautiful, deep red hue that signals classic red velvet.
Choosing the Right Red Food Coloring:
For the best results with Red Velvet Blossoms Cookies, I highly recommend using a high-quality gel food coloring. While liquid food coloring works, you often need more of it, which can sometimes alter the dough’s consistency. Gel colors are concentrated and deliver a much more intense, vibrant red with less product, giving your cookies that iconic look without compromise.
- Incorporate the dry ingredients: With the mixer on low speed, gradually add the dry ingredient mixture to the wet ingredients, mixing until just combined. Be careful not to overmix the dough once the flour is added. Overmixing can develop the gluten in the flour too much, leading to tough, dense cookies instead of the soft, chewy Red Velvet Blossoms Cookies we’re aiming for. Stop mixing as soon as you no longer see streaks of dry flour. The dough will be quite soft and sticky at this stage.
- Chill the dough (optional but recommended): While you can technically bake these cookies immediately, I find that chilling the dough for at least 30 minutes (or up to 2 hours) makes it much easier to handle and helps prevent the cookies from spreading too much during baking. Wrap the dough loosely in plastic wrap or cover the bowl, and place it in the refrigerator. This brief chilling period allows the flour to fully hydrate and the fats to firm up, resulting in a more cohesive dough and perfectly shaped cookies.
Forming and Baking the Red Velvet Blossoms
- Preheat your oven and prepare your baking sheets: While the dough is chilling, or once you’re ready to bake, preheat your oven to 350°F (175°C). Line two large baking sheets with parchment paper or silicone baking mats. This prevents sticking and makes cleanup a breeze. I always use parchment paper for consistent baking and easy transfer of the finished cookies. Also, unwrap all your Hershey’s Kisses and set them aside. They need to be ready to go as soon as the cookies come out of the oven.
- Prepare the coating sugar: Pour the remaining ½ cup of granulated sugar into a small, shallow bowl. This sugar will be used to coat the cookie dough balls, giving the Red Velvet Blossoms Cookies a lovely sparkly finish and a slight textural contrast.
- Scoop and roll the dough: Using a small cookie scoop (about 1.5 tablespoons) or by hand, scoop out portions of the chilled dough. Roll each portion into a smooth ball, approximately 1 inch in diameter. This size is perfect for a classic blossom cookie. After rolling, gently roll each dough ball in the bowl of granulated sugar, ensuring it’s evenly coated. The sugar coating will add a beautiful sparkle and a delightful textural crunch to the edges of your baked cookies.
- Arrange on baking sheets: Place the sugar-coated dough balls onto the prepared baking sheets, leaving about 2 inches of space between each cookie. These cookies will spread a bit as they bake, so adequate spacing is important to prevent them from merging into one giant cookie blob. I typically fit about 12 cookies per standard baking sheet.
-
Bake the cookies: Bake one sheet at a time in the preheated oven for 9-11 minutes. The exact baking time can vary depending on your oven, so keep a close eye on them. The cookies are done when the edges are just set and slightly golden, but the centers still look soft and slightly puffy. They might not look fully cooked in the middle, but trust me, they will continue to set as they cool on the baking sheet. Overbaking will result in dry, crumbly cookies, and we want soft, chewy Red Velvet Blossoms Cookies!
Signs of Perfectly Baked Red Velvet Blossoms:
Look for cookies that have puffed up nicely, show a slight crackle on the surface, and are set around the edges. The center should still appear somewhat soft; this is key to their chewy texture.
- Add the chocolate kisses immediately: This step is time-sensitive! As soon as you remove the baking sheet from the oven, immediately press one unwrapped Hershey’s Kiss gently but firmly into the center of each warm cookie. The warmth of the cookie will slightly melt the base of the chocolate, helping it adhere perfectly and creating that signature “blossom” effect. Be careful not to press too hard, or the cookie might crumble. If you wait too long, the cookies will cool and the chocolate won’t stick properly, or it won’t create that lovely melted base.
- Cool the cookies: Let the cookies cool on the baking sheet for about 5-10 minutes. This allows them to firm up slightly before you attempt to move them. The chocolate will also continue to soften and then set. After this initial cooling period, carefully transfer the Red Velvet Blossoms Cookies to a wire rack to cool completely. Allowing them to cool on a wire rack ensures air circulation all around the cookie, preventing the bottoms from becoming soggy and helping the chocolate to fully set. The chocolate kisses will take a while to firm up completely, especially if your kitchen is warm. If you’re in a hurry, you can pop the cooled-down cookies into the refrigerator for about 15-20 minutes to speed up the chocolate setting process.
Storage and Serving Suggestions
- Store your Red Velvet Blossoms Cookies: Once completely cooled and the chocolate is fully set, store these delightful Red Velvet Blossoms Cookies in an airtight container at room temperature for up to 3-5 days. If your home is particularly warm, or if you want to extend their freshness, you can store them in the refrigerator, but allow them to come to room temperature for about 15-20 minutes before serving for the best texture and flavor. The cold can make the cookies a bit firm, and the chocolate even harder, so bringing them back to room temperature really allows their softness to shine through.
- Freezing for later: These cookies also freeze beautifully! Once completely cooled and the chocolate is firm, arrange them in a single layer on a baking sheet and freeze until solid (about 1-2 hours). Then transfer the frozen cookies to a freezer-safe airtight container or bag, separating layers with parchment paper to prevent sticking. They can be frozen for up to 2-3 months. To enjoy, simply thaw them at room temperature for a few hours. This is a fantastic way to prepare a batch in advance for holiday gatherings or unexpected guests.
- Serving suggestions: These Red Velvet Blossoms Cookies are perfect on their own, but they also pair wonderfully with a glass of cold milk, a warm cup of coffee, or even a robust hot chocolate. Their vibrant red color and festive appearance make them an ideal treat for holidays like Valentine’s Day or Christmas, or simply to brighten any ordinary day. They also make a fantastic addition to a cookie platter or as a thoughtful homemade gift. I often package them in small cellophane bags with a ribbon for friends and family; they are always a huge hit! The soft, chewy texture of the red velvet cookie combined with the creamy, melting chocolate kiss is a truly irresistible combination that brings joy with every bite.
Conclusion:
So, there you have it! We’ve journeyed through the simple steps to create a truly spectacular treat, and I hope you’re as excited as I am about the prospect of bringing these beauties to life in your own kitchen. At its heart, this recipe isn’t just about baking; it’s about crafting moments of pure joy and indulgence. What truly makes these cookies a must-try is their undeniable charm and irresistible flavor profile. The vibrant, deep red hue immediately catches the eye, promising a festive spirit even before the first bite. But it’s the texture that truly seals the deal: a perfectly soft, tender, and chewy cookie base that practically melts in your mouth, providing that signature red velvet experience we all adore. The subtle hint of cocoa, combined with the slight tang from the buttermilk (or its clever substitute), creates a complex yet comforting flavor that is both familiar and utterly delightful. And let’s not forget the surprise chocolate kiss nestled right in the center, adding a creamy, melty finish that elevates each cookie from simply good to absolutely unforgettable. These aren’t just any cookies; they are a celebration in miniature, easy enough for a beginner to master yet impressive enough to wow even the most discerning palates. Imagine the aroma filling your home as they bake – a sweet, warm embrace that promises something truly special is coming out of the oven. These are the Red Velvet Blossoms Cookies you’ll want to make again and again.
Serving Suggestions and Creative Variations:
But the magic doesn’t have to stop once these delicious cookies cool. Part of the fun of baking is experimenting and finding new ways to enjoy your creations. For a classic pairing, nothing beats a tall glass of cold milk, allowing the rich flavors of the cookie and chocolate to truly shine. They also make an exquisite companion to your morning coffee or an afternoon cup of tea, adding a touch of elegance to your daily ritual. Thinking beyond the everyday, these Red Velvet Blossoms Cookies are an absolute showstopper on any holiday cookie platter, their striking color standing out beautifully amongst other festive treats. They make incredibly thoughtful homemade gifts, tucked into a decorative box or tied with a festive ribbon, perfect for sharing with friends, family, or appreciative neighbors.
Now, for those who love to get creative, consider these delightful variations. While a milk chocolate kiss is traditional and wonderful, feel free to experiment with other types of chocolate candies for the center. White chocolate kisses would offer a beautiful color contrast and a sweeter, creamier note, while dark chocolate kisses would intensify the cocoa experience. You could even try mini peanut butter cups for a delightful sweet and salty twist, or caramel-filled chocolates for an extra layer of gooey indulgence. Don’t be afraid to play with extracts in the dough; a touch of almond extract can enhance the flavor, or a hint of peppermint extract could transform them into a festive winter treat, especially when paired with a dark chocolate center. For an extra touch of sophistication, consider a light dusting of powdered sugar once the cookies are completely cool, or a delicate drizzle of melted white chocolate over the finished cookie. You could even make them mini-sized for bite-sized party treats, simply adjusting the baking time slightly. The possibilities are truly endless, allowing you to personalize this beloved recipe to your heart’s content.
Your Turn to Bake and Share!
I genuinely hope that reading through this recipe has inspired you to preheat your oven and dive into the delightful world of baking these stunning Red Velvet Blossoms Cookies. Trust me, the smiles they will bring to your loved ones’ faces, and the sheer satisfaction of creating something so beautiful and delicious from scratch, are rewards in themselves. Don’t hesitate to gather your ingredients, turn on some music, and let the joy of baking fill your kitchen. Once you’ve baked your batch, I would absolutely love to hear about your experience! Did you stick to the classic? Did you try a fun variation? Please share your stories, your tips, and especially your beautiful photos with me. Your creations inspire me and fellow bakers alike. So go on, give these incredible cookies a try – I promise you won’t regret it!
Red Velvet Blossoms Cookies
Red Velvet Blossoms Cookies are more than just a sweet treat; they are a delightful experience wrapped in stunning crimson and delicate white. Imagine biting into a soft, chewy cookie, rich with the signature subtle cocoa flavor and a hint of tang, perfectly balanced by a dusting of powdered sugar and crowned with a luscious chocolate kiss. These cookies don’t just taste incredible; they look like little jewels, making them an absolute showstopper on any dessert platter, especially during holidays or special gatherings.
Ingredients
Instructions
Important Information
Nutrition Facts (Per Serving)
It is important to consider this information as approximate and not to use it as definitive health advice.
Allergy Information
Please check ingredients for potential allergens and consult a health professional if in doubt.