Festive Christmas Fruitcake Traybake – the very name conjures images of cozy holiday gatherings and the unmistakable aroma of spices and dried fruit. But what if I told you that achieving that classic taste and texture doesn’t have to involve weeks of “feeding” a traditional fruitcake or the stress of a complex baking project? I’m absolutely delighted to share a recipe that brings all the beloved elements of a traditional Christmas fruitcake into an incredibly convenient and utterly delicious traybake format.
This isn’t just any fruitcake; it’s a celebration of holiday heritage made accessible. Fruitcake has a storied past, dating back centuries as a staple for preserving fruits and an essential part of festive celebrations across many cultures, symbolizing abundance and good fortune. Our modern take on this classic honors that tradition while simplifying the process. People adore this dish for its deep, comforting flavors, the wonderful chewiness of the candied fruits, the satisfying crunch of nuts, and its incredibly moist, rich crumb. It’s perfect for slicing and sharing with guests, a thoughtful edible gift, or simply enjoying with a warm cup of tea by the fire. The brilliance of this particular Festive Christmas Fruitcake Traybake lies in its ease of preparation without compromising on that authentic, celebratory taste we all look forward to each holiday season.

Ingredients:
- For the Soaked Fruit Medley:
- 300g (about 2 cups) mixed dried fruit (currants, sultanas, raisins) – I love a good quality mix for depth of flavour.
- 100g (about ⅔ cup) glace cherries, halved or quartered – these add a lovely pop of colour and sweetness.
- 50g (about ¼ cup) candied peel, finely chopped – a classic fruitcake ingredient!
- 50g (about ¼ cup) dried apricots or cranberries, chopped – for a little extra tang and chewiness.
- 125ml (½ cup) brandy, dark rum, or strong cold tea (for a non-alcoholic option) – this is where the magic starts to happen!
- For the Fruitcake Batter:
- 225g (1 cup) unsalted butter, softened – make sure it’s truly soft for easy creaming.
- 225g (1 cup packed) dark brown sugar – this gives our cake that rich, caramelised flavour and moist texture.
- 4 large eggs, at room temperature – room temperature eggs emulsify much better.
- 1 tbsp black treacle or molasses – for an extra layer of deep, rich sweetness and colour.
- Zest of 1 orange – brightens everything up!
- Zest of 1 lemon – another burst of freshness.
- 300g (2 ½ cups) plain (all-purpose) flour – I always sift my flour for a lighter batter.
- 1 tsp baking powder – to give our traybake a gentle lift.
- ½ tsp salt – balances the sweetness beautifully.
- 2 tsp ground mixed spice – the quintessential Christmas flavour.
- 1 tsp ground cinnamon – warming and fragrant.
- ½ tsp ground nutmeg – freshly grated is always best if you have it!
- Optional: 50g (about ½ cup) chopped pecans or almonds – for added crunch and nutty flavour.
- For the Glaze and Decoration:
- 3 tbsp apricot jam – for that classic glossy fruitcake finish.
- 1 tbsp hot water or extra brandy/rum – to loosen the jam.
- A selection of glace cherries, blanched almonds, or festive sprinkles for decorating – let your festive spirit shine!
Phase 1: Preparing Your Festive Fruit Medley
-
Gather and Chop Your Fruits:
First things first, let’s get those delicious dried fruits ready. I like to take all my mixed dried fruit, glace cherries (halving or quartering the larger ones so they distribute nicely throughout the cake), candied peel, and any chopped apricots or cranberries, and place them into a large, heatproof mixing bowl. If your dried fruits feel a bit clumpy, gently separate them with your fingers. This ensures that every piece gets properly hydrated and infused with flavour. This initial step is crucial for achieving that characteristic moistness in our Festive Christmas Fruitcake Traybake.
-
Infuse with Flavour:
Now for the star of the show: the liquid! Pour your chosen liquid – be it rich brandy, dark rum, or strong cold tea – directly over the fruit in the bowl. I find the alcohol really brings out the deep flavours of the dried fruit and helps preserve the cake beautifully, but a strong brew of black tea works wonderfully for a non-alcoholic version, offering similar plumping and flavour-enhancing benefits. Make sure all the fruit is well coated in the liquid.
-
Soak and Hydrate:
Give the fruit and liquid a good stir to ensure everything is evenly distributed. Then, cover the bowl tightly with cling film or a clean kitchen towel. Now, the waiting game begins! Ideally, I let this mixture sit at room temperature for at least 24 hours, or even up to 3-5 days if I’m planning ahead. The longer it soaks, the plumper and more flavourful your fruit will become, truly absorbing all that lovely liquid. If you’re soaking for multiple days, give it a stir once a day to redistribute the liquid. This patient soaking process is a key secret to a truly spectacular fruitcake.
Phase 2: Crafting the Rich Fruitcake Batter
-
Preheat and Prepare Your Tray:
When you’re ready to bake, begin by preheating your oven. I usually set mine to 150°C (300°F) for fruitcakes because they benefit from a slower, gentler bake to prevent burning the edges while ensuring the centre cooks through. Next, prepare a 23x33cm (9×13-inch) baking tray. Grease it thoroughly with butter or a baking spray. Then, line the base and sides with baking parchment, leaving a slight overhang on the longer sides to make it easier to lift the cake out later. For fruitcakes, I often double-line the sides with parchment, creating a slight collar above the tin, and even wrap the outside of the tin with a layer of brown paper or newspaper, secured with string. This acts as extra insulation, preventing the edges of the cake from over-browning or drying out.
-
Sift Your Dry Ingredients:
In a medium bowl, combine your plain flour, baking powder, salt, ground mixed spice, ground cinnamon, and ground nutmeg. Sifting these ingredients together isn’t just about removing lumps; it also aerates the flour, which contributes to a lighter crumb, and ensures all the spices and leavening agents are evenly distributed throughout the mixture. Give it a whisk after sifting to be extra sure.
-
Cream Butter and Sugar:
In a large mixing bowl, or the bowl of your stand mixer fitted with the paddle attachment, add your softened unsalted butter and dark brown sugar. Beat them together on medium speed until the mixture is beautifully light, fluffy, and pale in colour. This creaming process incorporates air into the batter, which is fundamental for the cake’s texture. It usually takes a good 5-7 minutes, so don’t rush this step. Achieving a truly light and airy creamed mixture is absolutely vital for a moist fruitcake.
-
Incorporate Eggs and Treacle:
With the mixer still running on medium-low, add the eggs one at a time, beating well after each addition. If the mixture looks like it’s starting to curdle slightly (which can happen if the eggs are too cold or added too quickly), don’t panic! Just add a tablespoon of the sifted flour mixture and continue beating. The flour helps to re-emulsify the batter. Once all the eggs are incorporated, beat in the black treacle (or molasses) and the vibrant orange and lemon zests. Oh, the aroma at this stage is just heavenly – truly starting to smell like Christmas!
-
Fold in Dry Ingredients:
Reduce your mixer speed to low, or switch to a spatula for this part. Gradually add the sifted flour and spice mixture to the wet ingredients. Mix just until combined. It’s really important not to overmix at this stage, as overmixing can develop the gluten in the flour, leading to a tough cake. We want a tender, crumbly fruitcake, not a dense, chewy one.
-
Add the Star of the Show – Your Soaked Fruit:
Now for the grand finale of the batter-making! Gently fold in your beautifully plump, soaked fruit and any optional chopped nuts (like pecans or almonds) into the batter. I use a large spatula for this, making sure to scrape down the sides of the bowl and fold from the bottom up, ensuring that the fruit is evenly distributed throughout the mixture. We want every slice of our Festive Christmas Fruitcake Traybake to be bursting with fruit! Take your time with this, ensuring no clumps of fruit remain and the batter is thoroughly mixed.
Phase 3: Baking Your Festive Christmas Fruitcake Traybake
-
Transfer to the Tray and Smooth:
Carefully spoon the rich fruitcake batter into your prepared baking tray. Use the back of a spoon or an offset spatula to gently spread the mixture evenly into all corners, smoothing the top. This ensures an even bake and a beautifully presented traybake once it’s cooked. I often make a slight dip in the centre of the batter, as fruitcakes tend to rise more around the edges.
-
Bake Slowly and Gently:
Place the tray into your preheated oven. Bake for approximately 1 hour and 30 minutes to 2 hours. Fruitcakes are best baked at a lower temperature for a longer time to ensure they cook through without drying out or burning on the surface. Around the 1-hour mark, I like to check on it. If the top seems to be browning too quickly, loosely cover the tray with a piece of foil to prevent further browning. This gentle baking process is key to the perfect texture of your Festive Christmas Fruitcake Traybake.
-
Test for Doneness:
To check if your fruitcake is cooked through, insert a long, thin wooden skewer or cake tester into the centre of the cake. It should come out clean, with no wet batter attached. If there’s still wet batter, return it to the oven for another 10-15 minutes and test again. Remember that ovens can vary, so use the cooking time as a guide, and rely on the skewer test for accuracy. The top should be a beautiful deep golden brown, and the edges should feel firm to the touch.
-
Cooling Process:
Once baked, remove the traybake from the oven and let it cool in the tray for about 15-20 minutes. This initial cooling in the hot tray allows the cake to firm up gently and prevents it from breaking when you try to move it. After this time, carefully lift the cake out of the tray using the parchment overhangs and transfer it to a wire rack to cool completely. It’s important for fruitcake to cool completely before slicing or decorating. This can take several hours, or even overnight. Patience is a virtue when making fruitcake!
Phase 4: Nurturing and Decorating Your Traybake
-
“Feeding” Your Fruitcake (Optional, but Recommended!):
For an even more delicious and moist fruitcake, I highly recommend “feeding” it. Once your Festive Christmas Fruitcake Traybake is completely cool, take a skewer and prick several holes all over the top surface. Then, very gently spoon or brush a tablespoon or two of extra brandy, rum, or strong cold tea over the surface, allowing it to soak into the cake. Wrap the cake tightly in baking parchment, then in foil, and store it in an airtight container in a cool, dark place. You can repeat this “feeding” process once a week for 2-3 weeks before serving. This truly enhances the flavour and keeps the cake incredibly moist.
-
Prepare Your Festive Glaze:
When you’re ready to decorate your magnificent Festive Christmas Fruitcake Traybake, it’s time for the glaze. In a small saucepan or microwave-safe bowl, gently heat the apricot jam with 1 tablespoon of hot water or extra brandy/rum. Stir continuously until the jam has melted and become a smooth, pourable consistency. If you want a perfectly clear glaze, you can push the melted jam through a fine-mesh sieve to remove any fruit pieces.
-
Apply the Glossy Finish:
Using a pastry brush, generously brush the warm apricot glaze all over the top surface of your cooled fruitcake. The glaze will set as it cools, providing that classic shiny, slightly sticky finish that we all love on fruitcakes. This not only makes it look beautiful but also helps to seal in the moisture.
-
Decorate with Festive Flair:
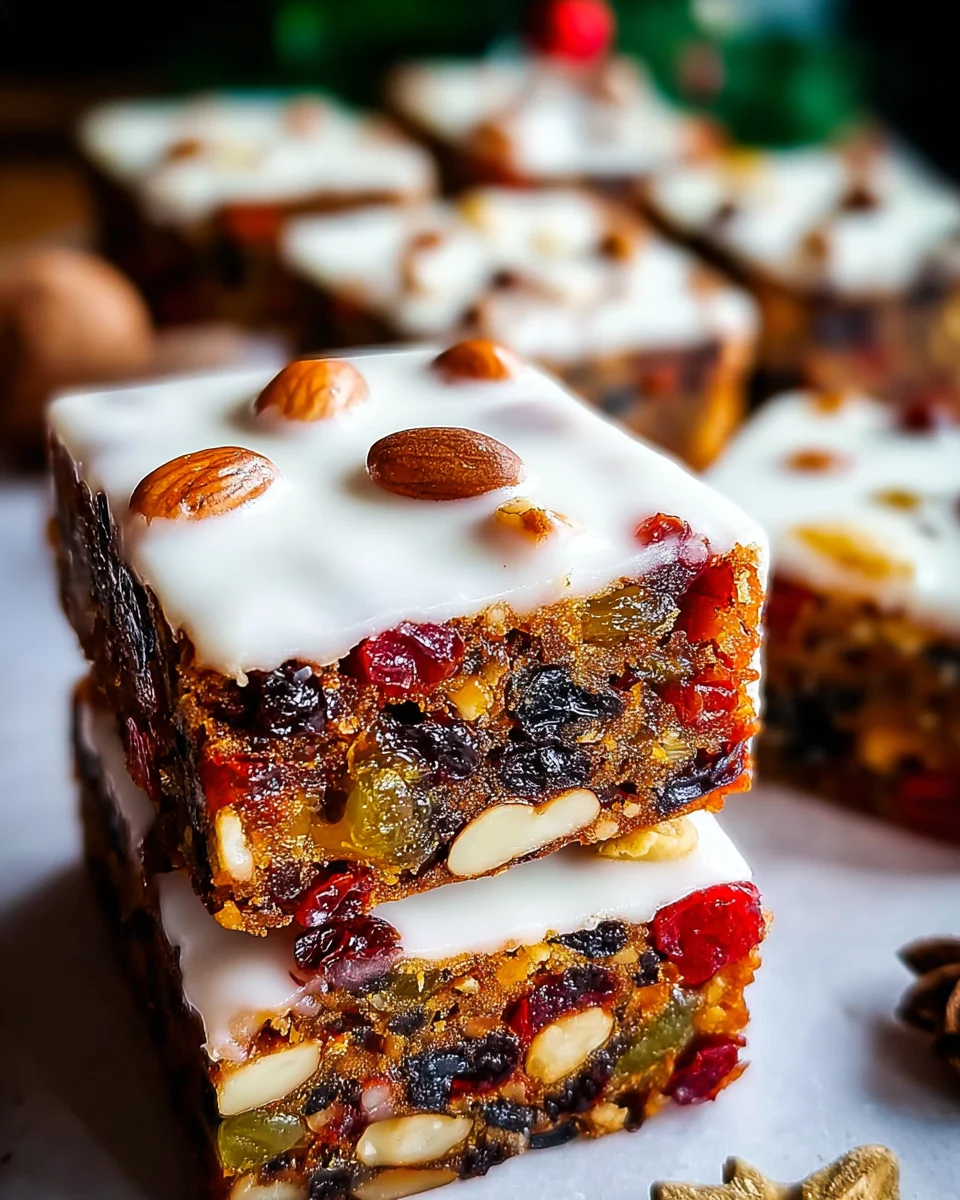
Now for the fun part – making it look truly festive! Arrange your glace cherries, blanched almonds, or a sprinkling of festive edible glitter or sprinkles on top of the still-wet glaze. You can create a beautiful pattern, or simply scatter them artfully. I love creating a wreath-like pattern with the cherries and almonds around the edge, leaving the centre for a lovely dust of icing sugar. Let your creativity run wild! This final flourish is what truly makes this a spectacular Festive Christmas Fruitcake Traybake, ready to impress your family and friends.
-
Storage and Serving:
Once decorated, allow the glaze to set completely. Store your traybake in an airtight container in a cool, dark place. It will keep beautifully for several weeks, and in fact, the flavours only improve over time. When ready to serve, slice into squares or rectangles. This fruitcake is absolutely wonderful on its own, with a cup of tea or coffee, or even served with a dollop of clotted cream or a slice of mature cheddar cheese for a truly traditional experience. Enjoy every rich, fruity, and wonderfully spiced bite!
Conclusion:
And there you have it, my friends! We’ve reached the delicious culmination of our culinary journey, and I genuinely hope you’re feeling as inspired as I am to whip up this absolute winner. What makes this recipe a true gem, a definite must-try in your festive baking repertoire, is its unparalleled blend of convenience and classic, comforting flavor. Forget the days of labor-intensive, hours-long baking marathons; this delightful traybake offers all the rich, aromatic complexity of a traditional fruitcake without any of the fuss. It’s incredibly forgiving, perfect for both seasoned bakers and those just starting their holiday kitchen adventures. The way the fruits meld with the spices, creating that irresistible depth of flavor, is truly something special. Each bite is a warm hug, a sweet reminiscence of holidays past, and a promise of joyous moments to come, making it an ideal centerpiece for any gathering. The ease with which this comes together, coupled with its incredible taste, makes it an undeniable addition to your holiday baking list.
The beauty of this particular creation lies not only in its ease but also in its incredible versatility. While it’s undeniably superb on its own, perhaps with a simple cup of tea or a robust coffee on a chilly afternoon, there are so many ways to elevate the experience. Imagine a slice served warm, perhaps with a generous dollop of velvety brandy butter or a cloud of freshly whipped cream – pure indulgence! For those with a sweet tooth, a scoop of vanilla bean ice cream melting gently over a warm piece is an absolute revelation, creating a delightful contrast in temperatures and textures. It also cuts beautifully into elegant squares, making it perfect for a festive dessert platter, mingling effortlessly with other treats, or even as a sophisticated canapé. Don’t forget a simple dusting of icing sugar for a beautiful, snowy finish that truly enhances its holiday charm and makes it look even more appealing. Alternatively, a thin drizzle of a simple citrus glaze, made with icing sugar and a squeeze of orange or lemon juice, can add a bright, zesty counterpoint that tantalizes the taste buds.
But why stop there? This recipe is a fantastic canvas for your own creativity. Feel free to experiment with different combinations of dried fruits – perhaps adding some tangy dried cranberries, exotic candied ginger, or even some delicate glacé cherries for an extra pop of color and chewiness. If you’re a fan of nuts, a handful of toasted pecans or walnuts folded into the batter will introduce a lovely crunch and earthy undertone. For an adults-only version, soaking the dried fruits in a splash of your favorite festive spirit – rum, brandy, or even an orange liqueur – overnight will infuse the entire traybake with an even deeper, more complex aroma and flavor profile, making it truly irresistible. You could also try adding a touch of orange zest directly into the batter for an extra layer of bright flavor. For a truly luxurious touch, a simple cream cheese frosting could transform it into an even more decadent dessert, perfect for a special occasion, turning it into a festive fruitcake layer. The possibilities are as endless as your imagination, allowing you to tailor this delicious treat to your exact preferences and dietary needs, perhaps even trying a gluten-free flour blend.
Ultimately, this isn’t just a recipe; it’s an invitation to create memories, to fill your home with the intoxicating scents of the season, and to share something truly special with your loved ones. I genuinely hope you’ll give this wonderful creation a try, because I am confident it will become a cherished part of your holiday traditions. It’s comforting, it’s celebratory, and it’s genuinely satisfying to bake and to eat. There’s an immense sense of pride that comes from presenting a homemade treat, especially one as universally adored and beautifully presented as this one. The Festive Christmas Fruitcake Traybake truly embodies the spirit of giving and togetherness, wrapped up in every delicious, spice-infused bite. It’s a guaranteed crowd-pleaser that will have everyone asking for your secret recipe.
So, go ahead! Gather your ingredients, put on some cheerful holiday music, and let the magic happen. When you do try it, I would absolutely love to hear about your experience. Did you make any exciting variations? What was your favorite serving suggestion? Perhaps you discovered a new pairing or decorated it in a unique way? Please share your stories, your triumphs, and even your creative tweaks in the comments or on social media. Your insights inspire me and help our whole community of home bakers discover new ways to enjoy our favorite treats! Happy baking, and may your kitchen be filled with warmth, joy, and the irresistible aroma of this incredible holiday delight.
Festive Christmas Fruitcake Traybake
A convenient and delicious take on traditional Christmas fruitcake, this traybake offers deep, comforting flavors, chewy fruits, and a moist crumb. Simplified for ease without sacrificing authentic taste, it’s perfect for holiday sharing, gifting, or a cozy treat.
Ingredients
Instructions
Important Information
Nutrition Facts (Per Serving)
It is important to consider this information as approximate and not to use it as definitive health advice.
Allergy Information
Please check ingredients for potential allergens and consult a health professional if in doubt.