Decadent Oreo Red Velvet Cheesecake Drip Cake Recipe is not just a dessert; it’s an experience, a masterpiece born from the fusion of three beloved classics. Have you ever dreamed of a dessert that truly has it all – the velvety allure of red velvet cake, the rich tang of cheesecake, and the irresistible crunch of America’s favorite cookie? Prepare to have your culinary dreams come true, as I guide you through crafting a show-stopping cake that promises to be the centerpiece of any celebration and leave a lasting impression on everyone who tastes it.
The journey to this ultimate dessert begins with understanding its revered components. Red velvet cake, with its distinct cocoa flavor and vibrant hue, hails from the American South, often associated with elegant gatherings and celebratory occasions. Cheesecake, on the other hand, boasts an ancient lineage, with origins tracing back to ancient Greece, evolving over centuries into the creamy delight we know today. And then there’s the Oreo, a timeless cookie that brings a nostalgic charm and delightful texture to every bite. This extraordinary fusion represents the best of modern baking innovation, combining classic comfort with sophisticated indulgence in a truly spectacular way.
Why This Cake Will Steal the Show
People absolutely adore this dish because it delivers on every front, offering a complex yet harmonious flavor profile that is simply irresistible. Imagine slicing into layers of moist, cocoa-infused red velvet cake, separated by a creamy, luscious Oreo cheesecake layer, all enrobed in a velvety cream cheese frosting and finished with a dramatic chocolate drip and even more crushed Oreos. It’s a symphony of flavors and textures – the slight tartness of the cream cheese perfectly balances the sweetness, while the varied textures from the moist cake to the smooth cheesecake and crunchy cookies create an unforgettable sensory journey. This Decadent Oreo Red Velvet Cheesecake Drip Cake Recipe is truly a labor of love that pays off with every single forkful, promising gasps of delight and requests for seconds from all who taste it. Get ready to bake a memory!

Ingredients:
-
For the Decadent Red Velvet Cake Layers:
- 2 ½ cups (300g) all-purpose flour, spooned and leveled
- 1 ½ teaspoons baking soda
- 1 teaspoon cocoa powder, unsweetened (natural, not Dutch-processed, as we’re using baking soda)
- ½ teaspoon salt
- 1 cup (226g) unsalted butter, softened to room temperature
- 2 cups (400g) granulated sugar
- 2 large eggs, at room temperature
- 1 teaspoon pure vanilla extract
- 1 cup (240ml) buttermilk, at room temperature
- 2 tablespoons (30ml) red food coloring (gel preferred for intense color, I love Wilton’s or Americolor’s Super Red)
- 1 teaspoon white vinegar (this reacts with the baking soda to create that signature red velvet lift and tang)
-
For the Creamy Oreo Cheesecake Layer:
-
For the Oreo Crust:
- 20-22 Oreo cookies (about 1 ½ cups crushed), whole cookies including the cream filling
- 4 tablespoons (56g) unsalted butter, melted
-
For the Cheesecake Filling:
- 24 ounces (680g) full-fat cream cheese, softened to room temperature (three 8-ounce blocks)
- ¾ cup (150g) granulated sugar
- 2 large eggs, at room temperature
- 1 teaspoon pure vanilla extract
- ¼ cup (60g) sour cream, full-fat and at room temperature (this adds to the creaminess!)
- 10-12 Oreo cookies, roughly chopped (you can adjust this to your preference for chunkiness)
-
For the Dreamy Cream Cheese Frosting:
- 16 ounces (450g) full-fat cream cheese, very cold (this helps stabilize the frosting)
- 1 cup (226g) unsalted butter, softened to room temperature
- 6-8 cups (720-960g) powdered sugar, sifted (adjust to your desired sweetness and consistency)
- 2 teaspoons pure vanilla extract
- 2-4 tablespoons heavy cream or milk, as needed for consistency
-
For the Silky Chocolate Ganache Drip:
- 4 ounces (113g) good quality semi-sweet or dark chocolate, finely chopped
- ½ cup (120ml) heavy cream
-
For Decoration:
- 10-15 additional Oreo cookies, whole or roughly chopped, for garnishing the top and sides of the cake
Preparing the Decadent Red Velvet Cake Layers
- Preheat and Prepare: My first step is always to get the oven ready! Preheat your oven to 350°F (175°C). Then, grease and flour three 8-inch round cake pans. If you want to be extra careful, line the bottoms with parchment paper as well. This ensures our beautiful red velvet cakes slide out perfectly.
- Combine Dry Ingredients: In a medium bowl, I whisk together the all-purpose flour, baking soda, cocoa powder, and salt. Make sure to whisk them really well to ensure everything is evenly distributed. This is crucial for a consistent crumb.
- Cream Butter and Sugar: In a large mixing bowl, using either a stand mixer with the paddle attachment or a hand-held mixer, I cream together the softened butter and granulated sugar on medium speed until the mixture is light, fluffy, and pale in color. This usually takes about 3-5 minutes. Don’t rush this step; it’s essential for creating air in your cake.
- Add Eggs and Vanilla: Now, I add the eggs, one at a time, beating well after each addition until fully incorporated. Then, I stir in the vanilla extract. Scrape down the sides of the bowl to ensure everything is mixing evenly.
- Prepare Buttermilk Mixture: In a separate small bowl or liquid measuring cup, I combine the buttermilk, red food coloring, and white vinegar. Give it a quick stir. You’ll notice the vinegar reacting slightly with the baking soda in the dry ingredients later, which is exactly what we want!
- Alternate Wet and Dry: With the mixer on low speed, I gradually add the dry ingredients to the wet ingredients in three additions, alternating with the buttermilk mixture in two additions, beginning and ending with the dry ingredients. For example, add a third of the dry, mix until just combined, then half of the buttermilk mixture, mix, then another third of the dry, and so on. Be careful not to overmix! Overmixing develops gluten, which can lead to a tough cake. I always stop mixing as soon as the last streaks of flour disappear.
- Divide and Bake: Divide the batter evenly among your three prepared cake pans. I like to use a kitchen scale for this to ensure my layers are perfectly uniform, but you can eyeball it too. Bake for 25-30 minutes, or until a wooden skewer or toothpick inserted into the center of a cake comes out clean.
- Cooling Process: Once baked, I let the cakes cool in their pans on a wire rack for about 10-15 minutes. This allows them to firm up slightly. Then, I carefully invert them onto the wire rack, remove the pans, and peel off the parchment paper (if used). Let them cool completely before frosting, otherwise, your frosting will melt and slide right off!
Crafting the Creamy Oreo Cheesecake Layer
For the Oreo Crust:
- Prepare the Pan: For this cheesecake, I like to use an 8-inch springform pan. It’s essential to prepare it properly to prevent sticking and leaks. I grease the bottom and sides, then wrap the outside of the pan securely with a double layer of heavy-duty aluminum foil. This is crucial if you’re using a water bath, which I highly recommend for a crack-free cheesecake!
- Crush the Oreos: In a food processor, I pulse the whole Oreo cookies (cream filling included!) until they form fine crumbs. If you don’t have a food processor, you can place them in a zip-top bag and crush them with a rolling pin – it’s a great stress reliever!
- Make the Crust: In a medium bowl, I combine the Oreo crumbs with the melted butter. Stir until the crumbs are evenly moistened. Press this mixture firmly and evenly into the bottom of your prepared springform pan. You can use the bottom of a glass or your fingers to get it nice and compact.
- Chill the Crust: Pop the pan into the freezer for about 10-15 minutes while you prepare the filling. This helps to set the crust and prevents it from crumbling when you cut into the cheesecake later.
For the Cheesecake Filling:
- Cream the Cream Cheese: In a large mixing bowl, using a stand mixer with the paddle attachment or a hand-held mixer, I beat the softened cream cheese on medium speed until it is completely smooth and free of lumps. This is incredibly important; lumps at this stage mean lumps in your finished cheesecake. Take your time!
- Add Sugar: Gradually add the granulated sugar to the cream cheese, continuing to beat on medium speed until it’s well combined and the mixture looks creamy, about 2-3 minutes. Scrape down the sides of the bowl often.
- Incorporate Eggs and Vanilla: Reduce the mixer speed to low. Add the eggs, one at a time, mixing just until each egg is incorporated. Overmixing eggs can introduce too much air, which can cause cracks in your cheesecake. Finally, stir in the vanilla extract.
- Add Sour Cream: Gently fold in the sour cream. This adds an extra layer of richness and tanginess that I absolutely adore in a cheesecake.
- Fold in Oreos: Lastly, very gently fold in the roughly chopped Oreo cookies using a spatula. We want chunks of Oreos, not pulverized bits!
- Pour and Prepare for Water Bath: Pour the cheesecake filling over the chilled Oreo crust in the springform pan. Smooth the top with a spatula. Place the foil-wrapped springform pan into a larger roasting pan.
- Bake with a Water Bath: Carefully pour hot water into the roasting pan, ensuring it comes halfway up the sides of the springform pan. This water bath (bain-marie) creates a moist, even heat environment, which is the secret to a creamy, crack-free cheesecake. Bake at 325°F (160°C) for 60-75 minutes, or until the edges are set but the center still has a slight wobble when gently shaken.
- Cooling the Cheesecake: Turn off the oven, crack the oven door slightly, and let the cheesecake cool in the water bath for another hour. This slow cooling also helps prevent cracks.
- Chill Thoroughly: Remove the cheesecake from the water bath and the roasting pan. Carefully remove the foil. Let it cool completely on a wire rack at room temperature. Once at room temperature, transfer it to the refrigerator and chill for at least 6-8 hours, or preferably overnight. This step is non-negotiable for a perfect cheesecake!
Whipping Up the Dreamy Cream Cheese Frosting
- Beat Cold Cream Cheese: In a large mixing bowl, using a stand mixer with the paddle attachment or a hand-held mixer, beat the very cold cream cheese on medium-high speed until it’s completely smooth and creamy. Using cold cream cheese here helps to make a firmer, more stable frosting.
- Add Butter: Add the softened butter to the cream cheese. Beat on medium-high speed for another 2-3 minutes until the mixture is light, fluffy, and well combined. Scrape down the sides of the bowl frequently to ensure everything is incorporated.
- Gradually Add Powdered Sugar: With the mixer on low speed, gradually add the sifted powdered sugar, one cup at a time, until fully incorporated. If you dump it all in at once, you’ll have a powdered sugar cloud in your kitchen, trust me! Once all the sugar is in, increase the speed to medium-high and beat for 2-3 minutes until the frosting is light and fluffy.
- Add Vanilla and Cream: Stir in the vanilla extract. If the frosting is too thick, add heavy cream or milk, one tablespoon at a time, until you reach your desired piping and spreading consistency. I love a frosting that’s pipeable but still spreads beautifully.
- Taste and Adjust: Always give your frosting a taste! You can add more powdered sugar for extra sweetness or more heavy cream for a lighter consistency.
Creating the Silky Chocolate Ganache Drip
- Chop Chocolate: Place the finely chopped chocolate in a heatproof bowl. Chopping it finely helps it melt more quickly and evenly.
- Heat Cream: In a small saucepan, heat the heavy cream over medium heat until it just begins to simmer around the edges. Do not let it boil vigorously.
- Pour and Rest: Pour the hot cream over the chopped chocolate. Let it sit undisturbed for 5 minutes. This allows the heat from the cream to melt the chocolate.
- Stir to Combine: After 5 minutes, gently whisk the mixture starting from the center and working your way out until it’s completely smooth and glossy.
- Cool to Drip Consistency: Allow the ganache to cool at room temperature for about 30-60 minutes, stirring occasionally, until it thickens to a pourable but not runny consistency – think warm honey or thick syrup. It should be warm enough to flow but cool enough to cling to the cake rather than run straight off. This is absolutely key for a beautiful drip! If it’s too warm, it will make a mess; too cold, it won’t drip.
Assembling Your Decadent Oreo Red Velvet Cheesecake Drip Cake
- Level the Cake Layers: Using a serrated knife or a cake leveler, carefully level the tops of your red velvet cake layers so they are flat. This creates a stable base for stacking and a professional look.
- Trim the Cheesecake: Carefully remove the cheesecake from the springform pan. If you have any slightly uneven edges, you can gently trim them with a warm knife for a neater look.
- First Cake Layer and Frosting: Place one red velvet cake layer on your serving plate or cake stand. Spread a generous layer of cream cheese frosting evenly over the top, making sure to go almost to the edge.
- Add the Cheesecake Layer: Carefully center the chilled Oreo cheesecake layer on top of the first red velvet cake layer. This is the star of our “Decadent Oreo Red Velvet Cheesecake Drip Cake Recipe”!
- Second Cake Layer and Frosting: Place the second red velvet cake layer on top of the cheesecake. Spread another generous layer of cream cheese frosting.
- Third Cake Layer: Place the final red velvet cake layer on top.
- Crumb Coat: Apply a thin layer of cream cheese frosting all over the top and sides of the entire cake. This is called a “crumb coat,” and it seals in any loose crumbs, preventing them from showing up in your final frosting layer.
- Chill the Crumb Coat: Transfer the cake to the refrigerator and chill for at least 20-30 minutes, or until the crumb coat is firm. This step is a game-changer for a smooth final finish.
- Final Frosting Layer: Once the crumb coat is firm, apply a thicker, more generous layer of cream cheese frosting all over the top and sides of the cake. Use an offset spatula or bench scraper to smooth the frosting as much as possible for a polished look.
- Chill Again (Optional but Recommended): For an even cleaner drip, pop the frosted cake back into the refrigerator for another 15-20 minutes to firm up the outer layer of frosting.
- Apply the Chocolate Ganache Drip: Transfer the cooled ganache to a squeeze bottle or a piping bag with a small round tip. Starting from the top edge of the cake, gently squeeze and allow the ganache to drip down the sides. Vary the length of your drips for a more organic look. Once you’ve created your drips, pour the remaining ganache on top of the cake and gently spread it to the edges, creating a smooth pool of chocolate in the center.
- Decorate with Oreos: While the ganache is still slightly soft, arrange your whole and/or chopped Oreo cookies on top of the cake, around the edges of the ganache pool. You can also press some chopped Oreos onto the sides of the cake for extra texture and visual appeal.
- Final Chill: For best results and clean slicing, return the “Decadent Oreo Red Velvet Cheesecake Drip Cake” to the refrigerator for at least 30 minutes to allow the ganache to set and the cake to firm up before serving.
- Serve and Enjoy: When ready to serve, bring the cake out of the fridge about 15-20 minutes beforehand to allow the frosting to soften slightly. Use a sharp, warm knife for clean slices. Get ready to impress your guests with this showstopper!
Conclusion:
And there you have it, my dear fellow bakers! We’ve journeyed through every delicious step of creating a true showstopper, a dessert that isn’t just a cake, but an experience. I genuinely hope you’ve enjoyed following along, imagining the rich flavors and vibrant colors coming to life in your own kitchen. This isn’t just any dessert; it’s a masterpiece that marries the best of several beloved treats into one unforgettable creation. The sheer joy of cutting into a slice of this magnificent cake, revealing those distinct layers of moist red velvet, creamy cheesecake, and crunchy Oreo, is unparalleled. It’s a testament to the fact that sometimes, more truly is more when it comes to indulgence.
I know it might seem like a project, perhaps even a bit daunting at first glance, but I promise you, every moment spent whisking, layering, and decorating is an act of love that culminates in a dessert worthy of the grandest celebrations. Think about the gasps of delight when your guests first lay eyes on it, the way their eyes light up, and the inevitable “oohs” and “aahs” as they savor each complex bite. This cake isn’t just about satisfying a sweet tooth; it’s about creating memories, sharing joy, and impressing everyone at the table with your baking prowess. It’s a bold statement that says, “I care enough to make something truly extraordinary.”
When it comes to serving this majestic dessert, the classic approach is often the best: a generous slice on its own, perhaps accompanied by a simple cup of freshly brewed coffee or a soothing herbal tea. The cake itself is so rich and multi-layered that it needs little else to shine. However, if you’re looking to elevate the experience further, a small scoop of high-quality vanilla bean ice cream melting gently alongside can add a wonderful temperature contrast and a touch of extra creaminess. A scattering of fresh raspberries or strawberries can also introduce a lovely tart counterpoint to the sweetness, cleansing the palate and adding a burst of fresh flavor and vibrant color. For a truly luxurious finish, a delicate dollop of lightly sweetened whipped cream can never go amiss.
Don’t be afraid to experiment with variations either! While our Decadent Oreo Red Velvet Cheesecake Drip Cake Recipe is perfect as is, your kitchen is your playground. Consider using different flavored Oreos for the crust and crumble – perhaps mint Oreos for a festive twist, or golden Oreos for a lighter, vanilla-centric profile. You could also play with the cheesecake layer itself, adding mini chocolate chips for an extra textural surprise, or a swirl of caramel for an even deeper flavor dimension. The chocolate drip can also be customized; a white chocolate ganache would offer a stunning contrast against the red velvet, or a salted caramel drip could introduce an intriguing sweet and savory note. Imagine the possibilities! For smaller gatherings, you could even adapt this concept into individual mini cakes or elegant trifles served in glass jars, making for equally impressive single servings.
So, my friends, I implore you: don’t just admire this recipe from afar. Take the plunge! Gather your ingredients, put on your apron, and dedicate an afternoon to the delightful alchemy of baking. You’ll find immense satisfaction in the process, and an even greater reward in the incredible flavors you’ll create. Once you’ve baked and shared your masterpiece, I would absolutely love to hear about your experience. Did you make any exciting variations? What was your favorite part of the process? How did your friends and family react? Your stories and photos are truly inspiring to me and to our entire baking community. Please, share your triumphs with us! I can’t wait to see your stunning creations and hear all about your journey with this utterly irresistible dessert. Happy baking!
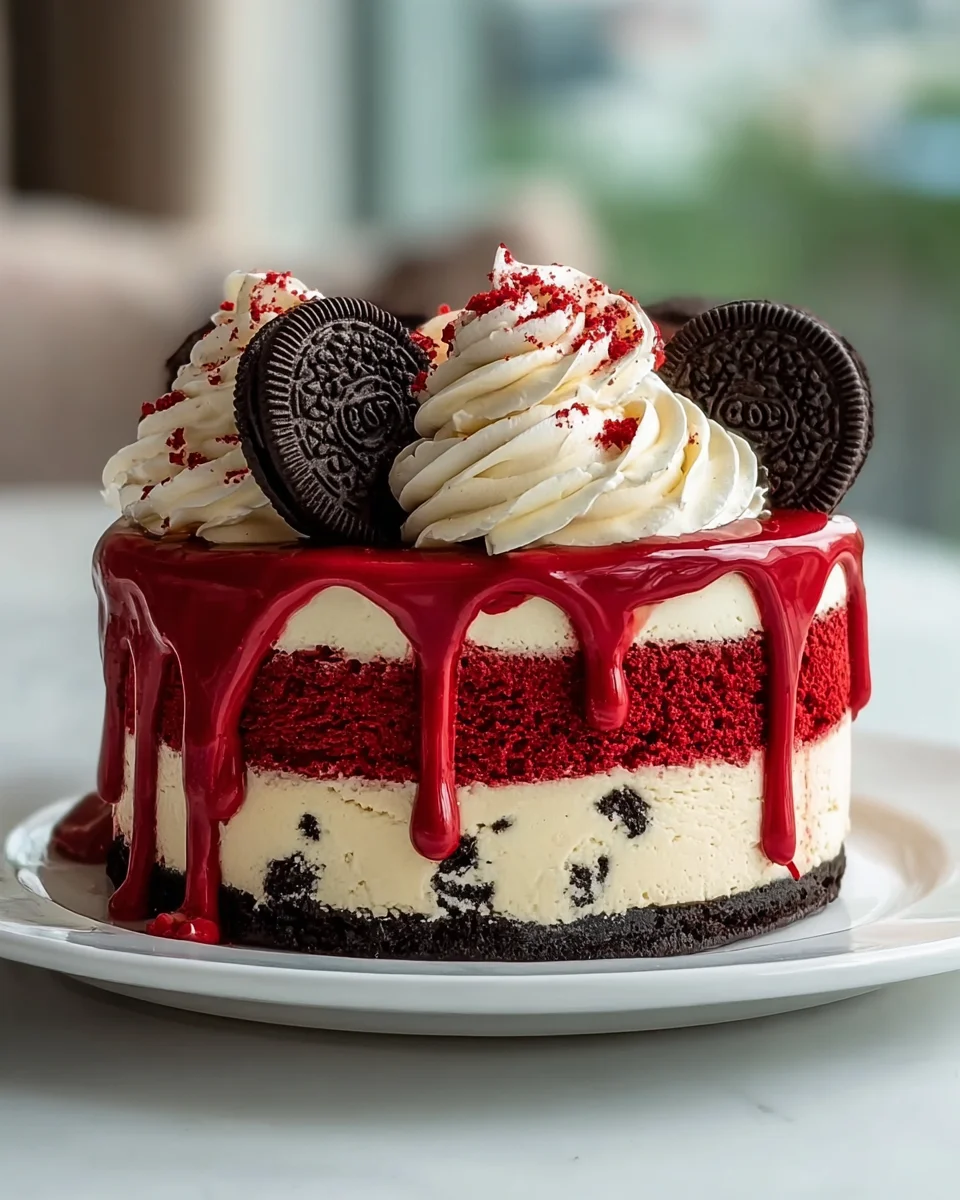
Decadent Oreo Red Velvet Cheesecake Drip Cake!
An experience, a masterpiece born from the fusion of three beloved classics: velvety red velvet cake, rich tang of cheesecake, and the irresistible crunch of America’s favorite cookie. This show-stopping cake promises to be the centerpiece of any celebration.
Ingredients
Instructions
Important Information
Nutrition Facts (Per Serving)
It is important to consider this information as approximate and not to use it as definitive health advice.
Allergy Information
Please check ingredients for potential allergens and consult a health professional if in doubt.