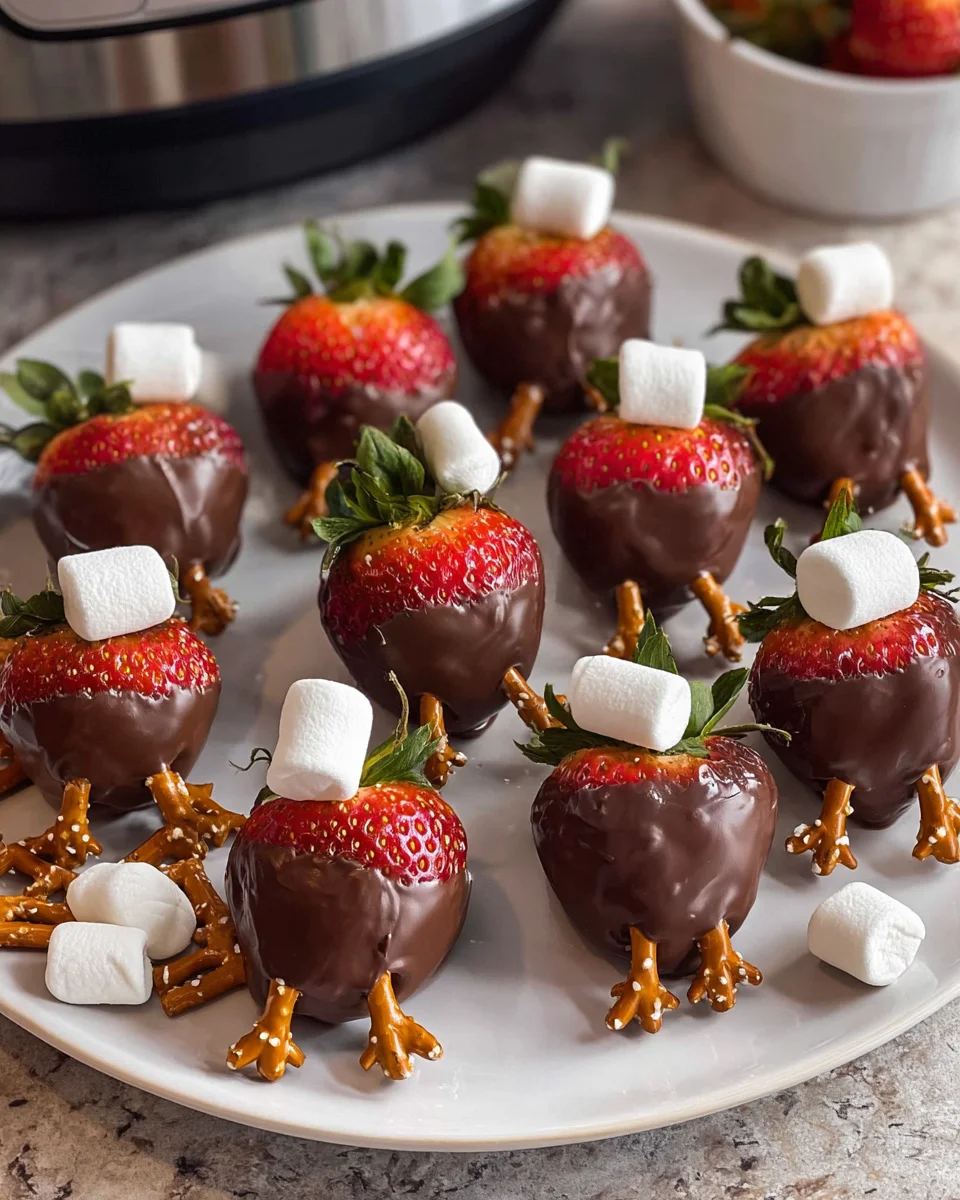
Chocolate Covered Strawberry Turkeys are about to become your new favorite holiday dessert centerpiece! If you’re searching for a delightful, no-bake treat that’s as charming to look at as it is delicious to eat, you’ve come to the right place. I remember the first time I saw these adorable creations; I was instantly smitten and knew I had to recreate them for my own family gatherings. While these sweet little turkeys don’t boast ancient historical roots, they’ve quickly carved out a special place in modern holiday traditions, especially during Thanksgiving, where they offer a whimsical and edible alternative to more traditional pies.
Why Everyone Loves Chocolate Covered Strawberry Turkeys
People absolutely adore these tasty morsels because they perfectly blend the fresh tang of ripe strawberries with the rich, indulgent sweetness of chocolate, all wrapped up in an incredibly cute package. They are surprisingly simple to assemble, making them a fantastic project for all ages and a stress-free addition to any busy holiday menu. No baking required, just a little dipping, decorating, and a lot of fun! I truly believe that once you try making these Chocolate Covered Strawberry Turkeys, they will become a cherished annual tradition, bringing smiles and a touch of edible artistry to your festive table.

Ingredients:
- For the Chocolate Covered Strawberries:
- 2 lbs fresh, ripe but firm strawberries, with green caps intact if possible (approximately 40-50 medium-sized berries)
- 12 oz (about 2 cups) good quality dark chocolate melting wafers or chocolate chips (for a richer, deeper flavor)
- 12 oz (about 2 cups) good quality milk chocolate melting wafers or chocolate chips (for a classic, sweet taste)
- 6 oz (about 1 cup) white chocolate melting wafers or chocolate chips (for decorative accents, especially the snood)
- 1-2 tablespoons coconut oil or vegetable shortening (optional, to thin chocolate for smoother dipping)
- For the Turkey Decorations:
- 40-50 candy corn pieces (for tail feathers – you’ll need one per turkey)
- 40-50 small pretzel sticks or short pretzel twists (for tail feathers – use 3-4 per turkey for a fan, so a larger bag)
- 80-100 edible candy eyes (small size, about 1/4 inch or 0.5 cm, two per turkey)
- 1/4 cup orange sprinkles or small orange candy beads (for the beak)
- 1/4 cup red sprinkles or a small tube of red gel icing (for the snood/wattle)
- Optional: Small shortbread cookies or chocolate wafers (to serve as a stable base for your turkeys)
- Optional: Assorted fall-themed sprinkles for extra decoration
Gathering Your Supplies and Prepping the Strawberries
- Prepare Your Workspace: Before we dive into the fun, let’s make sure our kitchen is ready for a smooth operation. I like to lay out several sheets of parchment paper or wax paper on a large baking sheet or directly on my counter space. This will be the landing pad for your delicious Chocolate Covered Strawberry Turkeys as they set. Having multiple sheets ready is key, as these little guys take up more space than you might think! I usually grab at least two large baking sheets.
- Wash and Dry the Strawberries Thoroughly: This step, my friends, is absolutely crucial. Water and melted chocolate are not friends, and even the smallest droplet can cause your beautiful chocolate to seize and become clumpy. Gently wash your strawberries under cool running water. Then, carefully lay them out on a clean kitchen towel or paper towels to air dry completely. I often gently pat each berry dry with a separate, dry paper towel, paying extra attention to the area around the green cap and stem. Ensure they are bone-dry. Any lingering moisture can ruin your chocolate coating and prevent it from adhering properly. You might even want to let them sit for an hour or so after patting to ensure every last drop of moisture has evaporated. I cannot stress enough how important this step is for perfect Chocolate Covered Strawberry Turkeys!
- Organize Your Decorations: Trust me on this one, once the chocolate is melted and the dipping begins, things move quickly! It’s best to have all your turkey decorations – the candy corn, pretzel sticks, edible eyes, orange sprinkles for beaks, and red sprinkles or gel for snoods – laid out in small bowls or on a plate, within easy reach. This prevents frantic searching with chocolate-covered fingers and ensures your decorating process is as smooth as possible.
Melting the Chocolate
-
Melt the Dark and Milk Chocolate: Now for the delicious part – melting the chocolate! You have a couple of excellent methods to choose from, and I’ll walk you through my favorites for achieving that perfectly smooth, glossy coating for your Chocolate Covered Strawberry Turkeys.
- Double Boiler Method (My Preferred for Best Results): This method provides gentle, even heat, which is ideal for chocolate. Set up a double boiler by filling a saucepan with about an inch or two of water. Place a heat-safe glass or metal bowl over the saucepan, ensuring the bottom of the bowl does not touch the water. Bring the water to a gentle simmer over medium-low heat. Add your dark chocolate melting wafers or chips to the top bowl. Stir continuously with a rubber spatula as the chocolate melts. It’s important to keep the heat low and steady. Once the dark chocolate is nearly fully melted with just a few small lumps remaining, remove the bowl from the heat. The residual heat will melt the rest. If using, stir in about 1 tablespoon of coconut oil or shortening to thin the chocolate slightly and make it extra smooth and shiny. This will help you get a beautifully even coating on your strawberries. Repeat this entire process in a separate bowl for your milk chocolate. Be extremely careful not to get any water or steam into the chocolate, as this will cause it to seize.
- Microwave Method (Quicker, but Requires Vigilance): If you’re short on time, the microwave is a viable option, but it requires careful attention to prevent burning. Place your dark chocolate wafers or chips in a microwave-safe bowl. Microwave on 50% power for 30-second intervals, stirring thoroughly after each interval. Chocolate retains its shape even when melted, so stirring is essential to gauge its consistency. Continue microwaving and stirring until the chocolate is smooth and fully melted. This usually takes about 1.5 to 3 minutes total, depending on your microwave’s power. Again, if using, stir in a bit of coconut oil or shortening for a smoother consistency. Repeat for your milk chocolate. Overheating chocolate in the microwave is very easy to do and will result in burnt, unusable chocolate. Err on the side of caution and always stir frequently.
You should have two separate bowls of beautifully melted, smooth chocolate ready for dipping your Chocolate Covered Strawberry Turkeys.
- Melt the White Chocolate (for decoration): In a smaller, separate bowl, melt your white chocolate using either the double boiler or microwave method described above. White chocolate is more delicate and can seize more easily, so be extra gentle with the heat. We’ll be using this for smaller details, especially the snood, so we don’t need as much, but we still need it to be perfectly smooth. You might want to place this melted white chocolate into a small piping bag or a ziploc bag with the corner snipped off for finer detail work later.
Dipping the Strawberries
- Dip the Strawberries in Chocolate: This is where your strawberries begin their transformation into the main body of our Chocolate Covered Strawberry Turkeys! Holding a dry strawberry by its green cap, dip it into either the dark or milk melted chocolate. I like to do about half in dark and half in milk chocolate for variety, but feel free to choose your favorite! Submerge the strawberry almost completely, leaving a small portion of the green cap exposed.
- Tap Off Excess Chocolate: Once dipped, gently lift the strawberry out of the chocolate. Hold it upside down over the bowl of melted chocolate and gently tap your wrist against the side of the bowl. This helps to shake off any excess chocolate, ensuring a nice, even coating without thick puddles at the bottom. A thin, smooth coating is what we’re aiming for. You want just enough chocolate to fully encase the berry.
- Place on Prepared Surface: Carefully place each chocolate-covered strawberry onto your parchment paper-lined baking sheets. Give them a little space so they don’t touch. We want to work relatively quickly here, as the next steps involve decorating before the chocolate fully sets. You can do about 5-10 strawberries at a time before moving on to decoration.
Creating the Turkey Feathers and Faces
-
Attach the Tail Feathers: While the chocolate is still wet and tacky on your dipped strawberry, it’s time to create those iconic turkey tail feathers!
- For Candy Corn Feathers: Gently press the flat, wide end of a candy corn piece into the back of the chocolate-covered strawberry, slightly above the bottom. You want the pointed orange tip to face upwards, creating a fan-like effect. You can use one large candy corn for a simple feather, or arrange three smaller candy corn pieces for a fuller look if your strawberries are larger. Make sure they are firmly embedded so they don’t fall off.
- For Pretzel Stick Feathers: For a different texture and look, you can use pretzel sticks. Carefully insert 3-4 pretzel sticks into the back of the strawberry, fanning them out like a peacock’s tail. The chocolate will act as the glue. You can also break pretzel twists into smaller pieces for a different shape. This gives a lovely salty crunch to your sweet Chocolate Covered Strawberry Turkeys.
Work quickly, as the chocolate will begin to set.
- Attach the Edible Eyes: Immediately after the feathers, place two edible candy eyes onto the front, upper portion of the chocolate-covered strawberry, while the chocolate is still wet. Gently press them into place. If your chocolate has started to set too much, you can dab a tiny bit of melted white chocolate (from your smaller bowl or piping bag) onto the back of the candy eyes before pressing them on. This is where your turkey’s personality truly begins to shine!
- Form the Beak: Now for the adorable little beak! While the chocolate is still soft, take a few orange sprinkles or small orange candy beads and gently press them onto the strawberry just below and between the eyes, forming a small triangular or pointed shape. This creates the turkey’s beak. Alternatively, if you have orange cookie icing, you can pipe a small triangular beak.
- Create the Snood (Wattle): The snood is that distinctive red fleshy appendage that hangs over a turkey’s beak. To create this, take your red sprinkles or a small blob of red gel icing. Carefully place a single red sprinkle (or a short line of gel icing) just above or to the side of the orange beak. It should look like a tiny, drooping red line. This small detail really brings your Chocolate Covered Strawberry Turkeys to life and makes them instantly recognizable!
Assembling Your Chocolate Covered Strawberry Turkeys (Optional Base)
- Attach to a Cookie Base (Optional but Recommended for Stability): If you want your Chocolate Covered Strawberry Turkeys to stand upright and be easily picked up, I highly recommend giving them a cookie base. While the chocolate on the strawberry is still wet (or you can dab a fresh bit of melted chocolate on the bottom of the strawberry if it’s already set), gently press the flat bottom of the strawberry onto a small shortbread cookie, chocolate wafer, or even a larger round sprinkle. This creates a stable platform for your turkey, making them much easier to display and serve. If you choose not to use a base, they can simply lie flat on the parchment paper.
- Add Any Additional Decorations: If you’re feeling extra festive, you can sprinkle a few fall-themed sprinkles around the base of your turkeys, or even use a bit of melted white chocolate to create small patterns on the chocolate body before it sets. This is your chance to get creative and add your personal touch to these adorable treats.
Setting and Storing
- Allow Your Turkeys to Set: Once all your Chocolate Covered Strawberry Turkeys are dipped and decorated, carefully transfer the baking sheets to the refrigerator. Let them chill for at least 20-30 minutes, or until the chocolate is completely firm and set. This is important not only for the chocolate to harden but also to ensure all the decorations are securely attached. Patience is a virtue here, as you want them perfectly firm before handling.
- Storage and Serving: Once the chocolate is fully set, your delightful Chocolate Covered Strawberry Turkeys are ready to be served! They are best enjoyed the same day they are made, as strawberries are perishable. Store any leftovers in an airtight container in the refrigerator for up to 1-2 days. The moisture from the strawberries can eventually make the chocolate “sweat” or dull, so fresh is definitely best for optimal appearance and taste. Arrange them beautifully on a platter for a festive holiday treat that everyone will adore!
Conclusion:
Well, my friends, we’ve reached the sweet finale of our culinary journey, and I genuinely hope you’re as excited as I am about this utterly charming and absolutely delicious creation. There’s just something incredibly special about transforming simple ingredients into something that not only tastes fantastic but also brings a huge smile to everyone’s face. This isn’t just another dessert recipe; it’s an invitation to inject a little bit of playful whimsy and gourmet delight into your next gathering. I truly believe that once you try these, you’ll understand exactly why they’ve become a firm favorite in my kitchen.
What makes this recipe a definite must-try? For starters, it’s the perfect blend of elegance and fun. You get the fresh, juicy burst of strawberries, perfectly complemented by the rich, indulgent coating of chocolate, all wrapped up in a presentation that is undeniably festive and unique. It’s a showstopper that demands attention, yet it’s surprisingly straightforward to assemble. Forget spending hours in the kitchen for a complicated dessert; this one delivers maximum impact with minimal fuss. Plus, the combination of fruit and chocolate is a timeless classic for a reason – it’s simply irresistible. This recipe takes that beloved pairing and elevates it with an imaginative twist that is perfect for autumn celebrations or any occasion where you want to add a touch of charming sophistication.
When it comes to serving these delightful treats, the possibilities are as endless as your imagination! They make a truly captivating centerpiece on a dessert platter, perhaps nestled among some autumnal leaves or alongside a bowl of fresh fruit for a vibrant display. Imagine them individually plated for a more formal dinner, each one a little edible sculpture waiting to be admired and devoured. For a more casual affair, you could arrange them on a tiered serving stand, allowing guests to pick their own adorable creation. They pair beautifully with a warm cup of coffee or tea, a glass of milk, or even a sparkling rosé for an adult gathering. I often find myself making a large batch for holiday potlucks, and they are always the first to disappear. They’re also fantastic as a thoughtful, edible gift – imagine presenting a small box of these to a host or a beloved friend; it’s a gesture that speaks volumes.
Now, let’s talk about making them your own! While the core recipe is utterly perfect as is, there are so many ways to infuse your personal touch. For the chocolate coating, don’t hesitate to experiment: try using a rich dark chocolate for a more intense flavor, a creamy milk chocolate for a sweeter profile, or even white chocolate for a contrasting aesthetic, perhaps even dyed with a little food coloring to match a specific theme. You could roll the chocolate-dipped base in finely chopped nuts like pecans or walnuts for an added crunch and earthy flavor. For the turkey feathers, consider different types of colorful candy melts or even use thin chocolate wafers in varying shades. Edible glitter or a dusting of cocoa powder could add an extra touch of sparkle or depth. For those who love a little heat, a pinch of cayenne pepper in the chocolate can add an intriguing kick. And if you’re feeling extra playful, why not turn them into “pops” by inserting a lollipop stick into the strawberry before dipping? This makes them even easier for little hands to enjoy and for a grab-and-go dessert bar.
So, there you have it, my friends. My heartfelt encouragement to roll up your sleeves, gather your ingredients, and embark on this wonderful little baking adventure. This recipe for Chocolate Covered Strawberry Turkeys is not just about creating a dessert; it’s about creating joy, making memories, and impressing everyone with your culinary creativity. It’s a testament to how simple ingredients, a little imagination, and a dash of effort can result in something truly extraordinary. I promise you, the smiles and compliments you’ll receive will make every moment worthwhile. Don’t be shy – dive in, make these fantastic treats, and most importantly, have fun with it! Once you’ve crafted your own flock of delightful turkeys, please, please share your triumphs with me! I absolutely adore seeing your creations and hearing about your experiences. Let me know what variations you tried, who loved them the most, and how they brightened your day. Happy creating, and enjoy every single bite!
Chocolate Covered Strawberry Turkeys
Adorable, no-bake Chocolate Covered Strawberry Turkeys combine fresh strawberries with rich chocolate, decorated as festive Thanksgiving treats. Simple to assemble and perfect for all ages.
Ingredients
Instructions
Important Information
Nutrition Facts (Per Serving)
It is important to consider this information as approximate and not to use it as definitive health advice.
Allergy Information
Please check ingredients for potential allergens and consult a health professional if in doubt.