Delicious Salted Caramel Fudge Truffles are more than just a sweet treat; they are an experience in pure indulgence, a symphony of flavors that dance on your palate. Imagine biting into a decadent, velvety smooth confection, where rich, dark chocolate fudge meets the irresistible allure of golden, buttery caramel, all perfectly balanced by a delicate sprinkle of sea salt. I’m absolutely thrilled to guide you through crafting these luxurious bites, which have become a modern classic cherished by dessert enthusiasts worldwide.
While fudge itself has a charming American history dating back to the late 19th century, and chocolate truffles boast a sophisticated French heritage, the brilliant marriage of salted caramel with these components is a relatively recent, yet utterly brilliant, culinary innovation. People absolutely adore this dish not only for its complex yet harmonious taste profile – that perfect balance of sweet, salty, and deep cocoa notes – but also for its incredibly smooth, melt-in-your-mouth texture. Every single bite feels like a luxurious escape, making them perfect for gifting, entertaining, or simply indulging yourself. I promise, learning to make these Delicious Salted Caramel Fudge Truffles will elevate your dessert repertoire and bring immense joy to everyone who tastes them.

Ingredients:
- For the Salted Caramel Layer:
- 1 cup (200g) granulated sugar
- 1/4 cup (60ml) water
- 6 tablespoons (85g) unsalted butter, cut into cubes, at room temperature
- 1/2 cup (120ml) heavy cream (full-fat whipping cream), warmed slightly
- 1 teaspoon flaky sea salt (or to taste, I love a good salty kick!)
- 1/2 teaspoon pure vanilla extract
- For the Fudge Base:
- 1 (14-ounce/397g) can sweetened condensed milk
- 1 1/2 cups (270g) semi-sweet chocolate chips (choose good quality for the best flavor, it really makes a difference!)
- 1/2 cup (113g) unsalted butter, cut into cubes
- 1 teaspoon pure vanilla extract
- 1/4 teaspoon fine sea salt
- For Coating and Garnish:
- 1 cup (180g) semi-sweet or dark chocolate chips, melted (for dipping)
- 1 tablespoon coconut oil or shortening (optional, but highly recommended for a smoother, shinier coating)
- Additional flaky sea salt, for sprinkling (the perfect finishing touch!)
- Cocoa powder, powdered sugar, or finely chopped nuts (optional, for alternative coatings if you’re feeling creative)
Preparing the Salted Caramel Layer
Making your own luscious, buttery salted caramel for these Delicious Salted Caramel Fudge Truffles is incredibly rewarding, and it adds that irresistible depth of flavor that truly sets them apart. Don’t be intimidated by making caramel; with a little attention and patience, you’ll achieve perfection, I promise! The rich, complex notes of homemade caramel are simply unparalleled.
- Combine Sugar and Water: In a medium-sized, heavy-bottomed saucepan, combine the granulated sugar and water. Make sure to use a pan with high sides, as the caramel will bubble up vigorously later when the cream is added. Give it a gentle swirl to ensure the sugar is evenly moistened. It’s crucial to avoid stirring with a spoon at this stage, as stirring can encourage sugar crystals to form, which can lead to a grainy caramel. We’re aiming for a beautiful, clear syrup that will transform into liquid gold.
- Cook the Sugar Syrup: Place the saucepan over medium-high heat. Let the sugar syrup come to a rolling boil without stirring. You’ll notice bubbles forming, and as the water evaporates, the syrup will gradually thicken. Keep a close eye on it, watching for any changes. The edges of the syrup might start to turn golden first. If you notice any stubborn sugar crystals forming on the sides of the pan, you can gently brush them down with a clean pastry brush dipped in a little water. This simple trick prevents them from causing the entire batch to crystallize, which would result in a less-than-silky caramel.
- Achieve Golden Caramel: Continue to cook the syrup, swirling the pan occasionally to ensure even cooking, until it turns a rich amber color. This usually takes about 8-12 minutes, but cook times can vary depending on your stove and pan. This is the most critical stage, so do not walk away from the stove! Sugar can go from perfectly golden to acridly burnt in a matter of mere seconds. You’re looking for a color similar to a copper penny or a dark, rich honey. A lighter color will result in a less intense, less complex caramel flavor, while too dark will make it undeniably bitter. The smell will also change, becoming nutty, toasted, and wonderfully complex – trust your senses!
- Add Butter: Once your caramel reaches that beautiful amber hue, immediately remove the pan from the heat. This stops the cooking process instantly. Carefully add the cubed unsalted butter, one piece at a time, whisking constantly and vigorously. The mixture will bubble up quite vigorously as the butter melts and emulsifies, so be prepared for a bit of a show and keep whisking! The butter serves multiple purposes here: it helps to stop the cooking, adds incredible richness, and contributes to the silky-smooth texture of the finished caramel. Continue whisking until all the butter is fully incorporated and the mixture is completely smooth and homogeneous.
- Incorporate Cream and Salt: Now, slowly and carefully pour in the warm heavy cream, whisking continuously throughout. Again, the mixture will bubble up and seize slightly as the cold cream hits the hot sugar, but don’t worry – just keep whisking! The warmth of the cream helps prevent the caramel from seizing too much and allows it to incorporate smoothly without creating hardened lumps. Continue to whisk until you have a perfectly smooth, homogeneous caramel sauce. Finally, stir in the flaky sea salt and the pure vanilla extract. Taste and adjust the salt if desired; some people, like me, prefer a bolder salty punch to really cut through the sweetness, while others like it more subtle.
- Cool the Caramel: Pour the finished salted caramel into a clean, heatproof bowl or container. Let it cool completely at room temperature, which can take an hour or two. Once cooled, cover it tightly and refrigerate for at least 2-3 hours, or preferably until it’s quite firm and scoopable. It absolutely needs to be firm enough to handle and mix into the fudge without making the entire truffle mixture too soft and unwieldy. This chilling step is absolutely crucial for the success of your Delicious Salted Caramel Fudge Truffles. Without it, the caramel will just melt into the fudge.
Making the Fudge Base
While our delectable caramel is chilling patiently, we can prepare the incredibly easy and wonderfully decadent fudge base. This is a no-fail fudge recipe that comes together quickly and provides the perfect rich, chocolatey backdrop for our salty-sweet caramel swirl. It’s truly one of the simplest and most satisfying fudge recipes out there, perfect for our truffles.
- Prepare the Double Boiler: Set up a double boiler. You can easily do this by placing a heatproof bowl (glass or stainless steel works best) over a saucepan filled with about an inch or two of simmering water. Ensure that the bottom of the bowl does not touch the water; we want to melt the ingredients using indirect heat from the steam, not direct contact with the hot water. This gentle heating method prevents the chocolate from scorching or seizing, ensuring a beautifully smooth fudge.
- Melt Ingredients: In the heatproof bowl set over your simmering water, combine the entire can of sweetened condensed milk, the semi-sweet chocolate chips, and the cubed unsalted butter. Stir occasionally with a heatproof spatula or spoon as the ingredients slowly melt. You’ll watch as they transform from individual components into a smooth, glossy, irresistible mixture. The chocolate should be completely melted and thoroughly integrated with the condensed milk and butter, forming a thick, uniform, and wonderfully aromatic paste. This usually takes about 5-8 minutes of gentle stirring.
- Add Flavorings: Once everything is fully melted and beautifully smooth, remove the bowl from the heat. Stir in the pure vanilla extract and the fine sea salt. The vanilla adds a lovely warmth and depth of flavor that complements the chocolate so well, and the fine sea salt (even though we have salted caramel) helps to balance the sweetness and enhance the overall chocolate flavor, making these Delicious Salted Caramel Fudge Truffles truly irresistible. Stir until everything is thoroughly well combined and evenly distributed throughout the rich fudge.
- Cool Slightly: Allow the fudge mixture to cool for about 10-15 minutes at room temperature, stirring occasionally. It should still be warm and pliable, making it easy to work with, but not piping hot. This slight cooling helps it to set a bit more evenly and prevents the caramel from melting too quickly when we combine the two layers. It also makes it less messy to handle in the next step.
Combining and Chilling
This is where the magic truly begins – bringing together the rich chocolate fudge and the firm, salty caramel into a harmonious, visually stunning swirl. The key here, just like with the caramel, is proper chilling to ensure the truffles hold their shape and have that perfect, satisfying bite.
- Swirl the Caramel into Fudge: Retrieve your beautifully chilled and firm salted caramel from the refrigerator. It should be firm enough to scoop with a spoon. Add generous spoonfuls of the firm caramel directly into the slightly cooled fudge base in the bowl. Now, here’s an important tip: do not mix it thoroughly! We want distinct ribbons and pockets of caramel swirling throughout the fudge, not a uniform blend that loses that delightful contrast. Use a spoon or a small spatula to gently fold and swirl the caramel into the fudge, creating beautiful marbled patterns. A few gentle turns are all you need to achieve that stunning visual appeal. Over-mixing will cause the caramel to fully incorporate and you’ll lose that lovely swirl effect that truly defines these Delicious Salted Caramel Fudge Truffles.
- Prepare for Chilling: Line an 8×8 inch (20×20 cm) baking pan with parchment paper, making sure to leave an overhang on all sides. This overhang is your secret weapon; it will act as convenient handles, making it incredibly easy to lift the set fudge cleanly out of the pan later. You can lightly grease the parchment paper with a tiny bit of butter or non-stick spray, just to be extra sure the fudge won’t stick, though usually, good quality parchment is sufficient on its own.
- Pour and Spread: Carefully pour the swirled fudge and caramel mixture into your prepared pan. Use an offset spatula or the back of a spoon to gently spread it evenly into the pan. Try not to press down too hard, as you want to preserve those beautiful caramel swirls you just created. If you notice any caramel chunks that are still a bit too firm, you can gently press them down into the fudge to ensure they’re nestled in nicely.
- Chill Thoroughly: Cover the pan loosely with plastic wrap to prevent any condensation from forming on the surface. Now, transfer the pan to the refrigerator and chill for at least 4-6 hours, or preferably overnight. This chilling step is absolutely vital for the success of your truffles. The fudge needs to be completely firm and thoroughly cold to be easily cut and rolled into beautiful, non-sticky truffles. If it’s not firm enough, your truffles will be frustratingly sticky, messy, and difficult to handle. Patience truly pays off here for perfectly formed Delicious Salted Caramel Fudge Truffles. Don’t rush this step!
Forming and Coating the Truffles
Once your fudge is perfectly chilled and firm, it’s time for the fun, hands-on part: transforming that decadent slab into individual, bite-sized truffles. This is where you bring your Delicious Salted Caramel Fudge Truffles to life and make them truly irresistible!
- Cut the Fudge: Lift the firm fudge out of the pan using the convenient parchment paper overhangs. Place it on a clean cutting board. Using a sharp knife that has been lightly oiled (you can just wipe a tiny bit of neutral oil on the blade with a paper towel; this helps immensely to prevent sticking), cut the fudge into small squares, roughly 1-inch by 1-inch. You can also cut it into strips first and then dice them. The exact size is up to you and your preference, but remember these are truffles, so smaller, elegant bites are usually preferred and easier to eat.
- Roll into Truffles: Take each fudge square and gently roll it between your palms to form a smooth, round ball. If the fudge starts to become too soft or sticky to handle as you work, pop the remaining squares back into the fridge for 10-15 minutes to firm up again. Work quickly and efficiently, using the warmth of your hands just enough to smooth them. As you roll, you’ll notice the lovely caramel swirls appearing on the surface of your truffle balls, making each one unique and visually appealing. Place the rolled truffles on a parchment-lined baking sheet as you finish them.
- Chill Truffles Again: Once all your truffles are rolled and looking perfectly round, return the baking sheet to the refrigerator for another 30 minutes to an hour. This re-chilling step is important to ensure they are firm enough for dipping and to prevent them from melting too quickly when handled or when they hit the warm melted chocolate. A very cold truffle will help the chocolate coating set quickly and smoothly.
- Melt Coating Chocolate: While the truffles are chilling for their final firm-up, prepare your coating chocolate. In a microwave-safe bowl, combine the semi-sweet or dark chocolate chips with the coconut oil or shortening (if you’re using it). Microwave in short 30-second intervals, stirring exceptionally well after each interval, until the chocolate is completely melted and beautifully smooth. Be careful not to overheat the chocolate, as it can seize and become unusable. Alternatively, you can melt the chocolate slowly and gently over a double boiler. The coconut oil or shortening helps to thin the chocolate slightly, making it much easier to dip and giving it a lovely, professional-looking shine.
- Dip the Truffles: Remove the well-chilled truffles from the refrigerator. Using a dipping fork or a regular dinner fork, carefully dip each truffle into the melted chocolate, allowing any excess chocolate to drip off back into the bowl. You want a thin, even coating that fully enrobes the truffle. Work relatively quickly, as the cold truffle will cause the warm chocolate to set quite fast, which is exactly what we want!
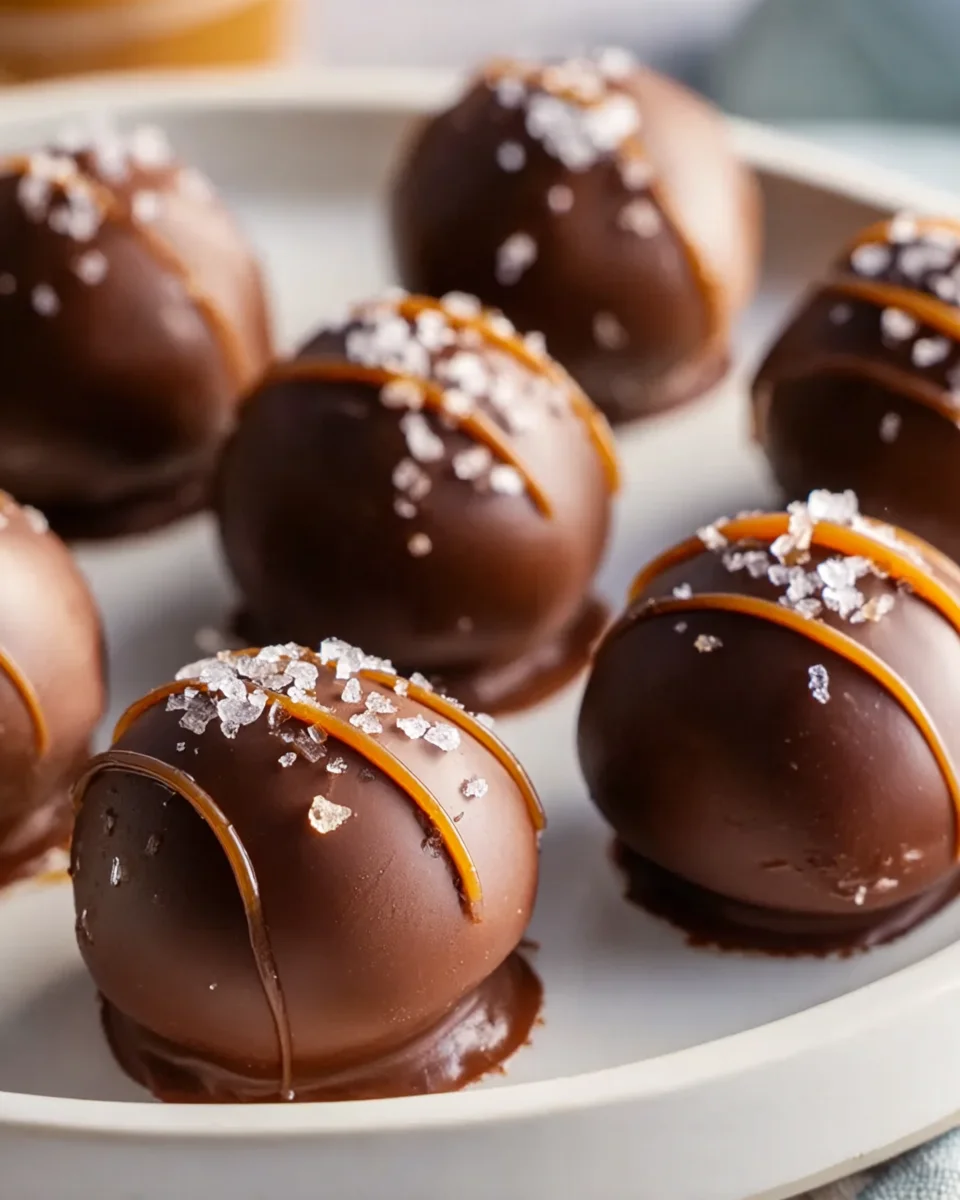
- Garnish and Set: Carefully place the chocolate-coated truffle back onto the parchment-lined baking sheet. Immediately, and I mean immediately, sprinkle with a pinch of flaky sea salt before the chocolate has a chance to set completely. The striking visual contrast of the dark chocolate, the glistening salt crystals, and the promise of the interior caramel swirl is what makes these so visually appealing and utterly delicious.
- Repeat and Chill: Continue dipping and garnishing all the truffles until your baking sheet is full of these little treasures. Once all are coated, return the baking sheet to the refrigerator for a final chill, about 15-30 minutes, to allow the chocolate coating to fully set and harden, creating that satisfying shell.
Finishing Touches and Storage
You’ve put in the effort, you’ve meticulously crafted each step, and now it’s time to enjoy the magnificent fruits of your labor – your truly magnificent Delicious Salted Caramel Fudge Truffles! These are worth every moment of your time.
- Allow to Temper Slightly (Optional but Recommended): For the absolute best texture and to allow the complex flavors to truly develop and bloom, I highly recommend allowing the truffles to come to room temperature for about 10-15 minutes before serving. This allows the chocolate coating to soften ever so slightly, the fudge to become wonderfully tender, and the caramel to relax, resulting in a much more enjoyable mouthfeel and flavor experience. However, if you prefer them very firm and cold, you can certainly serve them directly from the fridge.
- Alternative Coatings: If you prefer a different look or are looking for a variety, you can skip the melted chocolate dip for some of your truffles. Instead, after rolling the plain fudge truffles (before any dipping), you can roll them generously in good quality unsweetened cocoa powder, fine powdered sugar, or even finely chopped toasted nuts (like pecans or walnuts) for a different finish and flavor profile. These alternative coatings offer another dimension to your Delicious Salted Caramel Fudge Truffles.
- Storage: Store your Delicious Salted Caramel Fudge Truffles in an airtight container in the refrigerator. They will stay fresh and incredibly delicious for up to 2 weeks. For longer storage, these truffles freeze beautifully! Arrange them in a single layer on a baking sheet until frozen solid (this prevents them from sticking together), then transfer them to a freezer-safe bag or container, separating layers with parchment paper if needed. They can be frozen for up to 3 months. When you’re ready to enjoy them, simply thaw them in the refrigerator overnight before serving.
- Serving Suggestion: These truffles are not just a dessert; they are an experience! They are absolutely perfect for holiday gifts (everyone loves a homemade treat!), thoughtful party favors, or simply as a decadent, well-deserved treat to enjoy with a strong cup of coffee or a comforting mug of tea. The exquisite interplay of sweet, salty, rich chocolate, with the soft, chewy fudge, and the irresistible gooey caramel center makes them an unforgettable indulgence. Take a moment to savor every single bite of these homemade delights; you’ve earned it!
Conclusion:
My dear fellow home bakers and sweet treat enthusiasts, we’ve come to the grand finale, and I truly hope you’re as excited as I am about what we’ve just created. This recipe for these incredible sweets isn’t just another dessert; it’s an experience, a delightful journey for your taste buds that I wholeheartedly believe you absolutely must embark upon. The combination of rich, deep chocolate fudge intertwined with gooey, luscious salted caramel creates a symphony of flavors that is truly unparalleled. Each bite delivers that perfect balance – the comforting sweetness of caramel, the intense cocoa notes, and that essential touch of sea salt that elevates every single component, making it sing. It’s the kind of treat that makes you close your eyes in pure bliss, savouring every moment.
What makes this recipe a definite must-try is its remarkable ability to deliver gourmet-level indulgence with surprising ease. You don’t need to be a pastry chef to achieve these impressive results; the steps are straightforward, and the magic truly happens with simple, quality ingredients. Imagine presenting these beautifully crafted morsels at your next gathering, watching your guests’ faces light up with delight. They are elegant enough for a sophisticated dinner party, yet comforting and approachable for a casual coffee break. The texture alone is a masterpiece – a smooth, melt-in-your-mouth interior that yields to a slight chew, utterly satisfying from start to finish. I’m confident that once you taste them, you’ll understand exactly why I rave about these exquisite confections. They are not merely sweets; they are little nuggets of pure happiness, designed to bring joy with every single bite. The effort, which is minimal, is so incredibly worth the reward, proving that sometimes the most decadent treats are also the most accessible.
Now, let’s talk about enjoying these magnificent creations. While they are undoubtedly perfect on their own, perhaps nestled in a small paper cup as a post-dinner treat, there are so many wonderful ways to serve and even adapt them. Picture them alongside a steaming cup of freshly brewed coffee or a rich espresso, the bitterness providing a lovely contrast to their sweetness. They make phenomenal homemade gifts, artfully arranged in a decorative box tied with a ribbon – a truly thoughtful gesture that speaks volumes. For a special occasion, consider arranging them on a tiered dessert stand among other treats; they will surely be a showstopper.
If you’re feeling adventurous, these irresistible sweets are incredibly versatile. For an extra touch of decadence, you could try rolling some of them in finely chopped toasted pecans or walnuts, adding a delightful crunch and nutty flavor. Another wonderful variation is to dust them generously with high-quality unsweetened cocoa powder for a more sophisticated, slightly bitter finish, or even a blend of cocoa and a hint of espresso powder for an added depth. Want to make them even more festive? A drizzle of melted white chocolate or a sprinkle of colorful edible glitter can transform them into party-ready confections. For a truly grown-up twist, a tiny splash of a complementary liqueur, like a coffee liqueur or a good quality dark rum, can be folded into the caramel mixture just before setting, adding an extra layer of sophisticated flavor. You could also experiment with different types of sea salt – a flaky Maldon salt versus a fine Celtic sea salt can impart subtle textural and flavor differences. Don’t feel limited to rolling them into spheres either; pressing the mixture into a parchment-lined square pan and cutting them into neat fudge squares offers a different presentation and a slightly firmer bite. The possibilities for personalization are truly endless, allowing you to make this already fantastic base recipe uniquely your own.
I truly hope I’ve convinced you to dive headfirst into your kitchen and give this recipe for these truly exceptional Delicious Salted Caramel Fudge Truffles a try. I promise you, the joy of creating and then indulging in these perfect little spheres of bliss is an experience you won’t want to miss. They are so much more than just a sweet; they’re a mood booster, a perfect ending to any meal, and a delightful way to treat yourself or someone you care about. When you do make them – and I truly hope you will – please, please come back and share your experience! What variations did you try? How did your family and friends react? Your stories and tips are invaluable to our community. So, gather your ingredients, clear your counter, and get ready to create some magic. Happy baking, and happy indulging!
Melt-in-Your-Mouth Salted Caramel Fudge Truffles
Delicious Salted Caramel Fudge Truffles are an experience in pure indulgence, a symphony of flavors that dance on your palate. Imagine biting into a decadent, velvety smooth confection, where rich, dark chocolate fudge meets the irresistible allure of golden, buttery caramel, all perfectly balanced by a delicate sprinkle of sea salt. This modern classic is cherished for its complex yet harmonious taste profile – that perfect balance of sweet, salty, and deep cocoa notes – and its incredibly smooth, melt-in-your-mouth texture. Every bite feels like a luxurious escape, perfect for gifting, entertaining, or simply indulging yourself.
Ingredients
Instructions
Important Information
Nutrition Facts (Per Serving)
It is important to consider this information as approximate and not to use it as definitive health advice.
Allergy Information
Please check ingredients for potential allergens and consult a health professional if in doubt.