Little Debbie Christmas Tree Cakes Truffles are about to become your new favorite holiday tradition! Imagine capturing all the festive magic and iconic flavor of those beloved snack cakes and transforming them into elegant, bite-sized delights that are utterly irresistible. For generations, Little Debbie Christmas Tree Cakes have been a cherished symbol of the holiday season, evoking warm memories of childhood Christmases and sweet moments shared with loved ones. Their classic vanilla cake, creamy filling, vibrant green sprinkles, and signature chocolate coating are synonymous with holiday cheer across countless American homes.
I absolutely adore how this innovative recipe takes that nostalgic joy and elevates it into something truly special. These aren’t just a convenient treat; they’re a marvel of taste and texture – moist, sweet, and perfectly chocolatey, with a delightful hint of festive crunch from those iconic sprinkles. It’s the ultimate no-bake solution for holiday parties, thoughtful edible gifts, or simply indulging yourself in a gourmet twist on a classic. I promise, once you experience the ease and deliciousness of these Little Debbie Christmas Tree Cakes Truffles, you’ll understand why they are a must-make for every festive occasion. Prepare to impress everyone with these delightful bites that perfectly blend convenience with irresistible holiday spirit!

Ingredients:
- Little Debbie Christmas Tree Cakes: You’ll need about 2 boxes, which typically contain 5 cakes each, making a total of 10 festive cakes. These are the star of our show, bringing all that delightful vanilla cake, creamy frosting, and signature red sprinkle goodness. Make sure they’re fresh for the best texture!
- Cream Cheese: A 4 oz block (half of a standard 8 oz package), full-fat, and most importantly, softened to room temperature. This is our binding agent, providing the perfect tang and richness to complement the sweetness of the cakes, transforming them into a truffle-like consistency.
- White Candy Melts or Good Quality White Chocolate Chips: Approximately 24 oz (or about 1.5 bags). Candy melts are often easier to work with for dipping as they melt smoothly and set quickly. If using white chocolate chips, opt for a high-quality brand designed for melting to ensure a smooth, non-grainy coating.
- Green Food Coloring: An oil-based or gel food coloring specifically designed for chocolate. This is crucial! Water-based food coloring will cause your chocolate to seize and become unusable. We need that vibrant, iconic Christmas tree green!
- Christmas Sprinkles: An assortment of red, green, white, or themed holiday sprinkles. These add that final celebratory touch and a bit of crunch. Have fun with your selection!
- Optional: Coconut Oil or Vegetable Shortening: About 1-2 teaspoons, if using white chocolate chips. This helps thin out the melted chocolate, making it smoother and easier to dip your truffles for a perfectly even coating.
Equipment You’ll Need:
Before we dive into the fun of creating these “Little Debbie Christmas Tree Cakes Truffles,” let’s ensure you have all the necessary tools at your fingertips. Having everything prepped will make the process smooth and enjoyable!
- Large Mixing Bowl: Essential for crumbling the cakes and mixing in the cream cheese. Choose one that gives you plenty of room to work without spills.
- Electric Mixer (handheld or stand mixer with paddle attachment) or Sturdy Spatula/Spoon: While hands work too, a mixer makes quick work of thoroughly combining the cake crumbs and cream cheese, ensuring a uniform mixture.
- Baking Sheet(s): You’ll need at least one, possibly two, to place your formed truffles and later, the dipped and decorated ones.
- Parchment Paper or Silicone Mats: Crucial for lining your baking sheets. This prevents the truffles from sticking and makes for easy cleanup.
- Cookie Scoop (small, 1-1.5 tablespoon size): My absolute favorite tool for making uniformly sized truffles! It ensures consistency, which not only looks professional but also helps with even chilling and dipping.
- Microwave-safe Bowls or Double Boiler Setup: For melting your candy melts or white chocolate. Having appropriate vessels is key for proper melting.
- Dipping Tools: Specialty candy dipping tools are wonderful, but two forks (one to lower, one to lift and tap) or even sturdy toothpicks can work in a pinch. These help you achieve a beautifully coated truffle without getting your fingers too messy.
- Airtight Container: For storing your finished truffles to keep them fresh and delicious.
Preparing Your Delicious Little Debbie Christmas Tree Cakes Truffles
- Unwrap and Crumble Your Christmas Tree Cakes: This is where the magic truly begins, and frankly, it’s one of the most satisfying steps! Carefully unwrap all 10 of your Little Debbie Christmas Tree Cakes. I like to get them all out of their individual packaging first, creating a little festive mountain of goodness in my large mixing bowl. Now, for the fun part: using your hands, a sturdy fork, or even a potato masher, begin to crumble these cakes into fine, consistent crumbs. You want to break down every bit of cake, the iconic white frosting, and those adorable little red sprinkles until you have a fairly uniform mixture. The goal here isn’t just to break them apart, but to really integrate the cake with its inherent frosting, creating a slightly sticky, cohesive base. Don’t worry about perfection, but aim for consistency. Large chunks will make your truffles difficult to form later, potentially leading to uneven shapes or a crumbly texture. Continue this process, squeezing and mashing, until the mixture resembles a very moist, coarse sand. You should be able to press a small amount between your fingers, and it holds its shape. This step is crucial for achieving that signature truffle texture and ensures that the flavor of the Christmas Tree Cakes is fully dispersed throughout. Take your time and enjoy the process – it’s quite satisfying to deconstruct these beloved treats!
- Incorporate the Cream Cheese: Now it’s time to bring in our wonderful binding agent: the softened cream cheese. It’s absolutely essential that your cream cheese is at true room temperature. If it’s too cold, it won’t blend smoothly with the cake crumbs, and you’ll end up with frustrating lumps or an uneven mixture, which nobody wants in their perfectly smooth truffle! Add the 4 ounces of softened, full-fat cream cheese directly into your bowl with the crumbled Christmas Tree Cakes. At this stage, you can use your electric mixer on a low to medium speed with a paddle attachment, or if you prefer a more hands-on approach and a bit of a workout, a sturdy spatula or your (clean!) hands will work wonders. Mix everything together thoroughly until it’s completely combined and uniform in color and texture. You’ll notice the mixture transforming from a crumbly mess to a much more pliable, cohesive, and dough-like consistency. It should be sticky enough to hold together when pressed firmly, but not so wet that it’s difficult to handle. If, for any reason, your mixture feels too dry and isn’t coming together, you can add a tiny bit more softened cream cheese, about half an ounce at a time, until you reach the perfect consistency. The goal is a mixture that can be easily rolled into balls without crumbling or falling apart. This cream cheese is what gives our “Little Debbie Christmas Tree Cakes Truffles” their rich, decadent texture and helps them hold their shape beautifully. It also adds a slight tang that perfectly balances the sweetness of the cakes.
- Chill the Truffle Base (First Chill): This step, while requiring a bit of patience, is absolutely non-negotiable for perfectly formed truffles! Once your cake and cream cheese mixture is uniformly combined and has that wonderful pliable texture, gather it into a single mass in the bowl. Cover the bowl tightly with plastic wrap to prevent it from drying out or absorbing any refrigerator odors. Place it in the refrigerator for at least 30 minutes, or ideally, even an hour. Chilling is vital because it firms up the mixture significantly, making it much, much easier to scoop and roll into smooth, perfectly round balls. Trying to roll a warm, soft mixture will inevitably lead to a sticky, frustrating mess, resulting in misshapen truffles and very sticky hands – not ideal when you’re aiming for holiday perfection! While your mixture is chilling, you can prepare your baking sheets by lining them with parchment paper or silicone mats. This way, they’ll be ready and waiting for your soon-to-be-formed truffles. Trust me, patience here pays off in a big way, making the next steps a breeze rather than a struggle.
- Scoop and Roll: Once your cake mixture is nicely chilled and firm, remove it from the refrigerator. Using a small cookie scoop (about 1 to 1.5 tablespoons in size) is my absolute secret weapon for creating uniformly sized truffles. Consistency in size not only looks incredibly professional and appealing but also helps ensure even chilling and coating later on. Scoop out portions of the mixture, then gently roll each portion between the palms of your hands to form smooth, compact balls. Apply gentle, even pressure to ensure they are firm and hold their shape well. Aim for a consistent size across all your truffles so they look like they came straight from a gourmet bakery! As you roll, you might find that the mixture gradually starts to soften from the warmth of your hands. If this happens and it becomes too sticky or difficult to handle, don’t hesitate to pop the bowl (or even the partially rolled truffles on the baking sheet) back into the fridge for another 10-15 minutes to firm up again. This little break can make a huge difference. Place the finished balls onto your prepared baking sheets, leaving a little space between each one to prevent them from freezing together during the next chill. Remember to keep your hands as clean as possible throughout this process by wiping them occasionally with a damp cloth or rinsing them, as this helps prevent too much sticking. You should be able to get approximately 24-30 beautifully formed truffles from this recipe, depending on the exact size you choose for each one.
- Chill Again (Second Chill): After you’ve meticulously rolled all your festive “Little Debbie Christmas Tree Cakes Truffles” into those perfect little spheres, it’s time for another crucial chill session. This second chill is arguably the most important for successful dipping. Place the baking sheets with your neatly arranged truffles back into the refrigerator. This time, they need a good, long chill – at least 1-2 hours, or even longer if your refrigerator isn’t super cold, until they are very firm, almost solid. Some people even prefer to pop them in the freezer for about 15-20 minutes right before dipping for an extra firm, super-cold surface. An extra firm truffle helps to speed up the setting time of the chocolate coating and, more importantly, prevents the warm melted chocolate from melting your truffle core, which can lead to cracking or your truffle falling apart in the warm chocolate. A thoroughly chilled truffle core is absolutely crucial for successful, smooth dipping, as it helps the melted chocolate set quickly and evenly around the cold center. This second chill is a critical step for a beautiful, professional-looking finished product, so please don’t skip or shorten it! Your patience will be rewarded with gorgeous, easy-to-dip truffles.
-
Prepare Your White Candy Melts (or Chocolate): While your truffles are undergoing their final, essential chill, it’s the perfect moment to prepare your dipping chocolate. I highly recommend using good quality white candy melts designed specifically for coating. These tend to melt smoother, maintain a consistent viscosity, and set more quickly and consistently than regular white chocolate chips, making the dipping process much easier for beginners and seasoned bakers alike. If you are using white chocolate chips, I strongly suggest adding about a teaspoon of coconut oil or vegetable shortening per cup of chocolate chips to help thin it out. This will make the chocolate more fluid and easier to work with, resulting in a smoother, thinner, and more professional-looking coating.
Melting Methods:
- Microwave Method: Place your candy melts (or chocolate with the added shortening/coconut oil) in a microwave-safe bowl. Begin by microwaving on 50% power in short 30-second intervals. After each interval, remove the bowl and stir thoroughly with a dry spatula or spoon, even if the chocolate doesn’t appear to be fully melted. White chocolate and candy melts are particularly susceptible to seizing or burning if overheated, so stirring often is key to even melting and preventing scorching. Continue heating in these short bursts and stirring until there are still a few small lumps remaining. At this point, remove it from the microwave and continue stirring until these last few lumps fully dissolve from the residual heat. This method prevents overheating and ensures a perfectly smooth consistency.
- Double Boiler Method: If you prefer a more controlled melting process, set up a double boiler. Place your candy melts (or chocolate mixture) in a heatproof bowl that fits snugly over a saucepan of simmering water. Ensure the bottom of the bowl does not touch the water, as direct heat can cause the chocolate to burn. Stir continuously with a dry spatula until the chocolate is completely smooth and melted. Be extremely careful not to let any water or steam get into your chocolate, as even a tiny drop can cause it to seize instantly, turning it into a thick, clumpy, unusable mess. Regardless of the method, aim for a smooth, pourable consistency. If your melted coating seems too thick to dip easily, add a tiny bit more coconut oil or shortening (a quarter teaspoon at a time) and stir until fully incorporated and the desired consistency is achieved.
- Color Your Coating: To truly capture the festive essence of a Christmas Tree Cake, we’re going to transform our white coating into a vibrant green! Once your white candy melts are perfectly smooth and melted, add a few drops of green food coloring. It is absolutely crucial to use an oil-based or gel food coloring specifically designed for chocolate. Water-based liquid food colorings contain water, which, as mentioned earlier, will cause your beautiful melted chocolate to seize instantly, turning it into a thick, clumpy, grainy, and utterly unusable mess. Start with just a few drops of your chocolate-safe green coloring, stir it well, and then add more gradually, drop by drop, until you achieve your desired festive green shade. I personally like a vibrant, cheerful green that immediately screams “Christmas Tree!” Keep your melted and colored chocolate warm during the dipping process by placing the bowl over a larger bowl of warm (not hot) water, or use a chocolate warmer if you happen to have one. This helps to maintain it at the ideal dipping consistency, preventing it from thickening too quickly as you work.
- Dip Your Truffles: Now for the grand finale – the dipping! Remove only a few chilled truffles from the refrigerator at a time; keep the rest cold until they are ready to be dipped. This maintains their firm structure, which is vital for a clean dip. Using a specialized candy dipping tool, or even two forks (one to carefully lower, one to lift), carefully drop one truffle into the bowl of melted green chocolate. Submerge it completely, ensuring the entire surface is covered. Lift the truffle out of the chocolate, letting the excess drip back into the bowl. You can gently tap the dipping tool or fork against the edge of the bowl to encourage any lingering drips to fall away. A thin, even coat is what we’re aiming for here; an overly thick coating can detract from the delicate texture of the truffle inside and make it harder to eat. For the cleanest look, avoid spinning the truffle, as this can create unsightly “feet” of chocolate. Just a gentle tap and a quick lift should do the trick.
- Decorate Immediately: As soon as you’ve dipped a truffle and lifted it out of the chocolate, gently transfer it back to your parchment-lined baking sheet. While the green chocolate coating is still wet and tacky, generously sprinkle it with your festive Christmas sprinkles. This is where your personal creativity can truly shine! You can use traditional red and green sprinkles, sparkling nonpareils, edible glitter, or even a contrasting drizzle of white or red melted chocolate for an extra touch of flair once the green has set. Because the truffles are so cold, the chocolate coating will start to set quite quickly, so you need to work efficiently with the sprinkles. If you want to add a drizzle, melt a small amount of white or red candy melts in a separate small bowl, transfer it to a piping bag with a tiny snip off the end or a Ziploc bag with the corner snipped, and drizzle artistic patterns over the now-set green coating. For this particular recipe, mimicking the original Little Debbie Christmas Tree Cakes, simple red and green nonpareils or a classic sprinkle mix works perfectly to evoke that nostalgic charm. Don’t overload with sprinkles to the point of obscuring the beautiful green, but make sure each truffle gets a nice, celebratory festive crown. Repeat the dipping and decorating process for all your truffles, working in small batches to ensure the truffles remain cold and the chocolate coating remains at an ideal, workable consistency.
- Final Chill and Set: Once all your “Little Debbie Christmas Tree Cakes Truffles” are beautifully dipped, coated, and adorned with their festive decorations, it’s time for one last, crucial chill. Carefully place the baking sheets with your finished truffles back into the refrigerator for a final setting period. This last chill is absolutely essential for the chocolate coating to fully set and harden completely. This usually takes about 30 minutes to an hour, depending on the thickness of your chocolate coating and the temperature of your refrigerator. You’ll know they’re ready when the chocolate is firm to the touch, no longer tacky or soft, and has a nice, glossy finish. At this point, they’ll be perfectly stable and ready for elegant packaging in treat boxes, arrangement on a stunning holiday dessert platter, or immediate serving to eager guests. This final setting process ensures that your truffles are not only visually appealing but also delightful to handle and eat, with a satisfying snap from the chocolate shell that gives way to that wonderfully soft, cakey center.
- Serving: These incredible “Little Debbie Christmas Tree Cakes Truffles” are best served chilled or at a slightly cool room temperature. Serving them directly from the refrigerator will give you the firmest bite and the most satisfying snap from the chocolate coating, followed by the rich, dense interior. If you let them sit out for about 15-20 minutes before serving, the interior will soften just a touch, enhancing the melt-in-your-mouth experience. Arrange them on a pretty platter for a festive holiday party centerpiece, or for a more elegant touch, place each truffle in individual mini cupcake liners. They make a fantastic, memorable, and unique addition to any holiday dessert spread, and I promise you, they’ll be an instant conversation starter and a huge hit! Everyone loves the nostalgia of the original cakes, and these truffles take that beloved flavor to a whole new level of gourmet deliciousness and sophistication, while still retaining all the fun.
- Storage: To maintain their freshness, texture, and vibrant appearance, it’s crucial to store any leftover truffles properly. Always keep them in an airtight container in the refrigerator. Stored this way, they will retain their optimal flavor and texture for up to 1-2 weeks. While they might be safe to eat a little longer, their peak freshness and overall deliciousness are best enjoyed within this timeframe. If you want to prepare these festive treats further in advance, or if you simply have too many to enjoy right away, you can also freeze the truffles. For freezing, it’s often best to freeze them after they’ve been rolled and chilled but before dipping, though freezing them after dipping works perfectly well too. Place them in a single layer on a parchment-lined baking sheet to freeze solid, then transfer them to an airtight, freezer-safe container or a heavy-duty freezer bag for storage for up to 1 month. When you’re ready to enjoy them, simply thaw them slowly in the refrigerator overnight. Bring them out about 15-20 minutes before you plan to serve to allow the chocolate coating to soften just slightly and the cake interior to reach a perfect, tender consistency, enhancing the overall eating experience. Proper storage ensures that every bite of your homemade Little Debbie Christmas Tree Cakes Truffle is as delicious, festive, and delightful as the very first. Enjoy the holiday cheer and wonderful flavors these little bites of joy bring!
Forming Your Truffles
Dipping and Decorating Your “Little Debbie Christmas Tree Cakes Truffles”
Serving and Storage Tips for Your Festive Truffles
Conclusion:
Well, friends, we’ve reached the sweet end of our journey, and I genuinely hope you’re as excited as I am about this incredible recipe. If there’s one thing I want you to take away from our time together, it’s that these Little Debbie Christmas Tree Cakes Truffles are not just a treat; they’re an experience. They embody everything wonderful about the holiday season: joy, nostalgia, effortless charm, and undeniable deliciousness. I promise you, these aren’t just any truffles; they are a delightful explosion of festive flavors and textures that will transport you straight back to childhood Christmas mornings. Imagine that iconic green tree, that creamy filling, the sprinkles – all condensed into a bite-sized, decadent masterpiece. This recipe is an absolute game-changer for holiday entertaining because it delivers maximum impact with minimal fuss. You’ll impress everyone on your guest list without spending hours slaving away in the kitchen, which, let’s be honest, is a Christmas miracle in itself!
The beauty of these truffles lies in their simplicity, yet their flavor profile is anything but basic. Each bite offers that familiar vanilla cake taste, complemented by the rich, smooth coating, and the playful crunch of sprinkles. It’s a symphony of sweet sensations, perfectly balanced and utterly addictive. This isn’t just a recipe to make; it’s a recipe to savor. It’s about bringing smiles to faces, creating new holiday memories, and indulging in a little bit of magic. Whether you’re a seasoned baker or someone who rarely ventures beyond toast, this recipe is incredibly forgiving and guarantees a stunning result every single time. It truly is a must-try for anyone looking to add a unique, charming, and unbelievably tasty treat to their holiday repertoire this year.
Serving Suggestions to Elevate Your Truffle Experience:
Once your beautiful batch of truffles is ready, the serving possibilities are endless! For a casual gathering, arrange them artfully on a festive platter alongside other holiday cookies and candies. They make a fantastic addition to any dessert table, standing out with their vibrant colors and whimsical charm. Consider serving them with a warm mug of hot cocoa, a freshly brewed coffee, or even a glass of chilled milk for a truly comforting treat. They also make magnificent individual gifts; simply place a few in a cellophane bag tied with a festive ribbon, and you have a thoughtful, homemade present that anyone would adore. Imagine them nestled in a gift box for a teacher, a neighbor, or a colleague – they’re sure to be a cherished surprise.
Creative Variations to Make Them Your Own:
Part of the fun of any recipe is making it uniquely yours, and these truffles are incredibly adaptable. While the classic design is charming, don’t hesitate to experiment!
- Sprinkle Swap: Instead of the traditional festive sprinkles, try using edible glitter for an extra shimmer, crushed candy canes for a peppermint kick, or even finely chopped pistachios for a touch of green and a nutty crunch.
- Chocolate Dips: While white chocolate is traditional, consider dipping some in milk chocolate or dark chocolate for a richer, more intense flavor contrast. You could even do a drizzle of a contrasting chocolate over the white chocolate coating for an elegant marbled effect.
- Flavor Boosts: A tiny drop of peppermint extract, almond extract, or even a hint of rum extract can be added to the crumbled cake mixture before rolling to introduce a subtle new layer of flavor. Just be careful not to overdo it!
- Shape Shifters: While balls are standard, you could experiment with molding them into small log shapes or even using tiny cookie cutters (after chilling the mixture well) to create miniature festive shapes before dipping.
- Beyond Christmas Trees: While our focus is on the festive tree cakes, imagine adapting this idea for other holidays! Think Little Debbie Fudge Rounds for Halloween or Spring Rolls for Easter – the possibilities are truly endless once you master this basic truffle technique.
Ultimately, my biggest encouragement to you is simply this: give these truffles a try! Don’t let another holiday season pass without experiencing the sheer delight of these easy-to-make, utterly delicious treats. They are a guaranteed crowd-pleaser and a fantastic way to spread some holiday cheer. I am genuinely excited for you to whip up a batch, see the smiles they bring, and maybe even discover your new favorite holiday tradition. Once you’ve made them, please come back and share your experience with me. I’d love to hear about your triumphs, your variations, and how these delightful truffles made your holiday season a little brighter. Happy baking, and happy holidays!
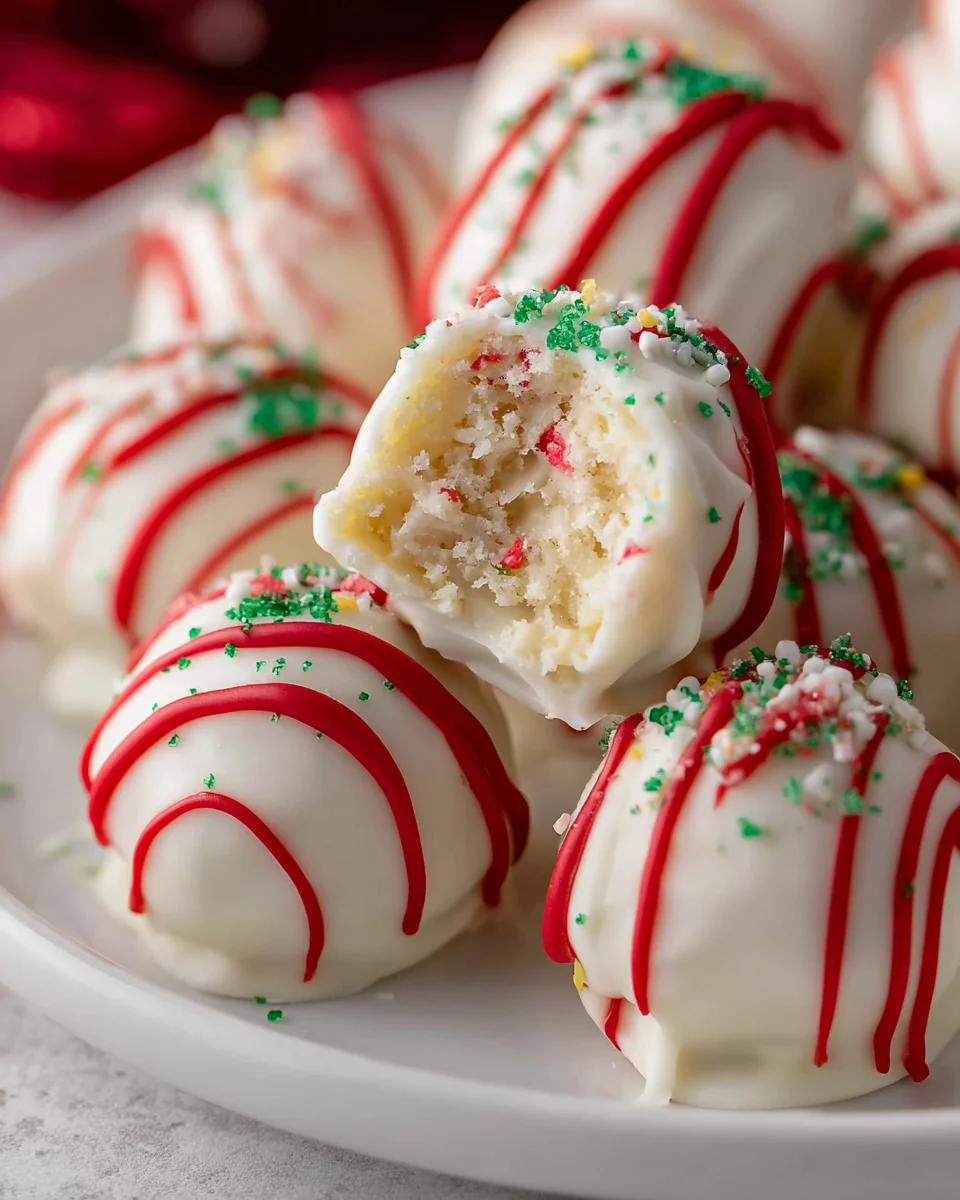
Little Debbie Christmas Tree Cakes Truffles
Transform beloved Little Debbie Christmas Tree Cakes into elegant, bite-sized truffles! This no-bake recipe captures all the festive magic and nostalgic flavor of the iconic snack cakes, perfect for holiday parties or sweet edible gifts.
Ingredients
Instructions
Important Information
Nutrition Facts (Per Serving)
It is important to consider this information as approximate and not to use it as definitive health advice.
Allergy Information
Please check ingredients for potential allergens and consult a health professional if in doubt.