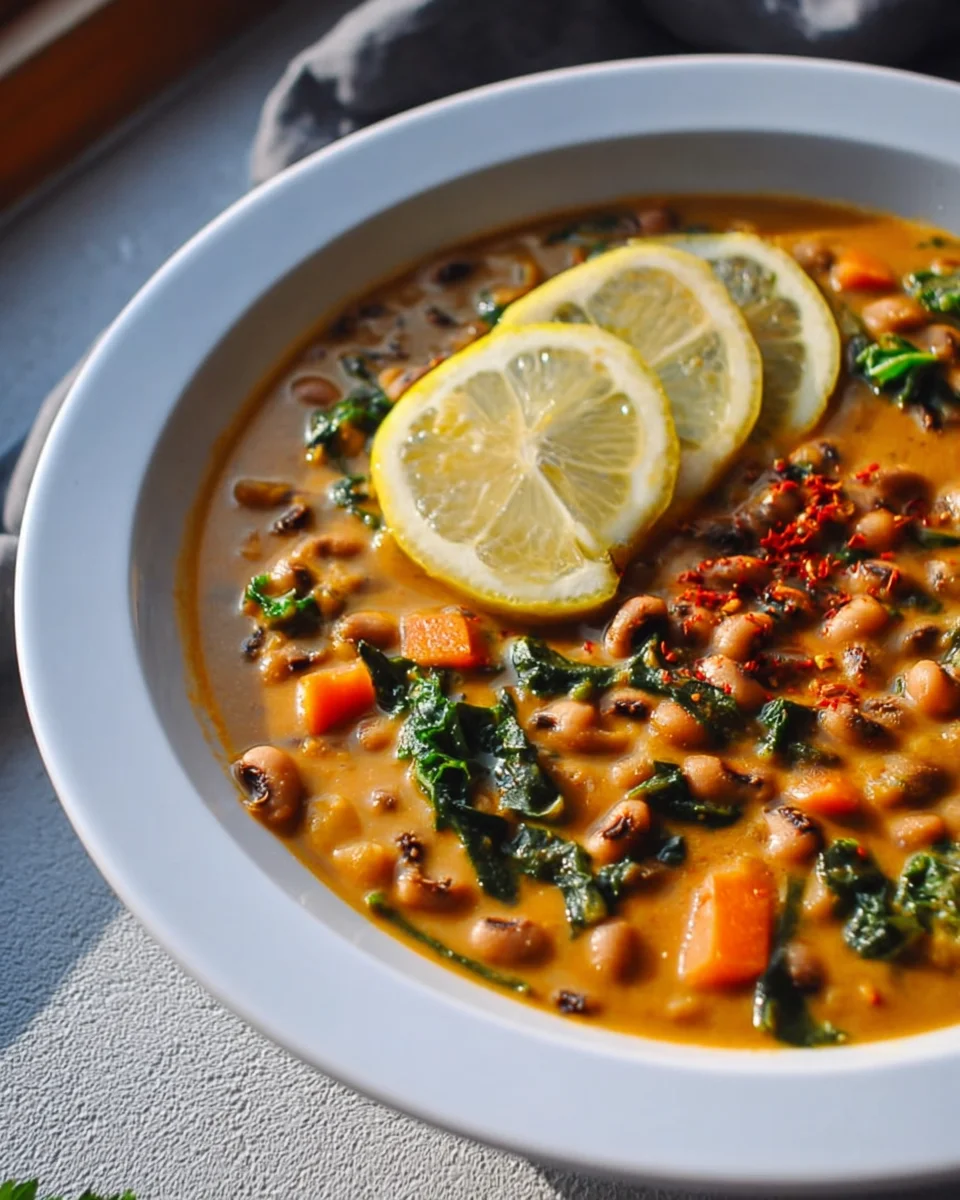
Instant Pot Black Eyed Peas Curry Recipe – if you’re searching for a dish that perfectly marries wholesome nutrition with an explosion of flavor and unparalleled convenience, then you’ve absolutely come to the right place. Imagine a rich, aromatic curry, simmering with tender black eyed peas and a medley of vibrant spices, all coming together effortlessly in your pressure cooker. This isn’t just another meal; it’s a comforting journey for your taste buds, promising to become a beloved staple in your kitchen.
Black eyed peas hold a special place in culinary traditions around the globe. From their symbolic role in the American South, representing good luck and prosperity, to the hearty stews and curries enjoyed across Africa and Asia, these humble legumes are a testament to global comfort food. Our specific take draws deep inspiration from the fragrant, spice-laden world of Indian cuisine, transforming this versatile ingredient into a modern classic that’s both deeply satisfying and wonderfully simple to prepare.
Why You’ll Adore This Instant Pot Black Eyed Peas Curry Recipe
People adore this dish for countless reasons: the creamy texture of the perfectly cooked peas, the profound depth of savory and subtly spicy flavors, and the incredible ease with which the Instant Pot brings it all to life. It’s a nutritious, plant-based powerhouse that delivers maximum flavor with minimal effort, making this Instant Pot Black Eyed Peas Curry Recipe ideal for busy weeknights, meal prepping, or a cozy weekend supper. Prepare to fall in love with its heartwarming embrace!

Ingredients:
- For the Instant Pot Black Eyed Peas Curry:
- 1 tablespoon vegetable oil or ghee
- 1 large onion, finely chopped (approximately 1.5 cups)
- 1 tablespoon fresh ginger, grated or minced
- 1 tablespoon garlic, minced
- 1-2 green chilies, slit lengthwise (adjust to your preferred level of spice)
- 1 teaspoon cumin seeds
- 1/2 teaspoon mustard seeds (optional, but they add a delightful nutty complexity)
- 1/4 teaspoon asafoetida (hing) – optional, traditionally used for digestion and flavor in lentil dishes
- 1 cup dried black eyed peas, thoroughly rinsed and drained (no pre-soaking is strictly required for Instant Pot cooking, which is a fantastic time-saver, but a 30-minute soak can sometimes lead to a slightly creamier texture if you have the time)
- 1 large ripe tomato, finely chopped, or 1/2 cup canned crushed tomatoes
- 1/2 teaspoon turmeric powder
- 1 teaspoon ground coriander powder
- 1/2 teaspoon red chili powder (use Kashmiri chili powder for vibrant color with less heat, or regular chili powder for more spice)
- 1/2 teaspoon garam masala
- 3 cups vegetable broth or water
- 1 teaspoon salt, or adjust to your taste preference later
- 1/4 cup full-fat coconut milk (canned, unsweetened) – optional, for an extra layer of richness and a velvety texture
- For the Tempering (Tadka – this step is highly recommended for an authentic and aromatic finish):
- 1 tablespoon vegetable oil or ghee
- 1/2 teaspoon mustard seeds
- 1/4 teaspoon cumin seeds
- 5-7 fresh curry leaves
- 1-2 dried red chilies (such as Byadagi or Arbol), broken into a few pieces
- For Garnish:
- Fresh cilantro, generously chopped
- A refreshing squeeze of fresh lime or lemon juice
Prepping for Your Instant Pot Black Eyed Peas Curry Adventure
1. Gather Your Ingredients: Before we dive into the exciting cooking process, I always recommend taking a few minutes to get all your ingredients prepped and laid out. This culinary practice, known as “mise en place,” makes the entire cooking experience much more streamlined and enjoyable, preventing any last-minute rushes or burnt onions! Take your time to finely chop the onion, mince the fresh ginger and garlic, and carefully slit the green chilies lengthwise. Crucially for our star ingredient, rinse your dried black eyed peas thoroughly under cold running water. We want them sparkling clean and ready to absorb all those wonderful flavors. One of the best aspects of this Instant Pot Black Eyed Peas Curry Recipe is its incredible convenience: you don’t actually need to pre-soak the black eyed peas. This saves you hours of planning ahead! However, if you have a spare 30 minutes, a quick soak can sometimes contribute to an even creamier, melt-in-your-mouth texture for the peas. Personally, I often skip the soaking step for the sheer ease and speed the Instant Pot provides.
2. Measure Your Spices with Precision: To ensure a smooth cooking flow, have all your dry spices measured out and organized in small bowls or ramekins. This includes turmeric powder, ground coriander, red chili powder, garam masala, cumin seeds, mustard seeds, and the optional asafoetida (hing). This preparation ensures you’re not fumbling with various spice jars while the Instant Pot is hot and demanding your full attention. The magic of a truly flavorful curry often begins with perfectly bloomed spices, and having them ready at hand is key to achieving that exquisite aroma and depth.
Building the Robust Flavor Base in Your Instant Pot
3. Initiate the Sauté and Temper the Seeds: Let’s kick off the flavor development for our delightful Instant Pot Black Eyed Peas Curry! Plug in your Instant Pot and select the “Sauté” function. Allow it to heat up until the display indicates “Hot,” which typically takes about 2-3 minutes. Once the pot is adequately heated, add 1 tablespoon of your chosen cooking oil or ghee to the inner pot. I often lean towards ghee for its rich, buttery aroma that adds an authentic Indian touch, but any neutral vegetable oil will also work beautifully. As soon as the oil is shimmering and hot, add the cumin seeds and, if using, the mustard seeds. Allow them to splutter and crackle for about 10-15 seconds. You’ll hear them pop joyfully, and a warm, earthy fragrance will immediately begin to permeate your kitchen. Be vigilant here; it’s crucial not to let these precious seeds burn, as scorched spices can impart an unwelcome bitter taste to your entire dish.
4. Softening the Aromatics: Immediately after the seeds have finished their lively dance, introduce the finely chopped onion to the pot. Stir thoroughly, ensuring the onions are evenly coated with the fragrant oil and spices. Sauté the onions for approximately 5-7 minutes, stirring occasionally, until they become beautifully translucent and begin to acquire a lovely golden hue at their edges. This step is incredibly important for building a foundational sweetness and depth of flavor in your curry. Resist the urge to rush this process! Once the onions have softened to perfection, add the minced ginger, minced garlic, slit green chilies, and the optional asafoetida (hing). Continue to stir constantly for another 1-2 minutes, until the pungent, raw aroma of the ginger and garlic mellows and transforms into a wonderfully fragrant perfume. Your kitchen will now be filled with an absolutely intoxicating blend of scents – a sure sign you’re on the right track! Use your wooden spoon or silicone spatula to scrape down any tasty bits that might be sticking to the bottom of the pot, ensuring nothing goes to waste and preventing any potential “Burn” warnings later.
5. Blooming the Ground Spices to Perfection: Now, for a truly magical moment in our Instant Pot Black Eyed Peas Curry Recipe! You might want to briefly press “Cancel” on your Instant Pot to slightly reduce the heat, or simply be very quick with your next additions. Add the turmeric powder, ground coriander powder, and red chili powder to the pot. Stir continuously for a short period, about 30 seconds to a minute. This vital technique, known as “blooming” the spices, allows their essential oils to release into the warm oil, dramatically intensifying their flavors and enhancing their vibrant colors. You’ll notice the mixture becoming incredibly fragrant and visually appealing. Exercise extreme caution during this step, as ground spices can burn very rapidly. If the mixture appears too dry and risks scorching, don’t hesitate to add a tiny splash of water (just about a tablespoon) to create a slurry and prevent sticking.
6. Incorporating Tomatoes and Black Eyed Peas: Add the chopped fresh tomato (or the crushed canned tomatoes) to the pot. Stir everything together thoroughly and continue to cook for another 3-5 minutes, pressing the “Sauté” button again if you previously cancelled it. Your goal here is for the tomatoes to break down completely, releasing all their juicy goodness and melding seamlessly with the other aromatics and spices. They should essentially melt into the mixture, forming a thick, rich, and cohesive paste that will serve as the luscious base for our curry. Once the tomatoes are thoroughly softened and you notice the oil beginning to separate from the mixture (a reliable sign that your base is beautifully cooked), add the rinsed and drained black eyed peas. Give everything a final, good stir, ensuring that each pea is lovingly coated with the fragrant and flavorful spice mixture. This meticulous layering of flavors is precisely what will create an truly outstanding and memorable Instant Pot Black Eyed Peas Curry Recipe.
Pressure Cooking Your Black Eyed Peas to Tender Perfection
7. Adding Liquid and Initial Seasoning: Carefully pour in the 3 cups of vegetable broth or water. Give the entire contents of the pot a final, thorough stir to combine everything beautifully. Take a moment to scrape up any delicious bits that might be clinging to the bottom of the pot; this is a crucial step to prevent any “Burn” warnings during the pressure cooking cycle. Add 1 teaspoon of salt at this stage. While you can always adjust the salt content later on, seasoning it now allows the flavors to truly penetrate the black eyed peas as they cook, enhancing the overall taste of your curry.
8. Securing the Instant Pot for Cooking: With everything prepared inside, it’s time to seal the deal! Carefully place the lid onto your Instant Pot, ensuring that the sealing ring is properly seated within the lid. Rotate the lid clockwise until it locks securely into place with an audible click. Before proceeding, double-check that the steam release handle (or knob) is correctly set to the “Sealing” position. Now, navigate to the control panel and select the “Pressure Cook” (or “Manual”) setting, making sure it’s set to “High Pressure.”
9. Setting the Cooking Time: Set the cooking timer for 15 minutes. For black eyed peas that haven’t been pre-soaked, 15 minutes at high pressure is generally the sweet spot, yielding wonderfully tender yet still intact peas. They won’t be mushy, but rather have a satisfying bite and creamy interior. If you did choose to give your black eyed peas a quick 30-minute soak, you might consider reducing the cooking time slightly to 12 minutes, though 15 minutes is still a safe bet for achieving a lovely, creamy texture without overcooking. Remember, the Instant Pot will take approximately 10-15 minutes to come up to pressure before the actual cooking countdown begins. Be patient during this preparatory phase, as the magic of tenderizing those black eyed peas is quietly happening within!
10. Allowing for Natural Pressure Release: Once the cooking cycle is complete and your Instant Pot emits a cheerful beep, it’s time for the vital natural pressure release (NPR) phase. Allow the pressure to release naturally for at least 10 minutes. This means you simply leave the pot undisturbed after the timer signals completion. Natural pressure release is beneficial as it allows the beans to finish cooking gently in the residual heat, preventing them from bursting open and contributing to a creamier texture. After the initial 10-minute natural release, carefully move the steam release handle (using a kitchen towel or oven mitt to protect your hand from the steam) to the “Venting” position to manually release any remaining pressure. Once the silver float valve drops down, it’s safe to twist open the lid.
11. Finishing Touches with Garam Masala and Coconut Milk: With the pressure fully released, carefully open the lid, tilting it away from your face to avoid the rush of hot steam. Give the curry a good, gentle stir. You’ll be greeted with beautifully tender black eyed peas and a curry that has naturally thickened to a wonderful consistency. Now, stir in the remaining 1/2 teaspoon of garam masala. Adding it at this stage ensures its fresh, vibrant aromatics truly shine through in the finished dish. If you’re opting for the delightful creaminess of canned coconut milk, now is the time to gently stir it in. Allow the coconut milk to heat through for just a minute or two on the “Sauté” setting (or simply from the residual heat of the curry) without letting it come to a rapid boil, as vigorous boiling can sometimes cause coconut milk to curdle.
The Flavorful Finish: Tempering (Tadka) and Serving Your Delicious Curry
12. Preparing the Aromatic Tempering (Tadka): While this step is entirely optional, I wholeheartedly recommend it as it truly elevates the flavor of your Instant Pot Black Eyed Peas Curry to another level. A well-executed tadka adds an incredible burst of fresh aroma, texture, and visual appeal right at the very end. In a small separate pan or a traditional Indian tadka pan, heat 1 tablespoon of oil or ghee over medium heat. Once the oil is shimmering and hot, add the mustard seeds and cumin seeds. Allow them to splutter and crackle for about 10-15 seconds. You’ll hear their characteristic popping sound, and they’ll release a wonderfully nutty, warm fragrance.
13. Infusing with Curry Leaves and Dried Chilies: Immediately after the seeds have done their work, add the fresh curry leaves and the broken pieces of dried red chilies to the hot oil. Be cautious at this point, as the curry leaves will splutter quite vigorously due to their moisture content. Fry for approximately 30 seconds, stirring gently, until the curry leaves become beautifully crisp and the dried chilies have deepened in color slightly, but without burning. The aroma emanating from this tadka is absolutely intoxicating and is a signature hallmark of many authentic Indian and South Indian dishes.
14. Integrating the Tadka into the Curry: With the tempering perfectly cooked, carefully pour the hot, aromatic mixture directly over the prepared black eyed peas curry in the Instant Pot. You’ll be rewarded with a satisfying sizzle, and a fragrant cloud of incredible aroma will rise from the pot, filling your kitchen with its magic. Give the curry a gentle stir to thoroughly incorporate the tempering throughout. This final, vibrant touch adds not only an incredible depth of layered flavor but also a beautiful rustic visual appeal to your curry.
15. Final Seasoning and Garnish: Now for the moment of truth: taste your magnificent curry and adjust for salt if necessary. A generous squeeze of fresh lime or lemon juice right before serving is a fantastic way to brighten up all the rich flavors and add a delightful zesty finish that truly makes the dish sing. Finally, complete your culinary masterpiece by generously garnishing your beautiful Instant Pot Black Eyed Peas Curry Recipe with a shower of freshly chopped cilantro.
16. Serving Suggestions and Enjoyment: Your incredibly delicious and hearty Instant Pot Black Eyed Peas Curry is now ready to be savored! This robust and flavorful curry is wonderfully versatile and pairs exquisitely with a wide array of accompaniments. I love serving it piping hot with fluffy basmati rice, warm and pillowy naan bread, or crispy, flaky parathas. It also makes a fantastic, protein-packed side dish alongside other Indian curries or grilled meats. For those seeking a lighter meal, you can absolutely enjoy it on its own as a wholesome and satisfying bowl of goodness, perhaps with a simple side salad. A little secret I’ve learned: the leftovers are often even more flavorful the next day, as the spices and other ingredients have had more time to deepen and marry, creating an even more complex taste experience. Don’t hesitate to make a big batch, as you’ll surely want to enjoy this for lunch or dinner again! This Instant Pot Black Eyed Peas Curry is truly a wholesome, nourishing, and incredibly satisfying meal that I am confident you and your loved ones will absolutely adore. Enjoy every single spoonful!
Conclusion:
Friends, if you’ve been searching for a dish that truly delivers on flavor, convenience, and wholesome goodness, then your culinary quest might just end here. I genuinely believe that this particular recipe isn’t just another meal; it’s an experience waiting to unfold in your kitchen. From the moment the aromatic spices begin to meld in your Instant Pot, you’ll know you’re on the verge of creating something truly special. This dish is a testament to how humble ingredients can transform into an extraordinary feast with minimal effort, thanks to the magic of pressure cooking. It’s perfect for those busy weeknights when time is a luxury, yet you crave a homemade meal that feels like it’s been simmering all day. Imagine coming home to a rich, deeply flavored curry, bursting with tender black eyed peas and a harmonious blend of spices that dance on your palate. That feeling of warmth and satisfaction is precisely what this recipe offers, making it an absolute must-try for everyone, regardless of their cooking skill level.
What truly sets this recipe apart is its incredible depth of flavor. We’re not talking about a bland, one-note dish; this is a symphony of savory, mildly spicy, and earthy tones that are incredibly comforting and utterly delicious. It’s a fantastic way to incorporate more plant-based protein into your diet without sacrificing taste or texture. The black eyed peas become wonderfully creamy and absorb all the delightful spices, creating a truly luxurious base for the curry. Plus, the sheer ease of preparation in the Instant Pot means less time spent stirring over a hot stove and more time enjoying the wonderful aromas filling your home. It’s a wholesome, hearty, and utterly satisfying meal that nourishes both body and soul, proving that delicious home cooking doesn’t have to be complicated.
Now, let’s talk about how to enjoy this culinary masterpiece. While it’s fantastic on its own, I love to serve this rich curry alongside a steaming bowl of fluffy basmati rice, allowing the grains to soak up every drop of that incredible sauce. For those who prefer a different accompaniment, wild rice, brown rice, or even quinoa make excellent, nutritious choices. If you’re a bread lover like me, don’t forget a warm piece of naan bread or a soft roti to scoop up every last bit of that deliciousness – it’s simply divine! To elevate the experience further, I highly recommend garnishing your bowl with a generous sprinkle of fresh cilantro, a squeeze of zesty lime juice to brighten the flavors, or even a dollop of cooling plain yogurt (or a dairy-free alternative for a vegan option). A little finely chopped red onion on top also adds a delightful crunch and tang that complements the curry beautifully. These simple additions can transform your meal from great to truly unforgettable.
Unleash Your Inner Chef with Creative Variations!
One of the aspects I adore most about this particular dish is its incredible versatility. Don’t be afraid to make it your own! For those who love a bit more heat, feel free to increase the amount of fresh green chilies or a pinch of cayenne pepper to really turn up the spice factor. On the other hand, if you prefer a milder curry, simply reduce the chilies or remove them entirely before serving. This incredible Instant Pot Black Eyed Peas Curry Recipe is also highly adaptable to incorporate extra vegetables. I often toss in a handful of fresh spinach or kale during the last few minutes of cooking for an added boost of greens, allowing them to wilt gently into the hot curry. Diced bell peppers, chunks of sweet potato, or even cauliflower florets would also be wonderful additions, adding more texture and nutrients to your meal. For an even creamier consistency, a splash of full-fat coconut milk stirred in at the end can create a lusciously smooth curry that’s utterly irresistible. You could also experiment with different spice blends, perhaps adding a touch of garam masala for an extra layer of aromatic complexity. The possibilities are truly endless, encouraging you to customize it to your family’s unique tastes and preferences.
So, there you have it! I truly hope I’ve convinced you to give this phenomenal recipe a try. I am incredibly confident that once you experience the ease, the aroma, and the sheer deliciousness of this curry, it will quickly become a cherished staple in your cooking repertoire. Don’t hesitate, gather your ingredients, fire up your Instant Pot, and embark on this wonderful culinary adventure. And please, when you do whip up a batch, I would absolutely love to hear about your experience! Share your photos, your serving suggestions, or any creative twists you added in the comments below. Your feedback and personal touches inspire me and our entire cooking community. Happy cooking, and get ready to enjoy a truly remarkable meal!
Instant Pot Black Eyed Peas Curry: Quick & Easy Recipe
If you’re searching for a dish that perfectly marries wholesome nutrition with an explosion of flavor and unparalleled convenience, then you’ve absolutely come to the right place. Imagine a rich, aromatic curry, simmering with tender black eyed peas and a medley of vibrant spices, all coming together effortlessly in your pressure cooker. This isn’t just another meal; it’s a comforting journey for your taste buds, promising to become a beloved staple in your kitchen.
Ingredients
Instructions
Important Information
Nutrition Facts (Per Serving)
It is important to consider this information as approximate and not to use it as definitive health advice.
Allergy Information
Please check ingredients for potential allergens and consult a health professional if in doubt.