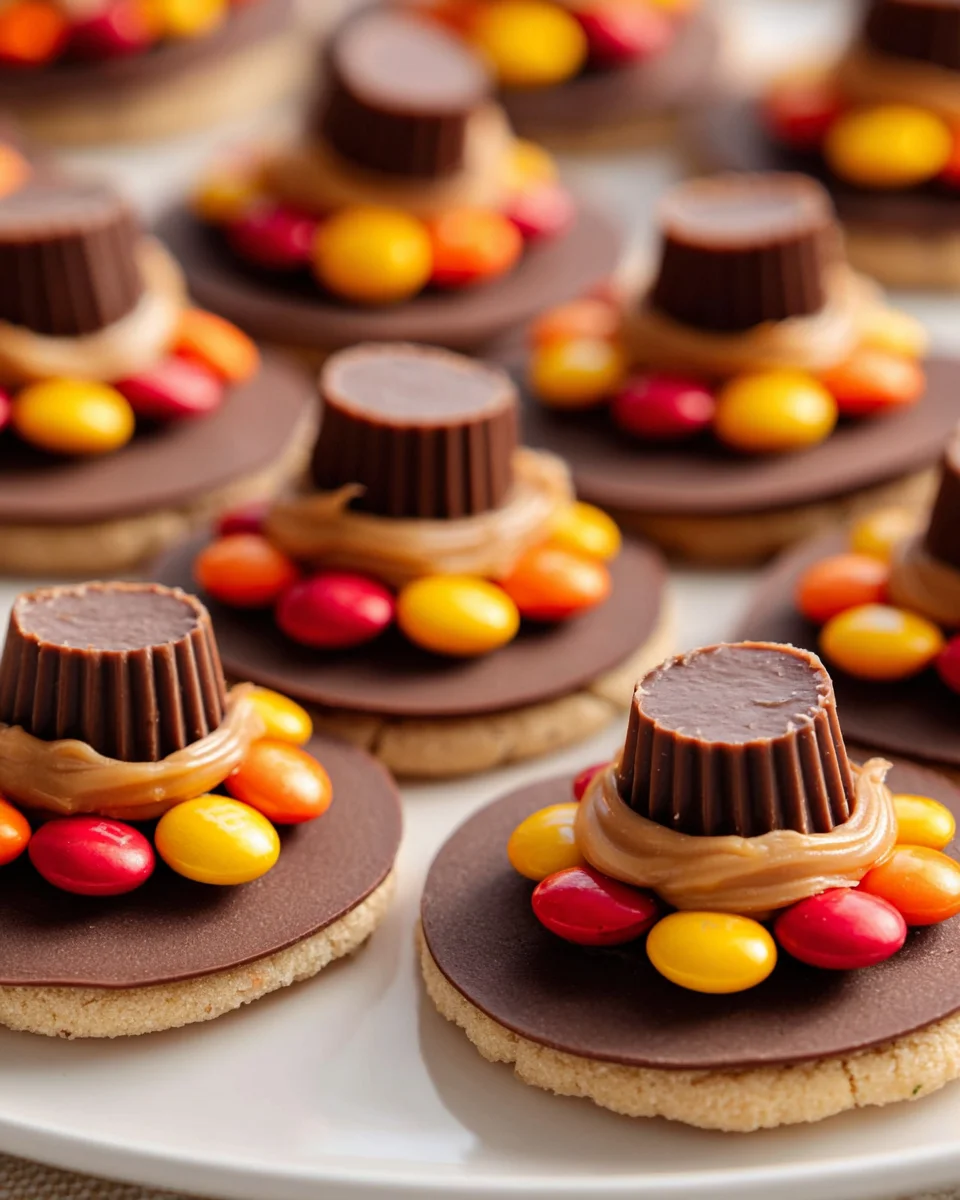
Pilgrim Hat Cookies
When I think of the festive season, one delightful treat that always comes to mind is Pilgrim Hat Cookies. These adorable sweets are not only a fun homage to the Thanksgiving spirit, but they also bring a burst of creativity to any gathering. With their charming chocolate-covered tops resembling the iconic hats of the pilgrims, they effortlessly bridge the gap between deliciousness and holiday cheer.
What makes Pilgrim Hat Cookies truly special is their delightful combination of flavors and textures. The base is typically a soft, chewy cookie, topped with a smooth chocolate disc that perfectly mimics a pilgrim’s hat. Just when you think they can’t get any better, a sweet candy corn piece crowns the hat, adding a pop of color and sweetness that will have everyone reaching for seconds. Trust me, these cookies are not just a treat for the taste buds; they’re a feast for the eyes, too!
Whether you’re baking with your kids or looking for a festive addition to your dessert table, Pilgrim Hat Cookies are sure to be a hit. They’re easy to make and even easier to enjoy, making them the perfect way to celebrate the season while creating sweet memories with loved ones. So, let’s roll up our sleeves and get ready to whip up a batch of these delightful cookies that are bound to bring smiles and gratitude all around!

Ingredient Notes
To create delightful Pilgrim Hat Cookies, you’ll need a handful of key ingredients that come together for a sweet treat perfect for Thanksgiving or any festive occasion. Here’s what you’ll need:
- Chocolate wafers: These serve as the base of your Pilgrim hats. If you can’t find chocolate wafers, you can use chocolate cookies or graham crackers as a substitute.
- Chocolate frosting: This will hold your candy decorations in place. If you prefer, you can make homemade frosting using powdered sugar, cocoa powder, butter, and milk.
- Mini peanut butter cups: These act as the top of the hat. For a nut-free alternative, consider using chocolate-covered caramel candies.
- Yellow icing or candy melts: This is used to create the buckle on the hat. If you want a quick alternative, you can use yellow sprinkles or even small pieces of yellow fruit-flavored candy.
- Optional decorations: Feel free to get creative with edible glitter or colored sugar for added flair!
Step-by-Step Instructions
Making Pilgrim Hat Cookies is not only fun but also a great activity to do with family and friends. Let’s walk through the steps together!
- Prepare your workspace: Start by gathering all your ingredients and tools. You will need a baking sheet, parchment paper, and a piping bag or a plastic bag with a corner snipped off for the icing.
- Lay out the wafers: Place your chocolate wafers on the parchment-lined baking sheet. Make sure they are spaced out evenly so you have enough room for the peanut butter cups.
- Add frosting: Using your chocolate frosting, place a generous dollop on top of each wafer. This will act as glue to hold the peanut butter cups in place.
- Top with peanut butter cups: Carefully place a mini peanut butter cup upside down on each frosted wafer. Press gently to ensure they stick well.
- Create the buckle: In a small bowl, prepare your yellow icing or melted yellow candy. Using your piping bag, draw a small square or rectangle on the front of each peanut butter cup to represent the buckle of the Pilgrim hat.
- Let them set: Allow the cookies to sit for a few minutes so the frosting and icing can set. This will help keep everything in place.
- Serve and enjoy: Once everything is set, your Pilgrim Hat Cookies are ready to be enjoyed! They make a great centerpiece for your dessert table.
Tips & Suggestions
Here are some additional tips to help you create the best Pilgrim Hat Cookies:
- Mix and match flavors: Feel free to experiment with different cookie bases or frosting flavors to suit your taste. A vanilla wafer or even a gingerbread cookie would create a fun twist!
- Get creative with decorations: Use colored icing or edible markers to add more detail to your hats. You could even make them look like different styles of hats!
- Make it a fun project: Involve kids or friends in the decorating process. It’s a great way to bond and create lasting memories.
- Consider dietary restrictions: If you have guests with allergies, consider using gluten-free cookies or dairy-free frosting to accommodate everyone.
Storage
To ensure your Pilgrim Hat Cookies stay fresh, follow these storage tips:
- Room temperature: Store the cookies in an airtight container at room temperature for up to a week. They’re best enjoyed fresh, but they can last a little longer if kept sealed.
- Refrigeration: If you live in a warm climate, you might want to refrigerate them to prevent the chocolate from melting. Just be sure to let them come back to room temperature before serving.
- Freezing: If you want to make these cookies ahead of time, you can freeze them. Just freeze them in a single layer on a baking sheet first, then transfer to an airtight container. They can last up to three months in the freezer.
Now that you have the complete guide to making Pilgrim Hat Cookies, I hope you enjoy creating and sharing this delightful treat with your loved ones! Happy baking!
Final Thoughts
If you’re looking for a delightful and festive treat to add to your holiday celebrations, look no further than Pilgrim Hat Cookies. These charming little cookies not only capture the spirit of Thanksgiving with their playful design, but they also deliver a delicious burst of flavor with every bite. The combination of chocolate and peanut butter is simply irresistible, making them a favorite among both kids and adults alike. Plus, they’re easy to make, so you can get the whole family involved in the fun! Trust me, Pilgrim Hat Cookies are a must-try this season, and they’ll surely become a cherished tradition in your home. So gather your ingredients and let’s create some sweet memories together!

Delicious Pilgrim Hat Cookies: A Festive Treat for All!
- Total Time: 15 minutes
- Yield: 24 cookies
Description
These delightful Pilgrim Hat Cookies are a fun homage to the Thanksgiving spirit, combining chocolate and peanut butter for a festive treat. Perfect for gatherings, they bring smiles and creativity to any dessert table.
Ingredients
- Chocolate wafers
- Chocolate frosting
- Mini peanut butter cups
- Yellow icing or candy melts
- Optional decorations (edible glitter or colored sugar)
Instructions
- Prepare your workspace: Start by gathering all your ingredients and tools. You will need a baking sheet, parchment paper, and a piping bag or a plastic bag with a corner snipped off for the icing.
- Lay out the wafers: Place your chocolate wafers on the parchment-lined baking sheet. Make sure they are spaced out evenly so you have enough room for the peanut butter cups.
- Add frosting: Using your chocolate frosting, place a generous dollop on top of each wafer. This will act as glue to hold the peanut butter cups in place.
- Top with peanut butter cups: Carefully place a mini peanut butter cup upside down on each frosted wafer. Press gently to ensure they stick well.
- Create the buckle: In a small bowl, prepare your yellow icing or melted yellow candy. Using your piping bag, draw a small square or rectangle on the front of each peanut butter cup to represent the buckle of the Pilgrim hat.
- Let them set: Allow the cookies to sit for a few minutes so the frosting and icing can set. This will help keep everything in place.
- Serve and enjoy: Once everything is set, your Pilgrim Hat Cookies are ready to be enjoyed! They make a great centerpiece for your dessert table.
- Prep Time: 15 mins
- Cook Time: 0 mins
- Category: Dessert
- Method: No-bake
- Cuisine: American
Nutrition
- Serving Size: 1 cookie
- Calories: 120
- Sugar: 10 g
- Sodium: 50 mg
- Fat: 6 g
- Saturated Fat: 3 g
- Unsaturated Fat: 2 g
- Trans Fat: 0 g
- Carbohydrates: 15 g
- Fiber: 1 g
- Protein: 2 g
- Cholesterol: 5 mg
Keywords: Feel free to experiment with different cookie bases or frosting flavors. Consider using gluten-free cookies or dairy-free frosting to accommodate dietary restrictions.