Christmas Cherry Bars
Oh, do I have a delightful recipe to share with you today that just screams holiday cheer! We all know how hectic the festive season can get, but some traditions are worth savoring, and for me, that includes baking up something truly special and delicious. That’s exactly what these Christmas Cherry Bars are all about.
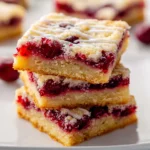
What makes these bars so incredibly special, you ask? Well, imagine a symphony of festive colors and flavors! You’ve got that vibrant, ruby-red cherry filling, perfectly nestled on a buttery, golden crust, and then crowned with a dreamy, creamy topping that just melts in your mouth. They’re not just a dessert; they’re a little piece of edible holiday magic, perfectly capturing the spirit of Christmas in every single bite.
I promise you, these Christmas Cherry Bars are going to be your new favorite holiday go-to. They are so easy to whip up, yet they look absolutely stunning on any holiday table, making them perfect for potlucks, gifting to neighbors, or simply enjoying with your family by the fireplace. Readers just adore how the tartness of the cherries perfectly balances the sweet crust and luscious topping, creating a truly irresistible treat that everyone will fall in love with.
So, let me give you a quick peek at what we’re creating: a delightful base, a gooey, jewel-toned cherry layer, and a heavenly, smooth finish that brings it all together. Get ready to bake something truly memorable this season!

Ingredient Notes
Crafting the perfect Christmas Cherry Bars starts with selecting the right ingredients. I always find that a little attention to detail here makes all the difference in achieving that wonderfully festive flavor and texture. Here’s a rundown of what you’ll need and some thoughts on substitutions.
For the Shortbread Crust and Streusel Topping:
- All-Purpose Flour: This forms the backbone of our delightful buttery crust and crumbly streusel. I recommend using a good quality unbleached all-purpose flour.
- Granulated Sugar: For sweetness and to help create that perfect crisp texture in the shortbread.
- Unsalted Butter (cold and cubed): This is absolutely essential for a tender, flaky shortbread. Cold butter, cut into small cubes, helps prevent overmixing and ensures a truly crumbly texture. If you’re looking for a dairy-free option, a good quality plant-based butter alternative that’s designed for baking can work wonderfully here. Just make sure it’s cold!
- Almond Extract: For me, almond extract is the secret ingredient that truly elevates cherry desserts, giving them a marzipan-like depth that’s just divine. If you have an almond allergy or prefer not to use it, vanilla extract is a fantastic and universally loved alternative that will still provide a lovely warmth to the bars.
- Salt: Just a pinch to balance the sweetness and enhance all the other flavors.
For the Cherry Filling:
- Canned Cherry Pie Filling: This is the star of our show, providing that vibrant red color and sweet-tart cherry flavor that screams “Christmas!” I typically use one standard 21-ounce can. You can absolutely use a homemade cherry pie filling if you have a recipe you love, or even incorporate some fresh or frozen pitted cherries (thawed and drained) into a store-bought filling for extra texture and freshness.
- Lemon Zest (optional): A little zest from a fresh lemon can brighten up the cherry filling beautifully, adding a subtle tang that really makes the flavors pop. I find it adds a lovely festive touch without being overpowering.
For the Garnish (Optional):
- Sliced Almonds: Sprinkling some sliced almonds over the streusel before baking adds a lovely crunch and visual appeal, complementing the almond extract in the crust perfectly.
- Powdered Sugar: A light dusting after cooling gives these bars a gorgeous, snowy finish that’s perfect for the holidays.
My goal is always to create a recipe that’s both delicious and adaptable. Remember, these are my favorite ways to make Christmas Cherry Bars, but feel free to experiment and make them your own!
Step-by-Step Instructions
Let’s get baking! These Christmas Cherry Bars are surprisingly simple to put together, and the steps are straightforward. I promise you’ll have a stunning and delicious holiday treat in no time.
1. Prepare for Baking:
- First things first, I always preheat my oven to 350°F (175°C). This ensures the oven is at the correct temperature when I put the bars in, leading to even baking.
- Next, prepare your baking pan. I use a 9×13 inch baking pan for these bars. For easy removal and clean slices, I line it with parchment paper, leaving an overhang on the sides. This creates “slings” that you can use to lift the entire batch of bars out of the pan once they’re cooled. If you don’t have parchment paper, a good greasing and flouring of the pan will work too.
2. Make the Shortbread Crust and Streusel:
- In a large mixing bowl, I combine the all-purpose flour, granulated sugar, and salt. Give these dry ingredients a quick whisk to ensure they’re well combined.
- Now for the butter! I add the cold, cubed unsalted butter to the dry ingredients. You have a few options here:
- Food Processor Method: This is my go-to for speed and consistency. Pulse the mixture until it resembles coarse crumbs. Be careful not to overmix; you want pea-sized pieces of butter still visible.
- Pastry Blender Method: If you don’t have a food processor, a pastry blender works wonderfully. Cut the butter into the flour mixture until you have coarse crumbs.
- Fingertip Method: You can also use your fingertips to rub the butter into the flour mixture. This is a bit more hands-on but ensures you don’t overwork the dough.
- Once you have a crumbly mixture, I stir in the almond extract (or vanilla extract if you’re using that instead).
- Next, I set aside about 1 to 1½ cups of this crumbly mixture. This will be our streusel topping later.
3. Form the Crust:
- Take the remaining crumb mixture and press it evenly into the bottom of your prepared 9×13 inch baking pan. I use the bottom of a flat glass or my fingers to gently but firmly press it down, creating a compact base.
- Bake this crust for about 10-12 minutes, or until the edges are just lightly golden. This step, called pre-baking or blind baking, helps ensure your crust is perfectly crisp and not soggy once the filling is added.
- Once lightly baked, remove the pan from the oven. Keep the oven on!
4. Add the Cherry Filling:
- Carefully and evenly spread the canned cherry pie filling over the warm, partially baked crust. If I’m using lemon zest, I’ll gently stir it into the pie filling before spreading it. I try to get it right to the edges for a beautiful finish.
5. Top with Streusel and Bake:
- Crumble the reserved streusel mixture evenly over the cherry filling. If I’m adding sliced almonds, I sprinkle them over the streusel now.
- Return the pan to the preheated oven and bake for another 25-30 minutes, or until the streusel topping is golden brown and the cherry filling is bubbly around the edges.
6. Cool Completely:
- This is perhaps the most important step for clean, neat bars! Once baked, remove the pan from the oven and place it on a wire rack to cool COMPLETELY. This can take 2-3 hours, or even longer. Resist the urge to cut into them warm, as the filling will still be too soft and the bars won’t hold their shape. Patience is key for perfect bars!
7. Slice and Serve:
- Once thoroughly cooled, use the parchment paper overhangs to lift the entire slab of bars out of the pan and transfer it to a cutting board.
- Using a sharp knife, cut the bars into desired squares or rectangles. For an extra festive touch, I love to dust them with a little powdered sugar before serving.
Tips & Suggestions
I’ve made these Christmas Cherry Bars many times over the years, and I’ve picked up a few tricks and tips along the way that I think will help you achieve the best results. These suggestions are designed to make your baking experience even smoother and your bars even more delicious!
- Keep Your Butter Cold: This is my number one rule for shortbread-based bars. Cold butter creates those wonderful flaky pockets in the crust and streusel. If your kitchen is warm, you can even pop your bowl of flour and butter into the fridge for 10-15 minutes before working with it. I find this especially helpful during warmer holiday seasons.
- Don’t Overmix the Crust: When creating the shortbread mixture, mix it just until it comes together into coarse crumbs. Overmixing develops the gluten in the flour, which can lead to a tough crust instead of a tender one. The less you handle it, the better!
- Pre-Bake for a Sturdy Base: That initial 10-12 minute bake for the bottom crust is crucial. It helps to set the crust, preventing it from becoming soggy under the cherry filling. I never skip this step!
- Cooling is Non-Negotiable: I cannot stress this enough – allow the bars to cool completely before cutting. The cherry filling needs ample time to set up properly. If you cut into them too early, the filling will be runny, and the bars will crumble, making a messy situation. A few hours at room temperature, or even an hour in the refrigerator once mostly cooled, will result in beautifully neat slices.
- For Clean Cuts: Once fully cooled, I use a large, sharp knife to cut my bars. For extra clean edges, wipe your knife clean with a damp cloth between each slice, especially after the first few cuts through the sticky cherry filling.
- Enhance the Christmas Spirit:
- Extra Almond Flavor: If you’re an almond lover like me, consider adding a tiny splash (about ¼ teaspoon) of almond extract directly into the cherry pie filling before spreading it. It deepens the flavor wonderfully.
- Festive Glaze: Instead of just powdered sugar, you could make a simple drizzle. Whisk together ½ cup powdered sugar with 1-2 teaspoons milk (dairy or non-dairy) and a tiny drop of almond extract. Drizzle over the cooled bars for an extra touch of sweetness and visual appeal. You could even add a tiny bit of red or green food coloring for extra holiday cheer!
- White Chocolate Drizzle: A drizzle of melted white chocolate over the cooled bars adds a beautiful contrast and another layer of sweetness.
- Spices: A pinch of cinnamon or nutmeg stirred into the shortbread mixture can add an extra layer of warm, holiday spice.
- Adjust Pan Size if Needed: While I specify a 9×13 inch pan, if you use a slightly smaller pan, your bars will be thicker and might require a few extra minutes of baking. A larger pan will yield thinner bars and might bake a bit quicker. Keep an eye on them!
With these tips in mind, I know you’ll create Christmas Cherry Bars that are not only delicious but also picture-perfect for your holiday table!
Storage
Once you’ve gone through the effort of baking these delightful Christmas Cherry Bars, you’ll want to make sure they stay fresh and delicious for as long as possible. Here’s my advice on storing them, whether you plan to enjoy them in a few days or save some for later.
At Room Temperature:
- If you plan to devour your bars within 2-3 days, storing them at room temperature is perfectly fine.
- I recommend placing the completely cooled and cut bars in an airtight container. Keep them away from direct sunlight or heat sources, as this can affect their texture and freshness.
- Layering parchment paper between stacks of bars can prevent them from sticking together.
In the Refrigerator:
- For longer freshness, especially due to the fruit filling, I prefer to store Christmas Cherry Bars in the refrigerator. This will extend their shelf life to about 5-7 days.
- Again, ensure they are stored in an airtight container. The cool temperature helps maintain the firmness of the crust and keeps the cherry filling nice and stable.
- Before serving, I sometimes like to let them sit at room temperature for 15-20 minutes, or even gently warm a slice in the microwave for a few seconds, to bring out the flavors and soften the texture slightly.
Freezing for Longer Storage:
- These bars freeze beautifully, which is fantastic if you want to get a head start on your holiday baking or save some for an unexpected treat!
- Once the bars are completely cooled and cut, I usually arrange them in a single layer on a baking sheet lined with parchment paper. Flash freeze them for about an hour, or until solid. This prevents them from sticking together when transferred to a container.
- After flash freezing, transfer the frozen bars to an airtight, freezer-safe container or a heavy-duty freezer bag. You can layer them with parchment paper in between.
- They will keep well in the freezer for up to 2-3 months.
- To Thaw: When you’re ready to enjoy them, simply take out the desired number of bars and let them thaw at room temperature for a few hours, or overnight in the refrigerator. I find they taste just as good as freshly baked!
Proper storage means you can enjoy these festive Christmas Cherry Bars long after the initial baking session!

Final Thoughts
I genuinely hope you’re as thrilled about these Christmas Cherry Bars as I am! They truly are more than just a dessert; they’re a little slice of holiday magic that brightens any festive table. With their cheerful red cherry filling peeking through a golden, buttery crust, and that irresistible balance of sweet and tart, I promise these bars are an absolute dream come true for your holiday baking.
What makes these Christmas Cherry Bars a must-try is how effortlessly they bring joy and warmth. They’re perfect for sharing at gatherings, a lovely treat to enjoy with a warm cup of cocoa on a cold evening, or even beautifully packaged as a heartfelt homemade gift. Once you experience their delightful flavor and festive charm, I’m confident they’ll quickly become a treasured and much-anticipated tradition in your holiday season for years to come. Enjoy every delicious bite!
Delicious Christmas Cherry Bars: A Must-Make Holiday Treat
- Total Time: 1 hour
- Yield: 12 servings 1x
Description
These Christmas Cherry Bars are a delightful combination of a buttery crust, vibrant cherry filling, and a creamy topping, perfect for the holiday season. Easy to make and stunning to present, they are sure to become a festive favorite.
Ingredients
- 2 cups All-Purpose Flour
- 1 cup Granulated Sugar
- 1 cup Unsalted Butter (cold and cubed)
- 1 teaspoon Almond Extract
- 1/4 teaspoon Salt
- 1 can (21 ounces) Canned Cherry Pie Filling
- 1 teaspoon Lemon Zest (optional)
- Sliced Almonds (optional)
- Powdered Sugar (for dusting)
Instructions
- Preheat your oven to 350°F (175°C). Prepare a 9×13 inch baking pan by lining it with parchment paper, leaving an overhang on the sides.
- In a large mixing bowl, combine the all-purpose flour, granulated sugar, and salt. Whisk to combine.
- Add the cold, cubed unsalted butter to the dry ingredients. Use a food processor, pastry blender, or your fingertips to mix until the mixture resembles coarse crumbs.
- Set aside about 1 to 1½ cups of the crumb mixture for the streusel topping.
- Press the remaining crumb mixture evenly into the bottom of the prepared baking pan. Bake for about 10-12 minutes until the edges are lightly golden.
- Spread the canned cherry pie filling evenly over the warm crust. If using lemon zest, stir it into the filling before spreading.
- Crumble the reserved streusel mixture over the cherry filling. If using sliced almonds, sprinkle them on top.
- Return the pan to the oven and bake for another 25-30 minutes until the streusel topping is golden brown and the cherry filling is bubbly.
- Remove from the oven and cool completely on a wire rack for 2-3 hours before cutting into bars.
- Prep Time: 20 mins
- Cook Time: 40 mins
- Category: Dessert
- Method: Baking
- Cuisine: American
Nutrition
- Serving Size: 1 bar
- Calories: 250
- Sugar: 18 g
- Sodium: 150 mg
- Fat: 12 g
- Saturated Fat: 7 g
- Unsaturated Fat: 3 g
- Trans Fat: 0 g
- Carbohydrates: 34 g
- Fiber: 1 g
- Protein: 2 g
- Cholesterol: 30 mg
Keywords: Keep your butter cold for a flaky texture. Don't overmix the crust to avoid toughness. Allow the bars to cool completely before cutting for neat slices.