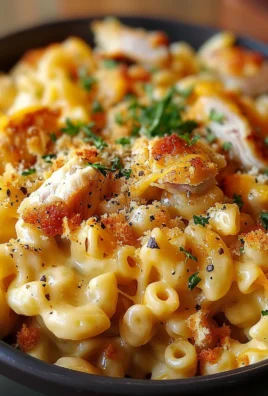
Lemon Chicken Romano
Lemon Chicken Romano is truly one of my favorite weeknight heroes, but it’s elegant enough to impress at any dinner party. What makes this dish so utterly irresistible, you ask? It’s that perfect harmony of bright, zesty lemon cutting through the rich, salty, umami notes of Romano cheese. We’re talking about tender, succulent chicken breasts (or cutlets, your choice!) coated in a flavorful mixture that crisps up beautifully, creating an incredible crust with every bite.
You’ll love how quickly this comes together, transforming simple ingredients into a meal that feels gourmet. It’s savory, it’s tangy, it’s comforting, and it’s guaranteed to become a staple in your kitchen.

Ingredient Notes
Creating a truly memorable Lemon Chicken Romano starts with understanding the star players in this delightful dish. Each ingredient plays a crucial role in building the layers of flavor that make this recipe so beloved. I’ve carefully selected them to ensure that sharp, tangy, and savory profile we’re all looking for.
The Chicken
- Boneless, Skinless Chicken Breasts or Thighs: I prefer using boneless, skinless chicken breasts for their lean texture and quick cooking time. Pounding them to an even thickness (about 1/2 inch) is a game-changer; it ensures they cook evenly and remain incredibly tender. If you’re a fan of richer flavor and a slightly more forgiving cut, boneless, skinless chicken thighs work beautifully too!
- Substitutions: If you’re looking for an alternative to poultry, lean beef cutlets pounded thin can also be used, though the cooking time and flavor profile will differ slightly, offering a heartier option. For a lighter touch, thin turkey cutlets are an excellent stand-in.
The Romano Cheese
- Pecorino Romano Cheese: This is the hero ingredient that gives our dish its distinctive name and robust, salty, and slightly pungent flavor. It’s a hard, salty Italian cheese made from sheep’s milk. Grate it freshly yourself if you can; pre-grated cheeses often contain anti-caking agents that can affect the texture of your sauce.
- Substitutions: While Pecorino Romano is ideal, a good quality Parmesan cheese (Parmigiano-Reggiano) can be used in a pinch for a slightly milder, nuttier flavor. You could also explore other hard, aged Italian cheeses if you have a favorite.
The Lemon
- Fresh Lemons: There’s simply no substitute for fresh lemon juice and zest here. The bright, zesty aroma and tangy flavor from fresh lemons are absolutely essential to the dish. We’ll be using both the zest for aromatic punch and the juice for the sauce, providing that iconic citrusy lift.
- Substitutions: Bottled lemon juice will lack the vibrancy and the essential oils from fresh zest, so I really urge you to stick with fresh lemons for the best results.
For the Dredging
- All-Purpose Flour: A light coating of flour helps to create a beautiful golden-brown crust on the chicken and later helps to thicken our luscious sauce.
- Substitutions: For a gluten-free option, you can easily use a gluten-free all-purpose flour blend or even almond flour for a slightly different texture and nutty note.
The Sauce Base
- Chicken Broth: This forms the base of our savory sauce, adding depth and richness. I recommend using a good quality, low-sodium chicken broth so you can control the seasoning yourself.
- Substitutions: If you don’t have chicken broth, vegetable broth is a perfectly suitable alternative. For a touch of complexity typically found with wine, you can add a splash of white grape juice or a non-alcoholic cooking wine substitute alongside the broth.
- Fresh Garlic: Minced fresh garlic provides an aromatic foundation for our sauce. Don’t skimp on this!
- Olive Oil and Butter: A combination of these two is my secret for searing the chicken to perfection and building the sauce. Olive oil provides a high smoke point, while butter adds rich flavor and helps with browning.
Herbs & Seasoning
- Fresh Parsley: A generous sprinkle of fresh chopped Italian flat-leaf parsley at the end brightens the dish visually and adds a fresh, herbaceous note.
- Dried Oregano: Just a pinch adds a classic Italian aroma to the sauce.
- Salt and Freshly Ground Black Pepper: Season generously throughout the cooking process, tasting as you go.
Step-by-Step Instructions
Let’s get cooking! I’m going to guide you through each step to ensure your Lemon Chicken Romano turns out absolutely perfect – tender chicken in a bright, savory sauce. It’s simpler than you might think!
Step 1: Prepare the Chicken
- First things first, let’s get our chicken ready. Take your boneless, skinless chicken breasts and pat them thoroughly dry with paper towels. This is a crucial step for achieving a nice sear.
- Place each chicken breast between two sheets of plastic wrap or in a large zip-top bag. Using a meat mallet or the flat side of a heavy pan, pound the chicken until it’s about 1/2-inch thick. This ensures even cooking and tenderness.
- Season both sides of the pounded chicken generously with salt and freshly ground black pepper.
Step 2: Dredge the Chicken
- In a shallow dish, combine your all-purpose flour and about half of your freshly grated Pecorino Romano cheese. Give it a good whisk to mix everything evenly.
- Lightly dredge each seasoned chicken breast in the flour and Romano mixture, shaking off any excess. You want a thin, even coating. Set the dredged chicken aside on a plate or baking sheet.
Step 3: Sear the Chicken
- Heat a large skillet (my preference is a heavy-bottomed pan like cast iron or stainless steel) over medium-high heat. Add a tablespoon of olive oil and a tablespoon of butter. Let the butter melt and the oil shimmer.
- Carefully place 2-3 pieces of the dredged chicken in the hot skillet, being careful not to overcrowd the pan. If you put too many in, they’ll steam instead of sear.
- Sear the chicken for about 3-4 minutes per side, until it’s beautifully golden brown and cooked through. The internal temperature should reach 165°F (74°C).
- Once cooked, transfer the chicken to a clean plate and loosely tent it with foil to keep it warm while you prepare the sauce. Repeat with any remaining chicken, adding more oil and butter if needed.
Step 4: Build the Lemon Romano Sauce
- With the chicken out of the pan, reduce the heat to medium. If there’s a lot of excess oil or burned bits, you can quickly wipe out the pan with a paper towel, leaving the flavorful browned bits (fond) in the bottom.
- Add a fresh tablespoon of butter to the skillet. Once melted, add your minced fresh garlic and a pinch of dried oregano. Sauté for about 30-60 seconds, until fragrant, being careful not to burn the garlic.
- Pour in your chicken broth (or vegetable broth with a splash of white grape juice for that complexity). Use a wooden spoon to scrape up all those delicious browned bits from the bottom of the pan – that’s pure flavor!
- Bring the sauce to a gentle simmer and let it cook for 2-3 minutes, allowing it to reduce and thicken slightly.
- Now, stir in the fresh lemon juice. Taste the sauce and adjust seasoning with salt and pepper if necessary. Remember, the Romano cheese will add saltiness later, so season lightly for now.
Step 5: Combine and Finish
- Return the seared chicken breasts to the skillet, nestling them into the simmering sauce. Let them gently warm through for 1-2 minutes.
- Remove the skillet from the heat. Sprinkle the remaining freshly grated Pecorino Romano cheese over the chicken and sauce. The residual heat will melt it beautifully.
- Finally, sprinkle generously with freshly chopped Italian flat-leaf parsley and a touch of fresh lemon zest for an extra burst of aroma and brightness.
- Serve immediately and enjoy your homemade Lemon Chicken Romano!
Tips & Suggestions
To truly elevate your Lemon Chicken Romano from good to absolutely unforgettable, I’ve gathered some of my favorite tips and suggestions. These are the little secrets that make all the difference in flavor and presentation.
Pounding the Chicken is Key
- Even Thickness: I cannot stress this enough – pounding your chicken breasts to an even 1/2-inch thickness is paramount. It guarantees that every piece cooks uniformly, stays tender, and doesn’t dry out in spots while other areas are still cooking. It also helps with the breading adhering properly and ensures a quick sear.
- Technique: When pounding, use the flat side of a meat mallet or a heavy rolling pin. Start from the center and work your way outwards, being gentle but firm.
Don’t Skimp on Fresh Ingredients
- Lemon Power: Always, always use fresh lemons for both juice and zest. The vibrant, aromatic oils from fresh zest and the bright acidity of fresh juice are irreplaceable. Bottled juice simply won’t give you the same lively flavor.
- Quality Romano: A good quality block of Pecorino Romano, freshly grated, will make a world of difference compared to pre-grated options. It melts better and has a far superior flavor profile.
- Fresh Herbs: While dried oregano is fine for the sauce base, a generous sprinkling of fresh parsley at the end really brightens the dish, both visually and in taste.
Mastering the Sear and Sauce
- Don’t Overcrowd the Pan: This is a golden rule for searing. If you cram too many chicken pieces into the skillet, the temperature will drop, and the chicken will steam instead of getting that beautiful golden-brown crust. Work in batches if necessary.
- Building Flavor (Fond): Those browned bits stuck to the bottom of your pan after searing the chicken? That’s called “fond,” and it’s pure flavor! When you deglaze the pan with broth, make sure to scrape it all up. This is where a lot of the sauce’s depth comes from.
- Sauce Consistency: If your sauce seems too thin, let it simmer for a few more minutes to reduce. If it’s too thick, you can add a splash more chicken broth or even a little water until it reaches your desired consistency. Remember, the cheese will thicken it slightly at the end.
Serving Suggestions
- Classic Pairings: Lemon Chicken Romano is absolutely fantastic served over a bed of al dente pasta (like linguine or spaghetti) to soak up all that delicious sauce. Rice, especially a light pilaf or couscous, is another great choice.
- Vegetable Sides: Complement the richness of the chicken and sauce with some fresh green vegetables. Asparagus, green beans, or broccoli, lightly steamed or roasted, make wonderful additions. A simple mixed green salad with a vinaigrette dressing offers a nice counterpoint.
- Crusty Bread: Don’t forget a good crusty Italian bread to mop up every last drop of that incredible sauce!
Make-Ahead & Variations
- Partial Prep: You can pound and dredge the chicken a few hours in advance and keep it refrigerated on a baking sheet lined with parchment paper. This speeds up dinner prep significantly.
- Spice It Up: For a little kick, add a pinch of red pepper flakes to the garlic when you’re building the sauce.
Storage
You’ve put in the effort to create a fantastic Lemon Chicken Romano, and I want to make sure you know how to properly store any leftovers so you can enjoy them just as much the next day (or beyond!). Proper storage is key to maintaining flavor and safety.
Refrigeration
- Cooling Down: First and foremost, allow your Lemon Chicken Romano to cool down completely to room temperature before storing. Placing hot food directly into the refrigerator can raise the internal temperature of your fridge, potentially affecting other foods and increasing the risk of bacterial growth. This usually takes about 30-60 minutes, but no longer than two hours.
- Airtight Container: Once cooled, transfer the chicken and its accompanying sauce to a clean, airtight container. This helps to prevent oxidation, keeps the chicken from drying out, and stops any odors from mingling with other foods in your refrigerator.
- Duration: Stored properly in an airtight container in the refrigerator, Lemon Chicken Romano will remain fresh and delicious for 3 to 4 days.
Freezing
- Is it Ideal? While technically you can freeze Lemon Chicken Romano, I have to be honest: it’s not my top recommendation for this particular dish. The chicken can sometimes become a bit drier, and the sauce, especially with the cheese, can sometimes separate slightly or become a little grainy upon thawing and reheating. The fresh, bright quality of the lemon is also diminished.
- How to Freeze: If you do decide to freeze it, ensure it’s completely cooled. Transfer the chicken and sauce to a freezer-safe, airtight container or a heavy-duty freezer bag. Try to remove as much air as possible to prevent freezer burn.
- Duration: It can be stored in the freezer for up to 2 to 3 months.
Reheating
- From the Refrigerator:
- Stovetop (Recommended): This is my preferred method for reheating. Place the chicken and sauce in a skillet over low to medium-low heat. Add a splash of chicken broth or water if the sauce seems too thick or dry. Cover the skillet and heat gently, stirring occasionally, until the chicken is heated through. This gentle approach helps prevent the chicken from drying out.
- Microwave: If you’re in a hurry, you can reheat individual portions in the microwave. Place the chicken and sauce in a microwave-safe dish, cover loosely, and heat in 30-second intervals, stirring in between, until heated through. Be careful not to overheat, as this can dry out the chicken.
- From the Freezer:
- Thawing: If frozen, thaw the dish overnight in the refrigerator before reheating. Do not try to reheat directly from frozen, as this will lead to uneven cooking and a less desirable texture.
- Reheat Method: Once thawed, follow the stovetop reheating instructions above. You might want to whisk in a fresh knob of butter and a tiny squeeze of lemon juice at the end to revitalize the sauce.
- Important Note: Always ensure the chicken is piping hot all the way through before serving again. The internal temperature should reach 165°F (74°C).

Final Thoughts
I truly believe that if there’s one recipe you absolutely have to try, it’s this incredible Lemon Chicken Romano. The way the bright, zesty lemon beautifully complements the savory, nutty Romano cheese creates a symphony of flavors that is simply irresistible. Every bite of the tender chicken is a delightful experience, making Lemon Chicken Romano a truly special dish.
Whether you’re looking for a weeknight meal that feels gourmet or a show-stopping dish to impress guests, Lemon Chicken Romano delivers every time. It’s surprisingly easy to achieve such impressive results, and I promise you, once you taste it, you’ll want to make Lemon Chicken Romano again and again. Go ahead, give it a try – you won’t regret bringing this deliciousness to your table!

Lemon Chicken Romano: Zesty & Flavorful Dinner Recipe
- Total Time: 45 minutes
- Yield: 4 servings
Description
Lemon Chicken Romano is a delightful weeknight meal that impresses at any dinner party. This dish features succulent chicken breasts coated in a crispy mixture, harmonizing bright lemon flavors with the richness of Romano cheese.
Ingredients
- Boneless, Skinless Chicken Breasts or Thighs
- Pecorino Romano Cheese
- Fresh Lemons
- All-Purpose Flour
- Chicken Broth
- Fresh Garlic
- Olive Oil
- Butter
- Fresh Parsley
- Dried Oregano
- Salt
- Freshly Ground Black Pepper
Instructions
- First things first, let's get our chicken ready. Take your boneless, skinless chicken breasts and pat them thoroughly dry with paper towels.
- Place each chicken breast between two sheets of plastic wrap or in a large zip-top bag. Using a meat mallet or the flat side of a heavy pan, pound the chicken until it’s about 1/2-inch thick.
- Season both sides of the pounded chicken generously with salt and freshly ground black pepper.
- In a shallow dish, combine your all-purpose flour and about half of your freshly grated Pecorino Romano cheese. Give it a good whisk to mix everything evenly.
- Lightly dredge each seasoned chicken breast in the flour and Romano mixture, shaking off any excess. Set the dredged chicken aside on a plate or baking sheet.
- Heat a large skillet over medium-high heat. Add a tablespoon of olive oil and a tablespoon of butter. Let the butter melt and the oil shimmer.
- Carefully place 2-3 pieces of the dredged chicken in the hot skillet. Sear the chicken for about 3-4 minutes per side, until it’s beautifully golden brown and cooked through.
- Once cooked, transfer the chicken to a clean plate and loosely tent it with foil to keep it warm while you prepare the sauce. Repeat with any remaining chicken.
- With the chicken out of the pan, reduce the heat to medium. If there's a lot of excess oil or burned bits, you can quickly wipe out the pan with a paper towel.
- Add a fresh tablespoon of butter to the skillet. Once melted, add your minced fresh garlic and a pinch of dried oregano. Sauté for about 30-60 seconds.
- Pour in your chicken broth. Use a wooden spoon to scrape up all those delicious browned bits from the bottom of the pan.
- Bring the sauce to a gentle simmer and let it cook for 2-3 minutes, allowing it to reduce and thicken slightly.
- Now, stir in the fresh lemon juice. Taste the sauce and adjust seasoning with salt and pepper if necessary.
- Return the seared chicken breasts to the skillet, nestling them into the simmering sauce. Let them gently warm through for 1-2 minutes.
- Remove the skillet from the heat. Sprinkle the remaining freshly grated Pecorino Romano cheese over the chicken and sauce.
- Finally, sprinkle generously with freshly chopped Italian flat-leaf parsley and a touch of fresh lemon zest.
- Serve immediately and enjoy your homemade Lemon Chicken Romano!
- Prep Time: 15 mins
- Cook Time: 30 mins
- Category: Dinner
- Method: Searing
- Cuisine: Italian
Nutrition
- Serving Size: 1 chicken breast with sauce
- Calories: 450
- Sugar: 1 g
- Sodium: 600 mg
- Fat: 20 g
- Saturated Fat: 8 g
- Unsaturated Fat: 10 g
- Trans Fat: 0 g
- Carbohydrates: 30 g
- Fiber: 2 g
- Protein: 40 g
- Cholesterol: 120 mg
Keywords: Pounding your chicken breasts to an even 1/2-inch thickness is crucial for even cooking. Always use fresh lemons for the best flavor, and a good quality block of Pecorino Romano cheese will enhance the dish significantly.