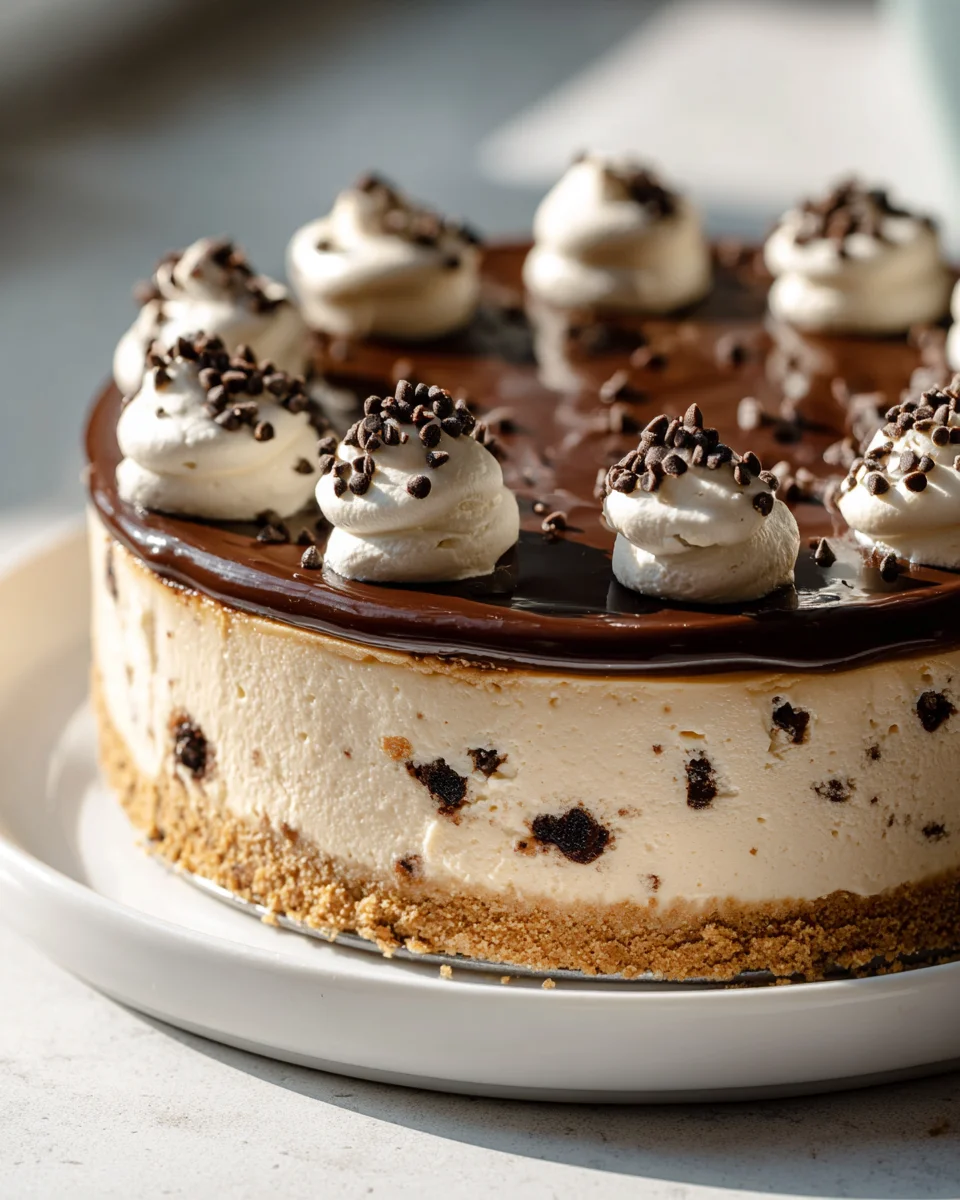
No Bake Cookie Dough Cheesecake
Oh my goodness, do I have a treat for you today that’s going to make all your dessert dreams come true! Forget turning on the oven, because this No Bake Cookie Dough Cheesecake is here to save the day, especially when you’re craving something spectacular without all the fuss.
What makes this recipe so incredibly special, you ask? Well, it’s a trifecta of pure dessert bliss! We’re talking about the creamy, tangy lusciousness of cheesecake, combined with the nostalgic, irresistible joy of edible cookie dough, all sitting pretty on a crunchy, buttery graham cracker crust – and the best part? Absolutely no baking required! That’s right, you can achieve a show-stopping dessert that tastes like it came from a gourmet bakery, but with minimal effort and no hot kitchen.
You are going to absolutely adore this recipe because it delivers on every single level. It’s perfect for those hot summer days, holiday gatherings, or simply when you want to impress without the stress. Imagine sinking your fork into a thick layer of smooth, rich cheesecake filling, studded generously with chunks of sweet, safe-to-eat cookie dough, all resting on a delightful crunch. It’s an explosion of textures and flavors that will have everyone begging for the recipe. Get ready to fall head over heels for your new favorite dessert!

Ingredient Notes
Crafting the perfect No Bake Cookie Dough Cheesecake starts with understanding the role each ingredient plays. I’ve found that using quality ingredients makes all the difference in achieving that rich, creamy texture and delightful cookie dough flavor we’re aiming for.
For the Edible Cookie Dough
- Heat-Treated All-Purpose Flour: This is crucial for safety! Raw flour can contain bacteria, so we need to heat-treat it first. I typically spread it on a baking sheet and bake at 300°F (150°C) for 5-7 minutes, or microwave it in a bowl for 1-2 minutes, stirring every 30 seconds, until it reaches 160°F (71°C). Let it cool completely before using.
- Unsalted Butter (Room Temperature): Creamy butter is key to a smooth cookie dough. Make sure it’s properly softened, but not melted.
- Brown Sugar & Granulated Sugar: A mix of both gives our cookie dough that classic depth of flavor and chewiness. Brown sugar adds moisture and a hint of molasses.
- Vanilla Extract: A good quality pure vanilla extract really enhances the flavor. Don’t skimp here!
- Milk (or Cream): Just a tablespoon or two helps bring the dough together to the right consistency. You can use any milk you prefer – whole milk, skim milk, or even a non-dairy alternative.
- Mini Chocolate Chips: I love mini chocolate chips for this because they distribute more evenly throughout the dough and in the cheesecake layers. Regular chocolate chips work too, or even chopped chocolate.
Substitutions for Cookie Dough: If you’re short on time or prefer not to heat-treat flour, you can often find pre-made edible cookie dough in the refrigerated section of many grocery stores. Just ensure it’s specifically labeled “edible” or “safe to eat raw.” For mix-ins, feel free to experiment with sprinkles, chopped nuts (if no allergies), or different types of chocolate chips like white chocolate or peanut butter chips.
For the Graham Cracker Crust
- Graham Cracker Crumbs: The classic choice for a reason! They provide a perfect crunchy, buttery base.
- Unsalted Butter (Melted): This binds the crumbs together, ensuring your crust holds its shape beautifully.
- Granulated Sugar (Optional): I sometimes add a tablespoon for a little extra sweetness, but it’s totally up to your preference.
Substitutions for Crust: Feel free to use crushed Oreo cookies (cream filling and all), Nilla Wafers, or even digestive biscuits for a different flavor profile. The quantity of melted butter might need slight adjustment depending on your chosen crumb type.
For the No-Bake Cheesecake Filling
- Full-Fat Cream Cheese (Softened): This is the star of our cheesecake! Use full-fat blocks, not whipped or spreadable cream cheese, for the best richness and setting power. It absolutely needs to be at room temperature to ensure a smooth, lump-free filling. I usually leave it out for at least an hour or two.
- Powdered Sugar (Confectioners’ Sugar): This sweetens the cheesecake and, unlike granulated sugar, dissolves easily to give us that silky-smooth texture without baking.
- Vanilla Extract: Again, a good quality vanilla really brings out the cheesecake flavor.
- Cold Heavy Cream (or Whipping Cream): This is the secret to a light, airy, and stable no-bake cheesecake! It needs to be very cold to whip properly into stiff peaks, which then gets folded into our cream cheese mixture, helping it set beautifully in the fridge.
Substitutions for Cheesecake Filling: If you’re looking for a dairy-free option, there are some excellent dairy-free cream cheese alternatives and full-fat coconut cream (chilled overnight, using only the thick, solid part) that can be used instead of dairy heavy cream. Just be aware that the texture might vary slightly.
Step-by-Step Instructions
Alright, let’s get this delicious No Bake Cookie Dough Cheesecake assembled! I always find it helpful to read through all the steps first before I start, just to get a good mental picture.
- Prepare Your Pan: First things first, grab a 9-inch springform pan. I like to lightly grease the bottom and sides and then line the bottom with a circle of parchment paper. This makes for super easy removal later!
- Make the Edible Cookie Dough:
- If you’re heat-treating your own flour, do that first and let it cool completely.
- In a medium bowl, cream together the softened unsalted butter, brown sugar, and granulated sugar with an electric mixer until light and fluffy (about 2-3 minutes).
- Beat in the vanilla extract.
- Gradually add the cooled, heat-treated flour, mixing on low speed until just combined.
- Stir in 1-2 tablespoons of milk, a little at a time, until the dough comes together and is moist but not sticky.
- Fold in the mini chocolate chips. Set aside about half of the cookie dough for the top layer, and the remaining half for the middle layer.
- Prepare the Graham Cracker Crust:
- In a small bowl, combine the graham cracker crumbs, melted unsalted butter, and optional granulated sugar. Mix until the crumbs are evenly moistened.
- Press the crumb mixture firmly and evenly into the bottom of your prepared springform pan. I use the back of a spoon or the bottom of a flat glass to get it really compact.
- Place the crust in the refrigerator to chill while you prepare the filling (at least 15-20 minutes).
- Whip the Heavy Cream: In a large, very clean bowl, beat the cold heavy cream with an electric mixer on medium-high speed until stiff peaks form. Be careful not to overbeat, or it might turn grainy. Set this aside in the fridge.
- Prepare the Cream Cheese Filling: In another large bowl, beat the softened full-fat cream cheese, powdered sugar, and vanilla extract with an electric mixer on medium speed until completely smooth and lump-free. This usually takes 2-3 minutes, scraping down the sides of the bowl as needed.
- Combine the Filling: Gently fold the whipped heavy cream into the cream cheese mixture using a spatula. Be careful not to deflate the whipped cream; use a light hand and fold just until no streaks remain. This step gives us that airy, cheesecake texture!
- Assemble the Cheesecake:
- Retrieve your chilled crust. Spoon about half of the cheesecake filling over the crust and spread it evenly.
- Crumble or dollop the reserved half of the edible cookie dough (the portion for the middle layer) over the first cheesecake layer.
- Carefully spoon the remaining cheesecake filling over the cookie dough layer and gently spread it out to cover.
- For the top, take the remaining half of the cookie dough and crumble it over the cheesecake, or roll small pieces into little “cookie dough balls” for a prettier presentation. You can even press them in slightly.
- Chill, Chill, Chill!: This is the most important part for a no-bake cheesecake! Cover the springform pan loosely with plastic wrap and refrigerate for at least 6 hours, but ideally overnight. The longer it chills, the firmer and more stable your cheesecake will be.
- Serve and Enjoy: Once thoroughly chilled and set, remove the sides of the springform pan. Slice with a sharp knife (running it under hot water and wiping it clean between slices helps immensely!) and serve.
Tips & Suggestions
I’ve made my fair share of no-bake cheesecakes, and I’ve picked up a few tricks along the way that I think will really help you nail this No Bake Cookie Dough Cheesecake:
- The Flour Factor: Please don’t skip heat-treating your flour for the cookie dough! It’s a simple step that ensures your edible cookie dough is safe to consume. Whether you use the microwave or oven method, let it cool completely before mixing it into your dough. Hot flour will melt your butter and make a mess!
- Cream Cheese Temperature is Everything: I can’t stress this enough – your cream cheese absolutely MUST be at room temperature for the cheesecake filling. If it’s cold, you’ll end up with lumps, no matter how much you beat it. Take it out of the fridge at least an hour or two before you plan to start.
- Cold Cream, Stiff Peaks: Your heavy cream needs to be straight out of the fridge, as cold as possible, to whip up into stiff peaks effectively. Some people even chill their mixing bowl and beaters for 15 minutes beforehand! This whipped cream is crucial for the cheesecake’s light texture and its ability to set without baking.
- Don’t Overmix the Whipped Cream: Once your heavy cream forms stiff peaks, stop beating! Overmixing can quickly turn it into grainy butter, which we don’t want in our cheesecake.
- Gentle Folding: When you’re incorporating the whipped cream into the cream cheese mixture, be gentle. Use a spatula and a folding motion to keep that precious air in the whipped cream. This is what gives your cheesecake its light and airy texture.
- Patience is a Virtue (Especially with Chilling): I know it’s hard to wait, but the chilling time is non-negotiable for a no-bake cheesecake. Six hours is the minimum, but if you can manage to let it chill overnight, you’ll be rewarded with a perfectly set, easy-to-slice cheesecake. Rushing this step will result in a soft, slumping dessert.
- Clean Slices: For those beautiful, picture-perfect slices, I always recommend using a long, sharp knife. For an extra clean cut, run your knife under hot water for a few seconds, wipe it dry, make a slice, and then repeat for each subsequent slice. This helps prevent the cheesecake from sticking to the knife.
- Topping It Off: Feel free to get creative with the top of your cheesecake! Besides the crumbled cookie dough, I sometimes drizzle a little chocolate sauce or caramel sauce right before serving, or add a dollop of whipped cream and a few extra mini chocolate chips.
- Don’t Forget the Pan! A springform pan is truly your best friend for this type of dessert. It makes getting the cheesecake out incredibly easy without damaging its beautiful structure. If you don’t have one, you can line a regular pie dish with plastic wrap, leaving an overhang, to help lift it out, but it won’t be as clean.
Storage
Once you’ve made this delightful No Bake Cookie Dough Cheesecake, you’ll want to make sure you store it properly to keep it fresh and delicious!
- In the Refrigerator: Your cheesecake will last wonderfully in the refrigerator for about 3-4 days. Always make sure it’s covered tightly with plastic wrap or placed in an airtight container to prevent it from absorbing any odors from other foods in your fridge and to keep it from drying out. I like to keep it in the springform pan with the sides on, covered, until I’m ready to serve, or transfer slices to an airtight container.
- Freezing for Later: This cheesecake freezes beautifully!
- Whole Cheesecake: Once the cheesecake is fully set, you can freeze it whole. Remove the sides of the springform pan (leave the bottom disc), wrap the entire cheesecake tightly with several layers of plastic wrap, and then an outer layer of aluminum foil. This double layer of protection helps prevent freezer burn.
- Individual Slices: For easy portioning, I often slice the cheesecake first. Place the slices on a baking sheet lined with parchment paper and freeze for about an hour until firm. Then, wrap each individual slice tightly in plastic wrap and place them in a freezer-safe bag or airtight container.
Frozen cheesecake can be stored for up to 1-2 months. When you’re ready to enjoy, simply transfer the desired amount to the refrigerator and let it thaw for several hours or overnight. It tastes best when fully thawed but still very cold.
- Serving Temperature: Always serve this No Bake Cookie Dough Cheesecake chilled. It’s designed to be a refreshing, cool dessert, and its texture is at its best when cold.
Final Thoughts
And there you have it! What’s not to love about a dessert that combines two of the most beloved treats – creamy cheesecake and irresistible cookie dough – all without ever turning on your oven? This No Bake Cookie Dough Cheesecake isn’t just a recipe; it’s a promise of pure, unadulterated joy in every single bite. I truly believe this is a must-try for anyone who adores easy desserts that taste incredibly indulgent.
Its smooth, rich texture paired with those delightful chunks of edible cookie dough makes for an unforgettable experience. Whether you’re whipping it up for a special occasion or simply treating yourself to something sweet, I’m confident you’ll find yourself falling head over heels for this incredible creation. Go ahead, give the No Bake Cookie Dough Cheesecake a try – I promise it will quickly become a cherished favorite!
No Bake Cookie Dough Cheesecake: The Ultimate Easy Dessert
- Total Time: 30 minutes
- Yield: 8 servings
Description
Indulge in the creamy, tangy delight of this No Bake Cookie Dough Cheesecake, featuring layers of rich cheesecake and edible cookie dough on a buttery graham cracker crust. Perfect for any occasion, this dessert is a show-stopper that requires no baking!
Ingredients
- Heat-Treated All-Purpose Flour
- Unsalted Butter (Room Temperature)
- Brown Sugar
- Granulated Sugar
- Vanilla Extract
- Milk (or Cream)
- Mini Chocolate Chips
- Graham Cracker Crumbs
- Unsalted Butter (Melted)
- Granulated Sugar (Optional)
- Full-Fat Cream Cheese (Softened)
- Powdered Sugar (Confectioners' Sugar)
- Vanilla Extract
- Cold Heavy Cream (or Whipping Cream)
Instructions
- Prepare Your Pan: First things first, grab a 9-inch springform pan. Lightly grease the bottom and sides and then line the bottom with a circle of parchment paper.
- Make the Edible Cookie Dough: If you're heat-treating your own flour, do that first and let it cool completely. In a medium bowl, cream together the softened unsalted butter, brown sugar, and granulated sugar with an electric mixer until light and fluffy (about 2-3 minutes). Beat in the vanilla extract. Gradually add the cooled, heat-treated flour, mixing on low speed until just combined. Stir in 1-2 tablespoons of milk, a little at a time, until the dough comes together and is moist but not sticky. Fold in the mini chocolate chips. Set aside about half of the cookie dough for the top layer, and the remaining half for the middle layer.
- Prepare the Graham Cracker Crust: In a small bowl, combine the graham cracker crumbs, melted unsalted butter, and optional granulated sugar. Mix until the crumbs are evenly moistened. Press the crumb mixture firmly and evenly into the bottom of your prepared springform pan. Place the crust in the refrigerator to chill while you prepare the filling (at least 15-20 minutes).
- Whip the Heavy Cream: In a large, very clean bowl, beat the cold heavy cream with an electric mixer on medium-high speed until stiff peaks form. Set this aside in the fridge.
- Prepare the Cream Cheese Filling: In another large bowl, beat the softened full-fat cream cheese, powdered sugar, and vanilla extract with an electric mixer on medium speed until completely smooth and lump-free (about 2-3 minutes).
- Combine the Filling: Gently fold the whipped heavy cream into the cream cheese mixture using a spatula until no streaks remain.
- Assemble the Cheesecake: Retrieve your chilled crust. Spoon about half of the cheesecake filling over the crust and spread it evenly. Crumble or dollop the reserved half of the edible cookie dough (the portion for the middle layer) over the first cheesecake layer. Carefully spoon the remaining cheesecake filling over the cookie dough layer and gently spread it out to cover. For the top, take the remaining half of the cookie dough and crumble it over the cheesecake.
- Chill, Chill, Chill!: Cover the springform pan loosely with plastic wrap and refrigerate for at least 6 hours, but ideally overnight.
- Serve and Enjoy: Once thoroughly chilled and set, remove the sides of the springform pan. Slice with a sharp knife and serve.
- Prep Time: 30 mins
- Cook Time: 0 mins
- Category: Dessert
- Method: No Bake
- Cuisine: American
Nutrition
- Serving Size: 1 slice
- Calories: 350
- Sugar: 25 g
- Sodium: 150 mg
- Fat: 22 g
- Saturated Fat: 12 g
- Unsaturated Fat: 8 g
- Trans Fat: 0 g
- Carbohydrates: 30 g
- Fiber: 1 g
- Protein: 4 g
- Cholesterol: 60 mg
Keywords: Make sure to heat-treat your flour for safety. Use room temperature cream cheese for a smooth filling, and ensure your heavy cream is very cold for the best results.