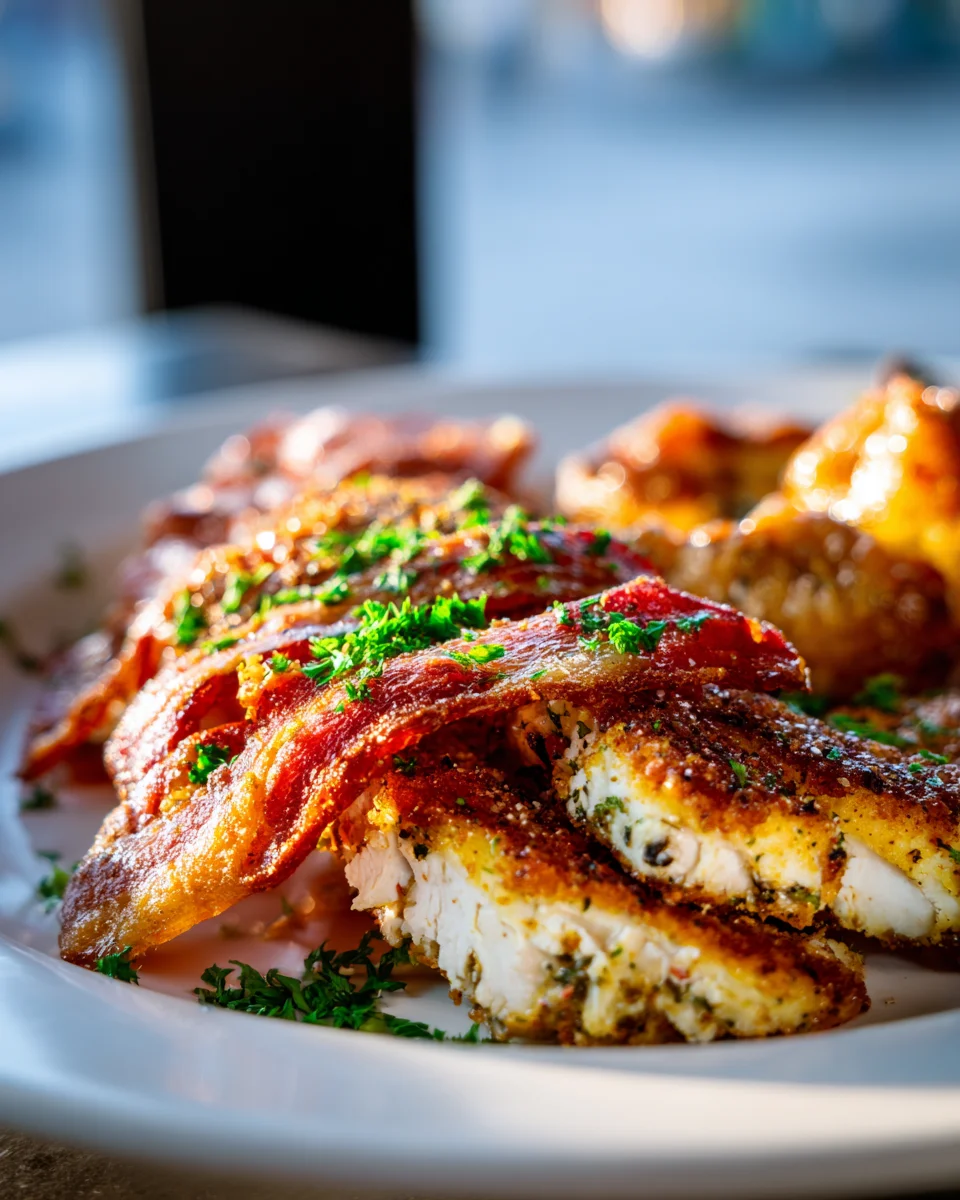
Crunchy Beef Bacon Chicken
Oh my goodness, I am so thrilled to finally share this recipe with you! If you’ve been craving a meal that delivers on both incredible flavor and an utterly satisfying texture, then this is it. Trust me, you’re going to fall head over heels for this one.
What makes Crunchy Beef Bacon Chicken truly shine is that glorious combination of tender, juicy chicken perfectly complemented by the savory, irresistible crispiness of premium beef bacon. It’s not just chicken wrapped in bacon; it’s an experience where every bite brings a delightful crunch followed by succulent meat, infused with all that smoky, rich goodness. We’re talking about beautifully seasoned chicken, perhaps pan-seared or baked, cradled by strips of beef bacon that cook down to a golden-brown perfection. It’s surprisingly simple to prepare but tastes like something straight out of a gourmet kitchen, making it perfect for a cozy weeknight or for truly impressing your dinner guests!

Ingredient Notes
Hello, fellow food enthusiasts! For our “Crunchy Beef Bacon Chicken,” the magic truly lies in selecting the right ingredients that work harmoniously to deliver that irresistible texture and flavor. Here’s a breakdown of what you’ll need and some handy substitutions.
- Chicken: I usually opt for boneless, skinless chicken breasts for this recipe. They cook relatively quickly and uniformly, making them perfect for pounding into thin cutlets. If you prefer, boneless, skinless chicken thighs can also be used; they tend to stay a bit juicier, but might require a slightly longer cooking time. Aim for about 1.5 lbs of chicken, which typically yields 4-6 servings.
- Beef Bacon: This is the star of our crunch! Look for good quality, thinly sliced beef bacon. The thinner it is, the crispier it will get when cooked and crumbled. We’ll be cooking it until super crispy and then crumbling it to incorporate into our breading.
- Panko Breadcrumbs: Don’t skimp on these! Panko is absolutely crucial for achieving that superior, extra-crispy exterior that traditional breadcrumbs often can’t match. Their flaky, airy structure makes all the difference. If you absolutely can’t find panko, regular plain breadcrumbs can work, but the crunch won’t be as dramatic. For a gluten-free option, use gluten-free panko breadcrumbs, which are widely available now.
- All-Purpose Flour: Essential for the initial dredge, it helps create a dry surface for the egg wash to adhere to. For a gluten-free version, simply substitute with a gluten-free all-purpose flour blend.
- Eggs: These act as our binder, creating the sticky surface needed for the breadcrumbs to cling to. Large eggs work best.
- Seasonings: I like to keep it simple but flavorful for the chicken itself. A good pinch of salt, freshly ground black pepper, garlic powder, and onion powder usually does the trick. Feel free to add smoked paprika or a touch of dried herbs like oregano or thyme for extra depth.
- Oil for Frying: A neutral-flavored oil with a high smoke point is key. Vegetable oil, canola oil, or grapeseed oil are excellent choices. You’ll need enough to allow for shallow frying, about 1-2 inches deep in your pan.
- Optional Dipping Sauce: While not strictly an ingredient in the chicken, a complementary sauce can elevate the dish. I often whip up a quick honey-mustard or a non-alcoholic BBQ sauce.
Step-by-Step Instructions
Get ready to create some crunchy, beefy, chicken magic! Follow these steps for a perfectly golden and flavorful “Crunchy Beef Bacon Chicken.”
- Prepare the Beef Bacon: Your first mission is to get that beef bacon super crispy. Lay your beef bacon strips in a single layer in a cold skillet (cast iron works beautifully here). Turn the heat to medium-low and cook slowly, turning occasionally, until it’s deeply golden brown and very crispy. This slow rendering ensures maximum crispness. Once cooked, transfer the crispy bacon to a plate lined with paper towels to drain. Let it cool completely, then finely crumble it. This is your “crunchy beef bacon” component!
- Prep the Chicken: Take your chicken breasts and place each one between two sheets of plastic wrap or parchment paper. Using a meat mallet or a heavy rolling pin, pound them evenly to about ¼-inch thickness. This ensures even cooking and helps create more surface area for that glorious breading. Season both sides of your pounded chicken cutlets generously with salt, pepper, garlic powder, and onion powder.
- Set Up Your Breading Station: Arrange three shallow dishes or pie plates in an assembly line.
- In the first dish, place your all-purpose flour.
- In the second dish, whisk your eggs until well combined.
- In the third dish, combine the panko breadcrumbs with your finely crumbled crispy beef bacon. Mix these thoroughly – you want that beef bacon crunch in every bite!
- Bred the Chicken: Now for the fun part! Take one seasoned chicken cutlet and dredge it thoroughly in the flour, shaking off any excess. Next, dip it into the whisked eggs, ensuring it’s fully coated, letting any excess drip off. Finally, press the chicken into the panko-beef bacon mixture, making sure it’s completely covered. Really press the breading on so it adheres well. Place the breaded cutlet on a clean plate or baking sheet. Repeat with the remaining chicken pieces. For optimal crunch, I sometimes like to place the breaded chicken in the refrigerator for 15-20 minutes – this helps the coating adhere even better during cooking.
- Heat the Oil: In a large, heavy-bottomed skillet (again, cast iron is great), pour about 1-2 inches of your chosen frying oil. Heat the oil over medium-high heat until it reaches around 350-375°F (175-190°C). You can test it by dropping a tiny pinch of panko in – it should sizzle immediately.
- Cook the Chicken: Carefully place 1-2 breaded chicken cutlets into the hot oil, ensuring you don’t overcrowd the pan. Cook for 3-5 minutes per side, or until the chicken is golden brown, crispy, and cooked through (internal temperature should reach 165°F or 74°C). The cooking time will vary depending on the thickness of your chicken.
- Drain and Serve: As each piece finishes cooking, transfer it to a wire rack set over a baking sheet lined with paper towels to drain any excess oil. This helps maintain the crunch. Let the chicken rest for a couple of minutes before serving.
Tips & Suggestions
To truly master your “Crunchy Beef Bacon Chicken” and make it a dish you’ll want to make again and again, here are a few extra tips and serving ideas:
- Maximizing the Crunch:
- Pound it Thin: As mentioned, thinner cutlets cook faster and more evenly, leading to a crispier result without the risk of overcooking the chicken.
- Chill Out: After breading, letting the chicken chill in the fridge for 15-20 minutes before frying helps the breading adhere better, reducing the chances of it flaking off in the hot oil.
- Don’t Overcrowd: Frying in batches is crucial. Overcrowding the pan lowers the oil temperature, leading to greasy, soggy chicken instead of crisp perfection.
- Proper Oil Temperature: Use a thermometer if you have one! Maintaining the oil between 350-375°F (175-190°C) is key for golden-brown deliciousness. Too low, and it’s greasy; too high, and the outside burns before the inside cooks.
- Flavor Boosters:
- Herbaceous Panko: Feel free to add some dried parsley, oregano, or a pinch of rosemary to your panko-beef bacon mixture for an aromatic twist.
- Spicy Kick: A pinch of cayenne pepper or red pepper flakes in the flour or panko mixture can add a lovely heat.
- Rub for the Chicken: Before breading, you could marinate the chicken in a bit of non-alcoholic Worcestershire sauce or a splash of lemon juice for extra flavor, just pat it very dry before flouring.
- Cooking Alternatives:
- Air Fryer Method: For a healthier option, spray the breaded chicken with a light coating of cooking spray. Air fry at 375°F (190°C) for 12-18 minutes, flipping halfway, until golden and cooked through. You might not get quite the same deep-fried crispness, but it’s still deliciously crunchy!
- Baking Method: Preheat your oven to 400°F (200°C). Place the breaded chicken on a wire rack set over a baking sheet, and lightly spray with cooking spray. Bake for 20-25 minutes, flipping halfway, until golden brown and cooked through.
- Serving Suggestions: This dish is quite rich, so I love to serve it with lighter sides. A fresh green salad with a vinaigrette, steamed asparagus, roasted broccoli, or even a light coleslaw are fantastic choices. For something heartier, mashed potatoes or a simple rice pilaf would be wonderful. And don’t forget that dipping sauce!
Storage
Once you’ve enjoyed your delicious “Crunchy Beef Bacon Chicken,” you might have some leftovers, or you might be thinking ahead for meal prep. Here’s how to store it properly to keep it as tasty as possible:
- Refrigeration: Cooked “Crunchy Beef Bacon Chicken” can be stored in an airtight container in the refrigerator for up to 3-4 days. While it won’t be quite as crispy as when freshly made, the flavor will still be fantastic.
- Reheating: To bring back some of that coveted crunch, I highly recommend reheating the chicken in an air fryer or a conventional oven.
- Air Fryer: Place the chicken in a single layer in your air fryer basket and cook at 350°F (175°C) for 5-8 minutes, or until heated through and crispy.
- Oven: Preheat your oven to 375°F (190°C). Place the chicken on a wire rack set over a baking sheet and bake for 10-15 minutes, or until thoroughly heated and re-crisped.
- Microwave: While convenient, the microwave will make the breading soft and potentially rubbery, so I generally advise against it for this dish if crunch is your goal.
- Freezing (Cooked): If you want to freeze cooked chicken, allow it to cool completely. Wrap individual pieces tightly in plastic wrap, then place them in a freezer-safe bag or airtight container. It can be frozen for up to 2-3 months. Thaw in the refrigerator overnight before reheating using the oven or air fryer method.
- Freezing (Uncooked, Breaded): You can also freeze the chicken after it’s been breaded but before cooking. Place the breaded cutlets on a baking sheet lined with parchment paper, ensuring they don’t touch. Freeze for 1-2 hours until solid. Then, transfer the frozen, breaded cutlets to a freezer-safe bag or container, separating layers with parchment paper. They can be frozen for up to 1 month. When ready to cook, you can fry them from frozen (they will take a few minutes longer) or thaw them in the refrigerator first.
Final Thoughts
And there you have it! I truly believe that my Crunchy Beef Bacon Chicken isn’t just another dinner recipe; it’s an experience waiting to happen in your kitchen. The magic truly lies in that irresistible crunch from the perfectly rendered beef bacon, melding beautifully with the tender, savory chicken. It’s a symphony of textures and flavors that dance on your palate, offering a delightful twist on classic chicken.
If you’re looking for a dish that brings a delightful surprise, elevates your weeknight meal, or simply want to impress without the fuss, Crunchy Beef Bacon Chicken is your answer. I promise, once you taste that glorious combination of juicy chicken and crispy beef bacon, you’ll understand why this recipe is truly a must-try. Go ahead, give it a whirl – I’m sure you’ll absolutely love it!
Crunchy Beef Bacon Chicken: Ultimate Flavor Fusion Recipe!
- Total Time: 45 minutes
- Yield: 4-6 servings 1x
Description
Experience the delightful crunch of beef bacon wrapped around tender chicken in this irresistible dish. Perfect for impressing guests or enjoying a cozy weeknight meal!
Ingredients
- 1.5 lbs boneless, skinless chicken breasts or thighs
- Thinly sliced beef bacon
- Panko breadcrumbs
- All-purpose flour
- Large eggs
- Salt
- Freshly ground black pepper
- Garlic powder
- Onion powder
- Smoked paprika (optional)
- Dried herbs like oregano or thyme (optional)
- Vegetable oil, canola oil, or grapeseed oil for frying
- Honey-mustard or non-alcoholic BBQ sauce (optional)
Instructions
- Prepare the Beef Bacon: Lay your beef bacon strips in a single layer in a cold skillet. Turn the heat to medium-low and cook slowly, turning occasionally, until it's deeply golden brown and very crispy. Transfer the crispy bacon to a plate lined with paper towels to drain. Let it cool completely, then finely crumble it.
- Prep the Chicken: Take your chicken breasts and place each one between two sheets of plastic wrap or parchment paper. Using a meat mallet or a heavy rolling pin, pound them evenly to about ¼-inch thickness. Season both sides of your pounded chicken cutlets generously with salt, pepper, garlic powder, and onion powder.
- Set Up Your Breading Station: Arrange three shallow dishes or pie plates in an assembly line. In the first dish, place your all-purpose flour. In the second dish, whisk your eggs until well combined. In the third dish, combine the panko breadcrumbs with your finely crumbled crispy beef bacon and mix thoroughly.
- Bred the Chicken: Take one seasoned chicken cutlet and dredge it thoroughly in the flour, shaking off any excess. Dip it into the whisked eggs, ensuring it’s fully coated, letting any excess drip off. Press the chicken into the panko-beef bacon mixture, making sure it’s completely covered. Place the breaded cutlet on a clean plate or baking sheet. Repeat with the remaining chicken pieces.
- Heat the Oil: In a large, heavy-bottomed skillet, pour about 1-2 inches of your chosen frying oil. Heat the oil over medium-high heat until it reaches around 350-375°F (175-190°C).
- Cook the Chicken: Carefully place 1-2 breaded chicken cutlets into the hot oil, ensuring you don't overcrowd the pan. Cook for 3-5 minutes per side, or until the chicken is golden brown, crispy, and cooked through (internal temperature should reach 165°F or 74°C).
- Drain and Serve: As each piece finishes cooking, transfer it to a wire rack set over a baking sheet lined with paper towels to drain any excess oil. Let the chicken rest for a couple of minutes before serving.
- Prep Time: 15 mins
- Cook Time: 30 mins
- Category: Dinner
- Method: Frying
- Cuisine: American
Nutrition
- Serving Size: 1 piece
- Calories: 400
- Sugar: 1 g
- Sodium: 600 mg
- Fat: 25 g
- Saturated Fat: 8 g
- Unsaturated Fat: 15 g
- Trans Fat: 0 g
- Carbohydrates: 30 g
- Fiber: 2 g
- Protein: 25 g
- Cholesterol: 150 mg
Keywords: For optimal crunch, chill the breaded chicken in the refrigerator for 15-20 minutes before frying. Use a thermometer to maintain oil temperature between 350-375°F for best results.