Homemade Cheesy Pizza Pockets Recipe
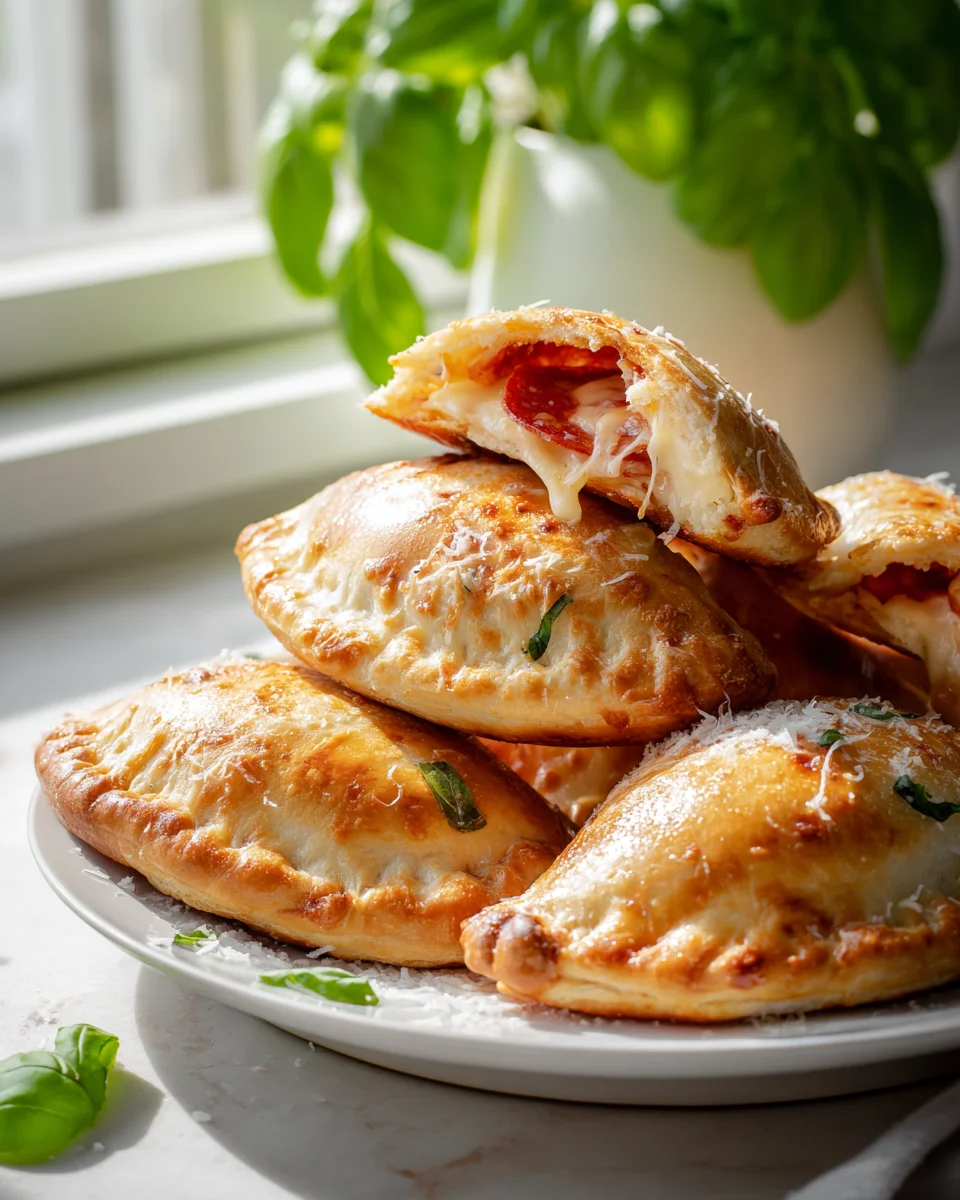
There’s just something incredibly satisfying about biting into a warm, gooey pizza pocket, isn’t there? But imagine that same incredible experience, elevated to a whole new level because you made it yourself! I’m so excited to share my Homemade Cheesy Pizza Pockets Recipe with you today, and trust me, this isn’t just another snack – it’s a game-changer.
What makes these pizza pockets so special? Well, for starters, they’re bursting with flavor that you simply won’t find in any frozen aisle. We’re talking about perfectly seasoned tomato sauce, a generous helping of melty, stretchy cheese (because really, is there such a thing as too much cheese?), and your favorite fillings, all tucked inside a golden, flaky crust. Forget about bland, dry store-bought versions; my recipe delivers that ultimate comforting, cheesy goodness in every single bite. You’ll love the warmth, the homemade freshness, and the pure joy of creating something so delicious and versatile.
This dish is essentially all the deliciousness of your favorite pizza, cleverly packaged into a convenient, handheld pocket. Think rich tomato sauce, savory crumbled beef (or whatever toppings your heart desires!), and a glorious blend of cheeses, all baked to golden perfection within a tender dough. They’re perfect for a quick weeknight dinner, a fun lunchbox surprise, an after-school snack, or even a party appetizer. Get ready to ditch the takeout and embrace the irresistible charm of homemade!

Ingredient Notes
Making homemade cheesy pizza pockets is such a fun and rewarding experience, and the best part is how customizable they are! Here’s a breakdown of the key ingredients I use and some fantastic substitutions to fit your pantry and preferences.
- Pizza Dough: This is the foundation of our pockets! I often opt for store-bought refrigerated pizza dough to save time, and it works wonderfully. You can find it in the dairy or deli section of most supermarkets. If you’re feeling ambitious, homemade pizza dough is always a winner and gives you ultimate control over the texture. Alternatively, for a flakier, richer pocket, you could use puff pastry sheets – just be sure to adjust baking times as puff pastry bakes faster.
- Pizza Sauce: A good quality marinara or pizza sauce is crucial for that authentic flavor. I usually go for my favorite store-bought brand to keep things simple, but feel free to whip up your own homemade sauce if you have a go-to recipe. Just ensure it’s not too watery, or it might make your pockets soggy.
- Cheese: The “cheesy” in pizza pockets means we need some serious cheese pull! Low-moisture part-skim mozzarella is my absolute non-negotiable for its fantastic melt and stretch. I also love to mix in a little shredded provolone for extra flavor and creaminess, or a sprinkle of Parmesan for a sharper, saltier kick. Feel free to use a pre-shredded Italian blend for convenience, but shredding your own from a block often melts better.
- Fillings: This is where you can truly make these pockets your own!
- Meat: For classic pizza flavor, I love using beef pepperoni slices. If you prefer, cooked crumbled ground beef seasoned with Italian herbs also makes a fantastic, hearty filling. Just make sure any meat is fully cooked and drained of excess fat before adding it.
- Vegetables: Diced bell peppers (any color!), thinly sliced red onion, sautéed mushrooms, and black olives are some of my favorite additions. Remember to pre-cook any veggies that release a lot of moisture (like mushrooms and onions) to prevent soggy pockets.
- Seasonings: A sprinkle of dried Italian seasoning, garlic powder, or red pepper flakes (for a little heat!) can really elevate the flavor of your filling.
- Egg Wash (Optional): A simple egg wash (one egg beaten with a tablespoon of water) brushed over the pockets before baking gives them a beautiful golden-brown, shiny crust. If you prefer not to use an egg, melted butter or a little milk also works to help achieve a nice color.
Step-by-Step Instructions
Let’s get those hands a little messy and create some delicious homemade cheesy pizza pockets! Here’s how I put them together:
- Prep Your Ingredients: First things first, get all your fillings ready. If you’re using cooked ground beef, brown it in a skillet over medium heat, drain off any fat, and set it aside to cool slightly. Dice any vegetables you’re using (like bell peppers or onions) into small, manageable pieces. If using mushrooms, I like to quickly sauté them to remove excess moisture. Grate your cheeses and have your pizza sauce and beef pepperoni slices ready to go.
- Preheat Oven and Prep Baking Sheet: Preheat your oven to 400°F (200°C). Line a large baking sheet with parchment paper or a silicone baking mat. This prevents sticking and makes cleanup a breeze.
- Roll Out the Dough: On a lightly floured surface, unroll your pizza dough. I typically roll it out into a large rectangle, about 1/4 inch thick. If using puff pastry, unroll the sheets according to package directions.
- Cut the Dough: Using a knife or a pizza cutter, cut the rolled-out dough into individual rectangles or squares. I usually aim for pieces that are roughly 4×6 inches, which makes a good-sized pocket, but you can adjust based on how big or small you want your pockets to be.
- Assemble Your Pockets: Now for the fun part! On one half of each dough rectangle, leaving about a 1/2-inch border around the edges, spread a spoonful of pizza sauce. Don’t overdo it with the sauce, or your pockets might get soggy.
Next, layer a generous amount of your shredded mozzarella and other cheeses. Then, add your chosen fillings – a few slices of beef pepperoni, a spoonful of cooked ground beef, some diced peppers, or whatever you fancy. Remember not to overfill, as this can make sealing difficult and lead to leaks during baking.
- Fold and Seal: Carefully fold the plain half of the dough over the filling, aligning the edges to create a pocket. Gently press down around the edges to seal. To get a really secure seal and a pretty crimped edge, I like to use the tines of a fork to press down all around the perimeter of each pocket. This not only looks nice but also helps prevent any delicious filling from escaping during baking.
- Egg Wash (Optional) and Vent: If you’re using an egg wash, lightly brush the tops of each sealed pizza pocket. This will give them a beautiful golden sheen. Before baking, use a sharp knife to cut a couple of small slits or poke a few holes on top of each pocket. This allows steam to escape, preventing the pockets from puffing up too much or bursting.
- Bake to Golden Perfection: Carefully transfer your assembled pizza pockets to the prepared baking sheet. Bake in the preheated oven for 15-20 minutes, or until the crust is golden brown and the cheese is bubbly and melted. Baking time can vary based on your oven and the thickness of your dough, so keep an eye on them.
- Cool and Serve: Once baked, remove the pizza pockets from the oven and let them cool on the baking sheet for a few minutes before transferring them to a wire rack. They will be very hot! Serve warm with extra marinara sauce for dipping, if desired. Enjoy your homemade cheesy pizza pockets!
Tips & Suggestions
To ensure your homemade cheesy pizza pockets are a total hit every single time, I’ve gathered a few of my favorite tips and tricks:
- Don’t Overfill: This is probably the most crucial tip! It’s tempting to cram in as much delicious filling as possible, but overfilling will make it incredibly difficult to seal the pockets properly, leading to cheesy explosions in your oven (which, while delicious, are messy). A tablespoon or two of sauce, a good pinch of cheese, and a small amount of toppings per pocket is usually perfect.
- Seal Them Tight: A good seal is key to preventing leaks. After folding the dough over, gently press around the edges with your fingers to remove air and adhere the dough. Then, use the tines of a fork to crimp all the way around. For an extra secure seal, you can slightly moisten the inside edge of the dough with a little water before folding it over.
- Pre-cook Wet Veggies: Vegetables like mushrooms, onions, and even spinach can release a lot of moisture when cooked. To prevent soggy pockets, I always recommend sautéing these types of vegetables briefly beforehand to cook out some of that water. Let them cool before adding them to your pockets.
- Vary Your Fillings: Don’t be afraid to experiment! These pizza pockets are incredibly versatile. Try different cheese combinations, add cooked Italian beef sausage, or go for a vegetarian option with roasted red peppers, artichoke hearts, or a pesto base instead of marinara. The possibilities are endless!
- Make Ahead Option: Pizza pockets are fantastic for meal prep! You can assemble them fully and then either bake immediately or freeze them for later. (See storage notes below for freezing instructions).
- Serve with Dipping Sauce: While they’re delicious on their own, serving your pizza pockets with a side of warm marinara sauce, ranch dressing, or even a garlic herb dipping oil takes them to the next level.
- Air Fryer Method: If you have an air fryer, these pockets are fantastic when air-fried! Air fry at 350°F (175°C) for 8-12 minutes, flipping halfway, until golden brown and heated through. Cooking times may vary depending on your air fryer model, so keep an eye on them.
Storage
Homemade cheesy pizza pockets are fantastic for making ahead or enjoying as leftovers. Here’s how I recommend storing them:
- Refrigeration (Cooked Pockets): Once your pizza pockets have cooled completely, you can store them in an airtight container in the refrigerator for up to 3-4 days.
- Reheating (Cooked Pockets):
- Oven: This is my preferred method for reheating, as it helps the crust crisp up again. Reheat in a preheated oven at 350°F (175°C) for about 10-15 minutes, or until heated through.
- Microwave: For a quick reheat, microwave individual pockets for 30-60 seconds, or until warm. Be aware that the crust might be softer, but the cheese will be perfectly melted.
- Air Fryer: Reheat in an air fryer at 325°F (160°C) for 5-8 minutes, or until hot and crispy.
- Freezing (Unbaked Pockets): You can freeze unbaked pizza pockets for future enjoyment! After assembling the pockets and crimping the edges, place them in a single layer on a parchment-lined baking sheet and freeze until solid (about 2-3 hours). Once frozen, transfer them to a freezer-safe bag or airtight container. They’ll keep well for up to 2-3 months. When ready to bake, you can bake them directly from frozen. Add an extra 5-10 minutes to the baking time, or until golden brown and cooked through.
- Freezing (Baked Pockets): If you have leftover baked pockets, you can freeze them too! Let them cool completely, then wrap each pocket individually in plastic wrap, followed by a layer of aluminum foil. Store in a freezer-safe bag or container for up to 1-2 months. Reheat from frozen in a 350°F (175°C) oven for about 20-25 minutes, or until heated through.
Final Thoughts
And there you have it! I truly hope you’re inspired to dive into the wonderful world of this Homemade Cheesy Pizza Pockets Recipe. There’s an undeniable joy and satisfaction that comes from creating these warm, gooey, and utterly delicious pockets right in your own kitchen. Forget about bland, store-bought alternatives; this Homemade Cheesy Pizza Pockets Recipe allows you to customize every bite with your favorite beef fillings, fresh veggies, and a generous helping of melted cheese, making them infinitely superior. I promise you, the moment you taste the burst of familiar pizza flavors wrapped in that golden, tender crust, you’ll understand why this recipe is a must-try. It’s perfect for a fun family meal, a quick and satisfying lunch, or even an impressive snack for guests. Go on, give it a go – I know you’ll love it!

Easy Homemade Cheesy Pizza Pockets – A Family Favorite
- Total Time: 35 minutes
- Yield: 4 servings 1x
Description
Experience the joy of biting into warm, gooey pizza pockets made right in your kitchen! These cheesy delights are customizable and perfect for any occasion.
Ingredients
- Store-bought refrigerated pizza dough or homemade pizza dough or puff pastry sheets
- Good quality marinara or pizza sauce
- Low-moisture part-skim mozzarella cheese
- Shredded provolone cheese
- Parmesan cheese
- Beef pepperoni slices
- Cooked crumbled ground beef
- Diced bell peppers
- Thinly sliced red onion
- Sautéed mushrooms
- Black olives
- Dried Italian seasoning
- Garlic powder
- Red pepper flakes
- 1 egg (for egg wash, optional)
- 1 tablespoon water (for egg wash, optional)
- Melted butter or milk (for egg wash alternative, optional)
Instructions
- Prep Your Ingredients: Get all your fillings ready. If using cooked ground beef, brown it in a skillet over medium heat, drain off any fat, and set aside to cool slightly. Dice any vegetables into small pieces and sauté mushrooms to remove excess moisture. Grate your cheeses and have your pizza sauce and beef pepperoni slices ready.
- Preheat Oven and Prep Baking Sheet: Preheat your oven to 400°F (200°C). Line a large baking sheet with parchment paper or a silicone baking mat.
- Roll Out the Dough: On a lightly floured surface, unroll your pizza dough into a large rectangle, about 1/4 inch thick. If using puff pastry, unroll the sheets according to package directions.
- Cut the Dough: Cut the rolled-out dough into individual rectangles or squares, roughly 4×6 inches.
- Assemble Your Pockets: On one half of each dough rectangle, spread a spoonful of pizza sauce, layer shredded mozzarella and other cheeses, and add your chosen fillings. Avoid overfilling.
- Fold and Seal: Fold the plain half of the dough over the filling, press down around the edges to seal, and use a fork to crimp the edges.
- Egg Wash (Optional) and Vent: Brush the tops of each sealed pizza pocket with egg wash, if using. Cut small slits or poke holes on top of each pocket to allow steam to escape.
- Bake to Golden Perfection: Transfer the assembled pizza pockets to the prepared baking sheet and bake for 15-20 minutes, or until golden brown and cheese is bubbly.
- Cool and Serve: Let the pizza pockets cool on the baking sheet for a few minutes before transferring to a wire rack. Serve warm with extra marinara sauce for dipping.
- Prep Time: 15 mins
- Cook Time: 20 mins
- Category: Snack
- Method: Baking
- Cuisine: Italian
Nutrition
- Serving Size: 1 pocket
- Calories: 300
- Sugar: 2 g
- Sodium: 600 mg
- Fat: 15 g
- Saturated Fat: 7 g
- Unsaturated Fat: 5 g
- Trans Fat: 0 g
- Carbohydrates: 30 g
- Fiber: 2 g
- Protein: 12 g
- Cholesterol: 50 mg
Keywords: Don't overfill the pockets to ensure they seal properly. Pre-cook wet vegetables to prevent sogginess. Feel free to experiment with different fillings and cheeses.