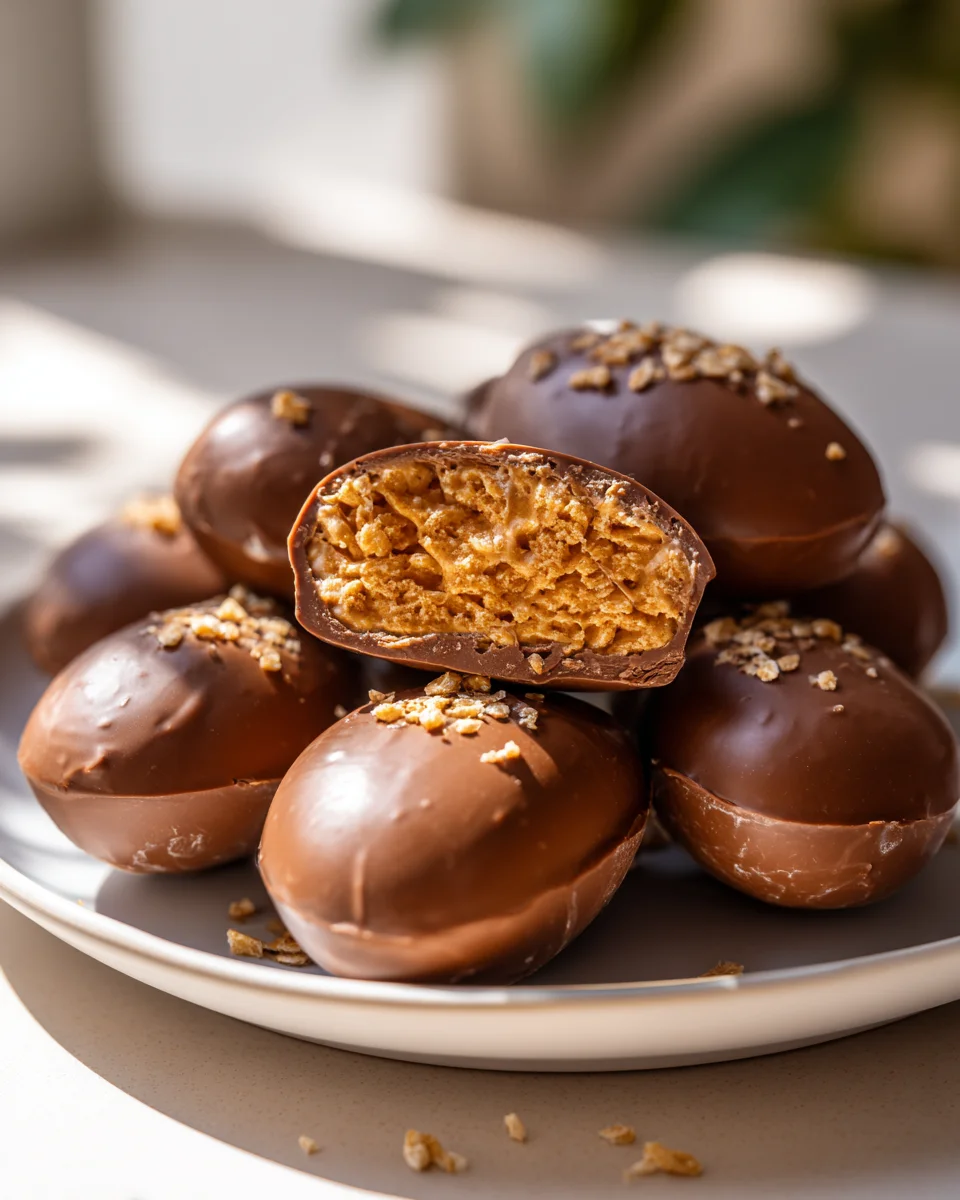
Crunchy Peanut Butter Eggs With Rice Krispies
Oh, let me tell you, if you’re a fan of the classic peanut butter chocolate combo, you are in for an absolute treat! I’m so excited to share this recipe with you because it’s truly something special. What makes these Crunchy Peanut Butter Eggs With Rice Krispies stand out is the incredible play of textures: you get that smooth, rich peanut butter base, but then BAM! a fantastic crunch from the Rice Krispies, all enveloped in a perfectly tempered chocolate shell. It’s like your favorite candy bar, but elevated and made with love in your own kitchen.
You’re going to adore how simple these are to whip up – no baking required! They’re the perfect homemade treat for any occasion, whether you’re looking for a delightful dessert, a fun snack for the kids, or even a thoughtful edible gift. In essence, we’re taking a creamy, sweet peanut butter mixture, folding in those delightful crispy cereal bits, shaping them into cute little eggs, and then giving them a luxurious dip in melted chocolate. Prepare for a seriously satisfying crunch and a burst of flavor in every single bite!

Oh, you are in for such a treat! These Crunchy Peanut Butter Eggs with Rice Krispies are one of my absolute favorite no-bake confections, especially around springtime or whenever I’m craving that irresistible combination of creamy peanut butter, satisfying crunch, and rich chocolate. They’re surprisingly simple to make, yet they taste like something straight out of a fancy candy shop. The best part? No oven required, just a bit of mixing, shaping, and dipping. Let’s get started on creating these delightful, bite-sized treasures!
Ingredient Notes
Crafting the perfect Crunchy Peanut Butter Egg starts with understanding the role each ingredient plays. Here’s a rundown of what you’ll need and some thoughts on substitutions to ensure your eggs turn out perfectly crunchy and utterly delicious.
- Creamy Peanut Butter: This is the star of the show! I always reach for creamy, processed peanut butter (like Jif or Skippy) for this recipe. Its smooth, consistent texture is ideal for creating a pliable mixture that’s easy to shape. Natural peanut butter, while delicious, can be a bit trickier due to its varying oil content and tendency to separate; it might make your mixture too oily or too dry, requiring more adjustments. If you absolutely must use natural, stir it extremely well before measuring, and be prepared to add a little more powdered sugar if the mixture seems too loose, or a tiny bit more melted butter if it’s too stiff.
- Powdered Sugar (Confectioners’ Sugar): Essential for both sweetness and structure. Powdered sugar dissolves beautifully into the peanut butter, preventing any grittiness you’d get from granulated sugar, and it helps bind everything together into a firm, workable dough. Don’t try to substitute with granulated sugar unless you want a very different (and probably less pleasant) texture!
- Unsalted Butter: Melted butter adds richness and helps create that smooth, blendable base for our peanut butter mixture. I prefer unsalted so I can control the overall saltiness, but if you only have salted, that’s fine too – just be aware it might slightly alter the flavor profile. For a dairy-free option, a good quality vegan butter stick (not margarine spreads) works wonderfully here, mimicking the fat content and texture of traditional butter.
- Vanilla Extract: Just a touch of pure vanilla extract really elevates the flavor, adding a warm, aromatic note that complements the peanut butter beautifully. Don’t skip this!
- Crisp Rice Cereal (Rice Krispies): Ah, the “crunchy” part of our Crunchy Peanut Butter Eggs! Rice Krispies are non-negotiable for that signature light, airy, and incredibly satisfying crunch. They absorb some of the moisture from the peanut butter mixture without getting soggy too quickly, maintaining their crispness. While other crisp rice cereals exist, Rice Krispies are my go-to for their consistent texture and size. I wouldn’t recommend substituting with other cereals, as they won’t provide the same delicate crunch.
- Chocolate for Coating: This is where you can really customize your eggs! I usually opt for good quality semi-sweet chocolate chips or melting wafers. Milk chocolate provides a sweeter candy-bar flavor, while dark chocolate offers a lovely contrast to the sweet peanut butter filling. Melting wafers or chocolate bark are often easiest to work with as they melt smoothly and set up nicely. If using chocolate chips, sometimes adding a teaspoon or two of shortening or coconut oil (not water!) to the melted chocolate can help thin it slightly for easier dipping and a smoother finish.
Step-by-Step Instructions
Let’s get those hands a little sticky and create some magic! Follow these steps closely for perfect Crunchy Peanut Butter Eggs every time.
- Preparation is Key: First things first, line a large baking sheet (or two smaller ones) with parchment paper or wax paper. This will be where your shaped and coated eggs will rest. Gather all your ingredients and measure them out. Melting the butter ahead of time is also a good idea so it has a moment to cool slightly.
- Whip Up the Peanut Butter Base: In a large mixing bowl, combine the creamy peanut butter, melted butter, and vanilla extract. Stir these together thoroughly until they are well combined and smooth.
- Incorporate the Powdered Sugar: Gradually add the powdered sugar to the peanut butter mixture, mixing it in a little at a time. I usually do this in two or three additions, stirring until each addition is fully incorporated. The mixture will start to thicken considerably and become quite stiff. You might need to switch from a spoon to a sturdy spatula or even use your hands (cleaned, of course!) to ensure it’s all evenly mixed. The goal is a firm, uniform “dough” that holds its shape.
- Fold in the Rice Krispies: Now for the crunch! Gently fold in the crisp rice cereal. Be careful not to crush them too much. Mix until the Rice Krispies are evenly distributed throughout the peanut butter mixture. The mixture should still be firm enough to handle without being overly sticky. If it feels too wet, add another tablespoon or two of powdered sugar. If it’s too dry and crumbly, add a tiny bit more melted butter (start with half a teaspoon).
- Shape Your Eggs: This is the fun part! Take about 1 to 1.5 tablespoons of the peanut butter mixture and roll it between your palms into an oval, egg-like shape. Aim for consistency in size so they all set and coat evenly. Place each shaped egg onto your prepared baking sheet. Once all the mixture is shaped, you should have around 24-30 eggs, depending on their size.
- Chill Time (Crucial!): Once shaped, place the baking sheet of peanut butter eggs into the refrigerator for at least 30 minutes, or even up to an hour. This chilling step is absolutely vital as it helps the eggs firm up, making them much easier to dip in chocolate without falling apart or leaving a crumbly mess in your chocolate.
- Melt the Chocolate Coating: While your eggs are chilling, prepare your chocolate. You can do this using a double boiler method (placing a heatproof bowl over a pot of simmering water, ensuring the bowl doesn’t touch the water) or in the microwave. If using the microwave, heat the chocolate in 20-30 second intervals, stirring well after each, until smooth and fully melted. Be very careful not to overheat the chocolate, as it can seize or burn. If you’re using chocolate chips and want a thinner coating, now is the time to stir in a teaspoon or two of shortening or coconut oil.
- Dip and Coat: Remove the chilled peanut butter eggs from the refrigerator. Using a fork or a candy dipping tool, carefully drop one egg into the melted chocolate. Spoon chocolate over the top to ensure it’s fully coated. Lift the egg out with the fork, tapping it gently against the side of the bowl to allow any excess chocolate to drip off. This helps create a smooth, even coating without too much pooling at the bottom.
- Set and Decorate: Carefully transfer the chocolate-coated egg back to the parchment-lined baking sheet. If you plan to add any sprinkles or decorations, do so immediately while the chocolate is still wet. Repeat with the remaining eggs.
- Final Chill: Once all the eggs are coated, return the baking sheet to the refrigerator for another 15-30 minutes, or until the chocolate is completely set and firm to the touch.
Tips & Suggestions
Here are some of my go-to tips and suggestions to make your Crunchy Peanut Butter Eggs truly spectacular:
- Don’t Rush the Chill: I cannot stress this enough – chilling the peanut butter mixture both before and after dipping is absolutely critical. It ensures your eggs hold their shape beautifully and prevents the chocolate from becoming gloopy or messy. Cold eggs mean a faster set and a cleaner finish!
- Hands-On Shaping: If the peanut butter mixture is a bit sticky, lightly coat your hands with a tiny bit of powdered sugar or even a dab of neutral oil before shaping the eggs. This makes the process much smoother and less messy.
- Consistent Sizing: For uniform results, consider using a small cookie scoop (about 1 tablespoon capacity) to portion out the peanut butter mixture before rolling. This helps ensure all your eggs are roughly the same size, which is not only aesthetically pleasing but also ensures consistent chilling and dipping times.
- Melting Chocolate Wisdom: When melting chocolate, low and slow is the way to go. Chocolate can easily seize or burn if exposed to too much heat or any moisture. If using a microwave, stir frequently. If using a double boiler, ensure no water or steam gets into your chocolate bowl. Keep the chocolate warm over a very low heat or a bowl of warm (not hot) water during dipping if it starts to thicken.
- Dipping Like a Pro: For the smoothest coating, use a narrow, deep bowl for your melted chocolate. This allows you to fully submerge the egg without using an excessive amount of chocolate. Use a fork, or a dedicated candy dipping tool, to gently lower and lift the eggs. Tap gently against the side of the bowl to let excess chocolate drip off.
- Get Creative with Coatings: While classic chocolate is divine, don’t be afraid to experiment! White chocolate, colored candy melts (especially for Easter!), or even a mix of dark and white chocolate drizzled on top can add extra flair.
- Add-In Ideas: If you’re feeling adventurous and want even more texture, consider stirring in a tablespoon or two of finely chopped nuts (like peanuts or almonds) into the peanut butter mixture along with the Rice Krispies. Or, for a chocolate explosion, mini chocolate chips would be a delicious addition to the filling.
- Make Ahead Magic: These peanut butter eggs are perfect for making ahead! They store beautifully, so you can prepare them a few days in advance of when you need them, easing your party prep or just ensuring you have a stash of treats ready to go.
Storage
Once your Crunchy Peanut Butter Eggs are perfectly set, proper storage will ensure they stay fresh, crunchy, and delicious for as long as possible. Here’s how I like to store them:
- Room Temperature (Short-Term): If your home is cool (below 70°F or 21°C) and not too humid, these eggs can be stored in an airtight container at room temperature for up to 2-3 days. However, the chocolate might soften slightly, and the peanut butter will be softer too. I usually prefer them chilled, as it makes them firmer and less prone to melting.
- Refrigerator (Recommended for Best Texture): For optimal freshness and that satisfying firm bite, I highly recommend storing your Crunchy Peanut Butter Eggs in an airtight container in the refrigerator. Layer them with parchment paper between layers to prevent them from sticking together. Stored this way, they will stay fresh and delicious for up to 2 weeks. The chocolate will remain firm, and the peanut butter filling will have a wonderful, dense texture.
- Freezer (Long-Term Storage): These eggs freeze beautifully! If you want to make a big batch or save some for later, place them in a single layer on a parchment-lined baking sheet and freeze until solid (about 1-2 hours). Once frozen, transfer them to a freezer-safe airtight container or a heavy-duty freezer bag, again layering with parchment paper. They will keep well in the freezer for up to 2-3 months. To enjoy, simply pull them out and let them thaw in the refrigerator for a few hours, or at room temperature for about 30 minutes, before serving.
- Keeping Them Separate: Always store these eggs in an airtight container to prevent them from absorbing odors from other foods in the fridge or freezer, and to protect them from drying out.
Final Thoughts
I genuinely hope you’ve enjoyed the journey of creating these wonderful treats! There’s something truly special about the perfect marriage of creamy peanut butter and the irresistible, airy crunch of Rice Krispies that defines the Crunchy Peanut Butter Eggs With Rice Krispies. This isn’t just another dessert; it’s a delightful experience for your taste buds, offering a unique texture profile that’s hard to beat.
I find these to be an absolute must-try because of their simplicity and the sheer joy they bring. They’re quick to make, incredibly satisfying, and always put a smile on everyone’s face. Whether you’re preparing them for a holiday, a party, or just a sweet craving, the Crunchy Peanut Butter Eggs With Rice Krispies are guaranteed to be a sensational hit. So go on, embrace the fun of making (and devouring!) these incredibly tasty, perfectly crunchy, and utterly delightful peanut butter confections. I promise, they’ll become a cherished favorite in your recipe collection!

No-Bake Crunchy Peanut Butter Eggs & Rice Krispies
- Total Time: 15 minutes
- Yield: 24-30 servings 1x
Description
Indulge in these delightful no-bake Crunchy Peanut Butter Eggs with Rice Krispies, featuring a creamy peanut butter base and a satisfying crunch. Perfect for any occasion, these treats are easy to make and utterly delicious!
Ingredients
- 1 cup Creamy Peanut Butter
- 1/2 cup Powdered Sugar (Confectioners' Sugar)
- 1/4 cup Unsalted Butter, melted
- 1 tsp Vanilla Extract
- 3 cups Crisp Rice Cereal (Rice Krispies)
- 2 cups Chocolate for Coating
Instructions
- Line a large baking sheet with parchment paper or wax paper.
- In a large mixing bowl, combine the creamy peanut butter, melted butter, and vanilla extract. Stir until smooth.
- Gradually add the powdered sugar to the peanut butter mixture, mixing it in a little at a time until fully incorporated.
- Gently fold in the crisp rice cereal, being careful not to crush them too much.
- Take about 1 to 1.5 tablespoons of the mixture and roll it into an oval, egg-like shape. Place each shaped egg onto the prepared baking sheet.
- Chill the shaped eggs in the refrigerator for at least 30 minutes.
- Melt the chocolate using a double boiler or microwave until smooth.
- Remove the chilled eggs from the refrigerator and dip each egg into the melted chocolate, ensuring they are fully coated.
- Transfer the chocolate-coated eggs back to the parchment-lined baking sheet. Add any sprinkles or decorations immediately.
- Return the baking sheet to the refrigerator for another 15-30 minutes, or until the chocolate is completely set.
- Prep Time: 15 mins
- Cook Time: 0 mins
- Category: Dessert
- Method: No-Bake
- Cuisine: American
Nutrition
- Serving Size: 1 egg
- Calories: 150
- Sugar: 10 g
- Sodium: 50 mg
- Fat: 9 g
- Saturated Fat: 3 g
- Unsaturated Fat: 5 g
- Trans Fat: 0 g
- Carbohydrates: 15 g
- Fiber: 1 g
- Protein: 3 g
- Cholesterol: 5 mg
Keywords: Chilling the peanut butter mixture both before and after dipping is critical for maintaining shape. Use a small cookie scoop for consistent egg sizes.