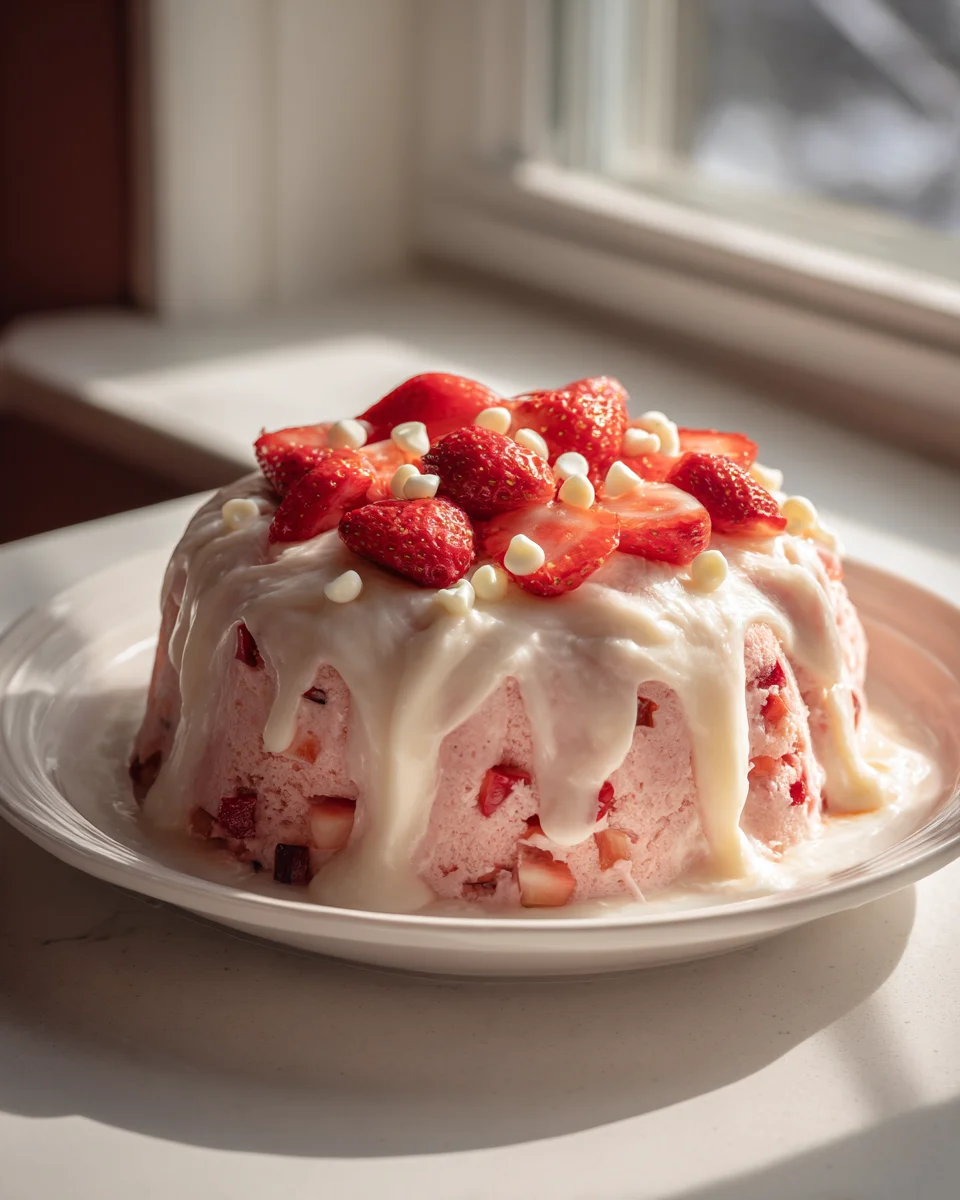
Strawberry Earthquake Cake
Oh boy, do I have a treat for you today! Forget everything you thought you knew about simple sheet cakes, because we’re diving headfirst into the magnificent world of Strawberry Earthquake Cake. This isn’t just a cake; it’s a spectacle, a delicious disaster (in the best way possible!), and frankly, one of the most fun desserts you’ll ever bake and devour.
So, what makes this cake so incredibly special? It’s all in the “earthquake” effect! As it bakes, pockets of sweetened cream cheese and vibrant strawberry goodness sink and swirl, creating beautiful cracks and fissures across the top, revealing a treasure trove of gooey, creamy, fruity deliciousness underneath. Each bite is an adventure, a delightful surprise of moist cake mingled with luscious strawberry pockets and a sweet, creamy drizzle that’s just irresistible.
I promise you, readers, you are going to absolutely adore this recipe. It looks incredibly impressive, making it perfect for potlucks, family gatherings, or just a truly decadent weeknight dessert, yet it’s surprisingly simple to put together. You’ll get a delightful mix of textures – soft cake, gooey sweet spots, and that bright burst of strawberry flavor – all in one glorious slice. Get ready to experience a dessert that’s as exciting to look at as it is to eat!

Welcome, fellow dessert lovers! Today, I’m thrilled to share one of my absolute favorite cakes, the Strawberry Earthquake Cake. This cake is a true showstopper, combining the luscious sweetness of strawberries with a rich, tangy cream cheese swirl that creates beautiful cracks and crevices – hence the “earthquake” name! It’s surprisingly simple to make, even for novice bakers, and the result is always a moist, flavorful cake that disappears faster than you can say “more, please!” Get ready to bake a dessert that’s as delightful to look at as it is to eat.
Ingredient Notes
Creating the perfect Strawberry Earthquake Cake starts with understanding the stars of the show. Here’s a rundown of the key ingredients and some helpful notes on substitutions:
- Yellow Cake Mix (or Vanilla): This is our base, providing a consistent foundation. I usually opt for a standard yellow or vanilla cake mix because its mild flavor allows the strawberry and cream cheese elements to truly shine. You can also use a strawberry-flavored cake mix for an extra berry punch. If you’re feeling adventurous, a white cake mix works beautifully too. Remember to follow the package directions for the liquid ingredients (oil, water, eggs), but we’ll be adding extra goodness!
- Fresh Strawberries: These are absolutely crucial for that vibrant, natural strawberry flavor. I recommend using fresh, ripe strawberries, diced into small pieces. You’ll incorporate some into the batter and save some for a topping or garnish. If fresh aren’t available, thawed frozen strawberries (drained well) can work in a pinch, but fresh truly elevate the taste and texture.
- Cream Cheese: This is what gives our “earthquake” its signature rich, tangy, and creamy texture. Always use full-fat cream cheese, softened at room temperature. This makes it much easier to mix smooth, without any lumps. Low-fat cream cheese might alter the texture slightly, making the swirl less luxurious.
- Unsalted Butter: Softened unsalted butter is essential for a smooth, rich cream cheese mixture. If you only have salted butter, you can use it, but omit any additional salt specified in the cream cheese filling recipe.
- Powdered Sugar (Confectioners’ Sugar): This fine sugar is perfect for creating a silky-smooth cream cheese swirl that melts beautifully into the cake. Sift it if it’s lumpy to ensure a perfectly smooth consistency.
- Vanilla Extract: A good quality vanilla extract enhances all the other flavors. It provides warmth and depth, complementing both the strawberries and the cream cheese. Don’t skip it!
- Optional: Strawberry Gelatin Powder: For an even more intense strawberry flavor and a lovely pink hue, you can add a small amount of strawberry-flavored gelatin powder (the instant kind, not activated) to your cake batter or even to the cream cheese swirl. This is entirely optional but highly recommended if you love a powerful strawberry punch.
Step-by-Step Instructions
Let’s get baking! Follow these clear steps to create your spectacular Strawberry Earthquake Cake:
- Prepare Your Cake Batter:
- Preheat your oven to the temperature specified on your yellow cake mix box (usually 350°F or 175°C).
- Grease and flour a 9×13 inch baking pan, or spray it thoroughly with non-stick baking spray. I sometimes line the bottom with parchment paper for easy removal, but it’s not strictly necessary.
- In a large mixing bowl, combine the cake mix, water, oil, and eggs according to the package directions. Beat with an electric mixer on low speed until moistened, then on medium speed for about 2 minutes, until smooth. Be careful not to overmix, as this can lead to a tough cake.
- Gently fold in about 1 cup of your diced fresh strawberries into the cake batter. If you’re using optional strawberry gelatin, you can stir about 1-2 tablespoons of the dry powder into the batter at this stage as well.
- Pour the strawberry-infused cake batter evenly into your prepared baking pan.
- Whip Up the Cream Cheese Swirl:
- While your cake batter is ready, prepare the luscious cream cheese swirl. In a medium mixing bowl, beat the softened cream cheese, softened unsalted butter, and vanilla extract with an electric mixer until smooth and creamy.
- Gradually add the powdered sugar, beating until the mixture is light, fluffy, and completely smooth. Scrape down the sides of the bowl as needed to ensure everything is well combined. This is your “earthquake” magic!
- Assemble the Earthquake Effect:
- Using a spoon or a small cookie scoop, dollop spoonfuls of the cream cheese mixture evenly over the top of the cake batter in the pan. Don’t worry about perfect placement; rustic is part of the charm!
- Once you’ve distributed all the cream cheese mixture, gently take a knife or a skewer and lightly swirl through the cream cheese and cake batter. You’re not looking to fully combine them, but rather to create beautiful marbled patterns. As the cake bakes, these cream cheese dollops will sink and crack, creating the signature “earthquake” look.
- Bake to Perfection:
- Place the baking pan in your preheated oven.
- Bake for 35-45 minutes, or until a wooden skewer or toothpick inserted into the center of the cake comes out with moist crumbs, but not wet batter. The cream cheese areas might still look a bit gooey, which is normal. The top should be lightly golden, and the edges should be pulling away slightly from the pan.
- Avoid opening the oven door too frequently during baking, as this can cause the cake to sink.
- Cool and Garnish:
- Once baked, remove the cake from the oven and place it on a wire rack to cool completely. This is very important! The “earthquake” structure sets as it cools, and cutting it too early can cause it to crumble.
- Once cooled, you can garnish your beautiful Strawberry Earthquake Cake. I love topping it with a generous scattering of extra fresh diced strawberries, perhaps a dusting of powdered sugar, or even a dollop of whipped cream before serving.
Tips & Suggestions
To ensure your Strawberry Earthquake Cake is an absolute triumph every time, here are a few tips and suggestions from my kitchen to yours:
- Room Temperature Ingredients are Key: For the cream cheese swirl, make sure your cream cheese and butter are thoroughly softened to room temperature. This ensures a lump-free, smooth mixture that will blend effortlessly and create the best texture for your “earthquake” effect.
- Don’t Overmix: When preparing the cake batter, mix until just combined and smooth. Overmixing develops gluten, which can lead to a dry, tough cake. Similarly, for the cream cheese mixture, beat until smooth and fluffy, but don’t go overboard.
- Even Swirling: When swirling the cream cheese into the batter, use a light hand. You want defined pockets and streaks, not a fully incorporated blend. The goal is for those delightful cream cheese islands to sink and create the “cracks” as the cake bakes.
- Check for Doneness Carefully: The baking time can vary depending on your oven. Look for the edges to be golden and pulling away from the pan, and a toothpick inserted into the cake (avoiding the obvious cream cheese pockets) should come out mostly clean with a few moist crumbs. The cream cheese parts will firm up as the cake cools.
- Chill for Best Texture: While delicious warm, Strawberry Earthquake Cake is truly at its best when it has had time to chill completely in the refrigerator. This allows the cream cheese layer to fully set and enhances the overall texture and flavor. Plus, it makes for cleaner slices!
- Serving Suggestions: This cake is fantastic on its own, but it’s also wonderful served with a scoop of vanilla ice cream, a dollop of freshly whipped cream, or a drizzle of strawberry sauce for an extra touch of decadence.
- Flavor Variations: Don’t limit yourself to strawberries! You could try this concept with other fruits like raspberries, blueberries, or even a peach earthquake cake. Experiment with different cake mix flavors and fruit combinations.
Storage
Due to the cream cheese in this cake, proper storage is essential to maintain its freshness and safety. Here’s what I recommend:
- Refrigeration is a Must: Always store your Strawberry Earthquake Cake in the refrigerator. The cream cheese filling requires chilling to remain safe to eat and to keep its delightful texture.
- Airtight Container: Place any leftover cake in an airtight container or cover the baking pan tightly with plastic wrap. This prevents the cake from drying out and absorbing odors from other foods in the fridge.
- Shelf Life: Stored correctly in the refrigerator, Strawberry Earthquake Cake will stay fresh and delicious for 3-5 days. Beyond that, the quality might start to decline, especially with fresh fruit.
- Freezing Instructions: If you want to keep your cake for longer, it freezes beautifully!
- Allow the cake to cool completely before freezing.
- You can freeze the entire cake (if well-wrapped) or cut it into individual slices.
- Wrap the cake or individual slices tightly in plastic wrap, then an additional layer of aluminum foil. This double layer protects against freezer burn.
- Store in the freezer for up to 2-3 months.
- To thaw, transfer the cake or slices to the refrigerator overnight. You can enjoy it chilled or let it come to room temperature for about 30 minutes before serving.
Final Thoughts
And there you have it! I truly hope you’ve enjoyed the journey of creating this incredible dessert. The Strawberry Earthquake Cake isn’t just a treat; it’s an experience. I love how it masterfully combines the vibrant, fresh taste of strawberries with that famously delightful, almost chaotic, texture that makes earthquake cakes so much fun. It’s the kind of cake that looks impressive but is surprisingly simple to pull together, making you feel like a star baker without all the fuss.
Whether you’re celebrating a special occasion, looking for a comforting dessert, or simply craving something extraordinary, I believe the Strawberry Earthquake Cake is an absolute must-try. Get ready for smiles, satisfied sighs, and perhaps even a few “wows” from your lucky tasters. Go ahead, give it a bake, and let the delicious tremors begin!

Strawberry Earthquake Cake Recipe: Easy & Delicious Dessert
- Total Time: 35 minute
- Yield: 12 servings 1x
Description
Dive into the magnificent world of Strawberry Earthquake Cake, a delightful dessert that combines vibrant strawberry goodness with a rich cream cheese swirl. This cake is not only visually stunning but also surprisingly simple to make, perfect for any occasion.
Ingredients
- 1 box Yellow Cake Mix (or Vanilla)
- 1 cup Fresh Strawberries, diced
- 8 oz Cream Cheese, softened
- 1/2 cup Unsalted Butter, softened
- 1 cup Powdered Sugar (Confectioners' Sugar)
- 1 tsp Vanilla Extract
- Optional: 1-2 tbsp Strawberry Gelatin Powder
Instructions
- Preheat your oven to the temperature specified on your yellow cake mix box (usually 350°F or 175°C).
- Grease and flour a 9×13 inch baking pan, or spray it thoroughly with non-stick baking spray.
- In a large mixing bowl, combine the cake mix, water, oil, and eggs according to the package directions. Beat with an electric mixer on low speed until moistened, then on medium speed for about 2 minutes, until smooth.
- Gently fold in about 1 cup of your diced fresh strawberries into the cake batter. If using optional strawberry gelatin, stir about 1-2 tablespoons of the dry powder into the batter at this stage.
- Pour the strawberry-infused cake batter evenly into your prepared baking pan.
- In a medium mixing bowl, beat the softened cream cheese, softened unsalted butter, and vanilla extract with an electric mixer until smooth and creamy.
- Gradually add the powdered sugar, beating until the mixture is light, fluffy, and completely smooth.
- Using a spoon or a small cookie scoop, dollop spoonfuls of the cream cheese mixture evenly over the top of the cake batter in the pan.
- Gently take a knife or a skewer and lightly swirl through the cream cheese and cake batter to create beautiful marbled patterns.
- Place the baking pan in your preheated oven and bake for 35-45 minutes, or until a wooden skewer or toothpick inserted into the center comes out with moist crumbs.
- Once baked, remove the cake from the oven and place it on a wire rack to cool completely.
- Once cooled, garnish your Strawberry Earthquake Cake with extra fresh diced strawberries, a dusting of powdered sugar, or a dollop of whipped cream before serving.
- Prep Time: 15 mins
- Cook Time: 35-45 mins
- Category: Dessert
- Method: Baking
- Cuisine: American
Nutrition
- Serving Size: 1 slice
- Calories: 320
- Sugar: 25 g
- Sodium: 200 mg
- Fat: 15 g
- Saturated Fat: 8 g
- Unsaturated Fat: 5 g
- Trans Fat: 0 g
- Carbohydrates: 42 g
- Fiber: 1 g
- Protein: 3 g
- Cholesterol: 40 mg
Keywords: Ensure your cream cheese and butter are at room temperature for a smooth mixture. Don't overmix the batter to avoid a tough cake, and allow the cake to chill in the refrigerator for the best texture.