Stuffed Biscoff Butter Lava Cookies
Stuffed Biscoff Butter Lava Cookies! Oh my goodness, get ready to dive into a dessert experience that will absolutely blow your mind. I’m so excited to share this recipe with you because it’s truly special. We’re not just making cookies today; we’re crafting little pockets of pure, gooey joy, each one bursting with that irresistible, spiced caramel goodness of Biscoff.
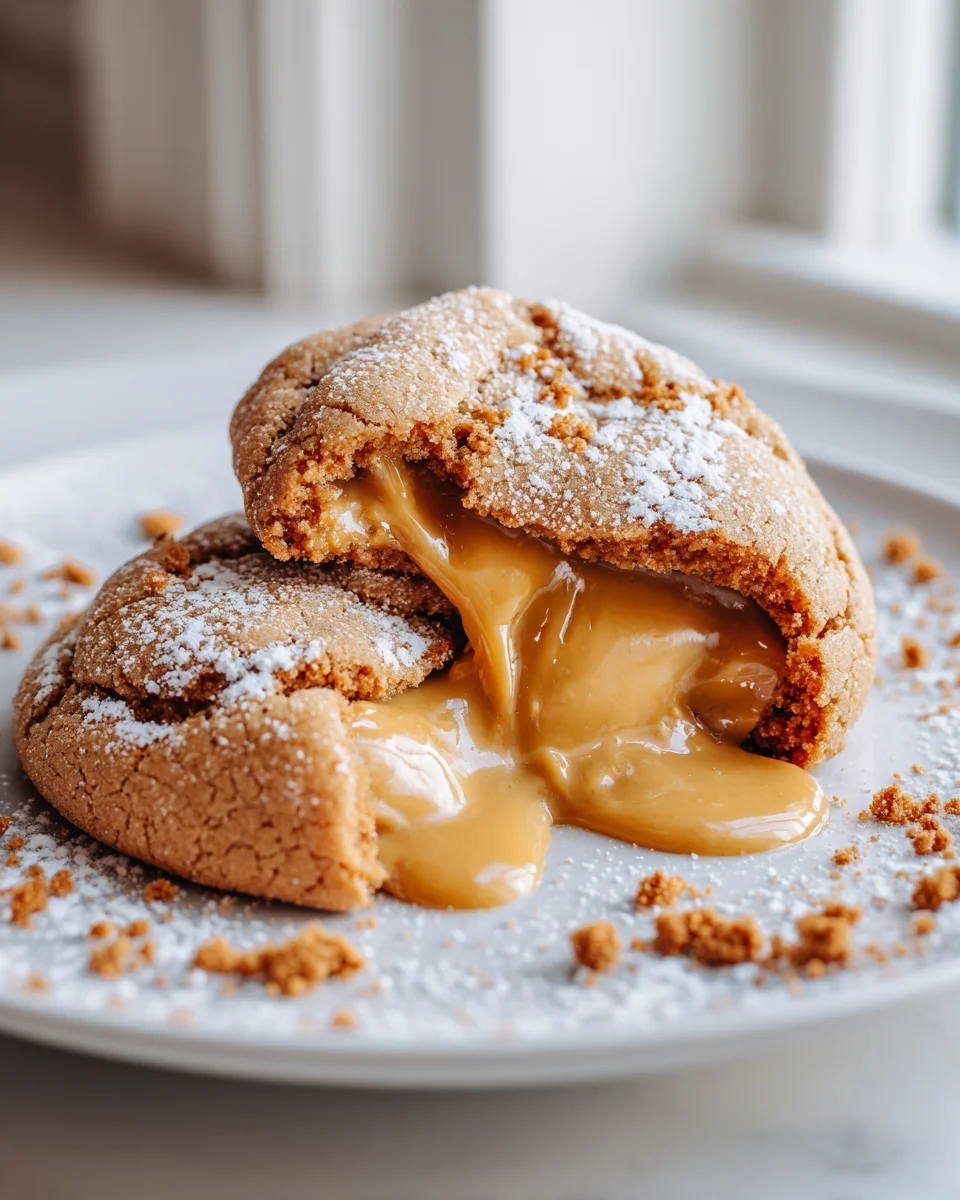
What makes these cookies so utterly divine, you ask? It’s all in that incredible lava center! Imagine biting into a perfectly golden, chewy cookie, only to discover a warm, molten river of Biscoff butter oozing out. It’s a textural dream: the slightly crisp edge, the soft, tender cookie base, and then that glorious, creamy Biscoff core. Trust me, it’s an experience that goes way beyond your average cookie.
You’ll adore these Stuffed Biscoff Butter Lava Cookies because they deliver on every level – they’re comforting, incredibly indulgent, and they have that fantastic “wow” factor that makes them perfect for sharing (or not!). This recipe walks you through how to create a rich, flavorful cookie dough that perfectly encases a generous dollop of frozen Biscoff cookie butter, ensuring that magical lava effect every single time. Prepare to fall head over heels!

Ingredient Notes
Crafting the perfect Stuffed Biscoff Butter Lava Cookies truly hinges on understanding a few key ingredients. I’ve found that paying attention to these details makes all the difference in achieving that irresistible gooey center and chewy cookie.
- Biscoff Cookie Butter: This is the star of our show, providing that iconic “lava” center. You’ll want a good quality, smooth Biscoff spread (also known as Speculoos spread). The smooth variety works best for a truly molten center. I personally love the original Lotus Biscoff brand for its authentic flavor. Don’t be tempted by crunchy versions for the filling, as it might prevent that smooth, oozing lava effect we’re aiming for.
- Substitution: While Biscoff is truly unique, if you absolutely can’t find it, a good quality, smooth cashew butter or even a very creamy peanut butter could be used in a pinch, but be aware that the flavor profile will obviously change significantly. It won’t be “Biscoff Lava,” but still a delicious stuffed cookie!
- Unsalted Butter: I always opt for unsalted butter in my baking so I can control the amount of salt. Make sure it’s softened to room temperature, but not melted. This allows it to cream properly with the sugars, creating air pockets for a tender cookie.
- Substitution: For a dairy-free option, a good quality plant-based butter stick (like Miyoko’s Kitchen or Earth Balance baking sticks) can often be substituted cup-for-cup.
- Granulated Sugar & Light Brown Sugar: The combination here is crucial. Granulated sugar contributes to spread and crispness, while light brown sugar adds moisture, chewiness, and a lovely caramel note that complements the Biscoff so well. Make sure your brown sugar is soft and fresh, not hardened.
- Substitution: While I stick to this blend, you could use all light brown sugar for an even chewier, moister cookie, though it might spread a little less. Avoid using only granulated sugar, as you’ll miss out on the chewiness.
- All-Purpose Flour: Standard unbleached all-purpose flour works perfectly here. Make sure to measure it correctly, either by weight (my preferred method for accuracy) or by spooning it into the measuring cup and leveling it off, rather than scooping directly from the bag (which can compact it and lead to too much flour).
- Substitution: A 1:1 gluten-free all-purpose baking blend (one containing xanthan gum) could work, but be prepared for a slightly different texture in the final cookie.
- Eggs: Large eggs, at room temperature, help to emulsify the batter and add richness and structure. Room temperature eggs combine more easily with the butter and sugar, creating a smoother dough.
- Vanilla Extract: A good quality pure vanilla extract enhances all the other flavors.
- Baking Soda & Baking Powder: This dynamic duo ensures our cookies rise beautifully and have a soft, slightly chewy texture. Baking soda reacts with the acidic brown sugar, while baking powder provides an extra lift.
- Salt: Just a touch of salt is essential to balance the sweetness and bring out the depth of flavor in the Biscoff. Don’t skip it!
- Crushed Biscoff Cookies (Optional, but Recommended!): I love adding some finely crushed Biscoff cookies directly into the dough and/or sprinkling on top for an extra layer of flavor and delightful crunch. It truly amplifies the Biscoff experience.
Step-by-Step Instructions
Let’s get those incredible Stuffed Biscoff Butter Lava Cookies baking! The key to success is in the preparation, especially for that glorious lava center. Follow these steps, and you’ll be enjoying warm, gooey cookies in no time.
- Prepare the Biscoff Lava Centers: This is a critical first step, so don’t skip it! Line a small plate or baking sheet with parchment paper or a silicone mat. Using a small spoon or a mini cookie scoop (about 1-2 teaspoons worth), scoop out portions of the Biscoff butter onto the prepared surface. You’ll want about 12-14 portions, depending on how generous you want your lava. Freeze these Biscoff balls for at least 30-45 minutes, or until they are firm. This firmness is essential to prevent them from melting out of your cookies too quickly during baking. I often do this the night before.
- Preheat Oven & Prep Pans: Preheat your oven to 375°F (190°C). Line two large baking sheets with parchment paper or silicone mats. This helps prevent sticking and makes for easy cleanup.
- Cream Wet Ingredients: In a large mixing bowl, using an electric mixer (handheld or stand mixer with a paddle attachment), cream together the softened unsalted butter, granulated sugar, and light brown sugar on medium speed until the mixture is light, fluffy, and pale in color, about 2-3 minutes. Scrape down the sides of the bowl as needed.
- Add Eggs and Vanilla: Beat in the eggs, one at a time, mixing well after each addition until just combined. Then, stir in the vanilla extract. Don’t overmix here; we’re just incorporating the ingredients.
- Combine Dry Ingredients: In a separate medium bowl, whisk together the all-purpose flour, baking soda, baking powder, and salt. Make sure these are well combined to ensure even distribution throughout the dough.
- Gradually Add Dry to Wet: With the mixer on low speed, gradually add the dry ingredients to the wet ingredients, mixing until just combined. Be careful not to overmix; overmixing can lead to tough cookies. Stop as soon as you no longer see streaks of flour.
- Fold in Crushed Biscoff (Optional): If you’re adding crushed Biscoff cookies to the dough, gently fold them in by hand with a spatula until evenly distributed.
- Assemble the Cookies: Now for the fun part – stuffing! Take a scoop of cookie dough (about 1.5-2 tablespoons, or use a medium cookie scoop). Flatten it gently in the palm of your hand to form a disk. Place one frozen Biscoff butter ball in the center of the dough disk. Carefully wrap the dough around the Biscoff ball, sealing the edges completely. Make sure the Biscoff is fully encased, with no seams or cracks in the dough, to prevent leakage during baking. Repeat with the remaining dough and Biscoff centers.
- Bake: Arrange the stuffed cookie dough balls on your prepared baking sheets, leaving about 2 inches between each cookie as they will spread. Bake for 10-12 minutes, or until the edges are golden brown and set, but the centers still look slightly soft and gooey. This slight underbaking is key for that perfect lava effect.
- Cool: Remove the baking sheets from the oven. For the best “lava” experience, let the cookies cool on the baking sheet for about 5-10 minutes. This allows them to set up slightly while still retaining their molten center. Transfer them to a wire rack to cool completely, though I highly recommend eating at least one warm!
Tips & Suggestions
To truly master these Stuffed Biscoff Butter Lava Cookies and ensure they’re a showstopper every single time, I’ve gathered my top tips and suggestions. These small details can elevate your baking from good to absolutely amazing!
- Do NOT Skip Freezing the Biscoff Butter Centers: I cannot stress this enough! This step is paramount for achieving that incredible, flowing “lava” effect. If the Biscoff butter isn’t firm, it will melt too quickly during baking and either seep out of the cookies or fully incorporate into the dough, losing that distinct gooey center. I often freeze mine for longer than recommended, sometimes even overnight, to ensure they’re rock-solid.
- Ensure a Tight Seal: When you’re encasing the frozen Biscoff butter ball with cookie dough, take the time to really pinch and seal all the edges. Any small gap or crack can be a potential leak point for your precious Biscoff lava, leading to flat, disappointed cookies. Think of it like creating a perfect little Biscoff dumpling.
- Don’t Overmix the Dough: Once you add the flour, mix until just combined. Overmixing develops the gluten in the flour, which can lead to tough, dense cookies instead of the soft, chewy ones we’re aiming for. A light hand here goes a long way.
- Slightly Underbake for Max Gooeyness: For that ultimate lava experience, these cookies are best when they’re slightly underbaked. Look for edges that are set and lightly golden, but the centers still appear a bit soft and perhaps even a touch glossy. They will continue to set as they cool on the baking sheet. If you bake them until fully firm, your lava center will be more like a soft solid than a molten river.
- Serve Warm for the Best Experience: While delicious at any temperature, these cookies truly shine when served warm. The heat reactivates the Biscoff butter, making it perfectly molten. Pop a cooled cookie in the microwave for 10-15 seconds, or warm it gently in a low oven for a few minutes, to revive that lava effect.
- Enhance with Toppings:
- Extra Crushed Biscoff: Sprinkle a little extra crushed Biscoff cookie on top of the warm cookies immediately after they come out of the oven for added texture and flavor.
- Drizzle: Melt a tablespoon or two of Biscoff butter and drizzle it over the cooled cookies for an extra dose of flavor and a beautiful finish.
- Flaky Sea Salt: A tiny sprinkle of flaky sea salt on top can beautifully cut through the sweetness and enhance the Biscoff notes.
- Uniform Size Matters: Use a cookie scoop to ensure all your cookie dough balls are roughly the same size. This promotes even baking, so you don’t have some cookies underbaked and others overbaked on the same tray.
Storage
You’ve gone to all the effort to make these incredible Stuffed Biscoff Butter Lava Cookies, so proper storage is key to enjoying them for as long as possible (which, let’s be honest, usually isn’t very long because they disappear so quickly!). Here’s how I keep mine fresh:
- At Room Temperature:
Once your cookies have completely cooled, store them in an airtight container at room temperature. They will stay fresh and wonderfully chewy for up to 3-4 days. For the best “lava” experience after the first day, I highly recommend gently reheating them. A quick 10-15 second zap in the microwave will bring that Biscoff butter back to its molten glory, or a few minutes in a low oven (around 250°F / 120°C) works beautifully too.
- Refrigeration:
While you can store these cookies in an airtight container in the refrigerator for up to a week, be aware that the cold will firm up both the cookie dough and the Biscoff lava center significantly. The cookies might also become a bit chewier and less soft. If you refrigerate them, reheating is almost a must to restore their texture and get that lava flowing again.
- Freezing Baked Cookies:
These cookies freeze beautifully, which is fantastic for having a stash on hand! Once the cookies are completely cool, place them in a single layer on a baking sheet and freeze for about an hour until solid. This “flash freeze” prevents them from sticking together. Then, transfer the frozen cookies to a freezer-safe airtight container or a heavy-duty freezer bag. They will keep well for up to 2-3 months.
To enjoy a frozen cookie, you can thaw it at room temperature for an hour or so, then warm it in the microwave for 15-30 seconds, or in a preheated oven at 300°F (150°C) for 5-10 minutes until heated through and the Biscoff center is melted.
- Freezing Unbaked Dough Balls:
This is my secret weapon for fresh-baked cookies anytime! Prepare the dough and stuff the Biscoff centers as instructed. Then, arrange the unbaked, stuffed cookie dough balls on a baking sheet lined with parchment paper, making sure they don’t touch. Flash freeze them for 1-2 hours until solid. Once frozen, transfer the dough balls to a freezer-safe airtight container or freezer bag. They can be stored for up to 2-3 months.
When you’re ready to bake, place the frozen dough balls on a prepared baking sheet and bake as directed, adding an extra 2-4 minutes to the baking time. This way, you can have warm, gooey Stuffed Biscoff Butter Lava Cookies whenever the craving strikes!
Final Thoughts
And there you have it! We’ve journeyed through the creation of what I truly believe is a dessert masterpiece: Stuffed Biscoff Butter Lava Cookies. These aren’t just any cookies; they’re an experience, a delightful journey for your taste buds. Imagine sinking your teeth into a perfectly baked, slightly crisp-on-the-outside, chewy-on-the-inside cookie, only to discover a warm, molten core of rich, spiced Biscoff butter oozing out. It’s a symphony of textures and flavors that truly captivates the senses and elevates the humble cookie to something extraordinary.
I absolutely urge you to give these incredible Stuffed Biscoff Butter Lava Cookies a try. Whether you’re baking for a special occasion, a cozy night in, or simply to treat yourself to something truly unforgettable, this recipe delivers on every front. They are an absolute showstopper, guaranteed to bring smiles and satisfy even the most discerning sweet tooth. Get ready to fall head over heels for your new favorite cookie!
Stuffed Biscoff Butter Lava Cookies: Warm, Melty, Divine!
- Total Time: 42 minutes
- Yield: 12 servings
Description
Dive into a dessert experience with these Stuffed Biscoff Butter Lava Cookies, featuring a warm, molten center of Biscoff butter. Each cookie is a delightful combination of chewy texture and rich flavor that will leave you craving more.
Ingredients
- Biscoff Cookie Butter
- Unsalted Butter, softened
- Granulated Sugar
- Light Brown Sugar
- All-Purpose Flour
- Large Eggs, at room temperature
- Vanilla Extract
- Baking Soda
- Baking Powder
- Salt
- Crushed Biscoff Cookies (Optional, but Recommended)
Instructions
- Prepare the Biscoff Lava Centers: Line a small plate or baking sheet with parchment paper or a silicone mat. Scoop out portions of the Biscoff butter onto the prepared surface, about 12-14 portions. Freeze these Biscoff balls for at least 30-45 minutes until firm.
- Preheat Oven & Prep Pans: Preheat your oven to 375°F (190°C). Line two large baking sheets with parchment paper or silicone mats.
- Cream Wet Ingredients: In a large mixing bowl, cream together the softened unsalted butter, granulated sugar, and light brown sugar on medium speed until light and fluffy, about 2-3 minutes.
- Add Eggs and Vanilla: Beat in the eggs one at a time, mixing well after each addition. Stir in the vanilla extract.
- Combine Dry Ingredients: In a separate bowl, whisk together the all-purpose flour, baking soda, baking powder, and salt.
- Gradually Add Dry to Wet: With the mixer on low speed, gradually add the dry ingredients to the wet ingredients, mixing until just combined.
- Fold in Crushed Biscoff (Optional): If using, gently fold in crushed Biscoff cookies by hand with a spatula.
- Assemble the Cookies: Take a scoop of cookie dough and flatten it in your hand. Place one frozen Biscoff butter ball in the center and wrap the dough around it, sealing the edges completely.
- Bake: Arrange the stuffed cookie dough balls on the prepared baking sheets, leaving about 2 inches between each. Bake for 10-12 minutes until the edges are golden brown and the centers are slightly soft.
- Cool: Let the cookies cool on the baking sheet for about 5-10 minutes before transferring them to a wire rack to cool completely.
- Prep Time: 30 mins
- Cook Time: 12 mins
- Category: Dessert
- Method: Baking
- Cuisine: American
Nutrition
- Serving Size: 1 cookie
- Calories: 200
- Sugar: 12 g
- Sodium: 150 mg
- Fat: 10 g
- Saturated Fat: 5 g
- Unsaturated Fat: 5 g
- Trans Fat: 0 g
- Carbohydrates: 25 g
- Fiber: 1 g
- Protein: 3 g
- Cholesterol: 30 mg
Keywords: Ensure to freeze the Biscoff butter centers for the best lava effect. Do not overmix the dough to keep the cookies soft and chewy. Serve warm for the ultimate experience.