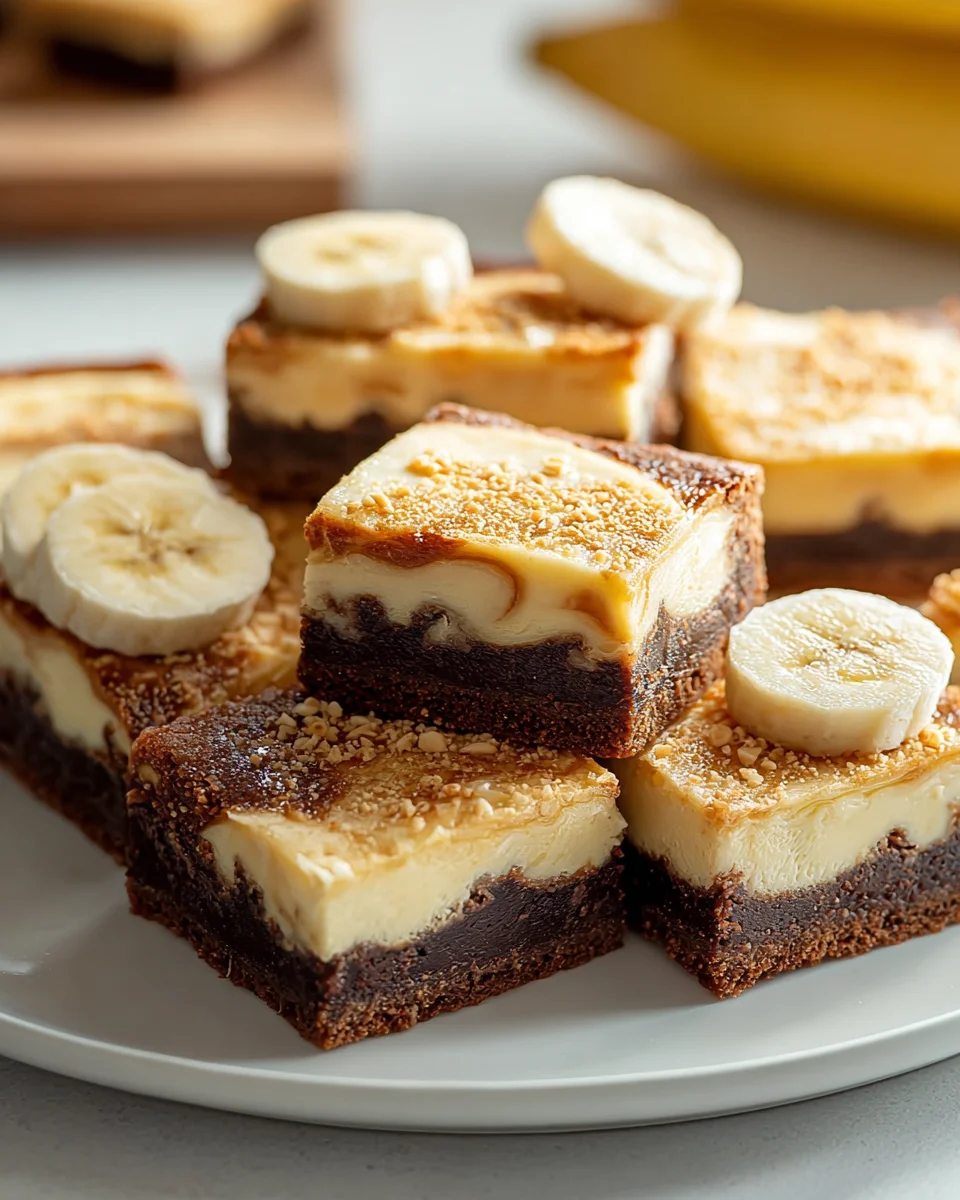
Banana Pudding Brownies
Oh boy, do I have a treat for you today! Get ready to have your dessert world rocked because these Banana Pudding Brownies are an absolute game-changer. I mean, seriously, who ever thought to combine two of the most comforting, soul-satisfying desserts into one glorious square? Well, I did, and let me tell you, it’s a stroke of genius!
You’re going to absolutely adore these because they bring together the best of both worlds. Imagine the fudgy, rich chocolate goodness of your favorite brownie, but then, BAM! It’s topped with all the nostalgic flavors and creamy textures of a classic banana pudding. We’re talking ripe bananas, luscious vanilla cream, and those delightful crunchy vanilla wafers, all sitting pretty on a chocolatey base. It’s an unexpected twist that just works in the most delicious way possible.
This dish isn’t just a dessert; it’s an experience. It’s special because it offers that delightful contrast of a dense brownie with a light, creamy, fruity topping, making every bite a journey of textures and flavors. It’s the perfect showstopper for your next potluck, a unique bake sale item, or just a fantastic way to treat yourself to something truly extraordinary. Trust me, once you try these, you’ll wonder how you ever lived without them!

Ingredient Notes
Creating these Banana Pudding Brownies is an exciting journey into two dessert favorites, and the right ingredients are key to their success. Here’s a breakdown of what you’ll need and why, along with some helpful substitutions.
For the Brownie Base:
- All-Purpose Flour: This forms the structure of our rich brownie base. I prefer using unbleached all-purpose flour for a slightly softer crumb. You can substitute with a 1:1 gluten-free baking blend if you’re looking to make these gluten-friendly, but be aware the texture might be slightly different.
- Unsweetened Cocoa Powder: For that deep, chocolatey brownie flavor. I recommend a good quality unsweetened cocoa powder. Dutch-processed cocoa will give you a darker brownie with a milder chocolate flavor, while natural unsweetened cocoa will result in a slightly lighter color and more intense chocolate tang. Either works beautifully!
- Granulated Sugar & Brown Sugar: The combination gives us both sweetness and chewiness. Granulated sugar provides crisp edges, while brown sugar adds moisture and that lovely fudgy texture we crave in a brownie.
- Unsalted Butter: I always opt for unsalted so I can control the salt level. If you only have salted butter, just reduce the added salt in the recipe by about ¼ teaspoon. Melted butter ensures a dense, fudgy brownie.
- Eggs: These are crucial for binding the ingredients, adding richness, and contributing to the brownies’ fudgy texture. Use large eggs, at room temperature, for best incorporation.
- Vanilla Extract: Don’t skip this! A good quality pure vanilla extract enhances all the chocolate flavors.
- Salt: Just a pinch balances the sweetness and brings out the cocoa’s depth.
For the Banana Pudding Layer:
- Instant Vanilla Pudding Mix: This is our shortcut to creamy, delicious banana pudding perfection. While a classic vanilla flavor works best, you could experiment with a banana cream instant pudding mix for an extra punch of banana flavor. Just make sure it’s the instant variety, not the cook-and-serve type, for quick setting.
- Whole Milk: For the creamiest pudding. You can use lower-fat milk, but the pudding might be a bit less rich. Non-dairy alternatives like almond milk or oat milk can also be used, but again, the final texture might vary slightly – some non-dairy milks yield a slightly thinner pudding.
- Ripe Bananas: The star of the show! You want bananas that are ripe but not overly mushy – still firm enough to slice neatly, but with plenty of sweet spots. Yellow with a few brown flecks is ideal. Avoid green bananas (not sweet enough) or fully brown ones (too mushy).
- Vanilla Wafers: These iconic cookies are essential for that classic banana pudding experience. They soften beautifully in the pudding, adding texture and a hint of vanilla sweetness. If you can’t find them, shortbread cookies or even graham cracker squares can work in a pinch, though the flavor profile will be slightly different.
- Whipped Topping (Cool Whip or Homemade Whipped Cream): For that light, airy, creamy finish. I often use a store-bought whipped topping for convenience, but freshly made whipped cream (heavy cream, a touch of powdered sugar, and vanilla) is absolutely divine and adds an extra layer of richness.
Step-by-Step Instructions
Let’s get baking! These Banana Pudding Brownies are a labor of love that’s absolutely worth it. Follow these steps for a dessert that will truly wow.
Step 1: Prepare Your Brownie Base
- Preheat and Prep: Start by preheating your oven to 350°F (175°C). Line a 9×13 inch baking pan with parchment paper, leaving an overhang on the sides – this will be your “sling” to easily lift the brownies out later. Lightly grease the parchment.
- Melt Butter & Combine Sugars: In a large, microwave-safe bowl or a saucepan, melt the unsalted butter. Once melted, remove from heat and stir in both the granulated sugar and brown sugar until well combined.
- Add Eggs & Vanilla: Whisk in the eggs, one at a time, until fully incorporated and the mixture is smooth and glossy. Stir in the vanilla extract. It’s important to really mix well here to get that fudgy texture.
- Combine Dry Ingredients: In a separate bowl, whisk together the all-purpose flour, unsweetened cocoa powder, and salt.
- Combine Wet and Dry: Gradually add the dry ingredients to the wet ingredients, mixing only until just combined. Be careful not to overmix; overmixing can lead to tough brownies.
- Bake the Brownie Base: Pour the brownie batter into your prepared baking pan and spread it evenly. Bake for 25-30 minutes, or until a toothpick inserted into the center comes out with moist crumbs, but not wet batter. You still want it slightly fudgy.
- Cool Completely: This step is CRUCIAL. Remove the brownies from the oven and let them cool completely in the pan on a wire rack. They should be at room temperature before you even think about adding the pudding layer. I often let them cool for at least 2 hours, or even pop them in the fridge for 30 minutes to speed it up once they’re no longer hot.
Step 2: Prepare the Banana Pudding Layer
- Whisk the Pudding: In a large bowl, whisk together the instant vanilla pudding mix and the cold whole milk for about 2 minutes, or until the mixture begins to thicken. It won’t be fully set yet, but it should be noticeably thicker than just milk.
- Chill Briefly: Place the pudding mixture in the refrigerator for about 5-10 minutes to allow it to set up a bit more. This helps create a firmer layer that won’t totally seep into your brownies.
Step 3: Assemble Your Banana Pudding Brownies
- Layer Vanilla Wafers: Once your brownies are completely cool, arrange a single layer of vanilla wafers over the top of the brownie base. You might need to break some to fit snugly, but don’t worry about perfection.
- Add Sliced Bananas: Evenly distribute a layer of freshly sliced ripe bananas over the vanilla wafers. Try to cover as much surface area as possible.
- Pour Pudding: Gently pour the slightly chilled and thickened vanilla pudding mixture over the bananas and wafers, spreading it evenly to the edges of the pan.
- Chill for Setting: Place the entire pan back into the refrigerator for at least 4-6 hours, or preferably overnight. This chilling time is essential for the pudding to fully set and for the flavors to meld beautifully. It also softens the wafers to that perfect, melt-in-your-mouth consistency.
Step 4: The Finishing Touch
- Add Whipped Topping: Just before serving, spread your whipped topping (either store-bought or homemade) evenly over the set pudding layer.
- Garnish (Optional but Recommended!): Decorate with a few more vanilla wafers, some fresh banana slices (tossed lightly in lemon juice to prevent browning if preparing ahead), or a sprinkle of chocolate shavings.
- Slice and Serve: Use the parchment paper overhang to lift the entire dessert out of the pan onto a cutting board. Use a sharp knife to cut into squares. For clean cuts, wipe your knife with a warm, damp cloth between each slice.
Tips & Suggestions
Making these Banana Pudding Brownies is a delightful experience, and a few insider tips can elevate your dessert from good to absolutely unforgettable. I’ve learned these through trial and error, so you don’t have to!
- Banana Ripeness is Key: I can’t stress this enough! For the best flavor and texture in your pudding layer, use bananas that are ripe (mostly yellow with a few brown spots) but still firm enough to slice easily. Overripe bananas will be too mushy and release too much moisture, potentially thinning your pudding layer. Underripe bananas won’t have the natural sweetness needed.
- Cool the Brownies Completely: Patience is a virtue here! If you try to add the pudding layer to warm brownies, the heat will melt the pudding, resulting in a runny, messy disaster. Ensure your brownies are completely at room temperature, or even slightly chilled, before moving on.
- Don’t Skimp on Chilling Time: This isn’t just a suggestion; it’s a requirement for success. The lengthy chilling time (4-6 hours minimum, overnight is best) allows the pudding to fully set, the vanilla wafers to soften to their iconic texture, and all the flavors to truly meld into that perfect banana pudding profile. If you rush it, your brownies will be a sloppy mess.
- Prevent Banana Browning: If you’re planning to garnish with fresh banana slices on top of the whipped cream, consider tossing them very gently in a tiny bit of lemon juice or a fruit protector like Fruit-Fresh before placing them. This will keep them looking appealing for longer, especially if serving over a few hours.
- Clean Cuts for Presentation: For bakery-worthy squares, use a large, sharp knife. Wipe the knife clean with a warm, damp cloth between each cut. This prevents the layers from smearing and gives you beautiful, defined slices.
- Flavor Boosts:
- For an extra layer of decadence, try drizzling a little caramel sauce or melted chocolate over the whipped topping before serving.
- A sprinkle of finely chopped pecans or walnuts could add a nice textural contrast to the soft layers.
- If you want to lean even more into the banana flavor, use a banana cream instant pudding mix instead of vanilla.
- Serving Temperature: These brownies are best served chilled, straight from the refrigerator.
Storage
Due to the fresh bananas and the dairy-based pudding and whipped topping, proper storage is essential for these Banana Pudding Brownies.
- Refrigeration is Key: Always store any leftovers in an airtight container in the refrigerator. This is critical for food safety and maintaining the integrity of the pudding and whipped cream layers.
- Shelf Life: These brownies are best enjoyed within 3-4 days of preparation. While they might still be safe to eat after that, the bananas will start to soften considerably and potentially discolor, and the overall texture won’t be as fresh.
- Not Freezer-Friendly: I highly recommend against freezing these Banana Pudding Brownies. The fresh bananas will turn very mushy and watery upon thawing, and the pudding layer can develop an unappealing texture. These are definitely a “make and enjoy fresh” kind of dessert!
- Cover Well: Ensure the container is truly airtight to prevent the brownies from absorbing any refrigerator odors and to keep the whipped topping from drying out.
Final Thoughts
And there you have it – my full guide to creating the truly extraordinary Banana Pudding Brownies! I honestly believe this recipe is an absolute game-changer in the dessert world, and a definite must-try for anyone who loves unique treats. Why is it so special? Because these Banana Pudding Brownies aren’t just another sweet treat; they’re a brilliant fusion, marrying the comforting, creamy layers and nostalgic flavors of classic banana pudding with the rich, fudgy decadence of a perfectly baked brownie. Every single bite delivers that delightful interplay of soft banana, crunchy vanilla wafer, and dense chocolate, creating a symphony of textures and tastes that is utterly irresistible. If you’re searching for a dessert that will truly impress, spark joy, and become an instant favorite, I urge you to whip up a batch of these unforgettable Banana Pudding Brownies. I promise you, the smiles and satisfied sighs will make it all worthwhile!
Indulgent Banana Pudding Brownies: Easy & Delicious Recipe
- Total Time: 1 hour
- Yield: 12 servings 1x
Description
These Banana Pudding Brownies combine the rich, fudgy goodness of brownies with the creamy, nostalgic flavors of banana pudding. It’s a delightful dessert experience that will impress everyone!
Ingredients
- 1 cup All-Purpose Flour
- 1/2 cup Unsweetened Cocoa Powder
- 1 cup Granulated Sugar
- 1/2 cup Brown Sugar
- 1/2 cup Unsalted Butter
- 2 large Eggs
- 1 teaspoon Vanilla Extract
- 1/4 teaspoon Salt
- 1 package Instant Vanilla Pudding Mix
- 2 cups Whole Milk
- 2 Ripe Bananas
- 1 package Vanilla Wafers
- 1 container Whipped Topping (Cool Whip or Homemade Whipped Cream)
Instructions
- Step 1: Prepare Your Brownie Base
- Preheat your oven to 350°F (175°C). Line a 9×13 inch baking pan with parchment paper, leaving an overhang on the sides. Lightly grease the parchment.
- In a large, microwave-safe bowl or a saucepan, melt the unsalted butter. Once melted, remove from heat and stir in both the granulated sugar and brown sugar until well combined.
- Whisk in the eggs, one at a time, until fully incorporated and the mixture is smooth and glossy. Stir in the vanilla extract.
- In a separate bowl, whisk together the all-purpose flour, unsweetened cocoa powder, and salt.
- Gradually add the dry ingredients to the wet ingredients, mixing only until just combined. Be careful not to overmix.
- Pour the brownie batter into your prepared baking pan and spread it evenly. Bake for 25-30 minutes, or until a toothpick inserted into the center comes out with moist crumbs.
- Remove the brownies from the oven and let them cool completely in the pan on a wire rack.
- Step 2: Prepare the Banana Pudding Layer
- In a large bowl, whisk together the instant vanilla pudding mix and the cold whole milk for about 2 minutes, or until the mixture begins to thicken.
- Place the pudding mixture in the refrigerator for about 5-10 minutes to allow it to set up a bit more.
- Step 3: Assemble Your Banana Pudding Brownies
- Once your brownies are completely cool, arrange a single layer of vanilla wafers over the top of the brownie base.
- Evenly distribute a layer of freshly sliced ripe bananas over the vanilla wafers.
- Gently pour the slightly chilled and thickened vanilla pudding mixture over the bananas and wafers, spreading it evenly.
- Place the entire pan back into the refrigerator for at least 4-6 hours, or preferably overnight.
- Step 4: The Finishing Touch
- Just before serving, spread your whipped topping evenly over the set pudding layer.
- Decorate with a few more vanilla wafers, some fresh banana slices, or a sprinkle of chocolate shavings.
- Use the parchment paper overhang to lift the entire dessert out of the pan onto a cutting board. Use a sharp knife to cut into squares.
- Prep Time: 30 mins
- Cook Time: 30 mins
- Category: Dessert
- Method: Baking
- Cuisine: American
Nutrition
- Serving Size: 1 square
- Calories: 350
- Sugar: 25 g
- Sodium: 150 mg
- Fat: 15 g
- Saturated Fat: 8 g
- Unsaturated Fat: 5 g
- Trans Fat: 0 g
- Carbohydrates: 50 g
- Fiber: 2 g
- Protein: 4 g
- Cholesterol: 50 mg
Keywords: For the best flavor and texture, use ripe bananas that are mostly yellow with a few brown spots. Ensure the brownies are completely cool before adding the pudding layer, and allow sufficient chilling time for the pudding to set.