Easy Snowman Cake Pops Adorable Christmas Recipe! The holiday season truly sparkles with a unique kind of magic, and in my kitchen, that magic often comes to life through baking. What better way to capture the joyous spirit of Christmas than by creating delightful treats that are not only delicious but also incredibly charming and fun to make? I’ve always found that some of the most cherished festive memories are created right at home, surrounded by the sweet aroma of holiday spices and the happy chatter of loved ones. While traditional Christmas desserts can sometimes feel intimidating, I am absolutely thrilled to share a recipe that combines impressive visual appeal with surprising simplicity.
Why Everyone Admires These Festive Bites
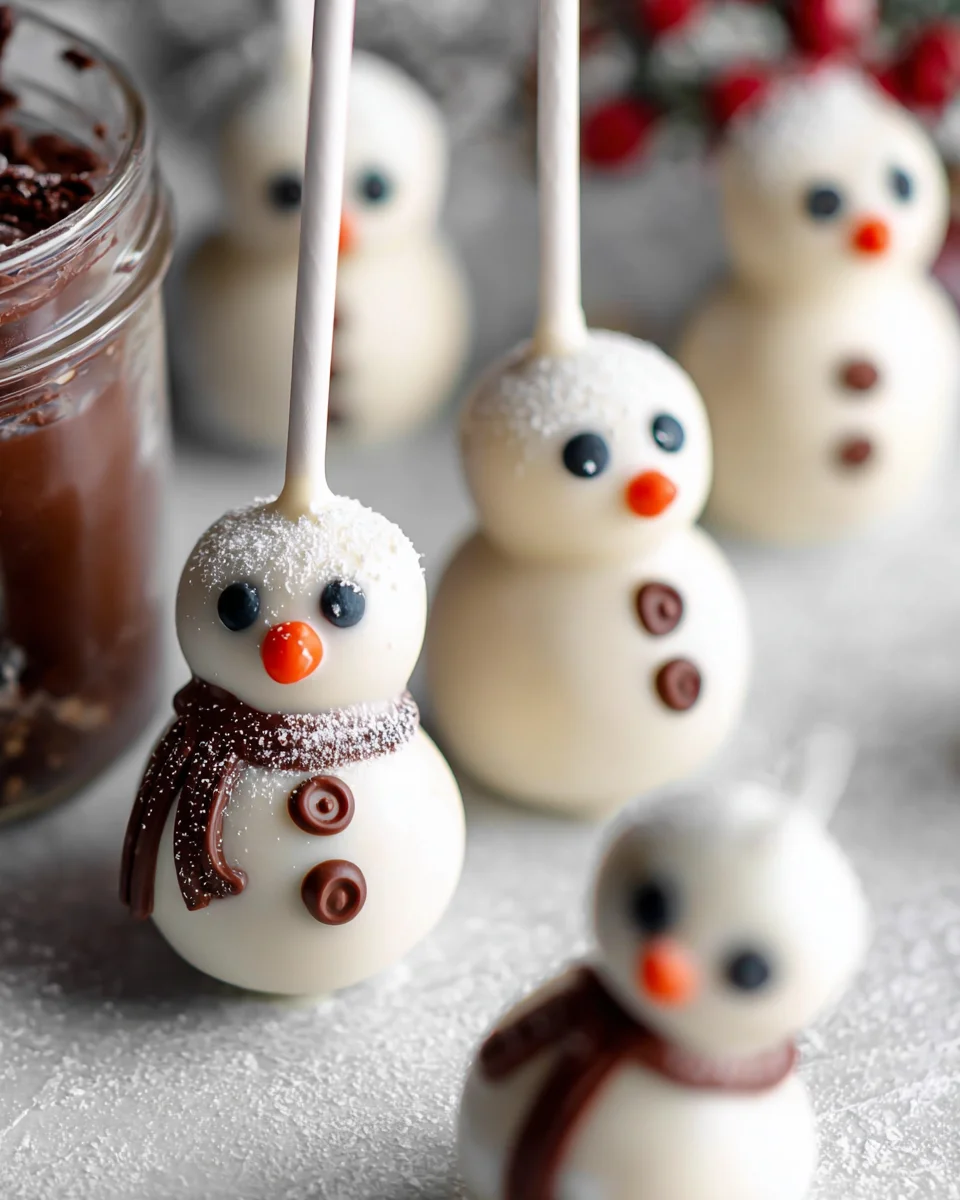
Cake pops themselves have evolved into a beloved modern staple at countless parties and gatherings, offering a perfectly portioned bite of sweet indulgence. But with this recipe, we’re elevating them into something truly special: irresistibly cute snowmen! People absolutely adore these whimsical creations, not just for their delightful moist, tender cake centers and smooth candy shell, but also for their incredible visual charm. They are an amazing way to infuse a personalized, handmade touch into your holiday dessert spread, or even to craft charming, edible gifts for friends and family. This truly is an Easy Snowman Cake Pops Adorable Christmas Recipe that promises to bring smiles, warmth, and delicious satisfaction to your festive celebrations.

Ingredients:
- For the Cake Base:
- 1 box (approximately 15.25 ounces or 432g) white or vanilla cake mix
- Ingredients required by your cake mix box (typically eggs, water, vegetable oil)
- 1 can (approximately 16 ounces or 453g) vanilla frosting, or your preferred white frosting (you won’t use the whole can, but it’s good to have extra)
- For the Candy Coating:
- 12 ounces (approximately 340g) white candy melts or white chocolate wafers (specifically designed for melting and coating)
- 2-3 tablespoons shortening or paramount crystals (optional, but helps with smooth melting)
- For Assembling and Decorating:
- 48 lollipop sticks (6-inch length is ideal)
- Styrofoam block or a cake pop stand for drying
- Black edible food marker or a small tube of black gel icing with a fine tip for eyes and mouth
- Orange candy melts, orange sprinkles, or small orange candy pieces (like tic-tacs cut in half) for noses
- Red and/or green candy melts, thin strips of fruit leather, or small red/green sprinkles for scarves
- Mini chocolate chips or small black sprinkles for buttons
- Pretzel sticks (thin ones, broken into smaller pieces) for arms
- Optional Embellishments:
- Edible glitter or dusting powder for a snowy effect
- Small candy eyeballs for an even easier approach to the faces
Preparing the Cake Base for Our Snowman Cake Pops
- Bake the Cake: First things first, we need a delicious cake! Preheat your oven to the temperature specified on your cake mix box, usually around 350°F (175°C). Prepare your chosen baking pan – a 9×13 inch pan works wonderfully for this recipe. Lightly grease and flour it, or line it with parchment paper for easy removal. Then, follow the instructions on your cake mix box precisely to prepare the batter. Mix in the eggs, water, and oil as directed, ensuring you don’t overmix, which can lead to a dense cake. Pour the batter evenly into your prepared pan.
- Cool the Cake: Bake the cake according to the package directions, which typically takes between 28-32 minutes for a 9×13 inch pan. You’ll know it’s done when a toothpick inserted into the center comes out clean. Once baked, remove the cake from the oven and let it cool completely in the pan on a wire rack. This step is absolutely crucial; attempting to crumble a warm cake will result in a sticky, unmanageable mess. We want a firm, cool cake ready for crumbling.
- Crumble the Cake: Once your cake is thoroughly cooled, it’s time for the fun part – crumbling! Take the cooled cake and, using your hands, crumble it directly into a large mixing bowl. Break it down into very fine crumbs. The finer the crumbs, the smoother your cake pop mixture will be, leading to a much better texture for your snowman shapes. You want a consistent, fluffy pile of cake crumbs, with no large chunks remaining. This part can be a bit messy, but it’s quite therapeutic!
- Mix with Frosting: Now, for the magic that binds our cake pops together! Add about two-thirds of your can of vanilla frosting to the crumbled cake. Start by adding this amount, as you can always add more if needed. Using your hands (gloves are recommended here for cleanliness and to prevent sticky fingers), thoroughly mix the frosting into the cake crumbs. Squish and combine until you have a dough-like consistency that holds together when pressed. It should be moist enough to form a ball without cracking, but not so wet that it’s sticky or greasy. This is where the texture of your Easy Snowman Cake Pops is determined! If it feels too dry, add a little more frosting, a tablespoon at a time, until you reach that perfect consistency. It’s better to add gradually than to end up with an overly moist mixture.
Forming and Chilling the Cake Pops
- Shape the Snowman Bodies: With your perfectly mixed cake “dough,” it’s time to shape our adorable snowmen! For these delightful Easy Snowman Cake Pops Adorable Christmas Recipe treats, we’ll aim for a classic snowman look. Take small portions of the cake mixture, about 1 to 1.5 tablespoons worth, and roll them into smooth, round balls. For the traditional two-ball snowman, you’ll want a slightly larger bottom ball and a slightly smaller top ball. If you prefer a simpler design, you can make just one larger ball per snowman. Ensure all your balls are as uniform in size as possible for even dipping and a polished final look. Place the formed cake balls onto a baking sheet lined with parchment paper.
- Pre-Chill the Cake Balls: Once all your cake balls are formed, place the baking sheet into the refrigerator. Let them chill for at least 30 minutes, or even better, for an hour. This chilling step is absolutely essential. It helps the cake balls firm up, making them much easier to handle and preventing them from falling apart when you insert the lollipop sticks and dip them into the candy coating. Do not skip this step! It’s key to perfectly stable cake pops.
- Prepare for Sticks: While your cake balls are chilling, prepare your lollipop sticks. It’s a small but important step that contributes to the stability of your snowman cake pops.
- Insert Lollipop Sticks (with a candy melt ‘glue’): This is a crucial step for preventing your cake pops from falling off the stick. Once the cake balls are nicely chilled, melt a small amount of your white candy melts in a microwave-safe bowl (about 1/4 cup should be sufficient). Dip the tip of each lollipop stick about half an inch into the melted candy coating, then immediately insert the coated end of the stick firmly into the center of each chilled cake ball, going about halfway through the ball. The melted candy will act as a “glue” to secure the cake ball to the stick.
- Second Chill for Stability: After inserting all the sticks, return the baking sheet with the stick-laden cake balls back to the refrigerator. Let them chill again for another 15-20 minutes. This allows the candy melt “glue” to set completely, creating a very strong bond between the stick and the cake ball. A well-chilled cake pop attached securely to its stick is the foundation for an easy and successful dipping process.
Melting the Candy Coating and Dipping
- Melt the White Candy Melts: In a microwave-safe bowl (preferably a deep, narrow one which is ideal for dipping), melt your white candy melts. For best results, heat them in 30-second intervals, stirring thoroughly after each interval. If using, add a tablespoon or two of shortening or paramount crystals to help achieve a smoother, thinner consistency that’s easier to dip. Stir constantly until the candy melts are completely smooth and fluid, with no lumps remaining. Be very careful not to overheat the candy melts, as this can cause them to seize up and become unusable. If they seem too thick, you can add a little more shortening or paramount crystals, but only a small amount at a time. The perfect consistency is like melted paint – it should drip smoothly off a spoon.
- The Dipping Technique: Now for the transformation! Remove your chilled cake pops from the refrigerator. Hold a cake pop by its stick and dip it completely into the melted white candy coating. Submerge it fully and quickly.
- Remove Excess Coating: This is a key step for a smooth finish. Once dipped, gently tap the stick against the edge of the bowl to allow any excess candy coating to drip back into the bowl. Rotate the cake pop slowly as you tap to ensure an even coating and to prevent drips from forming. You want a thin, even layer of coating. Continue tapping until the dripping almost stops. This ensures your Easy Snowman Cake Pops have a sleek, clean surface for decorating.
- Drying the Base: Immediately after dipping and shaking off the excess, insert the stick of the cake pop into a Styrofoam block or a cake pop stand. Allow the coating to set completely. This usually takes about 10-15 minutes at room temperature, or you can place them in the refrigerator for 5-10 minutes to speed up the process. The coating should be firm and dry to the touch before you begin decorating.
Decorating Your Adorable Snowman Cake Pops
This is where your snowmen truly come to life! Precision and a steady hand will help, but remember, every snowman is unique and charming in its own way.
-
Creating the Face (Eyes and Mouth):
- For Eyes: Once the white coating is completely dry, use your black edible food marker or a tube of black gel icing with a fine tip to draw two small, round dots for the snowman’s eyes. Place them about halfway up the cake pop. If you’re using mini chocolate chips, you can attach them with a tiny dot of melted candy melt before the white coating fully sets (if working quickly) or by dabbing a tiny bit of melted white chocolate as “glue.”
- For Mouth: Below the eyes, you can draw a series of small black dots or a little curve for a smile using the same black edible marker or gel icing. Give your snowman some personality!
-
Adding the Carrot Nose:
- Using Orange Candy Melts: Melt a very small amount of orange candy melts in a separate small bowl. Dip the tip of a toothpick into the orange melt and then dab it onto the center of the snowman’s face, between and slightly below the eyes, pulling it out slightly to form a tiny carrot shape.
- Using Sprinkles or Candy: If using small orange sprinkles or tiny cut pieces of orange candy (like tic-tacs), you can attach them with a tiny dab of melted white candy coating as glue. The key is to create that iconic little pointed nose.
-
Fashioning the Scarf:
- With Candy Melts: Melt a small amount of red or green candy melts (or both!) in separate bowls. Using a toothpick or a very fine-tipped brush, carefully draw a thin line around the “neck” area of the snowman, just below the face, to create the base of the scarf. Then, add a few short, vertical lines hanging down from one side to simulate the fringe of the scarf. You can even create a little “knot” with an extra dab of candy melt.
- With Fruit Leather or Fondant: If you’re feeling a bit more adventurous, you can cut thin strips of red or green fruit leather or rolled fondant and gently wrap them around the snowman’s neck. These offer a lovely textured look. A tiny dab of corn syrup or water can help them stick.
-
Buttons for the Body:
- Using Mini Chocolate Chips: These are perfect for snowman buttons! Simply attach two or three mini chocolate chips down the front of the snowman’s body, using a tiny dab of melted white candy coating to secure each one.
- Using Black Sprinkles or Gel Icing: Alternatively, you can use black pearl sprinkles or draw small black dots with your edible marker or gel icing for a flatter button look.
-
Giving Them Arms (Pretzel Sticks):
- Carefully break thin pretzel sticks into smaller pieces, about 1 to 1.5 inches long, to serve as the snowman’s twig arms.
- Gently insert two pretzel pieces into the sides of the snowman’s body, one on each side, just below the scarf. Be gentle when inserting to avoid cracking the candy coating or breaking the cake pop. These pretzel arms add a wonderful rustic touch to our Adorable Christmas Recipe cake pops.
Final Touches and Presentation
- Setting the Decorations: Once all your snowmen are decorated, allow all the candy melt details (scarves, noses, buttons if using melted candy) to set completely. You can place them back into the refrigerator for a few minutes to speed this up, especially if the room is warm.
- Optional Glitter or Snow Effect: For an extra magical touch, you can lightly dust your finished snowman cake pops with edible white glitter or pearl dust. This gives them a beautiful, shimmering, freshly fallen snow appearance that truly elevates them for the Christmas season.
- Serving and Storage: Your Easy Snowman Cake Pops Adorable Christmas Recipe treats are now complete and ready to be enjoyed! Arrange them upright on a festive platter or continue to display them in a Styrofoam block for a charming presentation. Cake pops are best stored in an airtight container in the refrigerator and will stay fresh for up to a week. However, they are always best enjoyed within a few days of making them. These charming little snowmen are perfect for holiday parties, gifting, or simply enjoying with your family as a festive dessert.
Conclusion:
Well, my friends, we’ve reached the sweet end of our journey with what I truly believe is one of the most delightful and stress-free holiday treats you can whip up this season. I’m talking about more than just a dessert; it’s a little ball of joy, a tiny edible masterpiece that brings smiles to every face it graces. This recipe isn’t just about baking; it’s about creating memories, adding a sprinkle of magic to your festive gatherings, and proving that impressive doesn’t have to mean complicated. The sheer simplicity combined with the incredibly charming outcome makes these cake pops an absolute non-negotiable for your holiday baking list. They’re perfect for home bakers of all skill levels, offering a fantastic balance of fun, flavor, and visual appeal. You’ll be amazed at how quickly you can transform humble ingredients into something truly spectacular and conversation-starting.
Now that you’ve mastered the art of creating these adorable treats, let’s talk about how to make them truly shine. Presentation is everything! Imagine a festive platter laden with these charming snowman figures, perhaps nestled amongst a scattering of edible glitter or alongside some gingerbread cookies. They make incredible individual party favors – just pop them into clear treat bags tied with a festive ribbon, and you’ve got a memorable take-home gift for your guests. They also look fantastic arranged upright in a decorative vase or a block of floral foam, transforming into an edible centerpiece that guests will adore. For an extra touch of flair, consider setting up a DIY decorating station at your holiday party, allowing guests to add their own sprinkles or edible glitter to plain coated cake pops for interactive fun!
But don’t stop at just snowmen! The beauty of this base recipe lies in its versatility. While the “Easy Snowman Cake Pops Adorable Christmas Recipe” is fantastic as is, feel free to unleash your inner artist. Think about swapping out the classic vanilla cake for a rich chocolate, a zesty lemon, or even a spicy gingerbread flavor for an extra festive kick. You could use different candy melt colors for the coating – maybe green or red for Santa hats, or a shimmering blue for a frosty winter wonderland theme. Instead of just snowman faces, try making reindeer with mini pretzels for antlers and red M&Ms for noses, or even tiny Christmas tree shapes using green candy melts and colorful sprinkles. For those with dietary considerations, don’t fret! You can easily adapt this recipe by using your favorite gluten-free cake mix and dairy-free cream cheese frosting for the binder, ensuring everyone can enjoy a bite of this festive fun. The possibilities are truly endless, limited only by your imagination and the contents of your pantry.
Seriously, if you’re looking for that perfect blend of ease, charm, and deliciousness this holiday season, you absolutely must give this recipe a try. I promise you, the joy you’ll experience both in making them and in seeing the delighted reactions of your loved ones is immeasurable. There’s something so uniquely satisfying about creating something so beautiful and tasty from scratch, especially when it’s as fuss-free as these cake pops are. Don’t be intimidated; embrace the process, have fun with the decorating, and let your creativity flow. It’s truly a labor of love that feels more like play. Once you’ve brought these delightful little snowmen to life, I am so incredibly eager to hear all about your experience! Please, please, please come back and share your photos, your tips, your variations, and your stories in the comments below. Let’s create a wonderful community of holiday bakers sharing their triumphs and spreading cheer. I can’t wait to see your incredible creations and celebrate your baking successes. Go on, grab those ingredients, and let’s make some magic happen!
Easy Snowman Cake Pops: Adorable Christmas Recipe
Capture the magic of Christmas with these delightful and easy-to-make snowman cake pops! Perfectly portioned, charming, and fun to create, they feature moist cake centers, a smooth candy shell, and whimsical decorations.
Ingredients
Instructions
Important Information
Nutrition Facts (Per Serving)
It is important to consider this information as approximate and not to use it as definitive health advice.
Allergy Information
Please check ingredients for potential allergens and consult a health professional if in doubt.