Apple Crisp Mini Cheesecakes are a true culinary masterpiece, elegantly combining the nostalgic comfort of a classic apple crisp with the sophisticated creaminess of a rich cheesecake, all presented in a delightful, individually portioned package. As someone who appreciates both tradition and innovation in baking, I’ve found that this recipe truly stands out, offering a harmonious blend of textures and flavors that will captivate any palate.
Why You’ll Fall in Love with This Dessert
Imagine sinking your teeth into a vibrant, spiced apple filling nestled atop a velvety smooth cream cheese base, all crowned with a golden, buttery oat crumble. It’s a symphony of sweet and tart, soft and crunchy, warm and cool. This dessert isn’t just a treat; it’s an experience, perfect for impressing guests at a dinner party, brightening a family gathering, or simply indulging in a moment of pure bliss. While apple crisp evokes cozy autumn afternoons and the timeless essence of home baking, and cheesecake offers a luxurious indulgence tracing its lineage back centuries, this particular fusion represents the best of both worlds in a convenient, charming form. The individual servings make them incredibly easy to serve and enjoy, eliminating the need for slicing and ensuring everyone gets their own perfect bite.
I am genuinely thrilled to share the secrets to creating these extraordinary Apple Crisp Mini Cheesecakes, promising a dessert that delivers on both visual appeal and unforgettable taste.

Ingredients:
-
For the Buttery Graham Cracker Crust:
- 1 ½ cups (about 10-12 full sheets) graham cracker crumbs (I often crush my own for a finer, more consistent texture – a food processor is perfect for this!)
- ¼ cup granulated sugar
- 6 tablespoons unsalted butter, melted
-
For the Silky Smooth Cheesecake Filling:
- 2 (8-ounce) packages full-fat cream cheese, softened to room temperature (This is absolutely essential for a lump-free, creamy batter! Trust me on this one.)
- ½ cup granulated sugar
- 2 large eggs, also at room temperature
- ¼ cup full-fat sour cream, room temperature (this adds a beautiful tang and helps keep the cheesecake moist)
- 1 teaspoon pure vanilla extract (the good stuff!)
- Pinch of salt (just a little to balance the sweetness)
-
For the Warmly Spiced Apple Topping:
- 2 medium-sized apples, approximately 1.5 lbs total (I adore a mix here – one Granny Smith for tartness and one Honeycrisp or Fuji for sweetness and texture. They should be peeled, cored, and finely diced, about ¼-inch pieces).
- 2 tablespoons unsalted butter
- ¼ cup packed light brown sugar
- ½ teaspoon ground cinnamon
- ¼ teaspoon ground nutmeg
- ⅛ teaspoon ground cloves (optional, but it deepens the autumnal flavor beautifully!)
- 1 tablespoon water
- 1 teaspoon cornstarch
-
For the Irresistible Crunchy Crisp Topping:
- ½ cup old-fashioned rolled oats (Please, no instant oats here! We want that hearty, chewy texture.)
- ½ cup all-purpose flour
- ¼ cup packed light brown sugar
- ¼ teaspoon ground cinnamon
- Pinch of salt
- 4 tablespoons unsalted butter, very cold and cut into small cubes (keeping it cold is the secret to a crumbly crisp!)
-
Optional Garnish for a Finishing Touch:
- A dollop of freshly whipped cream
- A tiny sprinkle of extra cinnamon or a delicate apple slice
Preparing the Perfect Graham Cracker Crust for Your Apple Crisp Mini Cheesecakes
- Preheat and Prepare Your Muffin Tin: Let’s get started! First, preheat your oven to a cozy 325°F (160°C). Then, grab a 24-cup mini muffin tin. I always recommend lining it with mini paper liners. They make removing these delicate mini cheesecakes a breeze and ensure they keep their perfect shape. If you don’t have liners, you can lightly grease the muffin tin, but trust me, liners are your friend for this recipe.
- Combine Dry Crust Ingredients: In a medium-sized mixing bowl, pour in your 1 ½ cups of graham cracker crumbs. If you’re crushing your own, ensure they are finely processed for an even crust. Add the ¼ cup of granulated sugar to the crumbs. Give them a good stir with a fork to make sure they’re thoroughly combined. This creates the sweet, sturdy base for our mini masterpieces.
- Incorporate Melted Butter: Now, drizzle the 6 tablespoons of melted unsalted butter over the graham cracker and sugar mixture. Stir it with that same fork until all the crumbs are evenly moistened. You’re looking for a texture that resembles wet sand – when you press a small amount between your fingers, it should hold its shape. This butter is what binds our crust together and makes it so flavorful!
- Form the Crusts: It’s time to create the foundations for our cheesecakes! Divide the moistened graham cracker mixture evenly among the 24 mini muffin cups. I usually aim for about a level tablespoon in each cup. Using the back of a small spoon, a tart tamper, or even your clean fingers, firmly press the crumbs into an even, compact layer at the bottom of each liner. A well-pressed crust is a happy crust that won’t crumble when you lift it out later.
- Quick Pre-Bake for Stability: Pop the muffin tin into your preheated oven and bake the crusts for just 5 minutes. This quick bake helps to set the crust, making it sturdy and preventing it from becoming soggy once the creamy cheesecake filling is added. After 5 minutes, carefully remove the tin from the oven and set it aside to cool slightly while you move on to the next exciting step. Remember to keep that oven on!
Crafting the Silky Smooth Cheesecake Filling
- Beat the Softened Cream Cheese: In the bowl of your stand mixer fitted with the paddle attachment (or a large bowl with an electric hand mixer), place your two packages of room temperature cream cheese. Beat it on medium speed for a good 2-3 minutes. You want it to be incredibly smooth, light, and utterly free of any lumps. This step is absolutely crucial for achieving that signature silky cheesecake texture, so don’t be tempted to rush it! Make sure to scrape down the sides and bottom of the bowl frequently with a rubber spatula to ensure everything is evenly incorporated.
- Gradually Add Sugar: Now, with the mixer still on medium-low, gradually add the ½ cup of granulated sugar to the cream cheese. Beat until it’s just combined and the mixture is smooth again. Continue to scrape down the bowl. A friendly reminder: avoid overmixing at this stage! Incorporating too much air can sometimes lead to cracks in your finished cheesecakes, and we’re aiming for perfection here.
- Incorporate Eggs One at a Time: Reduce your mixer speed to low. Add the two room temperature eggs, one at a time. Beat gently after each addition until just combined. Again, resist the urge to overmix! We simply want the eggs to be fully incorporated into the luscious cream cheese mixture, not whipped vigorously.
- Fold in Sour Cream and Vanilla: Finally, gently stir in the ¼ cup of room temperature full-fat sour cream, the 1 teaspoon of pure vanilla extract, and the small pinch of salt. Mix on low speed until everything is just barely combined and the mixture looks smooth and homogenous. Give it one last scrape down with your spatula to ensure no unmixed pockets of ingredients remain lurking at the bottom of the bowl.
- Fill the Crusts: Time to fill those waiting crusts! Divide the cheesecake filling evenly among the 24 mini muffin cups, pouring it carefully over the pre-baked graham cracker crusts. I find a small cookie scoop or a measuring cup with a spout works wonderfully for this. Aim to fill each cup about ¾ full. Once filled, gently tap the muffin tin on your counter a few times. This helps to release any trapped air bubbles, ensuring a denser, smoother cheesecake.
- Initial Bake for the Cheesecake Base: Place the muffin tin back into your 325°F (160°C) oven and bake for 12-15 minutes. At this point, the edges of the cheesecakes should be just set, but the centers will still have a slight, delicate jiggle. This initial bake helps to firm up the cheesecake before we introduce our delicious toppings, preventing the apples from sinking. Remove from the oven and keep the oven running!
Creating the Spiced Apple Topping for Your Mini Cheesecakes
- Prepare Your Apples: While your cheesecake bases are getting their initial bake, let’s turn our attention to the star of the show – the wonderfully spiced apples! Take your 2 medium apples, which you’ve already peeled, cored, and finely diced. I really emphasize a small dice, around ¼-inch pieces, as they soften beautifully and fit perfectly atop our mini cheesecakes without being unwieldy.
- Sauté the Apples with Butter and Spices: In a medium saucepan, melt 2 tablespoons of unsalted butter over medium heat. Once shimmering, add your finely diced apples. Immediately follow with ¼ cup of packed light brown sugar, ½ teaspoon of ground cinnamon, ¼ teaspoon of ground nutmeg, and if you’re using it, the ⅛ teaspoon of ground cloves. Stir everything together really well to ensure the apples are thoroughly coated in those aromatic spices and sweet sugar. Oh, the smell that will fill your kitchen at this point is just heavenly!
- Simmer to Soften: Continue to cook the apples, stirring occasionally, for about 5-7 minutes. You want them to begin to soften, becoming tender-crisp, but they should still retain a little bit of their bite and shape. We’re not aiming for applesauce here! This gentle cooking brings out their natural sweetness and infuses them with all those lovely fall flavors.
- Thicken the Sauce: In a small, separate bowl, whisk together 1 tablespoon of water and 1 teaspoon of cornstarch until you have a smooth, lump-free slurry. Pour this cornstarch mixture directly into your simmering apples. Continue to cook and stir for another 1-2 minutes. You’ll notice the mixture will thicken into a lovely, glossy, syrupy sauce that coats the apples beautifully. This thickening step is important because it prevents the apple topping from making your cheesecake watery and ensures it stays nicely on top. Remove the saucepan from the heat and let the apple topping cool slightly while you work on the crisp.
Assembling the Crunchy Crisp Topping
- Combine Dry Crisp Ingredients: Grab another medium bowl. Add your ½ cup of old-fashioned rolled oats, ½ cup of all-purpose flour, ¼ cup of packed light brown sugar, ¼ teaspoon of ground cinnamon, and a tiny pinch of salt. Whisk all these dry ingredients together thoroughly until they are well combined. This is the base for our delightful crunchy layer.
- Cut in Cold Butter for Crumbles: Now, add the 4 tablespoons of very cold, cubed unsalted butter to the dry mixture. The key here is to keep the butter as cold as possible! Using your fingertips, a pastry blender, or even two knives, work the butter into the flour and oat mixture. You want to achieve a texture that resembles coarse crumbs, with some pea-sized pieces of butter still visible. Avoid overworking the dough with your warm hands, as this will melt the butter and prevent you from getting that wonderfully crumbly, crisp texture we’re aiming for when baked. Those little pockets of cold butter create steam and flaky layers in the oven!
Baking Your Apple Crisp Mini Cheesecakes to Golden Perfection
- Add the Spiced Apple Topping: Carefully spoon about 1-2 teaspoons of your now slightly cooled spiced apple topping over each partially baked cheesecake. Gently spread it out to cover the surface of the cheesecake base. The sweet, spiced apples are going to be a perfect complement to the creamy cheesecake!
- Sprinkle the Crunchy Crisp Topping: Now for the grand finale before baking! Evenly sprinkle a generous amount of your prepared crisp topping over the apples on each mini cheesecake. Don’t be shy here – that crisp layer adds an incredible textural contrast and a burst of warm, buttery flavor that truly elevates these treats.
- The Final Bake: Carefully return the muffin tin to your 325°F (160°C) oven. Bake for an additional 15-20 minutes, or until the cheesecake centers are just set (they’ll still have a slight, subtle jiggle when gently shaken) and the crisp topping is beautifully golden brown and looks delightfully bubbly. Your kitchen will be filled with the most absolutely irresistible aroma at this stage!
- Crucial Cooling Process: Once baked to perfection, carefully remove the muffin tin from the oven. This next part requires patience! Allow the mini cheesecakes to cool completely in the tin on a wire rack. This is a critical step! Do not, under any circumstances, try to remove them while they are still warm, as they will be very delicate and prone to breaking or cracking. As they cool, the cheesecakes will firm up significantly, becoming easier to handle.
- The Essential Chill Time: Once completely cool to the touch (this might take an hour or two), transfer the entire muffin tin to the refrigerator. Chill your beautiful Apple Crisp Mini Cheesecakes for at least 4 hours, or ideally, overnight. This extended chilling period allows the cheesecake to fully set, develop its rich flavor, and achieve that perfect creamy, dense texture we all love. It also makes them much easier to handle and ensures they hold their shape perfectly when served.
Chilling and Serving Your Exquisite Apple Crisp Mini Cheesecakes
- Gentle Removal for Display: Once thoroughly chilled and firm, it’s time to unveil your creations! Gently lift each mini cheesecake out of the muffin tin by holding onto the paper liner. If you opted not to use liners, carefully run a thin, sharp knife around the edge of each cheesecake before using a small offset spatula or a very thin knife to lift them out. Patience is key here to keep them looking pristine.
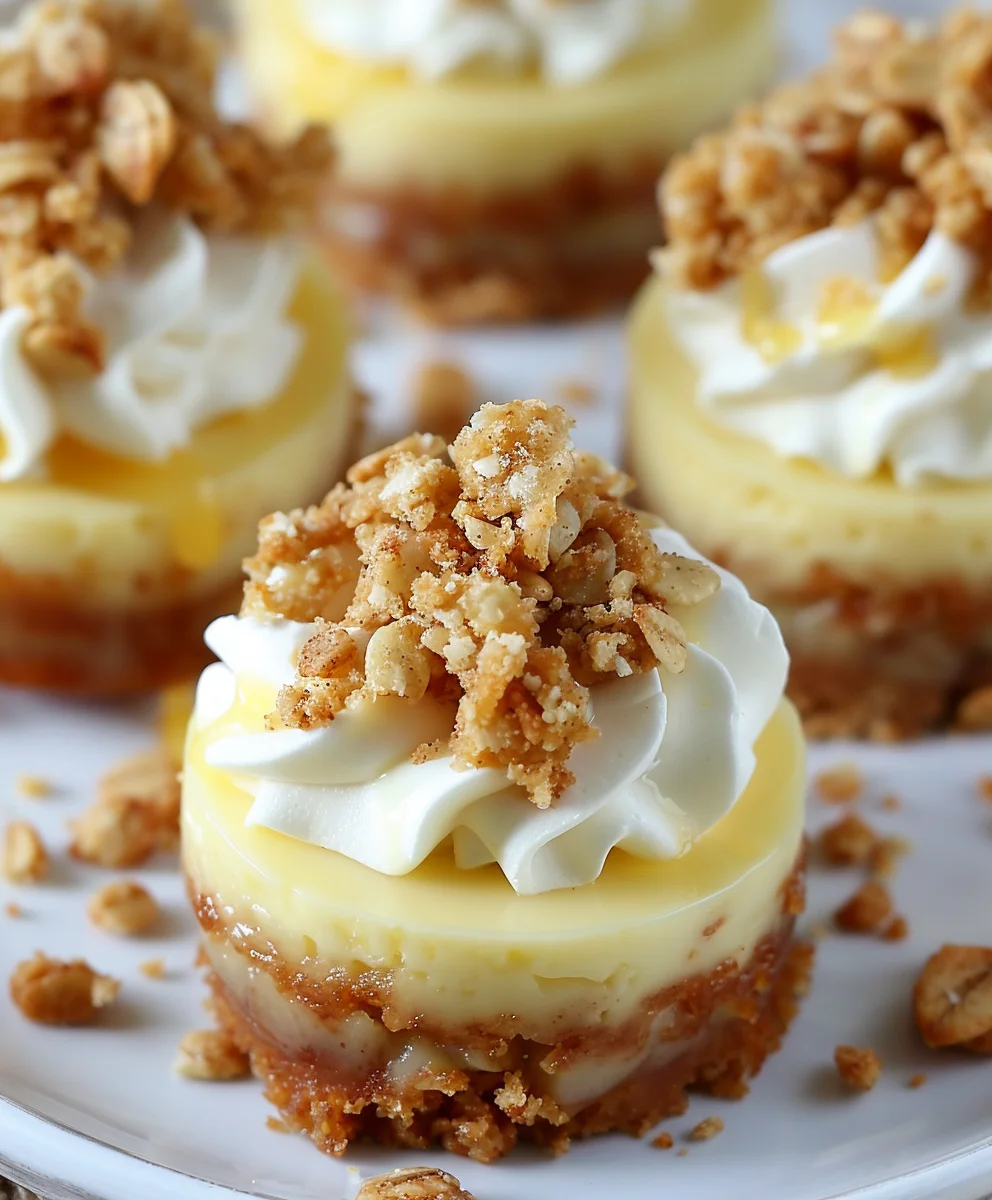
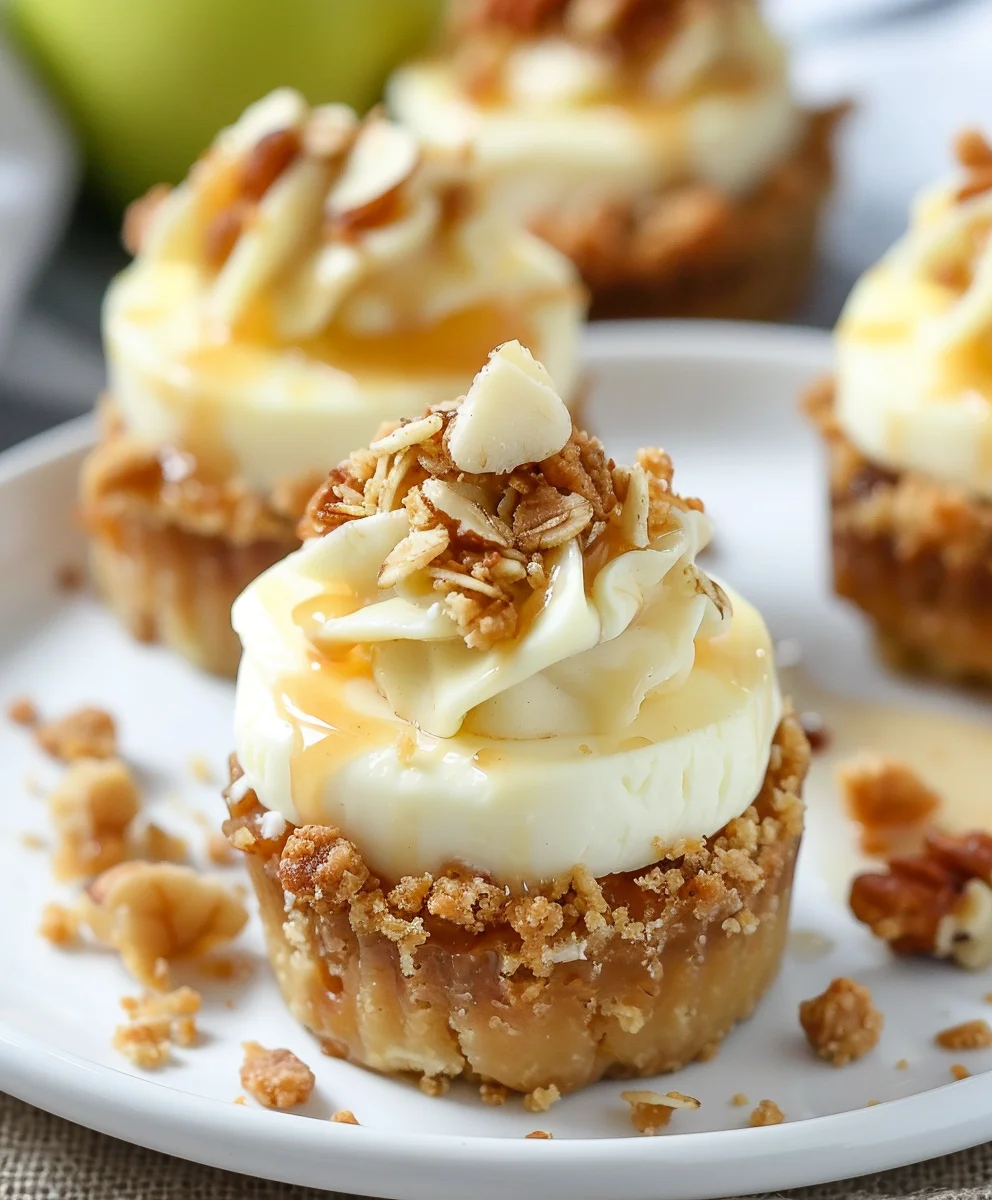
- Serve and Garnish with Flair: Arrange your stunning Apple Crisp Mini Cheesecakes on a beautiful serving platter. If desired, add an optional dollop of freshly whipped cream to the top of each cheesecake just before serving. A tiny sprinkle of extra cinnamon or a very thin, perfectly fanned apple slice can also add a lovely visual touch, making them even more inviting.
- Storage for Lingering Enjoyment: Should you (miraculously!) have any leftover mini cheesecakes, store them in an airtight container in the refrigerator for up to 3-4 days. While they are undoubtedly best enjoyed fresh, I can assure you they still taste wonderfully delicious the next day. I often find myself sneaking one for a delightful morning treat with my coffee!
- Savor the Flavors! Take a moment to truly appreciate your hard work and indulge in these delightful mini desserts. The harmonious combination of the buttery graham cracker crust, the smooth, tangy cheesecake filling, the warmly spiced tender apples, and the irresistible crunchy oat topping creates a sensory masterpiece. These Apple Crisp Mini Cheesecakes are absolutely perfect for autumn gatherings, holiday parties, or simply as a special, comforting treat for yourself and your loved ones.
Each bite is a symphony of cozy fall flavors and captivating textures!
You’ve created something truly special and memorable. Enjoy every single moment!
Conclusion:
As we wrap up our culinary journey with this truly delightful dessert, I hope you’re feeling as excited as I am about the prospect of bringing these beauties to your own table. There’s a certain magic that happens when classic comfort meets elegant presentation, and these mini cheesecakes are the epitome of that enchanting fusion. They’re not just another sweet treat; they’re an experience waiting to unfold with every single bite. The creamy, rich cheesecake base provides that smooth, luxurious foundation we all adore, offering a delightful contrast to the vibrant, spiced apple filling that sits perfectly atop it. And let’s not forget the pièce de résistance – the crisp, crumbly oat topping, which introduces an irresistible texture and a warm, nutty aroma that makes these irresistible. It’s this beautiful interplay of textures – the velvety, the tender, and the crunchy – combined with the harmonious balance of sweet, tart, and spiced flavors, that truly makes them stand out from the crowd.
Trust me, these aren’t just good; they’re outstanding. They offer all the beloved flavors of a traditional apple crisp, perfectly portioned into individual servings that exude sophistication without any of the fuss or complicated techniques. Whether you’re a seasoned baker or someone just starting to explore the joys of the kitchen, you’ll find immense satisfaction in creating something so utterly delicious and visually appealing. They are surprisingly straightforward to prepare, yet they deliver a ‘wow’ factor that makes them seem like you’ve spent hours perfecting them. That perfect blend of a tangy cream cheese base, the sweet, spiced apple layer, and the buttery oat crumble creates a symphony of flavors that will have everyone asking for the recipe. This isn’t just a dessert; it’s a conversation starter, a mood enhancer, and a testament to how incredible simple ingredients can be when brought together with a little love and creativity to produce something truly memorable.
Elevate Your Dessert Experience with These Serving Suggestions:
While these Apple Crisp Mini Cheesecakes are absolutely divine on their own, there are countless ways to elevate them further and tailor them to your personal taste or the specific occasion. For a truly decadent experience, I highly recommend serving them slightly chilled with a generous dollop of freshly whipped cream. The lightness and airiness of the cream provide a beautiful, cloud-like counterpoint to the richness of the cheesecake, making each bite even more luxurious. If you’re feeling extra indulgent, a scoop of premium vanilla bean ice cream melting gently alongside is an absolute game-changer, adding an extra layer of creamy delight and a cooling sensation that perfectly complements the warm spices of the apple crisp. Consider drizzling a touch of homemade caramel sauce or a high-quality store-bought caramel over the top just before serving for an added touch of sweetness and an elegant, glistening finish. A light sprinkle of cinnamon sugar or a few finely chopped and toasted pecans would also enhance both the presentation and the textural complexity, making each bite an even more exciting journey for your taste buds.
For seasonal variations, don’t hesitate to experiment with different fruit fillings once you’ve mastered the apple version. While apple is undeniably classic and always a crowd-pleaser, imagine a pear crisp topping in the cooler fall months, or a vibrant mixed berry crisp in the height of summer – the possibilities are truly endless, allowing you to adapt this incredible recipe to any time of year and utilize the freshest seasonal produce. You could even play with the spices, perhaps adding a touch of ground cardamom, a whisper of ginger, or a hint of allspice to the apple filling for a more exotic or nuanced twist. These individual desserts are also fantastic for potlucks, holiday buffets, or dinner parties, as they are exceptionally easy to transport and serve, eliminating the need for messy slicing and ensuring everyone gets a perfectly proportioned, beautiful treat. They are versatile enough for a casual backyard barbecue but also elegant enough for a formal holiday gathering, proving their universal appeal and adaptability.
Your Turn: Bake, Enjoy, and Share!
Now, it’s your turn! I genuinely hope you’re inspired to roll up your sleeves and give these magnificent Apple Crisp Mini Cheesecakes a try in your own kitchen. There’s an immense sense of satisfaction that comes from creating something so delicious from scratch and seeing the pure joy and smiles it brings to the faces of your loved ones. Don’t be shy – dive in, follow the steps, and revel in the creative process of baking. I promise you, the effort will be richly rewarded with an exquisite dessert that will impress and delight everyone fortunate enough to taste it. Once you’ve baked your batch, I would absolutely love to hear about your experience! What did you love most about them? Did you try any unique variations or serving suggestions that you’d recommend to others? Your feedback, personal touches, and culinary adventures truly inspire me and the entire community of home bakers who visit this page. Please feel free to share your photos, your triumphs, and any clever tips or tricks you discovered along the way. Let’s celebrate the joy of baking and the sheer delight of these wonderful treats together. Happy baking, my friends, and I can’t wait to see what you create!
Apple Crisp Mini Cheesecakes
Indulge in Apple Crisp Mini Cheesecakes, a harmonious blend of spiced apple filling atop a velvety cream cheese base, presented in delightful, individually portioned packages. This dessert combines classic apple crisp comfort with luxurious cheesecake creaminess, perfect for impressing guests or a special treat.
Ingredients
-
3/4 cup graham cracker crumbs
-
1 1/2 tablespoons sugar
-
1/2 teaspoon cinnamon
-
3 tablespoons melted unsalted butter
-
10 oz cream cheese, softened
-
6 tablespoons sugar
-
1 1/2 teaspoons vanilla extract
-
2 teaspoons all-purpose flour
-
1 egg
-
2 medium-small apples, peeled, finely chopped
-
2 teaspoons fresh lemon juice
-
1 1/2 teaspoons cinnamon
-
1/4 teaspoon nutmeg
-
2 tablespoons light brown sugar
-
1 1/2 teaspoons cornstarch
Instructions
-
Step 1
Preheat oven to 325°F (160°C). Line a 24-cup mini muffin tin. Combine 3/4 cup graham cracker crumbs, 1 1/2 tbsp sugar, and 1/2 tsp cinnamon. Add 3 tbsp melted butter; mix until moistened. Press about 1 tbsp mixture firmly into the bottom of each liner. Bake 5 minutes; remove and keep oven on. -
Step 2
In a mixer, beat 10 oz softened cream cheese until smooth (2-3 mins). Gradually add 6 tbsp sugar; beat until combined. On low speed, beat in 1 egg until just combined. Gently mix in 1 1/2 tsp vanilla extract and 2 tsp all-purpose flour until smooth. Divide filling evenly among crusts (about ¾ full); tap tin to release air. Bake 12-15 minutes, until edges are set with a slight jiggle in the center. Remove; keep oven on. -
Step 3
In a medium saucepan, combine 2 finely diced apples, 2 tsp fresh lemon juice, 1 1/2 tsp cinnamon, 1/4 tsp nutmeg, and 2 tbsp light brown sugar. Cook over medium heat, stirring occasionally, for 5-7 minutes until apples soften. Whisk 1 1/2 tsp cornstarch with a splash of water; add to apples. Cook and stir for 1-2 minutes until mixture thickens. Remove from heat; cool slightly. -
Step 4
Spoon about 1-2 teaspoons of cooled spiced apple topping over each partially baked cheesecake. Bake for an additional 15-20 minutes, until cheesecake centers are set and the topping is bubbly. -
Step 5
Cool completely in the muffin tin on a wire rack. Once cool, transfer the entire tin to the refrigerator and chill for at least 4 hours, or ideally, overnight. This is crucial for setting. -
Step 6
Gently lift each mini cheesecake out by its liner. Serve, optionally garnished with freshly whipped cream or a sprinkle of cinnamon. Store any leftovers in an airtight container in the refrigerator for up to 3-4 days.
Important Information
Nutrition Facts (Per Serving)
It is important to consider this information as approximate and not to use it as definitive health advice.
Allergy Information
Please check ingredients for potential allergens and consult a health professional if in doubt.