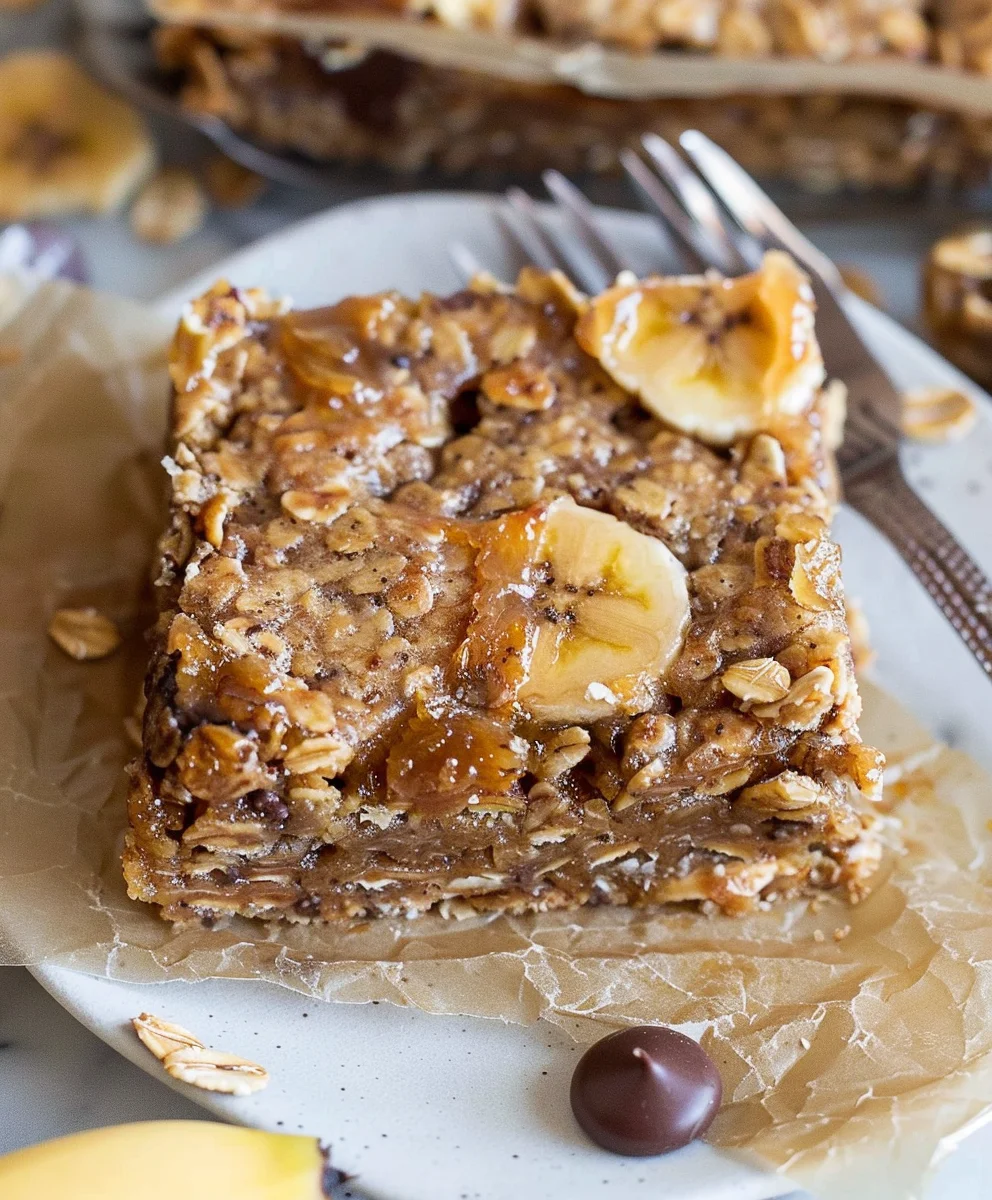
Banana Oatmeal Bars are truly a revelation, offering that perfect balance of wholesome goodness and undeniable comfort in every single bite. Have you ever found yourself with a few overly ripe bananas on the counter, pondering their delicious destiny beyond a smoothie or classic banana bread? Well, prepare to be captivated, because these bars are about to become your new favorite way to transform those sweet, speckled beauties into something absolutely extraordinary. They’re a convenient, delicious, and satisfying solution for busy mornings or a much-needed afternoon pick-me-up, proving that healthy eating can indeed be wonderfully delicious and incredibly simple.
While the concept of combining oats and fruit for sustenance has roots in many cultures, dating back to ancient grains and simple, nourishing preparations, these modern Banana Oatmeal Bars are a testament to contemporary home baking that values both health and convenience. People adore this dish for countless reasons: the delightful chewiness from the hearty oats, the moist sweetness infused by the ripe bananas, and the comforting hint of cinnamon or other warm spices. They strike a brilliant chord between a healthy breakfast option and a guilt-free treat, providing sustained energy without compromising on flavor. The ease of preparing a batch to enjoy throughout the week makes them an instant favorite for families and individuals alike.

Ingredients:
Creating these delightful banana oatmeal bars is a wonderfully satisfying experience, and it all begins with gathering the right components. Here’s everything you’ll need to bring this wholesome treat to life:
- For the Wet Ingredients:
- 3 large, very ripe bananas: Look for bananas with plenty of brown spots on their peels – this means they’re at their peak sweetness and easy to mash.
- 2 large eggs: Room temperature eggs tend to mix more evenly into batters.
- 1/2 cup pure maple syrup or honey: Your choice of natural sweetener. Adjust slightly based on the sweetness of your bananas and personal preference.
- 1/4 cup melted unsalted butter or coconut oil: If using coconut oil, make sure it’s liquid. Vegetable oil works too if you prefer a neutral flavor.
- 1 teaspoon pure vanilla extract: A classic flavor enhancer that truly elevates the taste.
- For the Dry Ingredients:
- 2 cups old-fashioned rolled oats: Not instant or quick-cooking oats. The rolled oats provide a wonderful chewy texture and structural integrity to our bars.
- 1 cup all-purpose flour: For structure and binding. Whole wheat flour can also be substituted for a denser, nuttier bar.
- 1 teaspoon baking soda: Our leavening agent, helping the bars rise and achieve a tender crumb.
- 1 teaspoon ground cinnamon: The perfect warm spice complement to banana and oats.
- 1/2 teaspoon fine sea salt: Crucial for balancing the sweetness and enhancing all the other flavors.
- Optional Add-ins (Highly Recommended!):
- 1/2 cup chocolate chips: Mini chocolate chips or regular semi-sweet are both fantastic.
- 1/2 cup chopped nuts: Walnuts or pecans add a lovely crunch and earthy flavor.
- 1/4 cup shredded unsweetened coconut: For an extra layer of tropical texture and flavor.
Prepping for Perfection: Your Mise en Place
- Get Your Oven Ready: My first step, always, is to preheat my oven. I set it to 350°F (175°C). This ensures the oven is at a consistent temperature when the batter goes in, which is crucial for even baking.
- Prepare Your Baking Pan: Next, I grab a 9×13 inch baking pan. For easy removal and clean-up, I love to line it with parchment paper, leaving an overhang on the longer sides to create “handles.” Then, I lightly grease the entire pan (even the parchment paper) with a little butter or non-stick cooking spray. This guarantees your banana oatmeal bars won’t stick, and you can lift them out of the pan effortlessly once they’ve cooled. Trust me, this little step saves so much frustration later!
- Mash Those Bananas: This is a key step where ripeness truly matters. Take your very ripe bananas and place them in a large mixing bowl. Using a fork or a potato masher, mash them until they are mostly smooth with a few small lumps remaining. I actually prefer a little texture, so I don’t go for a perfectly silky puree.
Why Ripe Bananas are Essential:
The Secret to Natural Sweetness and Moisture
Unripe bananas simply won’t give you the same depth of flavor or natural sweetness, and their texture is much harder to mash. The brown spots on the peel are your best friend here, indicating the starches have converted to sugars. If your bananas aren’t quite ripe enough, you can speed up the process by placing them in a paper bag with an apple for a day or two, or for a quicker solution, bake them unpeeled on a baking sheet at 300°F (150°C) for 15-30 minutes until their skins are black and shiny. Let them cool before mashing.
- Measure Out All Your Ingredients: Before I start mixing, I make sure all my ingredients are measured out and ready to go. This “mise en place” approach makes the whole baking process so much smoother and more enjoyable. Having everything laid out reduces stress and helps prevent forgotten ingredients!
Crafting the Heart of the Bars: The Wet Ingredients
This is where the magic begins, where all the moist, flavorful elements come together.
- Combine Wet Ingredients: In the large bowl with your mashed bananas, add the two large eggs, the maple syrup (or honey), the melted butter (or coconut oil), and the pure vanilla extract.
- Gentle Mixing is Key: With a whisk or a sturdy spoon, gently mix these ingredients together until they are well combined. You’re aiming for a cohesive, somewhat thick liquid mixture. Avoid over-mixing at this stage; we just want everything to be incorporated. The mixture will look a little rustic because of the mashed bananas, and that’s perfectly fine! The aroma of the vanilla and banana together is already so inviting.
Building the Base: The Dry Mix
Now we prepare the structure and bulk of our banana oatmeal bars. The dry ingredients provide that satisfying chew and hearty texture.
- Whisk Together Dry Ingredients: In a separate medium-sized bowl, combine your old-fashioned rolled oats, all-purpose flour, baking soda, ground cinnamon, and fine sea salt. Use a whisk to thoroughly combine them.
Understanding the Role of Each Dry Ingredient:
- Rolled Oats: These are the star! They provide chewiness, fiber, and that classic oatmeal bar texture. Avoid instant or quick oats as they can become mushy and won’t give you the same structural integrity or satisfying bite.
- All-Purpose Flour: Acts as a binder, giving the bars their overall structure. If you opt for whole wheat flour, expect a slightly denser and more rustic bar, which is also delicious!
- Baking Soda: This is our leavening agent. When combined with the acidic elements in the mashed bananas and other ingredients, it creates carbon dioxide, which helps the bars rise and become tender.
- Ground Cinnamon: This spice is the perfect companion to bananas and oats. It adds warmth, depth, and a comforting flavor profile that makes these bars feel incredibly cozy.
- Fine Sea Salt: Don’t ever skip the salt in a sweet recipe! It doesn’t make the bars salty; instead, it brightens and enhances all the other flavors, particularly the sweetness of the bananas and maple syrup, preventing them from tasting flat.
- Ensure Even Distribution: Whisking thoroughly here is important to ensure the baking soda and salt are evenly distributed throughout the flour and oats. This prevents pockets of unmixed ingredients and ensures a consistent rise and flavor in every bite.
Bringing It All Together: The Grand Combination
This is the moment where our wet and dry worlds unite to form the irresistible batter.
- Combine Wet and Dry: Pour the dry ingredient mixture into the wet ingredient mixture. This is where you need to exercise a little restraint!
- Mix Until Just Combined: Using a spoon or a spatula, gently fold the dry ingredients into the wet until just combined. Stop mixing as soon as you no longer see streaks of dry flour.
Why Gentle Mixing is Crucial:
Overmixing at this stage can lead to tough, dense bars. When flour is overmixed, the gluten develops too much, resulting in a chewy, less tender texture. We want our banana oatmeal bars to be soft, moist, and delightfully tender, so a light hand here is essential. The batter will be thick and shaggy, and that’s exactly what we’re looking for.
- Fold in Optional Add-ins: If you’re using chocolate chips, chopped nuts, or shredded coconut, now is the time to gently fold them into the batter. I often save a tablespoon or two of chocolate chips or nuts to sprinkle on top before baking for a pretty finish. These add-ins really elevate the flavor and texture, offering bursts of sweetness, crunch, or chewiness throughout the bars.
Baking to Golden Perfection
Now for the satisfying part: watching your creation transform in the oven!
- Transfer Batter to Pan: Spoon the thick, delightful batter into your prepared 9×13 inch baking pan.
- Evenly Spread: Use the back of your spoon or a spatula to gently spread the batter evenly across the bottom of the pan. Pay attention to the corners to ensure a consistent thickness, which will help the bars bake evenly.
- Bake Until Golden: Place the pan in your preheated 350°F (175°C) oven and bake for approximately 25-30 minutes.
- Check for Doneness: The bars are ready when the edges are beautifully golden brown and the center looks set. You can also perform the classic toothpick test: insert a toothpick into the center of the bars. It should come out clean or with a few moist crumbs attached, but no wet batter.
Common Baking Mistakes to Avoid:
- Opening the oven door too frequently: This causes temperature fluctuations, which can affect the rise and texture of your bars. Try to resist peeking until at least 20 minutes have passed.
- Overbaking: While underbaked bars are messy, overbaked bars can be dry and crumbly. Keep an eye on them, especially towards the end of the baking time, as oven temperatures can vary. The perfect bar is moist and tender.
- Enjoy the Aroma: Your kitchen will fill with the most incredible, comforting scent of warm bananas, cinnamon, and toasted oats. This is one of my favorite parts of baking!
The Art of Patience: Cooling and Slicing
I know it’s hard to wait, but cooling is an essential step for perfect banana oatmeal bars!
- Cool in the Pan: Once baked, remove the pan from the oven and place it on a wire cooling rack. Allow the bars to cool in the pan for at least 15-20 minutes.
Why Cooling is Crucial:
This initial cooling period allows the bars to set up properly. If you try to remove them too soon, they might crumble or break apart because they are still very tender and warm.
- Transfer to Wire Rack: After the initial cooling in the pan, carefully lift the bars out of the pan using the parchment paper overhangs as handles. Transfer the entire slab onto the wire cooling rack to cool completely. This usually takes another 30-60 minutes.
The Importance of Complete Cooling:
Allowing them to cool completely on the rack is vital. This prevents condensation from building up on the bottom of the bars, which could make them soggy. Cooling also ensures they firm up beautifully, making them much easier to slice into neat, perfect squares.
- Slice and Serve: Once fully cooled, use a sharp knife to slice the bars into your desired size. I usually go for 12-16 squares, depending on how generous I’m feeling! Serve them as a wholesome breakfast, a satisfying snack, or a delightful dessert.
Flavor Enhancements & Customization Ideas
These banana oatmeal bars are incredibly versatile. Here are some of my favorite ways to customize them:
- Nutty Variations: Beyond walnuts and pecans, try chopped almonds or even a sprinkle of sunflower or pumpkin seeds for extra crunch and nutrients.
- Dried Fruit Fun: Add a handful of raisins, dried cranberries, or chopped dried apricots to the batter for bursts of chewy sweetness.
- Spice It Up: A pinch of nutmeg or allspice alongside the cinnamon can add even more warmth and complexity. A tiny dash of ground ginger can also be wonderful.
- Glaze It: For an extra treat, whip up a simple glaze! Mix powdered sugar with a tablespoon or two of milk (dairy or non-dairy) and a tiny splash of vanilla extract until you reach a drizzly consistency. Drizzle it over the completely cooled bars before serving.
- For the Health-Conscious: You can experiment with using half whole wheat flour and half all-purpose flour for added fiber, or reduce the sweetener slightly if your bananas are exceptionally ripe.
Storage and Shelf Life
Once you’ve made a batch of these glorious banana oatmeal bars, you’ll want to make sure they stay fresh for as long as possible!
- Room Temperature Storage: Store the cooled banana oatmeal bars in an airtight container at room temperature for up to 3-4 days. If your kitchen is particularly warm or humid, they might fare better in the fridge.
- Refrigeration: For a longer shelf life, you can store them in an airtight container in the refrigerator for up to a week. I find they become a bit firmer when chilled, which some people prefer, especially in warmer weather.
- Freezing for Later: These bars freeze beautifully! Once completely cooled, wrap individual bars tightly in plastic wrap, then place them in a freezer-safe bag or container. They can be frozen for up to 2-3 months. When you’re ready to enjoy one, simply thaw it at room temperature or warm it gently in the microwave for a few seconds. This is perfect for meal prepping breakfasts or quick snacks!

Conclusion:
Well, there you have it! I truly hope you’re as excited about these incredible Banana Oatmeal Bars as I am. We’ve journeyed through the simple steps to create a truly magical treat that will revolutionize your snack game, your breakfast routine, and even your dessert cravings. This isn’t just another recipe; it’s an invitation to experience wholesome deliciousness that feels indulgent but is packed with goodness. I’m absolutely confident that once you try these, they will become a cherished staple in your home, bringing smiles and satisfying hunger pangs whenever they’re served.
Why These Banana Oatmeal Bars Are an Absolute Must-Try
If you’re still on the fence (though I doubt you are!), let me reiterate why these bars deserve a permanent spot in your culinary repertoire. First and foremost, the flavor profile is simply irresistible. The natural sweetness of perfectly ripe bananas melds beautifully with the hearty texture of oats, creating a comforting, satisfying bite every single time. There’s a subtle chewiness, a delightful moistness, and an overall warmth that just speaks to the soul. It’s the kind of treat that appeals to everyone, from the pickiest eaters to the most discerning palates. You’ll find yourself reaching for another slice, unable to resist their wholesome charm. They strike that perfect balance between being light enough for a morning bite but substantial enough to keep you going through your afternoon slump.
Beyond taste, consider the sheer convenience. These Banana Oatmeal Bars are remarkably easy to prepare, requiring minimal fuss and simple ingredients you likely already have in your pantry. No complicated techniques, no obscure components – just straightforward baking that yields spectacular results. They are perfect for meal prepping, allowing you to whip up a generous batch on Sunday and enjoy grab-and-go breakfasts or snacks all week long. Think of the precious minutes you’ll save on busy mornings, knowing you have a nutritious and delicious option waiting for you. Moreover, they are incredibly versatile, fitting seamlessly into various dietary needs with just a few minor adjustments, which we’ll discuss shortly. They offer a fantastic, budget-friendly way to use up those overripe bananas sitting on your counter, turning what might otherwise be waste into a golden opportunity for culinary delight. This recipe truly embodies the idea of “effortless indulgence,” proving that healthy eating doesn’t have to be bland or time-consuming.
Serving Suggestions and Delicious Variations to Explore
Now that you’re convinced these bars are a revelation, let’s talk about making them even more your own! While absolutely divine on their own, a warm Banana Oatmeal Bar truly shines when paired with a dollop of creamy Greek yogurt and a sprinkle of cinnamon for a wholesome, energizing breakfast. Imagine savoring that delightful combination with your morning coffee – pure bliss! For an afternoon pick-me-up, a tall glass of cold milk or a refreshing fruit smoothie makes an excellent accompaniment. If you’re leaning towards a dessert vibe, a scoop of vanilla ice cream melting decadently over a slightly warmed bar is an absolute game-changer, creating a comforting, home-style treat that’s hard to beat after dinner. You can even drizzle a little honey or maple syrup for an extra touch of sweetness.
But the fun doesn’t stop there! The beauty of this recipe lies in its incredible adaptability. Feeling adventurous? Try folding in a handful of chopped walnuts or pecans for an added crunch and nutty flavor dimension. A touch of shredded coconut would bring a lovely tropical twist, while a sprinkle of mini chocolate chips before baking transforms them into a more decadent, kid-friendly snack that everyone will adore. If you’re a fan of dried fruit, cranberries, raisins, or chopped apricots can add delightful bursts of sweetness and chewiness. For an extra boost of protein and healthy fats, a swirl of almond butter or peanut butter into the batter before baking adds richness and depth that’s utterly satisfying. Don’t hesitate to experiment with different spices too – a pinch of nutmeg, allspice, or even a touch of ginger alongside the cinnamon can introduce a wonderfully complex warmth that elevates the flavor profile. And for those who prefer a less sweet option, you can always slightly reduce the added sweetener, letting the natural banana flavor take center stage. The possibilities are truly endless, and each variation offers a chance to personalize these fantastic bars to your exact liking, ensuring they cater perfectly to your taste buds and any dietary preferences you might have.
Your Culinary Adventure Awaits!
So, what are you waiting for? I wholeheartedly encourage you to roll up your sleeves, gather your ingredients, and give these amazing Banana Oatmeal Bars a try this week. I promise, you won’t regret it. They are simple, satisfying, and simply superb – a true testament to the power of uncomplicated, wholesome ingredients. Once you’ve experienced the joy of baking and tasting them, I would absolutely love to hear from you. Did you add a unique twist? Was it your new favorite breakfast or snack? Share your experiences, your successes, and any creative variations you come up with. Your culinary journey is important to me, and sharing makes the experience even richer for all of us. Let’s make some delicious memories together!
Banana Oatmeal Bars: Healthy, Easy, & Delicious Treat!
Banana Oatmeal Bars are truly a revelation, offering that perfect balance of wholesome goodness and undeniable comfort in every single bite. They’re a convenient, delicious, and satisfying solution for busy mornings or a much-needed afternoon pick-me-up, proving that healthy eating can indeed be wonderfully delicious and incredibly simple.
Ingredients
-
1½ cups mashed bananas (approx. 3 ripe bananas)
-
½ cup nut butter
-
2 cups rolled oats
-
1 teaspoon cinnamon
-
1 teaspoon vanilla extract
-
3 tablespoons maple syrup
-
1 cup chocolate chips
-
½ teaspoon salt
Instructions
-
Step 1
Preheat oven to 350°F (175°C). Line a 9×13 inch baking pan with parchment paper, leaving an overhang on the sides, and lightly grease. -
Step 2
In a large bowl, mash the ripe bananas. Stir in the nut butter, maple syrup, and vanilla extract until well combined. -
Step 3
Add the rolled oats, cinnamon, and salt to the wet mixture. Mix gently until just combined and no dry streaks remain. -
Step 4
Fold in the chocolate chips. -
Step 5
Transfer the thick batter into the prepared baking pan. Use the back of a spoon or a spatula to spread it evenly across the bottom. -
Step 6
Bake for 25-30 minutes, or until the edges are golden brown and the center is set. A toothpick inserted into the center should come out clean or with moist crumbs. -
Step 7
Remove from oven and let cool in the pan on a wire rack for at least 15-20 minutes. Then, using the parchment paper overhangs, lift the bars out and transfer to the rack to cool completely (30-60 minutes) before slicing into squares.
Important Information
Nutrition Facts (Per Serving)
It is important to consider this information as approximate and not to use it as definitive health advice.
Allergy Information
Please check ingredients for potential allergens and consult a health professional if in doubt.