Classic Christmas Toffee—is there anything more synonymous with the warmth and joy of the holiday season than the rich, buttery aroma of homemade toffee wafting through your kitchen? For me, it evokes cherished memories of family gatherings, festive carols, and the simple pleasure of sharing edible gifts. This delightful confection has long held a special place in holiday traditions, serving as both a beloved treat and a thoughtful present for friends and loved ones. Its history is deeply intertwined with the festive spirit, a testament to the joy that simple, delicious treats bring during this special time of year.
Why is homemade toffee a holiday staple?
People adore this dish not just for its exquisite taste—the perfect balance of crisp sweetness and rich, caramelized butter—but also for its satisfying, melt-in-your-mouth texture that delivers a delightful crunch with every bite. The simplicity of its ingredients belies its incredible depth of flavor, making it a cornerstone of holiday baking for generations. The act of making Classic Christmas Toffee becomes a heartwarming ritual itself, a chance to slow down amidst the holiday rush and create something truly special from scratch. I’m thrilled to guide you through crafting this quintessential holiday treat, ensuring your festivities are infused with its irresistible charm.

Ingredients:
- 1 cup (2 sticks or 226g) unsalted butter: I always opt for good quality butter, as it’s the foundation of that rich, buttery flavor in our Classic Christmas Toffee. Make sure it’s at room temperature for easier melting, though it’s not strictly necessary if you’re patient.
- 1 cup (200g) granulated sugar: The primary sweetener that caramelizes into that glorious toffee.
- 1/4 cup (60ml) water: Helps dissolve the sugar evenly, preventing crystallization and ensuring a smooth texture.
- 1 teaspoon pure vanilla extract: Added at the very end for an extra layer of warmth and aroma, complementing the butter and caramel beautifully.
- 1/2 teaspoon salt: A crucial ingredient that balances the sweetness and deepens the overall flavor profile of our Classic Christmas Toffee. Don’t skip this; it truly makes a difference.
- 1/4 teaspoon baking soda: This tiny addition reacts with the heat and acid (from the butter’s lactic acid) to create tiny air bubbles, giving the toffee a slightly less dense, more brittle texture that’s a hallmark of the best toffee.
- 12 ounces (about 2 cups) good quality chocolate chips or chopped chocolate: I prefer semi-sweet chocolate, but milk chocolate or even dark chocolate can be used depending on your preference. High-quality chocolate melts more smoothly and provides a superior finish.
- 1 cup (about 115g) finely chopped nuts: Toasted almonds or pecans are my go-to choices for Classic Christmas Toffee. Toasting them beforehand enhances their flavor significantly. You’ll want to chop them finely so they adhere well to the chocolate layer.
Equipment You’ll Need:
Having the right tools on hand makes all the difference when crafting this exquisite Classic Christmas Toffee. Trust me, a little preparation here prevents a lot of stress later!
- Heavy-bottomed 3-quart saucepan: A robust, heavy-bottomed pan is absolutely essential. It distributes heat evenly, which is critical for preventing the sugar from scorching at the bottom while the rest cooks. This also helps maintain a consistent temperature, which is key for a perfect caramelization.
- Candy thermometer: This is non-negotiable for achieving the correct “hard crack” stage. Precision is vital in candy making, and a reliable thermometer ensures you hit that sweet spot between chewy and burnt. An instant-read thermometer can work if it has a high enough temperature range and can be clipped to the side of the pan for continuous monitoring.
- 9×13 inch baking pan: You’ll need this to spread your hot toffee. A standard metal baking pan works perfectly.
- Aluminum foil: For lining your baking pan. This makes for incredibly easy removal of the finished Classic Christmas Toffee.
- Silicone spatula or wooden spoon: For stirring. These materials are heat-resistant and won’t scratch your saucepan. A silicone spatula is particularly good for scraping down the sides of the pan.
- Pastry brush (optional but recommended): A small, clean pastry brush dipped in water can be used to wash down any sugar crystals that form on the sides of the pan during cooking. This prevents crystallization in the toffee.
- Offset spatula or butter knife: For spreading the melted chocolate smoothly over the toffee base.
- Sheet of parchment paper: While optional, placing a sheet of parchment paper over the hot chocolate layer before pressing nuts can help embed them more evenly without making a mess on your spatula.
- Small microwave-safe bowl or double boiler: For melting the chocolate.
Prepping Your Workspace for Perfect Classic Christmas Toffee:
Before you even think about turning on the stove, we need to get our workspace ready. This step is incredibly important for candy making because once the toffee starts cooking, things move quickly, and you won’t have time to fuss with preparation. Being organized is the secret to stress-free, delicious Classic Christmas Toffee!
- First things first, grab your 9×13 inch baking pan. We’re going to line it with aluminum foil. Make sure the foil extends up and over the edges of the pan; this creates handy “handles” that will allow you to lift the entire sheet of cooled toffee right out of the pan. This is a game-changer for easy removal and cleanup!
- Once your pan is neatly lined, generously butter or lightly spray the entire surface of the foil. And I mean generously! This prevents the hot, sticky toffee from adhering to the foil, making it much easier to break apart later. Don’t skip this step; it’s vital for a smooth process.
- Measure out all of your ingredients and have them ready and within arm’s reach. This is called “mise en place” in French, and it’s a golden rule in any kitchen, especially when making something as time-sensitive as Classic Christmas Toffee.
- Have your granulated sugar, water, and butter measured and ready for the saucepan.
- Your vanilla extract, salt, and baking soda should be measured and set aside together. These go in at a very specific moment, so having them prepped saves crucial seconds.
- Your chopped chocolate should be in a microwave-safe bowl or set up over a double boiler, ready to be melted.
- Your finely chopped, toasted nuts should be in a small bowl, ready to be sprinkled.
- Attach your candy thermometer to the side of your heavy-bottomed saucepan. Make sure the tip of the thermometer doesn’t touch the bottom of the pan, but is submerged enough to accurately read the temperature of the toffee mixture as it cooks.
- Have your heat-resistant spatula or wooden spoon nearby.
- Seriously, don’t underestimate the power of preparation here. Once that toffee hits the right temperature, you have mere moments to get it into the pan and move on to the next steps. Being prepared ensures a smooth, successful, and beautiful batch of Classic Christmas Toffee every time!
Making the Butter Toffee Base:
Now for the heart of our Classic Christmas Toffee – the luscious, golden butter base. This is where patience, attention, and a good candy thermometer truly shine. Don’t rush this process; it’s all about building flavor and achieving that perfect brittle texture.
- In your heavy-bottomed 3-quart saucepan, combine the 1 cup of unsalted butter, 1 cup of granulated sugar, and 1/4 cup of water. Place the saucepan over medium-low heat.
- Stir the mixture constantly with your silicone spatula or wooden spoon until the butter is completely melted and the sugar has fully dissolved. You’ll notice the mixture becoming smooth and uniform. This initial gentle heat helps prevent crystallization later on. Any sugar crystals clinging to the sides of the pan can be carefully washed down with a clean, damp pastry brush, ensuring a silky-smooth Classic Christmas Toffee.
- Once the sugar is dissolved and the butter is melted, increase the heat to medium-high. Bring the mixture to a rolling boil. At this point, resist the urge to stir constantly. While you do need to keep an eye on it, excessive stirring once it’s boiling can encourage crystallization.
- This is where your candy thermometer becomes your best friend. Keep a close watch on the temperature. The mixture will start to bubble vigorously, and its color will gradually change. It will go from a pale, creamy yellow to a light golden hue, then deepen into a rich, amber caramel color. This transformation is magical and tells you the Classic Christmas Toffee is developing its characteristic flavor.
- Continue to cook, stirring occasionally (about every minute or so) to prevent scorching, until the mixture reaches precisely 300-310°F (149-154°C). This is the “hard crack” stage, which is absolutely essential for a properly brittle toffee. Do not walk away from the stove during this critical phase! The temperature can climb very quickly in the final few degrees. If it goes too high, the toffee can burn and taste bitter; if it doesn’t go high enough, it will be too soft and chewy.
- As soon as your candy thermometer registers between 300-310°F, immediately remove the saucepan from the heat. Act quickly but carefully! Stir in the 1 teaspoon of vanilla extract, 1/2 teaspoon of salt, and 1/4 teaspoon of baking soda. The mixture will fizz and bubble up slightly when the baking soda is added – this is perfectly normal and contributes to the toffee’s signature texture. Stir just until combined, which will only take a few seconds.
- Without delay, pour the hot toffee mixture evenly over the prepared, buttered foil-lined baking pan. Use your spatula to help spread it if necessary, but try to work quickly as it sets up very fast. You want a relatively even thickness across the pan for our Classic Christmas Toffee.
- Set the pan aside on a heat-proof surface. Do not touch or move the toffee for a few minutes while we prepare the chocolate.
- A very important safety note: Hot sugar is extremely hot and can cause severe burns. Please exercise extreme caution when working with the toffee mixture. Keep children and pets away from the kitchen during this process. Have a bowl of ice water nearby in case of accidental splashes (though prevention is always best!).
Adding the Chocolate Layer:
Once our beautiful butter toffee base is poured and starting to firm up, it’s time to add the luxurious chocolate layer. This is what truly makes our Classic Christmas Toffee feel special and festive. The warmth from the still-hot toffee will help melt the chocolate perfectly.
- While the toffee base is still warm (it should be firm enough not to shift, but still radiating some heat), evenly sprinkle the 12 ounces of chocolate chips or chopped chocolate over the entire surface of the hot toffee. The residual heat from the toffee will begin to melt the chocolate.
- Let the chocolate sit undisturbed for about 5-7 minutes. This allows the heat to work its magic and create a smooth, spreadable consistency. You’ll see the chocolate start to look glossy and slightly melty around the edges. If your kitchen is particularly cool, you can briefly place the pan in a very lightly warmed (turned off) oven for a minute or two to encourage melting, but be careful not to overheat the toffee.
- After the chocolate has had a chance to melt, take your offset spatula or butter knife and gently begin to spread the chocolate evenly over the entire surface of the toffee. You want a smooth, uniform layer from edge to edge. Work carefully so as not to disturb the toffee underneath. The warmth from the toffee should make this process relatively easy, resulting in a beautiful, glossy finish for your Classic Christmas Toffee.
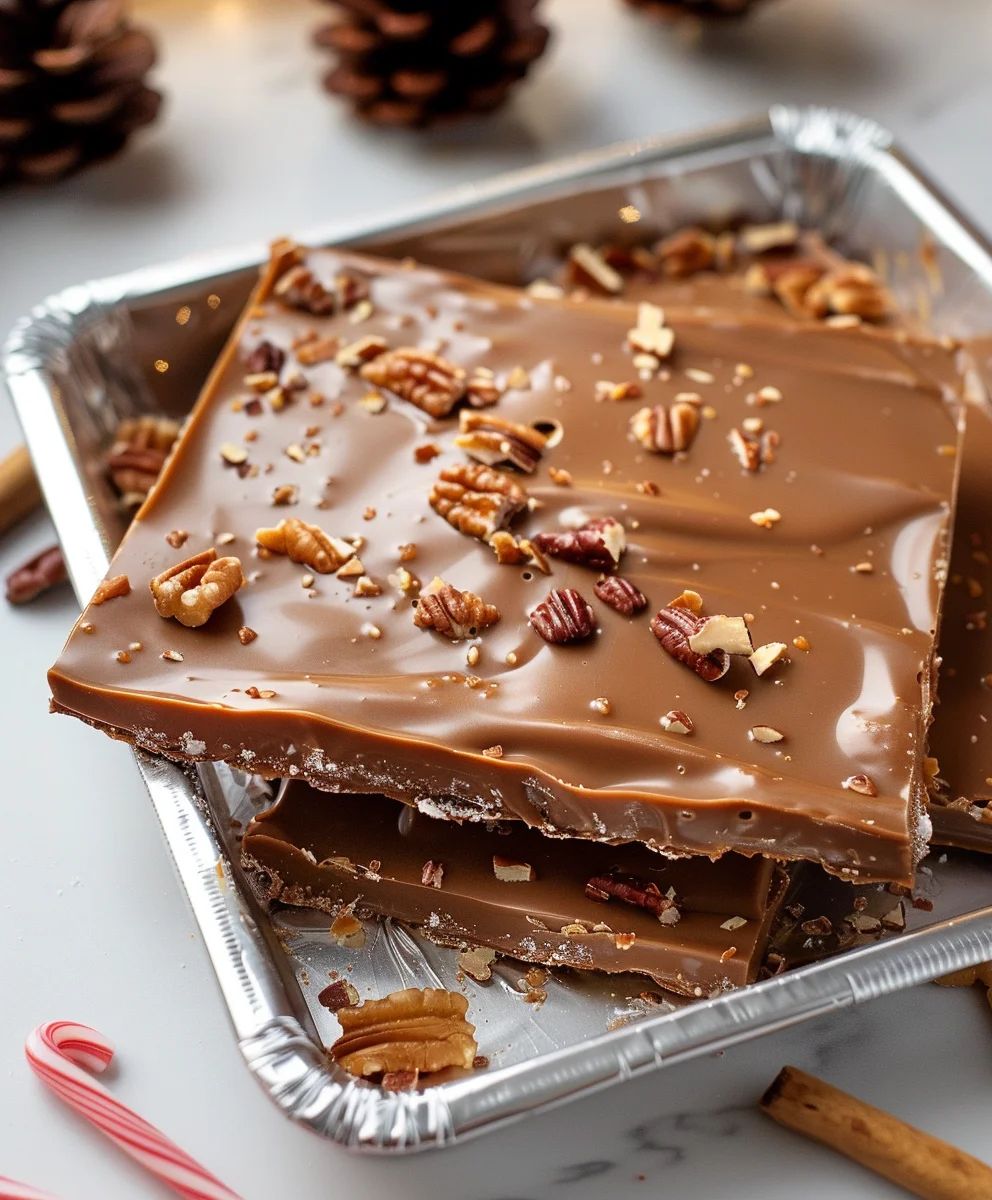
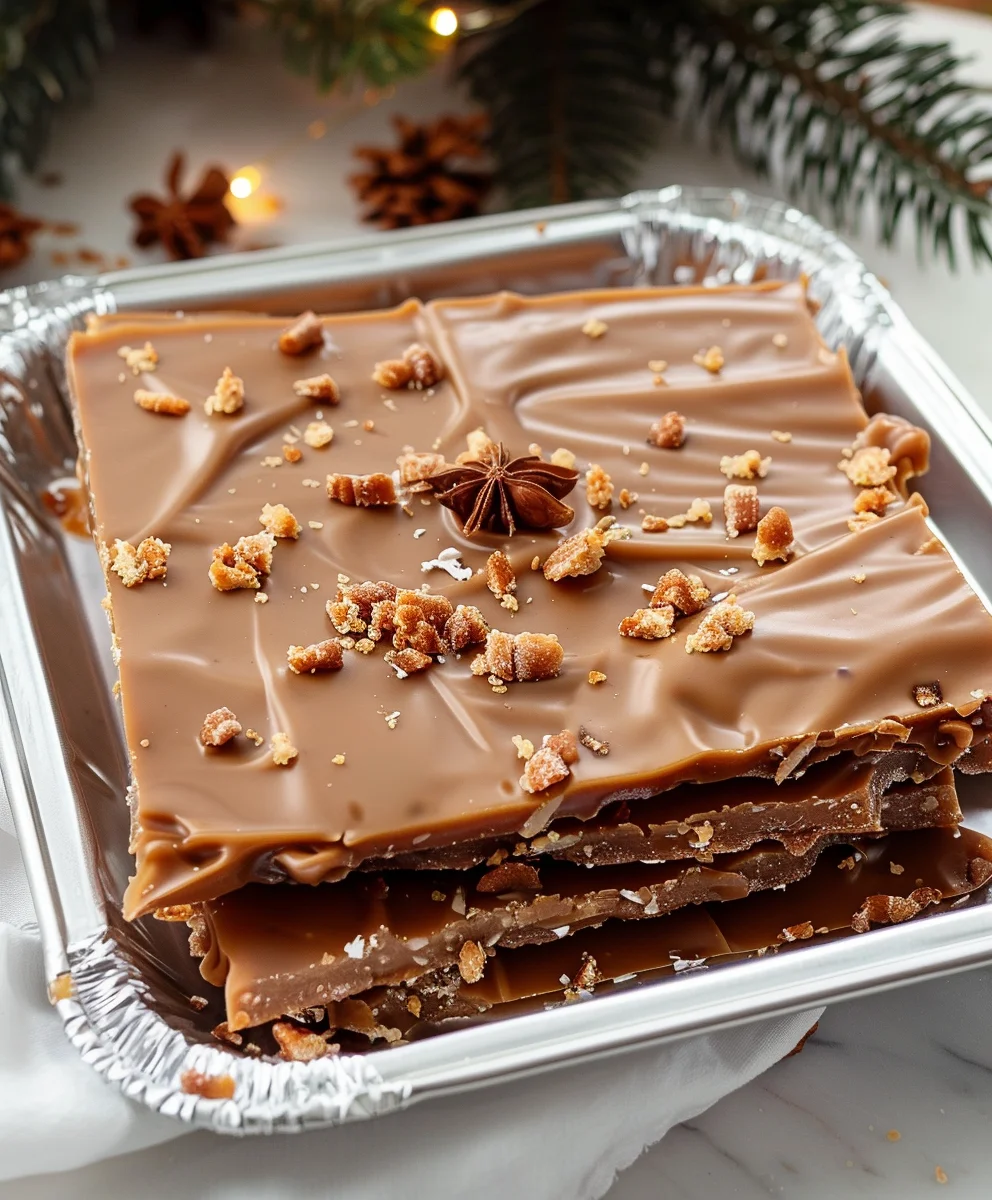
- Once the chocolate is smoothly spread, it’s time for the nuts! Immediately and generously sprinkle your 1 cup of finely chopped, toasted nuts over the melted chocolate layer. You can lightly press them down with your hands (if they’re clean and dry) or use a sheet of parchment paper placed on top, then gently press across the surface to ensure they adhere well to the chocolate. This creates a lovely texture and adds a delightful crunch to every bite of your Classic Christmas Toffee.
- For an extra touch of elegance and presentation, I sometimes like to add a tiny sprinkle of flaky sea salt over the nuts at this stage. It just brightens up all the flavors, offering a wonderful counterpoint to the sweetness.
Cooling and Finishing Your Classic Christmas Toffee:
Now comes the hardest part for me – waiting! Proper cooling is essential for achieving that perfect, satisfying snap when you break your Classic Christmas Toffee. Don’t rush it, or you’ll end up with a soft, bendy mess, and we want crisp, brittle perfection!
- Once the chocolate and nuts are layered, place the entire baking pan into the refrigerator. This step is crucial for rapidly cooling the toffee and setting the chocolate. It also helps achieve that desirable brittle texture.
- Allow the Classic Christmas Toffee to chill in the refrigerator for at least 2-3 hours, or even better, until it is completely firm and cold all the way through. You’ll know it’s ready when the chocolate is hard to the touch and the whole slab feels solid. This patient waiting period ensures that the toffee won’t be sticky and will break cleanly.
- After the toffee is thoroughly chilled and firm, remove the pan from the refrigerator. Grasp the foil “handles” that you created earlier and carefully lift the entire slab of toffee out of the pan and onto a clean cutting board or a sturdy counter surface.
- Now for the fun part – breaking it! Gently peel the foil away from the edges and bottom of the toffee. Place a sharp, heavy knife at one end of the slab and press down firmly to start breaking it into pieces. Alternatively, and this is my preferred method for a truly rustic look, you can simply break the cooled slab into irregular, bite-sized pieces with your hands. The distinct “crack” you’ll hear is incredibly satisfying and confirms you’ve achieved the perfect hard crack stage for your Classic Christmas Toffee. Each piece will have its own unique, charming shape, which is part of its homemade appeal.
- Arrange your beautiful pieces of Classic Christmas Toffee on a serving platter, or get ready to package them for gifting. The aroma of butter and chocolate will fill your kitchen, a sure sign of success!
Tips for Success with Your Classic Christmas Toffee:
Making toffee can feel a little intimidating the first time, but with these tips, you’ll be a Classic Christmas Toffee pro in no time! I’ve learned these tricks over countless batches, and they really do make a difference.
-
Invest in a Good Candy Thermometer:
I cannot stress this enough. A reliable candy thermometer is your best friend. Even a few degrees off can change the texture of your toffee from brittle to chewy. Calibrate your thermometer occasionally by placing it in boiling water; it should read 212°F (100°C) at sea level. If it doesn’t, adjust your target temperature accordingly.
-
Patience in the Beginning, Speed at the End:
When you first combine the butter, sugar, and water, stir gently over medium-low heat until the sugar is completely dissolved. This prevents crystallization. Once it boils, try not to stir too much, but when it hits that 300°F mark, remove it from the heat and incorporate the vanilla, salt, and baking soda swiftly. The toffee sets incredibly fast once it’s off the heat, so having everything measured and ready is crucial.
-
Preventing Sugar Crystallization:
Sugar crystals are the enemy of smooth toffee. To avoid them, ensure all sugar is dissolved before the mixture boils. If you see crystals forming on the sides of your pan as it cooks, use a clean, damp pastry brush to gently wash them down into the mixture. This prevents them from “seeding” the entire batch and turning your Classic Christmas Toffee grainy.
-
Don’t Overcook or Undercook:
Overcooked toffee: If you go past 310°F, your toffee can taste burnt and bitter. There’s no coming back from this, unfortunately.
Undercooked toffee: If you pull it off the heat before 300°F, your Classic Christmas Toffee will be soft and chewy, rather than beautifully crisp and brittle. It might still taste good, but it won’t have that satisfying snap. -
Use a Heavy-Bottomed Pan:
As mentioned in the equipment list, a heavy-bottomed pan ensures even heat distribution, significantly reducing the risk of scorching the sugar at the bottom while the rest of the mixture cooks. This is a small detail that makes a huge impact on the quality of your Classic Christmas Toffee.
-
Toasting the Nuts:
Seriously, toast your nuts! Whether you choose almonds, pecans, or walnuts, a quick toast in a dry pan or a few minutes in the oven (at 300°F/150°C) brings out their deep, nutty flavor. It elevates the entire Classic Christmas Toffee experience.
-
Embrace the Imperfections:
The beauty of homemade Classic Christmas Toffee is its rustic charm. Don’t worry if your pieces aren’t perfectly uniform. The irregular shapes add to the homemade appeal and ensure every piece is unique. It’s about the delicious taste and the love you put into it!
-
Safety First:
Remember that molten sugar is extremely hot. Keep children and pets away from the stovetop. If you get hot toffee on your skin, immediately run it under cold water for several minutes. Better safe than sorry!
-
Clean Up Immediately:
Once the toffee is poured, fill your saucepan with hot water and let it sit. The residual toffee will dissolve, making cleanup much easier. Don’t let it harden in the pan!
Storage and Gifting Ideas:
Once you’ve made a batch of this delightful Classic Christmas Toffee, you’ll want to make sure it stays fresh and delicious, especially if you’re planning to share it (which I highly recommend!). It makes for such a thoughtful and impressive gift.
-
Proper Storage for Longevity:
To maintain its crispness and prevent stickiness, store your Classic Christmas Toffee in an airtight container at room temperature. Layer the pieces between sheets of parchment paper or wax paper to prevent them from sticking together. This is especially important for the chocolate layer. If stored correctly, your toffee will remain fresh and wonderful for up to 2-3 weeks. I find that placing a small desiccant packet (like those little silica gel packets you find in new shoes) in the container can help absorb any moisture and keep it even crisper, though this is entirely optional.
While you can store it in the refrigerator, I generally prefer room temperature storage for Classic Christmas Toffee. Sometimes the fridge can cause condensation when you take it out, which can make the toffee slightly sticky. However, if your home is very warm and humid, the refrigerator might be a better option. Just be sure to let it come to room temperature for a few minutes before serving to appreciate its full flavor and texture.
-
Gifting Classic Christmas Toffee:
Homemade Classic Christmas Toffee is one of the most cherished gifts you can give during the holiday season. It shows you put time and effort into creating something truly special. Here are some of my favorite ways to package it:
- Decorative Tins: These are classic for a reason! Line a pretty tin with parchment paper, then fill it with layers of your toffee, separated by more parchment paper. Tie a festive ribbon around the tin for an extra touch.
- Clear Cellophane Bags: For a simpler presentation, place a few pieces of toffee in small, clear cellophane bags. Tie the top with a festive twist tie or ribbon. These are perfect for colleagues, neighbors, or as party favors.
- Small Gift Boxes: Line small, sturdy gift boxes with tissue paper, then arrange the toffee pieces inside. You can add a personalized tag with a handwritten message to make it even more special.
- Mason Jars: For a rustic and charming look, layer toffee pieces in clean Mason jars. Tie a bit of twine or a fabric scrap around the lid. It’s a beautiful presentation that also helps keep the Classic Christmas Toffee fresh.
- Homemade Edible Gifts Baskets: If you’re feeling ambitious, include your Classic Christmas Toffee in a larger basket alongside other homemade treats like cookies, fudge, or spiced nuts. It makes a truly spectacular gift.
No matter how you choose to package it, a handmade tag that says “Homemade Classic Christmas Toffee” adds a personal touch that everyone appreciates. Don’t forget to include a little note wishing them happy holidays!
-
Making Ahead for the Holidays:
This Classic Christmas Toffee is an excellent candidate for making ahead. Because it stores so well, you can prepare batches a week or two before your holiday gatherings or gifting events. This frees up precious time during the busiest part of the season, allowing you to enjoy the festivities without last-minute stress. Just remember to store it properly to maintain its peak freshness and delightful crunch!
Conclusion:
And there you have it, friends! We’ve journeyed through the simple, yet utterly delightful, process of creating a truly special treat. If you’re looking for a recipe that consistently delivers on both flavor and festive cheer, look no further. This isn’t just another sweet; it’s an experience, a memory in the making, and a testament to the magic that happens when a few humble ingredients come together in just the right way. I genuinely believe that once you taste the buttery, crisp snap of this homemade confection, you’ll understand exactly why it deserves a permanent spot in your culinary repertoire. It’s the kind of indulgence that makes you close your eyes and savor every single bite, a perfect symphony of sweet and rich that simply melts in your mouth, leaving behind only the faintest, lingering hint of pure joy. The satisfying crunch, followed by the immediate, smooth dissolution on the tongue, is a textural marvel that store-bought versions rarely achieve. It’s comforting, luxurious, and surprisingly easy to master, making it an ideal project for seasoned bakers and enthusiastic novices alike.
Why This Recipe is an Absolute Must-Try This Season
What truly sets this recipe apart is its incredible versatility and universal appeal. It transcends mere dessert status to become a centerpiece of holiday gatherings, a thoughtful homemade gift, or simply a well-deserved personal treat. The rich, golden hue, the irresistible aroma that fills your kitchen as it cooks, and the sheer delight on people’s faces when they taste it are all incredibly rewarding. It evokes a sense of nostalgia, reminding us of simpler times and cherished family traditions, yet it feels entirely fresh and exciting every time you make it. It’s robust enough to stand up to packaging and gifting, yet delicate enough to feel incredibly luxurious. The balance of sweet, buttery notes with the optional additions of chocolate and nuts creates a flavor profile that is both complex and comforting. Trust me, the effort, minimal as it is, pays off tenfold in the sheer pleasure it brings to everyone who tries it. It’s a guaranteed crowd-pleaser and a fantastic way to spread a little extra cheer during the holidays or any time you want to make someone (or yourself!) feel special.
Serving Suggestions & Creative Variations to Elevate Your Experience
While this delectable treat is utterly divine on its own, there are so many wonderful ways to enjoy and customize it! For a classic presentation, simply break it into irregular shards and arrange them artfully on a serving platter. It’s absolutely magnificent alongside a steaming mug of coffee or a comforting cup of tea, adding a touch of elegance to your morning or afternoon break. Consider crumbling it over a scoop of vanilla bean ice cream for an instant upgrade to a simple dessert; the contrast of cold, creamy ice cream with the crisp, sweet toffee is truly sensational. You could also sprinkle crushed pieces over a cheesecake, a bowl of oatmeal, or even incorporate it into a batch of holiday cookies for an unexpected textural pop.
Feeling adventurous with variations? The possibilities are endless! Instead of pecans, try using almonds, walnuts, or even macadamia nuts for a different nutty nuance. A sprinkle of flaky sea salt over the melted chocolate layer before it sets adds a sophisticated sweet-and-salty dimension that will truly tantalize your taste buds. You could experiment with different types of chocolate too – dark chocolate offers a lovely bittersweet counterpoint, while milk chocolate provides an extra layer of creamy sweetness. White chocolate, perhaps with a hint of peppermint extract, could transform it into an entirely new holiday sensation. For a truly festive touch, once the chocolate is set, you could drizzle a contrasting colored candy melt over the top or sprinkle with festive sprinkles. This adaptability is part of what makes it such a joy to prepare and share.
Your Invitation to Create and Share
So, now it’s your turn! I wholeheartedly encourage you to carve out a little time in your day, gather your ingredients, and immerse yourself in the delightful process of making this incredible sweet. Experience firsthand the magic of creating something so utterly delicious and deeply satisfying right in your own kitchen. This Classic Christmas Toffee is more than just a recipe; it’s an opportunity to create cherished memories, to indulge your sweet tooth, and to share a piece of your heart with those you love. I am genuinely excited for you to try it, to feel the pride of pulling a perfectly golden sheet of toffee from your oven, and to taste the fruits of your labor. Once you’ve made it, I would absolutely love to hear about your experience! Did you stick to the classic? Did you try a fun variation? Please don’t hesitate to share your thoughts, your successes, and perhaps even your own creative twists in the comments below. Your feedback and stories inspire me and help our whole community of home bakers. Happy baking, and happy indulging!
Classic Christmas Toffee
This Classic Christmas Toffee recipe delivers a perfect balance of crisp sweetness and rich, caramelized butter, with a satisfying, melt-in-your-mouth crunch. A cherished holiday treat perfect for sharing and gifting, evoking warmth and joy.
Ingredients
-
1 cup (226g) unsalted butter
-
1 cup (200g) granulated sugar
-
1/4 cup (60ml) water
-
1 tsp vanilla extract (or non-alcoholic alternative)
-
1/2 tsp salt
-
1/4 tsp baking soda
-
12 oz (approx. 2 cups) good quality chocolate chips (semi-sweet preferred)
-
1 cup (115g) finely chopped toasted pecans or almonds
Instructions
-
Step 1
Line a 9×13 inch baking pan with buttered aluminum foil. Measure all ingredients and have them ready. Attach a candy thermometer to a heavy-bottomed 3-quart saucepan, ensuring the tip doesn’t touch the bottom. -
Step 2
In the saucepan, combine butter, granulated sugar, and water. Cook over medium-low heat, stirring constantly, until butter is melted and sugar is fully dissolved. Increase heat to medium-high, bring to a rolling boil, and cook, stirring occasionally, until the mixture reaches 300-310°F (149-154°C) on the candy thermometer (hard crack stage). Immediately remove from heat. Quickly stir in vanilla extract, salt, and baking soda until just combined. Pour the hot toffee evenly into the prepared pan, spreading quickly if needed. -
Step 3
While the toffee base is still warm, evenly sprinkle chocolate chips over its entire surface. Let sit undisturbed for 5-7 minutes to melt. Using an offset spatula or butter knife, gently spread the melted chocolate into a smooth, uniform layer. Immediately and generously sprinkle the finely chopped toasted nuts over the chocolate layer, pressing gently to adhere. Optionally, sprinkle a tiny pinch of flaky sea salt. -
Step 4
Place the pan in the refrigerator for at least 2-3 hours, or until the toffee is completely firm and cold. Once chilled, lift the entire slab out using the foil handles. Gently peel away the foil. Break the cooled toffee slab into irregular, bite-sized pieces using your hands or a sharp knife. Arrange on a platter or prepare for storage/gifting.
Important Information
Nutrition Facts (Per Serving)
It is important to consider this information as approximate and not to use it as definitive health advice.
Allergy Information
Please check ingredients for potential allergens and consult a health professional if in doubt.