Butterfinger Bomb Cake Dessert is a delightful treat that brings together the rich flavors of chocolate and peanut butter in a way that will leave your taste buds dancing with joy. This indulgent dessert has become a favorite in many households, and for good reason! The combination of moist cake layers, creamy frosting, and crunchy Butterfinger pieces creates a texture that is simply irresistible.
Originating from the classic American candy bar, the Butterfinger has been a beloved sweet since its debut in the 1920s. Over the years, it has inspired countless recipes, but none quite capture the essence of this iconic treat like the Butterfinger Bomb Cake Dessert. People love this dish not only for its incredible taste but also for its convenience; it’s perfect for celebrations, potlucks, or simply as a sweet escape after a long day. Join me as we dive into this scrumptious recipe that is sure to become a staple in your dessert repertoire!

Ingredients:
- 1 box of chocolate cake mix (plus ingredients required on the box: eggs, oil, water)
- 1 cup of creamy peanut butter
- 1 cup of powdered sugar
- 1 cup of heavy whipping cream
- 1 teaspoon of vanilla extract
- 1 cup of Butterfinger candy bars, crushed (about 4-5 bars)
- 1 cup of chocolate frosting (store-bought or homemade)
- Extra Butterfinger pieces for garnish
Preparing the Cake
First things first, let’s get that cake going! I love the smell of chocolate cake baking in the oven; it’s like a warm hug for your kitchen.
- Preheat your oven to 350°F (175°C). This is crucial for getting that perfect rise on your cake.
- In a large mixing bowl, combine the chocolate cake mix with the ingredients listed on the box. Typically, this includes eggs, oil, and water. Mix until just combined; be careful not to overmix, as this can make the cake dense.
- Grease and flour two 9-inch round cake pans. You can also use parchment paper at the bottom for easy removal later.
- Divide the batter evenly between the two prepared pans. I like to use a kitchen scale to ensure they’re equal, but you can also eyeball it.
- Bake in the preheated oven for 25-30 minutes, or until a toothpick inserted in the center comes out clean. While the cakes are baking, let’s move on to the filling!
Making the Peanut Butter Filling
While the cakes are baking, I like to prepare the delicious peanut butter filling. This is where the magic happens!
- In a medium bowl, combine 1 cup of creamy peanut butter and 1 cup of powdered sugar. Mix until well combined. It should be thick but spreadable.
- In another bowl, whip 1 cup of heavy whipping cream until stiff peaks form. This usually takes about 3-5 minutes with a hand mixer.
- Gently fold the whipped cream into the peanut butter mixture. Be careful not to deflate the whipped cream; we want to keep it light and fluffy!
- Once combined, fold in the crushed Butterfinger pieces. This adds a delightful crunch and flavor to the filling.
Assembling the Cake
Now that we have our cakes baked and our filling ready, it’s time to assemble this beauty!
- Once the cakes are done baking, remove them from the oven and let them cool in the pans for about 10 minutes. Then, carefully turn them out onto a wire rack to cool completely.
- Once the cakes are completely cool, place one layer on a serving plate or cake stand. This will be the base of your Butterfinger Bomb Cake.
- Spread a generous layer of the peanut butter filling on top of the first cake layer. Make sure to spread it evenly to the edges.
- Place the second cake layer on top of the filling. Gently press down to ensure it sticks.
- Now, let’s frost the cake! Spread the chocolate frosting over the top and sides of the cake. I like to use an offset spatula for a smooth finish, but you can use a butter knife if that’s what you have.
- Once frosted, sprinkle additional crushed Butterfinger pieces on top for that extra crunch and visual appeal. You can also add some around the sides if you’re feeling fancy!
Chilling and Serving
Now that our cake is assembled, it’s time to let it chill and set before serving. This step is essential for the flavors to meld together.
- Cover the cake with plastic wrap or a cake dome and place it in the refrigerator for at least 1 hour. This will help the filling firm up a bit and make slicing easier.
- When you’re ready to serve, take the cake out of the fridge and let it sit at room temperature for about 10-15 minutes. This will make it easier to cut.
- Using a sharp
Conclusion:
In summary, the Butterfinger Bomb Cake Dessert is an absolute must-try for anyone who loves a rich, indulgent treat that combines the delightful crunch of Butterfinger candy with the moistness of cake and the creaminess of frosting. This dessert is not only a feast for the eyes but also a symphony of flavors that will leave your taste buds dancing with joy. Whether you’re celebrating a special occasion or simply want to satisfy your sweet tooth, this cake is sure to impress your family and friends. For serving suggestions, consider pairing this decadent dessert with a scoop of vanilla ice cream or a dollop of whipped cream to enhance its creamy texture. You can also experiment with variations by adding layers of chocolate ganache or incorporating different types of candy bars for a unique twist. The possibilities are endless, and I encourage you to get creative! I can’t wait for you to try this Butterfinger Bomb Cake Dessert! Once you do, please share your experience and any personal touches you added. Your feedback not only inspires me but also helps fellow readers discover new ways to enjoy this delightful treat. So, roll up your sleeves, gather your ingredients, and let the baking adventure begin! Happy baking! Print
Butterfinger Bomb Cake Dessert: A Decadent Treat for Chocolate Lovers
- Total Time: 110 minutes
- Yield: 12 servings 1x
Description
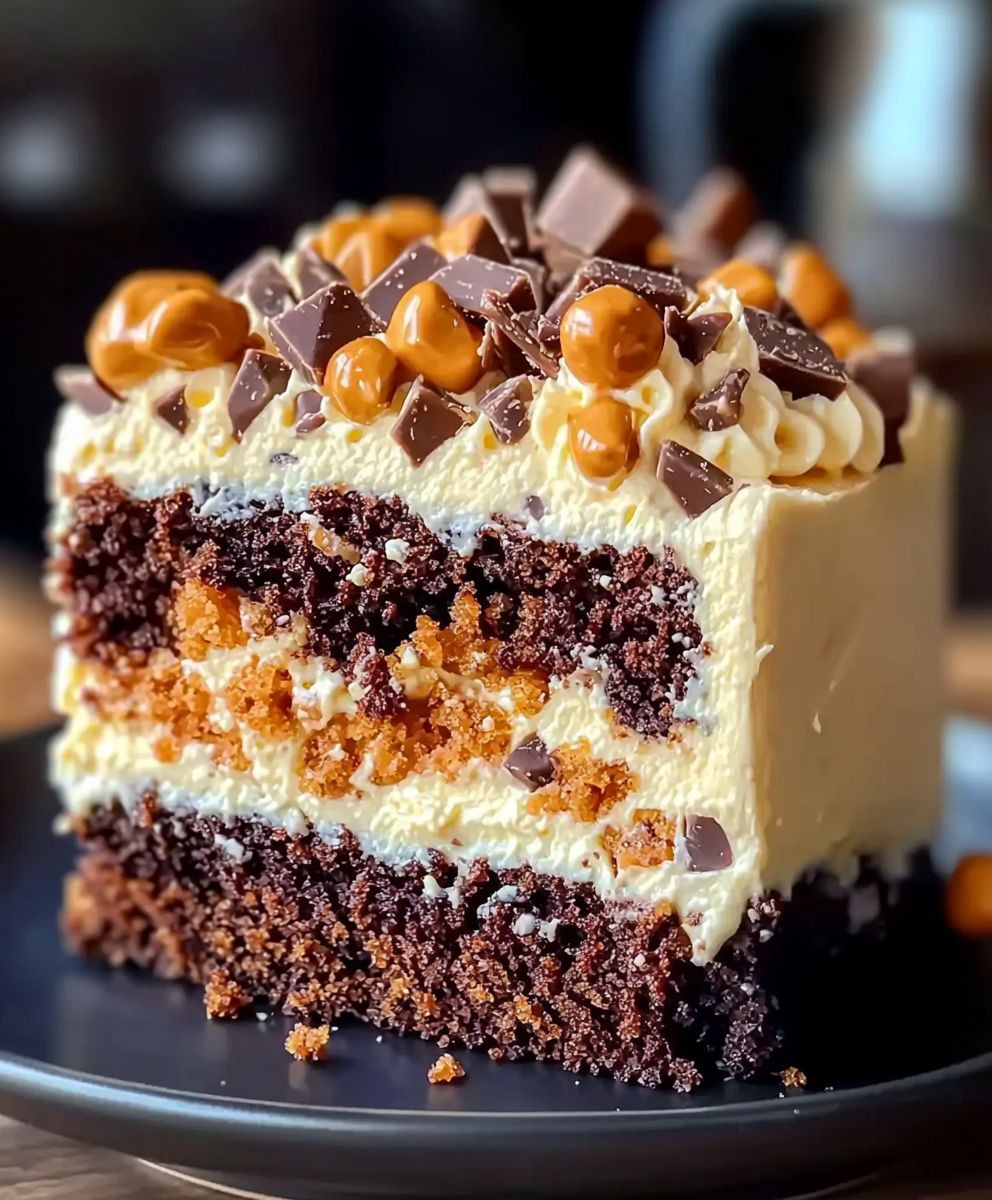
Indulge in this decadent Butterfinger Bomb Cake, featuring layers of rich chocolate cake, creamy peanut butter filling, and luscious chocolate frosting, all topped with crunchy Butterfinger pieces for a delightful treat.
Ingredients
- 1 box of chocolate cake mix (plus ingredients required on the box: eggs, oil, water)
- 1 cup of creamy peanut butter
- 1 cup of powdered sugar
- 1 cup of heavy whipping cream
- 1 teaspoon of vanilla extract
- 1 cup of Butterfinger candy bars, crushed (about 4–5 bars)
- 1 cup of chocolate frosting (store-bought or homemade)
- Extra Butterfinger pieces for garnish
Instructions
- Preheat your oven to 350°F (175°C).
- In a large mixing bowl, combine the chocolate cake mix with the ingredients listed on the box. Mix until just combined.
- Grease and flour two 9-inch round cake pans.
- Divide the batter evenly between the two prepared pans.
- Bake for 25-30 minutes, or until a toothpick inserted in the center comes out clean.
- In a medium bowl, combine 1 cup of creamy peanut butter and 1 cup of powdered sugar. Mix until well combined.
- In another bowl, whip 1 cup of heavy whipping cream until stiff peaks form.
- Gently fold the whipped cream into the peanut butter mixture, then fold in the crushed Butterfinger pieces.
- Once the cakes are done baking, let them cool in the pans for about 10 minutes, then turn them out onto a wire rack to cool completely.
- Place one layer on a serving plate and spread a generous layer of the peanut butter filling on top.
- Place the second cake layer on top and frost the cake with chocolate frosting.
- Sprinkle additional crushed Butterfinger pieces on top for garnish.
- Cover the cake and refrigerate for at least 1 hour before serving.
- Let the cake sit at room temperature for 10-15 minutes before slicing and serving.
Notes
- For a richer flavor, you can use dark chocolate cake mix instead of regular chocolate cake mix.
- Feel free to adjust the amount of Butterfinger pieces based on your preference.
- This cake can be made a day in advance; just keep it covered in the refrigerator.
- Prep Time: 20 minutes
- Cook Time: 30 minutes