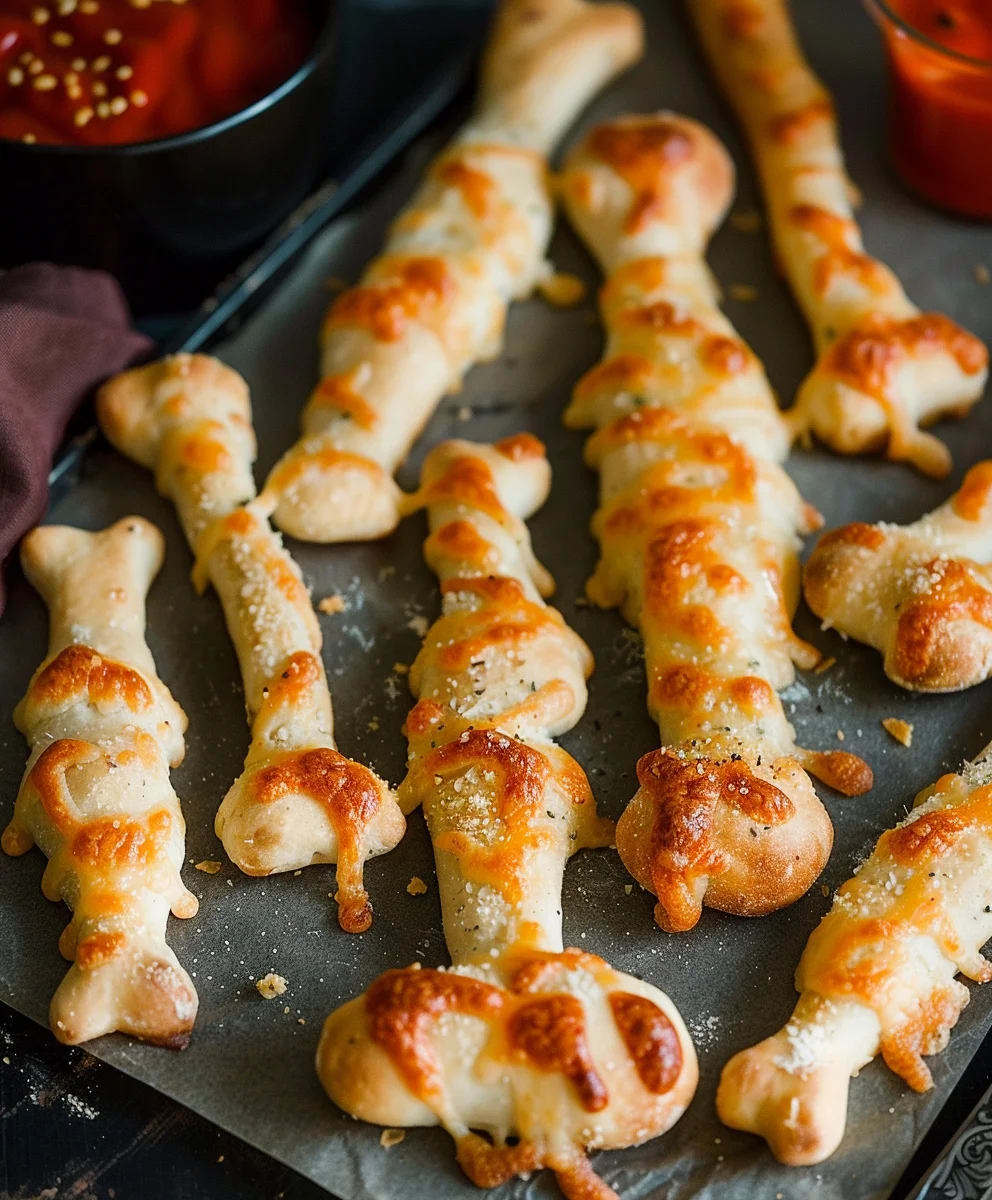
The Cheesy Halloween Breadstick Bones Recipe is precisely what your spooky season gatherings need to truly come alive! Are you ready to conjure up a treat that’s both delightfully eerie and irresistibly delicious? Imagine warm, soft, garlic-infused breadsticks, artfully shaped into spooky bones, with a gooey, savory core of melted cheese. This isn’t just a snack; it’s a centerpiece of ghoulish delight that will have everyone reaching for another “bone”!
Halloween has always been a time for playful frights and creative concoctions, extending far beyond the traditional candy bowl. While trick-or-treating is a hallmark, creating a memorable atmosphere at home with themed food has become an essential part of the celebration. These breadstick bones perfectly capture that spirit, blending the fun of a costume party with the comfort of homemade goodness. There’s a reason this Cheesy Halloween Breadstick Bones Recipe becomes an instant hit wherever it appears. People simply adore the magical combination of a fluffy, golden-brown exterior, a burst of savory garlic and herbs, and that utterly satisfying pull of warm, stretchy cheese. They offer a fantastic savory counterpoint to all the sweet treats, are incredibly easy to make, and add an undeniable visual charm to any festive table. Get ready to impress your ghoulish guests with this unforgettable, deliciously creepy creation!

Ingredients:
- Active Dry Yeast: 2 ¼ teaspoons (equivalent to one standard packet). I always make sure my yeast is fresh for the best rise; an expired packet can really put a damper on our breadstick dreams!
- Warm Water: 1 cup, ideally between 105-115°F (40-46°C). This temperature is absolutely crucial – too cold, and the yeast won’t activate; too hot, and you’ll kill it. Think of it as a cozy bath for our little yeast friends!
- Granulated Sugar: 1 teaspoon. This isn’t just for sweetness; it’s a little snack for the yeast, helping it wake up and get bubbling.
- All-Purpose Flour: 2 ½ to 3 cups, plus a little extra for dusting our workspace. The exact amount can vary slightly depending on humidity and how well you measure, so I recommend starting with 2 ½ cups and adding more gradually until the dough is just right.
- Salt: 1 teaspoon. Don’t skip this! It enhances the flavor of our breadsticks and also helps to control the yeast activity.
- Olive Oil: 2 tablespoons, plus another tablespoon or so for greasing the bowl. This adds a lovely subtle flavor and helps keep our dough tender and manageable.
- Shredded Mozzarella Cheese: 1 ½ cups, divided. I prefer whole milk low-moisture mozzarella for its excellent melt and stretch. Pre-shredded works, but shredding your own often gives a creamier melt.
- Grated Parmesan Cheese: ½ cup, divided. Freshly grated Parmesan adds an incredible depth of salty, nutty flavor that really elevates these breadsticks.
- Garlic Powder: 1 teaspoon. Because what’s a savory breadstick without a good hit of garlic?
- Onion Powder: ½ teaspoon. A fantastic companion to garlic powder, adding another layer of savory deliciousness.
- Dried Oregano: ½ teaspoon. This herb brings a classic Italian-American breadstick flavor that’s just irresistible.
- Large Egg: 1, lightly beaten (for our egg wash). This gives our breadstick bones a beautiful golden-brown color and a lovely sheen.
- Optional Toppings: A pinch of black sesame seeds or poppy seeds, if you’re feeling extra spooky and want to add “moldy” or “grimy” spots to your bones before baking. It’s a fun, creepy touch!
Equipment You’ll Need:
- Large mixing bowl
- Measuring cups and spoons
- Whisk or fork
- Clean kitchen towel or plastic wrap
- Rolling pin
- Sharp knife or pizza cutter
- Large baking sheets (2)
- Parchment paper or silicone baking mats
- Pastry brush (for egg wash)
- Wire cooling rack
- Stand mixer with dough hook (optional, but makes kneading a breeze!)
Preparation Phase: Bringing Our Bones to Life
This is where the magic of yeast begins, transforming simple ingredients into a dough that will become our wonderfully spooky breadstick bones. Don’t be intimidated; working with yeast is very rewarding!
- Activate the Yeast: In your large mixing bowl (or the bowl of your stand mixer), combine the warm water and granulated sugar. Give it a gentle stir to dissolve the sugar. Now, sprinkle the active dry yeast evenly over the surface of the water. Let it sit undisturbed for about 5 to 10 minutes. You’ll know it’s ready when a frothy, foamy layer appears on top – this is proof that your yeast is alive and well, eager to help our dough rise! If it doesn’t foam, your water might have been too hot or too cold, or your yeast might be old. In that case, I recommend starting over with fresh yeast and checking your water temperature carefully.
- Mix the Dry Ingredients: While your yeast is bubbling away happily, grab another medium-sized bowl. Whisk together 2 ½ cups of the all-purpose flour, the salt, garlic powder, onion powder, and dried oregano. This ensures all the delicious seasonings are evenly distributed throughout our dough, giving every bite maximum flavor.
- Combine Wet and Dry: Once your yeast mixture is foamy, pour in the 2 tablespoons of olive oil. Give it a quick stir. Then, gradually add the dry flour mixture to the wet ingredients, stirring with a sturdy spoon or a dough hook on your stand mixer set to low speed. I usually add about half the flour mixture first, stir until just combined, and then add the rest.
-
Knead the Dough:
- By Hand: Once the dough starts to come together and is too stiff to stir, turn it out onto a lightly floured surface. Begin to knead. This involves pushing the dough away from you with the heels of your hands, folding it back over, rotating it a quarter turn, and repeating. Continue kneading for 8 to 10 minutes. The dough should transform from shaggy and sticky to smooth, elastic, and no longer sticking excessively to your hands or the counter. This process develops the gluten, which gives our breadsticks their lovely chewiness.
- With a Stand Mixer: Attach the dough hook and mix on low speed for about 6-8 minutes. The dough should pull away from the sides of the bowl and cling to the hook. It will become smooth and elastic. A good way to check if it’s kneaded enough is the “windowpane test”: pinch off a small piece of dough and gently stretch it. If you can stretch it thin enough to see light through it without tearing, your gluten is well developed!
If the dough feels too sticky during kneading, add flour one tablespoon at a time. If it feels too dry and stiff, add a tiny bit of water.
- First Rise (The Beauty Sleep): Lightly grease your large mixing bowl with about a tablespoon of olive oil. Place the kneaded dough into the bowl, turning it once to coat all sides with oil. This prevents it from drying out during its rise. Cover the bowl tightly with plastic wrap or a clean, damp kitchen towel. Place it in a warm, draft-free spot. I often use my oven (turned off!) with the light on, as the light generates just enough warmth. Let the dough rise for 1 to 1 ½ hours, or until it has visibly doubled in size. This first rise is crucial for developing flavor and creating a light, airy texture.
Assembling Our Spooky Bones: The Shaping Magic
Now comes the fun, creative part! Transforming our lovely dough into eerie, yet delicious, bone shapes. Get ready to embrace your inner sculptor!
- Prepare Your Workspace and Dough: Once the dough has doubled, gently punch it down to release the air. This is a satisfying moment! Turn the dough out onto a lightly floured surface. Divide the dough into two equal portions. This makes it easier to work with. Line two large baking sheets with parchment paper or silicone baking mats.
- Roll and Cut: Take one portion of dough and, using your rolling pin, roll it out into a large rectangle, approximately 12×10 inches and about ¼ inch thick. Try to keep the thickness as even as possible for uniform baking. Using a sharp knife or a pizza cutter, cut the dough into long strips, about ½ to ¾ inch wide. I find that aiming for about 16-20 strips per dough portion works well.
- Fill with Cheesy Goodness: In a small bowl, combine ½ cup of the shredded mozzarella, ¼ cup of the grated Parmesan, and ½ teaspoon of garlic powder. This is our delicious cheesy filling! Take one strip of dough and lightly stretch it. Spoon a very thin line of the cheese mixture down the center of the strip. Carefully fold one long edge of the dough over the cheese, then fold the other long edge over, pinching the seam tightly to seal the cheese inside. You want to make sure the cheese is fully encased to prevent it from oozing out excessively during baking.
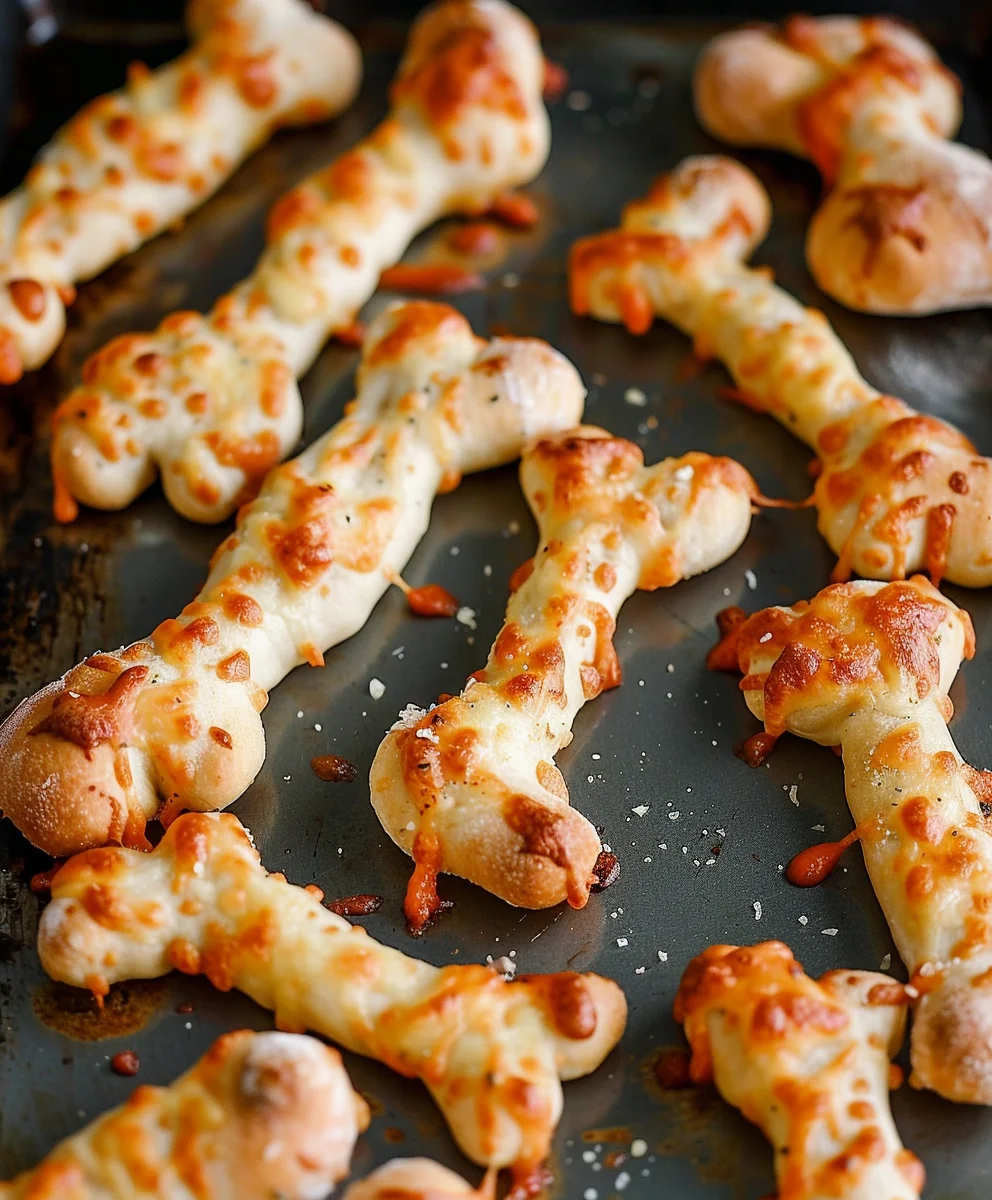
- Shape Your Bones: This is where the Halloween fun truly begins! Gently roll the cheese-filled dough strip on your surface a few times to further seal the seam and create a smooth rope. Now, let’s create those bone shapes. Take one end of the rope and pinch off about an inch of dough. Twist it around a few times, then gently flatten the end into a small, rounded “knuckle” or “joint.” Repeat this process on the other end of the rope, making another knuckle. If your dough strip is long enough, you can even create a third “joint” in the middle, resembling a femur bone. You can make them straight, slightly curved, or even a bit gnarled for a truly ancient, spooky look! Place your shaped breadstick bone on your prepared baking sheet. Leave about an inch or so between each bone to allow for expansion during the second rise and baking. Repeat this process with all the dough strips, working with one portion of dough at a time.
- Second Rise (Final Nap): Once all your spooky bones are shaped and arranged on the baking sheets, loosely cover them with plastic wrap or a clean kitchen towel. Let them rise in a warm, draft-free spot for another 20-30 minutes. They won’t double in size this time, but they should look slightly puffy and feel lighter. While they’re taking their short nap, preheat your oven.
Baking Our Bony Delights: The Oven’s Transformative Heat
The moment of truth! Into the heat they go, to emerge as golden, garlicky, cheesy Halloween perfection.
- Preheat the Oven: Preheat your oven to 375°F (190°C). This temperature ensures a good crisp exterior and a thoroughly cooked interior.
- Prepare the Egg Wash and Toppings: In a small bowl, whisk your large egg until it’s well beaten. This is our egg wash. Using a pastry brush, gently brush the tops and sides of each risen breadstick bone with the egg wash. This will give them that beautiful golden color and a slight shine.
- Add Final Touches: Sprinkle the remaining 1 cup of shredded mozzarella and ¼ cup of grated Parmesan cheese evenly over the tops of the breadstick bones. If you’re using black sesame seeds or poppy seeds for that extra “ghastly” effect, sprinkle them on now. A light dusting really sells the spooky aesthetic!
- Bake to Golden Perfection: Place the baking sheets in your preheated oven. If your oven has even heat distribution, you can bake both sheets at once, rotating them halfway through. If not, bake them one at a time. Bake for 15 to 20 minutes, or until the breadsticks are a beautiful golden brown, the cheese is bubbly and melted, and the kitchen smells absolutely divine. Keep an eye on them; oven temperatures can vary!
- Cool Slightly: Once baked, carefully remove the breadstick bones from the oven. Transfer them to a wire cooling rack to cool for 5-10 minutes. While it’s tempting to dig in immediately (and I totally get it, the smell is intoxicating!), letting them cool slightly helps the cheese set and makes them easier to handle.
The Grand Finale: Serving Our Cheesy Halloween Breadstick Bones
The moment we’ve all been waiting for! Time to present our ghoulishly good creations.
- Serve Warm: These Cheesy Halloween Breadstick Bones are truly best served warm, straight from the oven. The cheese is gooey, the bread is tender, and the flavors are at their peak.
- Dipping Delight: I love serving these alongside a warm bowl of marinara sauce for dipping. A pesto dipping sauce or even a creamy garlic aioli would also be fantastic. Encourage your guests (or family!) to pull apart the “joints” and dip away!
- Embrace the Theme: Arrange them artfully on a platter, perhaps with some plastic spiders or fake cobwebs for extra Halloween flair. You could even arrange them like a pile of bones, ready for a spooky feast! This Cheesy Halloween Breadstick Bones Recipe is not just food; it’s a centerpiece.
Tips for Perfect Cheesy Halloween Breadstick Bones:
- Yeast Freshness is Key: As I mentioned before, always check the expiration date on your yeast. If you’re unsure, do the activation step first. If it doesn’t foam, discard and get new yeast. It’s the foundation of good bread!
- Don’t Over-Flour: Resist the urge to add too much flour during kneading or shaping. A slightly sticky dough is often better than a stiff, dry one. Too much flour will result in dense, tough breadsticks. Add flour sparingly, just enough to prevent sticking.
- Even Thickness: When rolling out the dough and shaping the strips, try to maintain an even thickness. This ensures uniform baking, so you don’t end up with some crispy bits and some underdone sections.
- Get Creative with Shapes: Have fun with the bone shapes! No two bones in a real skeleton are perfectly identical, so don’t stress about making them all look exactly the same. Some can be gnarled, some long, some short. Let your imagination run wild for truly unique Halloween breadstick bones.
- The Power of Egg Wash: Don’t skip the egg wash! It’s not just for color; it also helps the cheese and any other toppings adhere better to the breadsticks, preventing them from falling off during baking or transport.
- Watch Your Oven: Every oven is different. Pay close attention to your breadsticks during the last few minutes of baking. They can go from perfectly golden to slightly burnt very quickly. If you notice one side browning faster, rotate your baking sheet.
- Make Ahead: You can prepare the dough up to the end of the first rise, then punch it down, cover it tightly with plastic wrap, and refrigerate it overnight. The next day, let it come to room temperature for about 30-60 minutes before proceeding with shaping and baking. This can save you time on the day of your Halloween festivities!
Storage and Reheating: Keeping Our Bones Fresh
- Storing Leftovers: If by some miracle you have any Cheesy Halloween Breadstick Bones left over, let them cool completely. Store them in an airtight container at room temperature for up to 2 days. For longer storage, you can keep them in the refrigerator for up to 4 days.
- Freezing: These breadsticks also freeze surprisingly well! Once fully cooled, place them in a single layer on a baking sheet and freeze until solid. Then, transfer the frozen breadsticks to a freezer-safe bag or container, removing as much air as possible. They can be stored in the freezer for up to 2 months.
- Reheating:
- From Room Temperature/Refrigerated: For the best texture, I recommend reheating them in a preheated oven or toaster oven at 350°F (175°C) for 5-10 minutes, or until warmed through and the cheese is slightly re-melted. Microwaving tends to make them soft and less appealing.
- From Frozen: Place the frozen breadsticks on a baking sheet and bake in a preheated oven at 350°F (175°C) for 10-15 minutes, or until they are hot, the cheese is bubbly, and the bread is crisp again. No need to thaw first!
Conclusion:
So, there you have it – my absolute favorite Halloween treat! I truly believe this Cheesy Halloween Breadstick Bones Recipe is an essential addition to any spooky celebration. It’s more than just a snack; it’s an experience. The moment those golden, cheesy breadstick bones emerge from your oven, filling your kitchen with an irresistible aroma of savory garlic and bubbling cheese, you’ll understand exactly what I mean. They’re visually striking, incredibly fun to make, and, most importantly, utterly delicious. Each bite offers that perfect combination of a slightly crisp exterior, a soft, chewy interior, and a burst of gooey, melted cheese. It’s comfort food with a playful, festive twist that appeals to both kids and adults alike. Seriously, if you’re looking for something that will make a memorable impression without requiring hours of complex preparation, this is it. These aren’t just breadsticks; they’re conversation starters, delightful morsels of Halloween joy that practically beg to be devoured. The simplicity of the ingredients belies the incredible flavor and visual impact they deliver, making them a true culinary win for any gathering.
Elevate Your Breadstick Bones: Serving Suggestions & Creative Twists
While these breadstick bones are absolutely phenomenal on their own, dipping them takes the experience to a whole new level. My go-to is a warm bowl of marinara sauce – the classic combination is unbeatable, providing a tangy counterpoint to the rich cheese. But don’t stop there! Imagine them alongside a creamy ranch dressing, a spicy ghost pepper aioli for those who dare, or even a rich, velvety queso dip for an extra layer of indulgence. They also make an excellent accompaniment to a hearty bowl of chili, a spooky black bean soup, or a comforting tomato soup on a crisp autumn evening. For a full meal, they pair wonderfully with a simple green salad or as a fun sidekick to your favorite lasagna or pasta dish, adding a playful, themed element to your dinner table. You could even serve them as part of a Halloween-themed charcuterie board, surrounded by other festive snacks.
And when it comes to variations, the sky’s the limit! Feel free to experiment with different cheeses. A mix of mozzarella and sharp cheddar works wonders, but you could also try a smoky provolone, a zesty pepper jack for a subtle kick, or even a sophisticated blend with some grated Parmesan and Asiago for extra depth of flavor. If you’re feeling adventurous, consider brushing them with a mixture of melted butter, garlic, and finely chopped fresh herbs like parsley or chives before baking for an extra layer of gourmet appeal. You could also sprinkle a pinch of red pepper flakes into your cheese mixture for a bit of heat, or even finely chop some sun-dried tomatoes or a tiny bit of cooked, crumbled bacon to mix into the cheese for an even richer filling. The beauty of this recipe is its flexibility; it’s a fantastic canvas for your culinary creativity. For a truly ghoulish touch, consider adding a tiny black olive “eyeball” to some of the bones after baking, securing it with a small dab of cream cheese.
Don’t Just Read About It – Make It!
I genuinely encourage you to clear your schedule, gather your ingredients, and give this amazing Cheesy Halloween Breadstick Bones Recipe a try this season. You won’t regret it! It’s an incredibly rewarding baking project that’s accessible for all skill levels and promises to bring smiles and satisfied tummies. Imagine the delight on your guests’ faces, or the happy murmurs from your family, as they bite into these adorable, savory treats. It’s the perfect way to infuse some extra fun and deliciousness into your Halloween celebrations, whether it’s for a big party, a cozy family movie night, or just a delightful afternoon snack. This recipe is designed to be joyful, easy, and impactful, taking the stress out of holiday baking and replacing it with pure, cheesy fun. Don’t be intimidated; the shaping is much simpler than it looks, and the results are truly worth every moment.
Once you’ve experienced the magic of making and tasting these breadstick bones, I would absolutely love to hear about it! Did you try a new cheese blend? Did you create a unique dipping sauce? Did your kids (or you!) have a blast shaping them? Please, please, please share your experiences in the comments below or tag me on social media. Your success stories and creative twists are not only inspiring but also incredibly helpful to other home cooks looking for their next delicious adventure. Let’s build a community of enthusiastic Halloween bakers who aren’t afraid to get a little cheesy and a lot spooky! Your feedback fuels my passion for sharing wonderful recipes, and I can’t wait to see your breadstick bone creations. Happy baking, and happy Halloween!
Cheesy Halloween Breadstick Bones
Conjure up delightful Cheesy Halloween Breadstick Bones! These warm, soft, garlic-infused breadsticks are artfully shaped into spooky bones with a gooey, savory core of melted cheese. A ghoulishly good, irresistible centerpiece for your Halloween gatherings.
Ingredients
-
2 ¼ tsp Active Dry Yeast
-
1 cup Warm Water (105-115°F)
-
1 tsp Granulated Sugar
-
2 ½ – 3 cups All-Purpose Flour, plus more for dusting
-
1 tsp Salt
-
3 tbsp Olive Oil (2 tbsp for dough, 1 tbsp for bowl)
-
1 ½ cups Shredded Mozzarella Cheese, divided
-
½ cup Grated Parmesan Cheese, divided
-
1 tsp Garlic Powder
-
½ tsp Onion Powder
-
½ tsp Dried Oregano
-
1 Large Egg, lightly beaten (for egg wash)
-
Optional: Black sesame seeds or poppy seeds
Instructions
-
Step 1
In a large bowl, combine warm water and sugar. Sprinkle yeast over; let sit 5-10 minutes until foamy. -
Step 2
In a separate bowl, whisk 2.5 cups all-purpose flour, salt, 1 tsp garlic powder, 0.5 tsp onion powder, and 0.5 tsp dried oregano. -
Step 3
Add 2 tbsp olive oil to the foamy yeast mixture. Gradually add the dry ingredients, stirring until a shaggy dough forms. -
Step 4
Knead dough on a lightly floured surface for 8-10 minutes by hand, or 6-8 minutes with a stand mixer, until smooth and elastic. Add flour sparingly if too sticky. -
Step 5
Lightly grease a large bowl with 1 tbsp olive oil. Place dough, turn to coat, cover, and let rise in a warm, draft-free spot for 1-1.5 hours until doubled in size. -
Step 6
Punch down dough and divide into two equal portions. Line two large baking sheets with parchment paper. -
Step 7
Roll one dough portion into a 12×10 inch rectangle, about ¼ inch thick. Cut into ½ to ¾ inch wide strips using a sharp knife or pizza cutter. -
Step 8
In a small bowl, combine ½ cup shredded mozzarella, ¼ cup grated Parmesan, and ½ tsp garlic powder for the filling. -
Step 9
Lightly stretch a dough strip. Spoon a very thin line of the cheese mixture down its center. Carefully fold one long edge of the dough over the cheese, then fold the other long edge over, pinching the seam tightly to seal the cheese inside. -
Step 10
Gently roll the cheese-filled strip a few times to further seal the seam and create a smooth rope. Pinch off about an inch of dough from each end, twist, and gently flatten into small, rounded ‘knuckles’ or ‘joints’ to form bone shapes. Place shaped breadstick bones on prepared baking sheets, leaving about an inch between each. -
Step 11
Loosely cover the shaped bones with plastic wrap or a clean towel; let rise in a warm spot for another 20-30 minutes until slightly puffy. Preheat oven to 375°F (190°C). -
Step 12
Whisk the large egg until well beaten. Using a pastry brush, gently brush the tops and sides of each risen breadstick bone with the egg wash. Sprinkle the remaining 1 cup shredded mozzarella and ¼ cup grated Parmesan cheese evenly over the tops. Add optional black sesame seeds or poppy seeds for a ‘ghastly’ effect. -
Step 13
Place baking sheets in the preheated oven. Bake for 15 to 20 minutes, or until the breadsticks are a beautiful golden brown and the cheese is bubbly and melted. Rotate sheets halfway through if baking both at once for even browning. -
Step 14
Carefully remove from oven. Transfer to a wire cooling rack to cool for 5-10 minutes. Serve warm, ideally with a warm bowl of marinara sauce for dipping.
Important Information
Nutrition Facts (Per Serving)
It is important to consider this information as approximate and not to use it as definitive health advice.
Allergy Information
Please check ingredients for potential allergens and consult a health professional if in doubt.