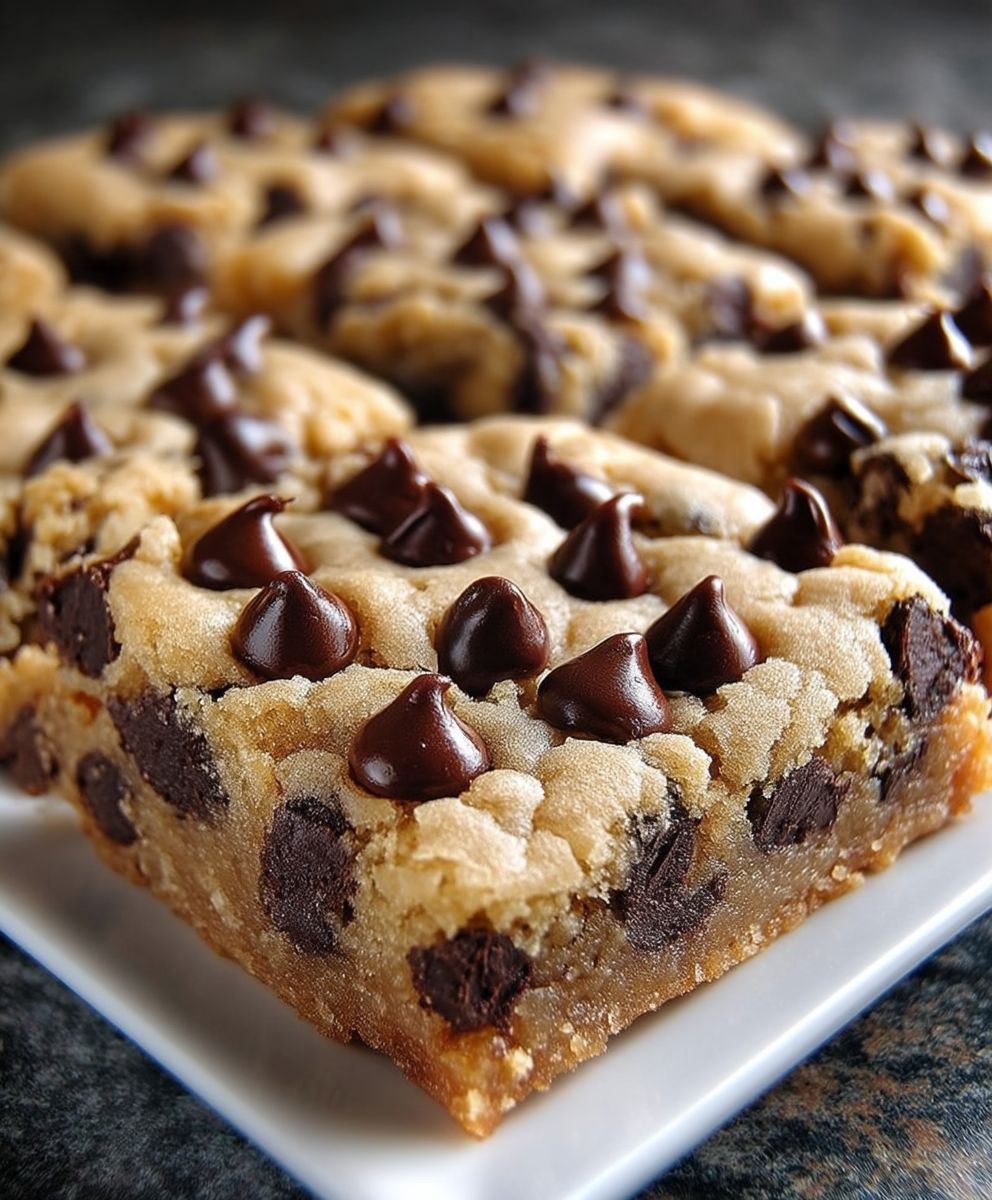
Chocolate Chip Cookie Bars: Prepare to meet your new favorite dessert! Imagine sinking your teeth into a thick, chewy, and utterly irresistible treat that combines the comforting flavors of a classic chocolate chip cookie with the ease of a bar. Forget meticulously scooping individual cookies; these bars deliver all the warm, gooey goodness in a fraction of the time.
While the exact origins of cookie bars are somewhat hazy, they likely emerged as a convenient adaptation of traditional cookies, offering a quicker and simpler way to satisfy that sweet craving. They represent a celebration of efficiency without sacrificing flavor. After all, who doesn’t love the idea of more cookie with less effort?
People adore chocolate chip cookie bars for so many reasons. The soft, slightly underbaked center contrasts beautifully with the crisp edges, creating a textural symphony in every bite. The rich, buttery dough, studded with melting chocolate chips, is simply divine. Plus, their portability makes them perfect for potlucks, bake sales, or a simple weeknight treat. They are easy to cut, easy to share, and undeniably delicious. So, if you’re looking for a crowd-pleasing dessert that’s both incredibly satisfying and surprisingly simple to make, look no further. Let’s get baking!

Ingredients:
- 1 cup (2 sticks) unsalted butter, softened
- 1 cup granulated sugar
- 1 cup packed light brown sugar
- 2 large eggs
- 1 tablespoon vanilla extract
- 3 cups all-purpose flour
- 1 teaspoon baking soda
- 1 teaspoon salt
- 2 cups chocolate chips (semi-sweet or milk chocolate, or a combination!)
- Optional: 1 cup chopped walnuts or pecans
Preparing the Dough:
- Cream the butter and sugars: In a large bowl (or the bowl of your stand mixer), cream together the softened butter, granulated sugar, and brown sugar until light and fluffy. This usually takes about 3-5 minutes. Make sure to scrape down the sides of the bowl occasionally to ensure everything is evenly mixed. The mixture should be pale and airy. Don’t rush this step; it’s crucial for achieving the right texture in your cookie bars.
- Incorporate the eggs and vanilla: Beat in the eggs one at a time, mixing well after each addition. Then, stir in the vanilla extract. The mixture might look slightly curdled at this point, but don’t worry, it will come together when you add the dry ingredients.
- Combine the dry ingredients: In a separate medium bowl, whisk together the flour, baking soda, and salt. Whisking ensures that the baking soda and salt are evenly distributed throughout the flour, which is important for proper leavening and flavor.
- Gradually add the dry ingredients to the wet ingredients: Gradually add the dry ingredients to the wet ingredients, mixing on low speed until just combined. Be careful not to overmix! Overmixing can develop the gluten in the flour, resulting in tough cookie bars. Stop mixing as soon as you see the flour disappear. A few streaks of flour are okay.
- Fold in the chocolate chips (and nuts, if using): Gently fold in the chocolate chips (and nuts, if using) until they are evenly distributed throughout the dough. Again, be careful not to overmix.
Baking the Cookie Bars:
- Preheat the oven and prepare the baking pan: Preheat your oven to 350°F (175°C). Grease and flour a 9×13 inch baking pan. Alternatively, you can line the pan with parchment paper, leaving an overhang on the sides for easy removal. This is my preferred method, as it makes it super easy to lift the cookie bars out of the pan after baking.
- Press the dough into the pan: Press the cookie dough evenly into the prepared baking pan. You can use your hands or the back of a spoon to spread the dough. Make sure the dough is evenly distributed so that the cookie bars bake evenly.
- Bake the cookie bars: Bake for 25-30 minutes, or until the edges are golden brown and a toothpick inserted into the center comes out with a few moist crumbs attached. The baking time may vary depending on your oven, so keep an eye on them.
- Cool completely: Let the cookie bars cool completely in the pan before cutting into squares. This is important because the cookie bars will continue to set as they cool. If you try to cut them while they are still warm, they will be crumbly and difficult to handle. If you used parchment paper, you can lift the entire slab of cookie bars out of the pan and onto a cutting board for easier cutting.
Tips and Variations:
Chocolate Chip Variations:
- Mix and Match Chocolate Chips: Use a combination of semi-sweet, milk chocolate, and dark chocolate chips for a more complex flavor profile.
- Add Chocolate Chunks: Substitute some of the chocolate chips with chocolate chunks for a chunkier texture.
- Use Different Flavored Chips: Experiment with peanut butter chips, butterscotch chips, or white chocolate chips.
Nutty Additions:
- Toasted Nuts: Toast the nuts before adding them to the dough for a richer, more intense flavor.
- Different Types of Nuts: Try using different types of nuts, such as almonds, hazelnuts, or macadamia nuts.
- Nut Butter Swirl: Swirl a spoonful of peanut butter or almond butter into the dough before baking for a nutty flavor and a marbled effect.
Other Add-Ins:
- Oatmeal: Add 1/2 cup of rolled oats to the dough for a chewier texture.
- Pretzels: Add crushed pretzels for a salty-sweet combination.
- Sprinkles: Add sprinkles to the dough or sprinkle them on top before baking for a festive touch.
- Dried Fruit: Add chopped dried cranberries, raisins, or apricots for a chewy and fruity flavor.
- Espresso Powder: Add a teaspoon of espresso powder to the dough to enhance the chocolate flavor.
Tips for Perfect Cookie Bars:
- Use Room Temperature Butter: Room temperature butter is essential for creaming properly with the sugars. If your butter is too cold, it won’t cream properly, and your cookie bars will be dense. If your butter is too soft, it will melt too quickly in the oven, and your cookie bars will be greasy.
- Measure Flour Accurately: Measuring flour accurately is crucial for achieving the right texture in your cookie bars. The best way to measure flour is to use a kitchen scale. If you don’t have a kitchen scale, spoon the flour into a measuring cup and level it off with a knife. Avoid scooping the flour directly from the bag, as this can pack the flour and result in too much flour in the recipe.
- Don’t Overmix the Dough: Overmixing the dough can develop the gluten in the flour, resulting in tough cookie bars. Mix the dough until just combined.
- Bake Until Just Done: Overbaking the cookie bars will result in dry, crumbly cookie bars. Bake until the edges are golden brown and a toothpick inserted into the center comes out with a few moist crumbs attached.
- Cool Completely Before Cutting: Let the cookie bars cool completely in the pan before cutting into squares. This is important because the cookie bars will continue to set as they cool. If you try to cut them while they are still warm, they will be crumbly and difficult to handle.
Storage Instructions:
- Store at Room Temperature: Store the cookie bars in an airtight container at room temperature for up to 3-4 days.
- Freeze for Longer Storage: For longer storage, you can freeze the cookie bars. Wrap them individually in plastic wrap and then place them in a freezer-safe bag or container. They can be frozen for up to 2-3 months. Let them thaw at room temperature before serving.
Troubleshooting:
- Cookie Bars are Too Dry: This could be due to overbaking or using too much flour. Make sure to measure the flour accurately and bake until just done.
- Cookie Bars are Too Soft: This could be due to underbaking or using too much butter. Make sure to bake the cookie bars for the recommended time and use the correct amount of butter.
- Cookie Bars are Too Dense: This could be due to not creaming the butter and sugars properly or overmixing the dough. Make sure to cream the butter and sugars until light and fluffy and mix the dough until just combined.
- Cookie Bars are Too Crumbly: This could be due to not letting the cookie bars cool completely before cutting them. Let the cookie bars cool completely in the pan before cutting into squares.
High Altitude Adjustments:
- Reduce Baking Powder: Reduce the baking powder by 1/4 teaspoon per teaspoon called for in the recipe.
- Increase Liquid: Increase the liquid by 1-2 tablespoons.
- Increase Oven Temperature: Increase the oven temperature by 25 degrees Fahrenheit.
- Reduce Baking Time: Reduce the baking time by 5-10 minutes.
Gluten-Free Option:
- Use Gluten-Free Flour Blend: Substitute the all-purpose flour with a gluten-free all-purpose flour blend. Make sure the blend contains xanthan gum, which helps to bind the ingredients together.
- Check for Cross-Contamination: Be sure to use gluten-free certified chocolate chips and other ingredients to avoid cross-contamination.
Vegan Option:
- Substitute Butter: Use a vegan butter substitute.
- Substitute Eggs: Use a flax egg (1 tablespoon ground flaxseed mixed with 3 tablespoons water, let sit for 5 minutes

Conclusion:
Okay, friends, let’s be honest: you’ve scrolled this far because you’re craving something sweet, easy, and utterly irresistible. And that’s exactly what these Chocolate Chip Cookie Bars deliver! They’re the perfect solution when you want the comforting taste of classic chocolate chip cookies without the fuss of scooping and baking individual rounds. Think of it as a giant, shareable cookie that’s soft, chewy, and packed with chocolatey goodness. What’s not to love?
But beyond the sheer simplicity, these bars are a must-try because they’re incredibly versatile. The recipe is a fantastic base for experimentation. Feeling adventurous? Throw in some chopped walnuts or pecans for a nutty crunch. Craving something a little more decadent? Swirl in a spoonful of Nutella or peanut butter before baking. Want to elevate the flavor profile? A sprinkle of sea salt on top after baking will do the trick! The possibilities are truly endless, and that’s part of what makes this recipe so special. It’s a blank canvas for your own culinary creativity.
And speaking of serving suggestions, these bars are amazing warm, straight from the oven (with a scoop of vanilla ice cream, of course!). But they’re equally delicious at room temperature, making them perfect for lunchboxes, picnics, or a quick afternoon treat. You can even cut them into smaller squares for a party or gathering. They’re guaranteed to be a crowd-pleaser, no matter how you serve them.
But wait, there’s more! For a truly indulgent experience, try drizzling melted chocolate over the cooled bars. White chocolate, dark chocolate, or even a combination of both would be divine. Or, if you’re feeling extra fancy, you could even add a layer of frosting. A simple vanilla buttercream or a rich chocolate ganache would take these bars to the next level.
I truly believe that everyone needs a reliable, go-to recipe for Chocolate Chip Cookie Bars, and this is it. It’s quick, easy, and yields consistently delicious results. Plus, it’s a great way to use up those chocolate chips that have been lurking in your pantry.
So, what are you waiting for? Preheat your oven, gather your ingredients, and get ready to bake up a batch of these amazing bars. I promise you won’t regret it! And once you’ve tried them, I’d love to hear what you think. Did you add any special ingredients? Did you try any of the serving suggestions? Share your experience in the comments below! I’m always eager to learn new tips and tricks from fellow bakers.
Happy baking, and enjoy every delicious bite! I can’t wait to see your creations! Don’t forget to tag me in your photos on social media – I love seeing your baking adventures! Let’s spread the cookie bar love!
Chocolate Chip Cookie Bars: The Ultimate Guide to Baking Perfection
Classic chocolate chip cookie bars, soft, chewy, and loaded with chocolate chips. Easy to make and perfect for sharing!
Ingredients
- 1 cup (2 sticks) unsalted butter, softened
- 1 cup granulated sugar
- 1 cup packed light brown sugar
- 2 large eggs
- 1 tablespoon vanilla extract
- 3 cups all-purpose flour
- 1 teaspoon baking soda
- 1 teaspoon salt
- 2 cups chocolate chips (semi-sweet or milk chocolate, or a combination!)
- Optional: 1 cup chopped walnuts or pecans
Instructions
- Cream the butter and sugars: In a large bowl (or the bowl of your stand mixer), cream together the softened butter, granulated sugar, and brown sugar until light and fluffy (3-5 minutes). Scrape down the sides of the bowl occasionally.
- Incorporate the eggs and vanilla: Beat in the eggs one at a time, mixing well after each addition. Stir in the vanilla extract.
- Combine the dry ingredients: In a separate medium bowl, whisk together the flour, baking soda, and salt.
- Gradually add the dry ingredients to the wet ingredients: Gradually add the dry ingredients to the wet ingredients, mixing on low speed until just combined. Be careful not to overmix.
- Fold in the chocolate chips (and nuts, if using): Gently fold in the chocolate chips (and nuts, if using) until they are evenly distributed throughout the dough.
- Preheat the oven and prepare the baking pan: Preheat your oven to 350°F (175°C). Grease and flour a 9×13 inch baking pan or line with parchment paper.
- Press the dough into the pan: Press the cookie dough evenly into the prepared baking pan.
- Bake the cookie bars: Bake for 25-30 minutes, or until the edges are golden brown and a toothpick inserted into the center comes out with a few moist crumbs attached.
- Cool completely: Let the cookie bars cool completely in the pan before cutting into squares.
Notes
- Use room temperature butter for best results.
- Measure flour accurately (spoon and level or use a kitchen scale).
- Don’t overmix the dough.
- Bake until just done to avoid dry bars.
- Cool completely before cutting for clean slices.
- Chocolate Chip Variations: Mix and match chocolate chips, add chocolate chunks, or use different flavored chips.
- Nutty Additions: Toast the nuts before adding them to the dough, use different types of nuts, or swirl a spoonful of peanut butter or almond butter into the dough before baking.
- Other Add-Ins: Oatmeal, Pretzels, Sprinkles, Dried Fruit, Espresso Powder.
- Storage Instructions: Store in an airtight container at room temperature for up to 3-4 days. Freeze for longer storage.
- Troubleshooting: Cookie Bars are Too Dry, Cookie Bars are Too Soft, Cookie Bars are Too Dense, Cookie Bars are Too Crumbly.
- High Altitude Adjustments: Reduce Baking Powder, Increase Liquid, Increase Oven Temperature, Reduce Baking Time.
- Gluten-Free Option: Use Gluten-Free Flour Blend, Check for Cross-Contamination.
- Vegan Option: Substitute Butter, Substitute Eggs.